
MX882 series Getting Started
Page 65
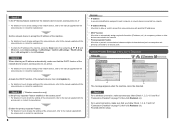
..., MMR Color: JPEG Modem speed Max. 33.6 kbps (Automatic fallback) Transmission speed Black: Approx. 3 seconds/page at 33.6 kbps (Based on ITU-T No.1 chart for US specifications and Canon FAX Standard chart No.1 for others , both in height Other sizes: 1 sheet Copy Specifications Multiple copy max. 99 pages Intensity adjustment 9 positions, Auto intensity (AE copy) Reduction/Enlargement 25 % - 400 % (1 % unit) Scan Specifications Scanner driver TWAIN/WIA (for Windows 7/Windows Vista/Windows XP) Maximum scanning size A4...
..., MMR Color: JPEG Modem speed Max. 33.6 kbps (Automatic fallback) Transmission speed Black: Approx. 3 seconds/page at 33.6 kbps (Based on ITU-T No.1 chart for US specifications and Canon FAX Standard chart No.1 for others , both in height Other sizes: 1 sheet Copy Specifications Multiple copy max. 99 pages Intensity adjustment 9 positions, Auto intensity (AE copy) Reduction/Enlargement 25 % - 400 % (1 % unit) Scan Specifications Scanner driver TWAIN/WIA (for Windows 7/Windows Vista/Windows XP) Maximum scanning size A4...
Network Setup Troubleshooting
Page 2
...Perform Setup Again P.2 P.3 P.3 Connection Checklist P.4 The directly entered access point was not detected. P.7 The Machine is Not Displayed (Detected) P.7 Check Printer Settings dialog box is Changed • Names of functions, etc. may differ from this manual. Reference Information Problems during Software Installation Description for wired connection. is Displayed Problems during Network Setup Character Entry P.2 Entering the Access Point's Wireless LAN Settings Directly on Windows 7 Home Premium and Mac OS X v.10.6.x. P.6 Instructions as notes for Macintosh users...
...Perform Setup Again P.2 P.3 P.3 Connection Checklist P.4 The directly entered access point was not detected. P.7 The Machine is Not Displayed (Detected) P.7 Check Printer Settings dialog box is Changed • Names of functions, etc. may differ from this manual. Reference Information Problems during Software Installation Description for wired connection. is Displayed Problems during Network Setup Character Entry P.2 Entering the Access Point's Wireless LAN Settings Directly on Windows 7 Home Premium and Mac OS X v.10.6.x. P.6 Instructions as notes for Macintosh users...
Network Setup Troubleshooting
Page 3
.... Problems during Network Setup Easy setup Advanced setup The Target Access Point is Not Displayed (Detected) Check Check 1 Make sure that you follow Check 1, 2, 3 and 4 of "Connection Checklist" on page 15, then press the left FUNCTION button (A) on how to change the settings of the access point, refer to the manual supplied with the access point or contact its manufacturer. Change the security protocol (encryption standard) for the access point, then configure settings...
.... Problems during Network Setup Easy setup Advanced setup The Target Access Point is Not Displayed (Detected) Check Check 1 Make sure that you follow Check 1, 2, 3 and 4 of "Connection Checklist" on page 15, then press the left FUNCTION button (A) on how to change the settings of the access point, refer to the manual supplied with the access point or contact its manufacturer. Change the security protocol (encryption standard) for the access point, then configure settings...
Network Setup Troubleshooting
Page 4
... check the MAC address of the machine, press the Setup button, then using an access point that the DHCP function of the access point is Not Displayed (Detected)" on how to check the settings of the access point, refer to the manual supplied with the access point or contact its manufacturer. Access point was not detected. Failed to connect to "Entering the Access Point's Wireless LAN Settings Directly on the Machine" on page...
... check the MAC address of the machine, press the Setup button, then using an access point that the DHCP function of the access point is Not Displayed (Detected)" on how to check the settings of the access point, refer to the manual supplied with the access point or contact its manufacturer. Access point was not detected. Failed to connect to "Entering the Access Point's Wireless LAN Settings Directly on the Machine" on page...
Network Setup Troubleshooting
Page 5
... configured to communicate using multiple access points Select Use multiple AccessPoints. • For subsequent operations, go to or / / in "Entering the Access Point's Wireless LAN Settings Directly on the Machine" on page 11. When using IEEE802.11n standard only? Glossary • MAC address A unique number assigned to each network device. • MAC address filtering A function to block access from unauthorized wireless devices by saving the MAC addresses of the access point is Displayed Check The message appears when multiple access...
... configured to communicate using multiple access points Select Use multiple AccessPoints. • For subsequent operations, go to or / / in "Entering the Access Point's Wireless LAN Settings Directly on the Machine" on page 11. When using IEEE802.11n standard only? Glossary • MAC address A unique number assigned to each network device. • MAC address filtering A function to block access from unauthorized wireless devices by saving the MAC addresses of the access point is Displayed Check The message appears when multiple access...
Network Setup Troubleshooting
Page 6
... the Access Point's Wireless LAN Settings Directly on the Machine" on page 11. • For details on page 11. Check 4 Is the MAC address filtering enabled on the access point? • For details on how to check the settings of the machine, press the Setup button, then using the { } [ ] and OK buttons, select Device settings > LAN settings > Confirm LAN settings > WLAN setting list to change the settings of the machine. • After that the entered access point name/network...
... the Access Point's Wireless LAN Settings Directly on the Machine" on page 11. • For details on page 11. Check 4 Is the MAC address filtering enabled on the access point? • For details on how to check the settings of the machine, press the Setup button, then using the { } [ ] and OK buttons, select Device settings > LAN settings > Confirm LAN settings > WLAN setting list to change the settings of the machine. • After that the entered access point name/network...
Network Setup Troubleshooting
Page 7
... to configure WPS settings of the machine, refer to the network is active, the network key needs to "Wireless Setup Using WPS (Wi-Fi Protected Setup)" in "Entering the Access Point's Wireless LAN Settings Directly on the Machine" on page 13. is Displayed Check The message appears when an error occurs. Glossary • IP address A numerical identification assigned to each computer or network device connected to a network. • MAC address A unique number assigned to each network device. • MAC address...
... to configure WPS settings of the machine, refer to the network is active, the network key needs to "Wireless Setup Using WPS (Wi-Fi Protected Setup)" in "Entering the Access Point's Wireless LAN Settings Directly on the Machine" on page 13. is Displayed Check The message appears when an error occurs. Glossary • IP address A numerical identification assigned to each computer or network device connected to a network. • MAC address A unique number assigned to each network device. • MAC address...
Network Setup Troubleshooting
Page 8
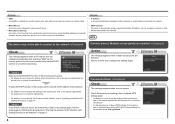
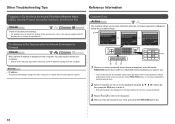
...C Check 1 For a wireless connection, make sure that does not support WPS, configure settings manually. Check 2 Is the machine connected to a network? • To confirm the connection status, press the Setup button, then using an access point that you follow Check 1, 2, 6, 7 and 8 of the machine manually, refer to "Wireless Setup Using Easy Setup" in the printed manual: Getting Started. • Check Check the printer settings (B), click Next (C), then click Wireless LAN Setup Information on the Check Printer Settings dialog box to display the access point information stored on page...
...C Check 1 For a wireless connection, make sure that does not support WPS, configure settings manually. Check 2 Is the machine connected to a network? • To confirm the connection status, press the Setup button, then using an access point that you follow Check 1, 2, 6, 7 and 8 of the machine manually, refer to "Wireless Setup Using Easy Setup" in the printed manual: Getting Started. • Check Check the printer settings (B), click Next (C), then click Wireless LAN Setup Information on the Check Printer Settings dialog box to display the access point information stored on page...
Network Setup Troubleshooting
Page 9
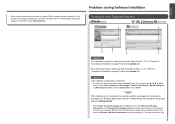
.... Disable the privacy separator feature. • For details on how to check settings of the network device, refer to the manual supplied with the network device or contact its manufacturer. Check 1 For a wireless connection, make sure that the DHCP function of the network device (router, access point, etc.) is Displayed Check B B Activate the DHCP function of the network device, then click Update (A). • For details on page...
.... Disable the privacy separator feature. • For details on how to check settings of the network device, refer to the manual supplied with the network device or contact its manufacturer. Check 1 For a wireless connection, make sure that the DHCP function of the network device (router, access point, etc.) is Displayed Check B B Activate the DHCP function of the network device, then click Update (A). • For details on page...
Network Setup Troubleshooting
Page 10
... communication between multiple wireless devices (such as computers and printers) connected to Active. Check 5 (* Wireless connection only) Is the privacy separator feature enabled on the access point? • For details on how to change settings of the machine, press the Setup button, then using the { } [ ] and OK buttons, select Device settings > LAN settings > Confirm LAN settings > WLAN setting list or LAN setting list. ENGLISH Check 2 Is the machine connected to the manual supplied with the network device or...
... communication between multiple wireless devices (such as computers and printers) connected to Active. Check 5 (* Wireless connection only) Is the privacy separator feature enabled on the access point? • For details on how to change settings of the machine, press the Setup button, then using the { } [ ] and OK buttons, select Device settings > LAN settings > Confirm LAN settings > WLAN setting list or LAN setting list. ENGLISH Check 2 Is the machine connected to the manual supplied with the network device or...
Network Setup Troubleshooting
Page 11
... Action This machine allows you need to restart your computer. • Search for the machine again after the Network Environment is Changed Check Wait until the IP address is displayed, press the center FUNCTION button (A) to switch to a keyboard having characters you want to use. • Three character sets are displayed on the upper section (C) of the access point, refer to a network. Each time you press...
... Action This machine allows you need to restart your computer. • Search for the machine again after the Network Environment is Changed Check Wait until the IP address is displayed, press the center FUNCTION button (A) to switch to a keyboard having characters you want to use. • Three character sets are displayed on the upper section (C) of the access point, refer to a network. Each time you press...

Network Setup Troubleshooting
Page 12
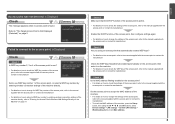
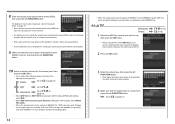
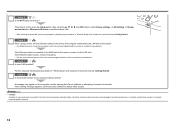
... Access Point's Wireless LAN Settings Directly on the Machine Action Enter the access point name/network name (SSID) and security setting (WEP, WPA, etc.) on the right of the target position using the [ or ] button, then enter characters. • To delete a character, select the section (C) of the screen using the [ or ] button, then press the right FUNCTION button (E). 4 Use the { or } button to select Wireless LAN setup...
... Access Point's Wireless LAN Settings Directly on the Machine Action Enter the access point name/network name (SSID) and security setting (WEP, WPA, etc.) on the right of the target position using the [ or ] button, then enter characters. • To delete a character, select the section (C) of the screen using the [ or ] button, then press the right FUNCTION button (E). 4 Use the { or } button to select Wireless LAN setup...
Network Setup Troubleshooting
Page 13
... key numbers will disable the connection between the machine and AirPort. 2 Press the OK button. 10 Select a security protocol for entering the access point name/network name (SSID). 9 Make sure that of the alphabet correctly. Change the encryption type to on page 13. WPA/WPA2 Go to on how to check the access point name/network name (SSID), refer to the manual supplied with TKIP set...
... key numbers will disable the connection between the machine and AirPort. 2 Press the OK button. 10 Select a security protocol for entering the access point name/network name (SSID). 9 Make sure that of the alphabet correctly. Change the encryption type to on page 13. WPA/WPA2 Go to on how to check the access point name/network name (SSID), refer to the manual supplied with TKIP set...
Network Setup Troubleshooting
Page 14
..., then press the OK button. 8 Select Manual setup, then press the OK button. • Follow the on-screen instructions to . 12 When the completion screen appears, press the OK button. ENGLISH 11-B WPA/WPA2 1 Press the OK button. Disable 2 Enter the network key, then press the left FUNCTION button. Letters are case sensitive. 3 Make sure that the network key is correct, then...
..., then press the OK button. 8 Select Manual setup, then press the OK button. • Follow the on-screen instructions to . 12 When the completion screen appears, press the OK button. ENGLISH 11-B WPA/WPA2 1 Press the OK button. Disable 2 Enter the network key, then press the left FUNCTION button. Letters are case sensitive. 3 Make sure that the network key is correct, then...
Network Setup Troubleshooting
Page 15
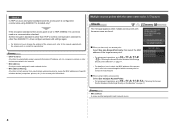
... printed manual: Getting Started. Restoring the Machine's Default LAN Settings to Perform Setup Again Action Follow the procedure below to restore LAN settings of the machine is now restored to the default state. 1 Press the Setup button. 2 Select Device settings, then press the OK button. 3 Select LAN settings, then press the OK button. 4 Select Reset LAN settings, then press the OK button. 5 Select Yes, then press the OK button. 6 Make...
... printed manual: Getting Started. Restoring the Machine's Default LAN Settings to Perform Setup Again Action Follow the procedure below to restore LAN settings of the machine is now restored to the default state. 1 Press the Setup button. 2 Select Device settings, then press the OK button. 3 Select LAN settings, then press the OK button. 4 Select Reset LAN settings, then press the OK button. 5 Select Yes, then press the OK button. 6 Make...
Network Setup Troubleshooting
Page 16
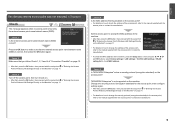
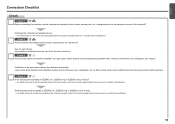
... change the operating mode of the access point, refer to the manual supplied with the access point or contact its manufacturer. 15 ENGLISH Connection Checklist Check Check 1 Before connecting the machine, are possible? Check 4 Is the access point operating in an open space with the computer and network device, or contact their manufacturers. Check 2 Are the machine and network device (router, access point, etc.) turned on each device. Configure the computer and network...
... change the operating mode of the access point, refer to the manual supplied with the access point or contact its manufacturer. 15 ENGLISH Connection Checklist Check Check 1 Before connecting the machine, are possible? Check 4 Is the access point operating in an open space with the computer and network device, or contact their manufacturers. Check 2 Are the machine and network device (router, access point, etc.) turned on each device. Configure the computer and network...
Network Setup Troubleshooting
Page 17
...? Check 6 When using the { } [ ] and OK buttons, select Device settings > LAN settings > Change wireless/wired > Wireless LAN active to the Internet and corporate networks safely. If the Ethernet cable is loose, connect it to the manual supplied with the router or contact its manufacturer. A message may appear on how to check the connection, refer to the LAN side. If the warning message appears, set the security software to the manual...
...? Check 6 When using the { } [ ] and OK buttons, select Device settings > LAN settings > Change wireless/wired > Wireless LAN active to the Internet and corporate networks safely. If the Ethernet cable is loose, connect it to the manual supplied with the router or contact its manufacturer. A message may appear on how to check the connection, refer to the LAN side. If the warning message appears, set the security software to the manual...
Network Key
Page 3
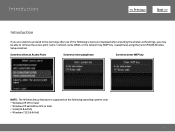
... supported on the following operating systems only: • Windows XP SP3 or later • Windows XP x64 Edition SP3 or later • Vista (32 & 64 bit) • Windows 7 (32 & 64 bit) 3 Screen to select an Access Point Screen to enter passphrase Screen to retrieve the access point name / network name (SSID), or the network key (WEP key / passphrase) using the Canon PIXMA Wireless Setup...
... supported on the following operating systems only: • Windows XP SP3 or later • Windows XP x64 Edition SP3 or later • Vista (32 & 64 bit) • Windows 7 (32 & 64 bit) 3 Screen to select an Access Point Screen to enter passphrase Screen to retrieve the access point name / network name (SSID), or the network key (WEP key / passphrase) using the Canon PIXMA Wireless Setup...
Network Key
Page 4
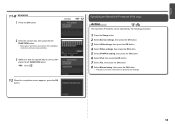
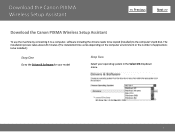
The installation process takes about 20 minutes. (The installation time varies depending on the computer environment or the number of applications to be copied (installed) to the Drivers & Software for your model Step Two Select your operating system in the Select OS dropdown menu. 4 Download the Canon PIXMA Wireless Setup Assistant > Download the Canon PIXMA Wireless Setup Assistant To use the machine by connecting it to a computer, software including the drivers needs to be installed.) Step One Go to the computer's hard disk.
The installation process takes about 20 minutes. (The installation time varies depending on the computer environment or the number of applications to be copied (installed) to the Drivers & Software for your model Step Two Select your operating system in the Select OS dropdown menu. 4 Download the Canon PIXMA Wireless Setup Assistant > Download the Canon PIXMA Wireless Setup Assistant To use the machine by connecting it to a computer, software including the drivers needs to be installed.) Step One Go to the computer's hard disk.

Network Key
Page 9
In the window for entering the network key is displayed, enter the key you copied in the step 4. 2. Press the left function key (End setup). > Step Six When the completion screen appears, press the OK button. 9 When the window for selecting access point of the printer unit, select the access point specified in Step Four. 3. Using the Canon PIXMA Wireless Setup Assistant Step Five 1.
In the window for entering the network key is displayed, enter the key you copied in the step 4. 2. Press the left function key (End setup). > Step Six When the completion screen appears, press the OK button. 9 When the window for selecting access point of the printer unit, select the access point specified in Step Four. 3. Using the Canon PIXMA Wireless Setup Assistant Step Five 1.


