Get support for Canon PIXMA MX882

Canon PIXMA MX882 Support Question

Canon PIXMA MX882 Support Question

Find answers below for this question about Canon PIXMA MX882.
Need a Canon PIXMA MX882 manual? We have 3 online manuals for this item!
Question posted by jswengel on June 16th, 2013

Printer Noise/not Printing

Canon mx882-printed successfully then tried again and paper jam.  Removed paper-had just barely started to feed and now makes a loud screeching noise and won't print.  message says to turn off and try again-if persists, consult manual.  can't find answer

Current Answers

Answer #1: Posted by linkshahzad on June 17th, 2013 2:07 AM
This answer was accepted by the poster of the original question.
linkshahzad

Member since:
June 12th, 2013

Points: 60,030
1,100
points
Removing a foreign object from inside the Printer

An unwanted foreign object inside the printer may obstruct its operation resulting in one of the following errors; paper jam error, 5100 error, C000 error, 6A80, 6A81 error or knocking / grinding noise and so on.

These items can be inadvertently dropped /left inside the printer during usage or storage of the printer. In most cases, it is relatively simple to remove the obstruction using common household items. If you wish, you may follow the steps below to check for and remove the foreign object from the inside printer.

These are examples of foreign objects which are commonly used around the printer:


Items needed:

  • Tweezers or long-nose pliers

  • Flashlight or other light source

Note: The illustrations below describe a PIXMA MG5220; however, the printer structure will be the similar for your model.

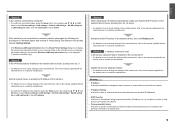
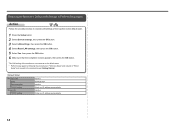
A) Check the Rear Tray area

  1. Power off the printer and unplug the printer's power cord.

  2. Using a flashlight, carefully inspect the Rear Tray area.


  3. If there is a foreign object, use tweezers or long-nose pliers to carefully remove it.

B) Check the inside of the printer

  1. Power on the printer and open the main access cover (scanning unit cover).

    The Print Head Holder (carriage) will move to ink changing (center) position.


  2. With the access cover open, unplug the power cord from the printer.

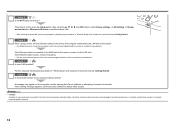
    Be sure the printer?s power LED is no longer illuminated. This will allow you to easily slide the carriage as instructed in step 3.

  3. Gently slide the carriage to the right side of the printer until it stops.

    IMPORTANT: Be careful not to touch the thin, clear encoder strip located just behind the carriage.


  4. Using a flashlight, carefully inspect the left and center locations for an obstruction.


  5. If there is a foreign object, use tweezers or long-nose pliers to carefully remove it.


  6. Gently slide the carriage to the left side of the printer until it stops.


  7. Using a flashlight, carefully inspect the right side for a foreign object.


  8. If there is a foreign object, use tweezers or long-nose pliers to carefully remove it.


  9. Power on the printer and confirm that the printer operates normally.

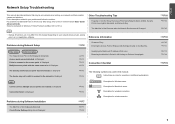
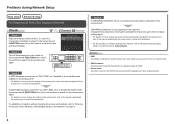
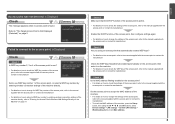
Related Canon PIXMA MX882 Manual Pages

MX882 series Getting Started - Page 65

... * With the Print Head and ink tanks installed. External dimensions Approx. 19.4 (W) X 17.7 (D) X 8.6 (H) inches Approx. 491 (W) X 448 (D) X 218 (H) mm * With the Paper Support and Paper Output Tray retracted....Transmission/reception: approx. 250 pages (Based on ITU-T No.1 chart for US specifications and Canon FAX Standard chart No.1 for others, both in height Other sizes: 1 sheet Copy ...
Network Setup Troubleshooting - Page 2

... Easy setup Advanced setup The Target Access Point is Displayed Multiple access points with the same name exist. P.7 The Machine is Not Displayed (Detected) P.7 Check Printer Settings dialog box is Displayed P.8 P.10 P.10 P.10 P.10 P.10 P.11 P.13 P.14 P.15  ENGLISH P.6 Instructions as notes for wireless connection. Find a description related to...
Network Setup Troubleshooting - Page 3

...standard) for the access point again. Check 2 Turn off the access point, turn it back on, then press the left FUNCTION ..., refer to "Wireless Setup Using Easy Setup" in the printed manual: Getting Started. "WPA/WPA2 Enterprise" is not supported on the access ... The Target Access Point is Not Displayed (Detected) Check Check 1 Make sure that you follow Check 1, 2, 3 and 4 of "Connection...
Network Setup Troubleshooting - Page 4

...Access Point's Wireless LAN Settings Directly on the Machine" on page 2. is Displayed Check The message appears when no access point is active. • For details on how to change the settings... point, refer to the manual supplied with the access point or contact its manufacturer. Check 2 Make sure that automatically creates WEP keys? • For details on the access point, refer to ...
Network Setup Troubleshooting - Page 5

...on how to check the MAC address of the access point is Displayed Check The message appears when multiple access points with the access point or contact its manufacturer. If ...8226; DHCP function A function to automatically assign required information (IP address, etc.) to computers, printers or other than TKIP or set the communication standard to other devices connected to the network. •...
Network Setup Troubleshooting - Page 7

... points are enabled. Check 1 Make sure that the DHCP function of the access point is Displayed Cannot connect. is Displayed Check The message appears when an IP address was... to configure WPS settings of specific wireless devices (computers, printers, etc.) to the access point beforehand. • DHCP function A function to automatically assign... procedures in the printed manual: Getting Started.
Network Setup Troubleshooting - Page 8

... in the printed manual: Getting Started. • Check Check the printer settings (B), click Next (C), then click Wireless LAN Setup Information on the Check Printer Settings dialog box... "Wireless Setup" and onward or "Wired Setup" and onward in the printed manual: Getting Started. For a wired connection, make sure that does not support WPS, configure settings manually. ENGLISH Problems during...
Network Setup Troubleshooting - Page 9

...to the manual supplied with the access point or contact its manufacturer.  A A The message appears when the machine cannot be detected. Check 5 (* Wireless connection only) Is the ...to prevent communication between multiple wireless devices (such as computers and printers) connected to check IP address. Check 1 For a wireless connection, make sure that you follow Check 1, 2, 3, 4, 5 and ...
Network Setup Troubleshooting - Page 10

...onward or "Wired Setup" and onward in the printed manual: Getting Started. • Click Wireless LAN Setup Information (B) on your computer. Make sure that the DHCP function of the network device...A function to automatically assign required information (IP address, etc.) to computers, printers or other devices connected to the network. • Privacy separator feature A function to ...
Network Setup Troubleshooting - Page 15

... by following the procedures in "Wireless Setup" and onward or "Wired Setup" and onward in the printed manual: Getting Started. Restoring the Machine's Default LAN Settings to Perform Setup Again Action Follow the procedure below to restore LAN... settings, then press the OK button. 5 Select Yes, then press the OK button. 6 Make sure that the completion screen appears, then press the OK button.
Network Setup Troubleshooting - Page 17

... security software active? If the warning message appears, set the security software to the manual supplied with the router or contact its manufacturer. A message may appear on how to check the connection, refer to always allow access. Perform setup by following the procedures in "Wired Setup" and onward in the printed manual: Getting Started.
Network Setup Troubleshooting - Page 34

QT5-3585-V01 XXXXXXXX ©CANON INC.2011 PRINTED IN XXXXXXXX
Network Key - Page 2

> Obtaining Your Network Key PIXMA MX882 Windows OS Introduction 3 Download the Canon PIXMA Wireless Setup Assistant 4 Using the Canon PIXMA Wireless Setup Assistant 6 Troubleshooting 10 2
Network Key - Page 3

... Access Point Screen to enter passphrase Screen to retrieve the access point name / network name (SSID), or the network key (WEP key / passphrase) using the Canon PIXMA Wireless Setup Assistant.
Network Key - Page 4

Download the Canon PIXMA Wireless Setup Assistant > Download the Canon PIXMA Wireless Setup Assistant To use the machine by connecting it to a computer, software including the drivers needs to be installed.) Step One Go to the ...
Network Key - Page 5

Write down the file name and the location to where the file is on file name. Begin Download Choose to "Save" the file. Download the Canon PIXMA Wireless Setup Assistant > Step Three In the Software section, click the link to download the file CanonAPChkTool. *File name will appear red when mouse pointer ...
Network Key - Page 6

Screen to select Access Point Screen to enter passphrase Screen to display the below window on the printer. Using the Canon PIXMA Wireless Setup Assistant > Using the Canon PIXMA Wireless Setup Assistant Step One Display the window for selecting access point using the buttons on the LCD screen. Please refer to the Getting Started Guide if you are unable to enter WEP key 6
Network Key - Page 7

Using the Canon PIXMA Wireless Setup Assistant > Step Two Double-click the downloaded tool for confirming the Canon PIXMA Wireless Setup Assistant CNMNPHLP. Step Three Read the License Agreement, and then click Yes when you accept the agreement. 7
Network Key - Page 8

NOTE: The Network Key may include the letters A to F in the Access Points window displayed on the printer unit (Step One). 3. The "Canon PIXMA Wireless Setup Assistant" tool is . > 8 Using the Canon PIXMA Wireless Setup Assistant Step Four 1. Confirm that the access point names listed in the window are the same as -is launched. 2. Then, write...
Network Key - Page 9

In the window for entering the network key is displayed, enter the key you copied in the step 4. 2. Using the Canon PIXMA Wireless Setup Assistant Step Five 1. Press the left function key (End setup). > Step Six When the completion screen appears, press the OK button. 9 When the window for selecting access point of the printer unit, select the access point specified in Step Four. 3.

Similar Questions

Ask a New Question
Use the box below to post a new question about this Canon product .
Points & Prizes
  • You can earn points for nearly everything you do on HelpOwl.com
  • You can trade in those points for gift cards at leading retailers such as Amazon.com and Walmart
  • It's that simple!
See How it Works
Create a Free Account

Canon Manuals

Find free Canon PIXMA MX882 manuals and user guides available at ManualOwl.com. Try out our unique manual viewer allowing you to interact with manuals from directly within your browser!

Canon Reviews

View thousands of Canon user reviews and customer ratings available at ReviewOwl.com.

Contact Information

Complete Canon customer service contact information including steps to reach representatives, hours of operation, customer support links and more from ContactHelp.com.

Scoreboard Ratings

See detailed Canon customer service rankings, employee comments and much more from our sister site.

Canon Recalls

Find comprehensive Canon recall information updated hourly on RecallOwl.com.