Quick Start Guide
Page 2
...are found here. 2. For further information about extending your product's 1 year limited warranty period. CarePAK must be purchased during your Canon service and support, call (1-800-385-2155), or visit our Web site at (1-866-251-3752). 4. For more information and... Date Customer Technical Support Sequence* 1. Email Tech Support - CarePAK offers toll-free Canon technical support and includes Canon's superb InstantExchange product replacement program. In addition, the latest driver downloads, answers to frequently asked questions, product information, and "where to start is...
...are found here. 2. For further information about extending your product's 1 year limited warranty period. CarePAK must be purchased during your Canon service and support, call (1-800-385-2155), or visit our Web site at (1-866-251-3752). 4. For more information and... Date Customer Technical Support Sequence* 1. Email Tech Support - CarePAK offers toll-free Canon technical support and includes Canon's superb InstantExchange product replacement program. In addition, the latest driver downloads, answers to frequently asked questions, product information, and "where to start is...
Quick Start Guide
Page 5
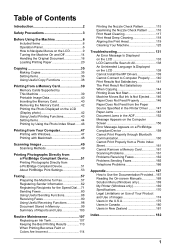
...Displayed on the LCD 133 LCD Cannot Be Seen At All 138 An Unintended Language Is Displayed on the LCD 138 Cannot Install the MP Drivers 139 Cannot Connect to Computer Properly ...... 140 Print Results Not Satisfactory 141 The Print Result Not Satisfactory When Copying 144 Printing Does Not ...Moves But Ink Is Not Ejected....... 146 Paper Does Not Feed Properly 146 Paper Does Not Feed from the Paper Source Specified in the Printer Driver ........ 147 Paper Jams 148 Document Jams in the ADF 152 Message Appears on the Computer Screen 156 Error Message Appears on a PictBridge Compliant ...
...Displayed on the LCD 133 LCD Cannot Be Seen At All 138 An Unintended Language Is Displayed on the LCD 138 Cannot Install the MP Drivers 139 Cannot Connect to Computer Properly ...... 140 Print Results Not Satisfactory 141 The Print Result Not Satisfactory When Copying 144 Printing Does Not ...Moves But Ink Is Not Ejected....... 146 Paper Does Not Feed Properly 146 Paper Does Not Feed from the Paper Source Specified in the Printer Driver ........ 147 Paper Jams 148 Document Jams in the ADF 152 Message Appears on the Computer Screen 156 Error Message Appears on a PictBridge Compliant ...
Quick Start Guide
Page 18
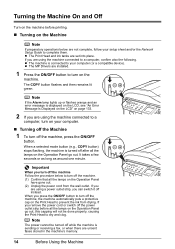
z The machine is connected to dry and clog. z The MP Drivers are set into place. z The Print Head and ink tanks are installed. 1 Press the ON/OFF button to turn on the machine. Note If the ...
z The machine is connected to dry and clog. z The MP Drivers are set into place. z The Print Head and ink tanks are installed. 1 Press the ON/OFF button to turn on the machine. Note If the ...
Quick Start Guide
Page 25
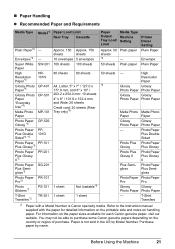
...be able to the instruction manual supplied with a Model Number is not sold in the US by name. Paper is Canon specialty media. Envelopes*3 - Printer Driver Setting Plain Paper Envelope Super White SW-201 100 sheets 100 sheets Paper 50 sheets Plain paper Plain Paper High Resolution ...Paper Photo Paper Pro Pro Glossy Glossy Photo Paper Photo Paper T-Shirt TR-301 1 sheet Transfers*3 1 sheet - Refer to purchase some Canon genuine papers depending on the paper sizes available for detailed information on the printable side and notes on handling paper. Purchase paper by Model ...
...be able to the instruction manual supplied with a Model Number is not sold in the US by name. Paper is Canon specialty media. Envelopes*3 - Printer Driver Setting Plain Paper Envelope Super White SW-201 100 sheets 100 sheets Paper 50 sheets Plain paper Plain Paper High Resolution ...Paper Photo Paper Pro Pro Glossy Glossy Photo Paper Photo Paper T-Shirt TR-301 1 sheet Transfers*3 1 sheet - Refer to purchase some Canon genuine papers depending on the paper sizes available for detailed information on the printable side and notes on handling paper. Purchase paper by Model ...
Quick Start Guide
Page 27
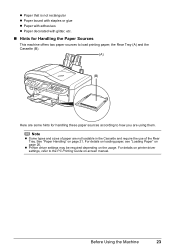
See "Paper Handling" on -screen manual. Before Using the Machine 23 Note z Some types and sizes of paper are using them. For details on printer driver settings, refer to the PC Printing Guide on page 21. z Paper that is not rectangular z Paper bound with staples or glue z Paper with adhesives z ...; Hints for handling these paper sources according to how you are not loadable in the Cassette and require the use of the Rear Tray. z Printer driver settings may be required depending on page 26. For details on loading paper, see "Loading Paper" on the usage. the Rear Tray (A) and the...
See "Paper Handling" on -screen manual. Before Using the Machine 23 Note z Some types and sizes of paper are using them. For details on printer driver settings, refer to the PC Printing Guide on page 21. z Paper that is not rectangular z Paper bound with staples or glue z Paper with adhesives z ...; Hints for handling these paper sources according to how you are not loadable in the Cassette and require the use of the Rear Tray. z Printer driver settings may be required depending on page 26. For details on loading paper, see "Loading Paper" on the usage. the Rear Tray (A) and the...
Quick Start Guide
Page 28
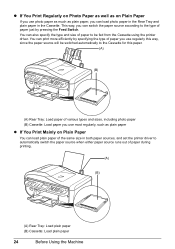
... of paper to be switched automatically to the Cassette for this way, since the paper source will be fed from the Cassette using the printer driver. You can print more efficiently by pressing the Feed Switch. z If You Print Regularly on Photo Paper as well as plain paper, you use ... Mainly on Plain Paper If you can load photo paper in the Rear Tray and plain paper in both paper sources, and set the printer driver to automatically switch the paper source when either paper source runs out of paper during printing. (A) (B) (A) Rear Tray: Load plain paper (B) Cassette: Load plain ...
... of paper to be switched automatically to the Cassette for this way, since the paper source will be fed from the Cassette using the printer driver. You can print more efficiently by pressing the Feed Switch. z If You Print Regularly on Photo Paper as well as plain paper, you use ... Mainly on Plain Paper If you can load photo paper in the Rear Tray and plain paper in both paper sources, and set the printer driver to automatically switch the paper source when either paper source runs out of paper during printing. (A) (B) (A) Rear Tray: Load plain paper (B) Cassette: Load plain ...
Quick Start Guide
Page 29
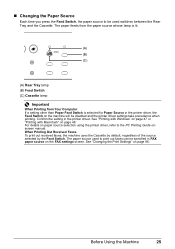
... (B) Feed Switch (C) Cassette lamp Important When Printing from Your Computer If a setting other than Paper Feed Switch is selected for Paper Source in the printer driver, the Feed Switch on page 96. When Printing Out Received Faxes To print out received faxes, the machine uses the Cassette by default, regardless of...See "Printing with Windows" on page 47 or "Printing with Macintosh" on the FAX settings screen. For details on paper source selection using the printer driver, refer to print out faxes can be used to the PC Printing Guide onscreen manual. Confirm the setting in the printer...
... (B) Feed Switch (C) Cassette lamp Important When Printing from Your Computer If a setting other than Paper Feed Switch is selected for Paper Source in the printer driver, the Feed Switch on page 96. When Printing Out Received Faxes To print out received faxes, the machine uses the Cassette by default, regardless of...See "Printing with Windows" on page 47 or "Printing with Macintosh" on the FAX settings screen. For details on paper source selection using the printer driver, refer to print out faxes can be used to the PC Printing Guide onscreen manual. Confirm the setting in the printer...
Quick Start Guide
Page 31
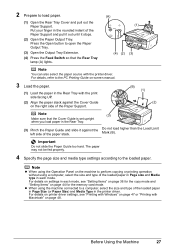
... card mode. z When using the machine connected to perform copying or printing operation without using the Operation Panel on settings in the printer driver. For details on printer driver settings, see "Setting Items" on page 36 for the copy mode and "Setting Items" on page 48. The paper may not be fed... the rounded indent of the Paper Support and pull it out until it against the Cover Guide on page 47 or "Printing with the printer driver. Press the Open button to the loaded paper. Before Using the Machine 27
... card mode. z When using the machine connected to perform copying or printing operation without using the Operation Panel on settings in the printer driver. For details on printer driver settings, see "Setting Items" on page 36 for the copy mode and "Setting Items" on page 48. The paper may not be fed... the rounded indent of the Paper Support and pull it out until it against the Cover Guide on page 47 or "Printing with the printer driver. Press the Open button to the loaded paper. Before Using the Machine 27
Quick Start Guide
Page 33
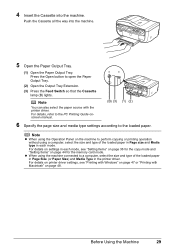
... Open button to the loaded paper. For details on settings in each mode, see "Printing with Windows" on page 47 or "Printing with the printer driver. Note You can also select the paper source with Macintosh" on page 48. For details, refer to the PC Printing Guide onscreen manual. (B) (3) (1) (2) 6 ..."Setting Items" on the machine to a computer, select the size and type of the loaded paper in Page size and Media type in the printer driver. Before Using the Machine 29 Note z When using a computer, select the size and type of the loaded paper in Page Size (or Paper Size)...
... Open button to the loaded paper. For details on settings in each mode, see "Printing with Windows" on page 47 or "Printing with the printer driver. Note You can also select the paper source with Macintosh" on page 48. For details, refer to the PC Printing Guide onscreen manual. (B) (3) (1) (2) 6 ..."Setting Items" on the machine to a computer, select the size and type of the loaded paper in Page size and Media type in the printer driver. Before Using the Machine 29 Note z When using a computer, select the size and type of the loaded paper in Page Size (or Paper Size)...
Quick Start Guide
Page 34
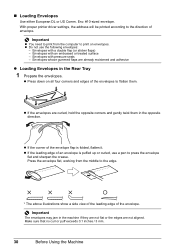
... of envelope. z Do not use a pen to the direction of the envelope flap is puffed up or curled, use the following envelopes: - With proper printer driver settings, the address will be printed according to press the envelope flat and sharpen the crease. z If the envelopes are curled, hold the opposite corners...
... of envelope. z Do not use a pen to the direction of the envelope flap is puffed up or curled, use the following envelopes: - With proper printer driver settings, the address will be printed according to press the envelope flat and sharpen the crease. z If the envelopes are curled, hold the opposite corners...
Quick Start Guide
Page 35
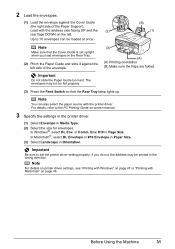
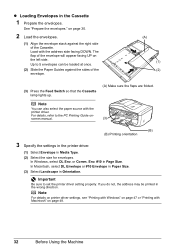
... Printing Guide on page 47 or "Printing with the printer driver. In Windows®, select DL Env. Note For details on printer driver settings, see "Printing with Windows" on -screen manual. 3 Specify the settings in the printer driver. (1) Select Envelope in Orientation. or Comm. In Macintosh&#... (A) (A) Printing orientation (B) Make sure the flaps are folded. (3) Press the Feed Switch so that the Cover Guide is set the printer driver setting properly. Important Be sure to 10 envelopes can also select the paper source with Macintosh" on the left side of the Paper Support). 2...
... Printing Guide on page 47 or "Printing with the printer driver. In Windows®, select DL Env. Note For details on printer driver settings, see "Printing with Windows" on -screen manual. 3 Specify the settings in the printer driver. (1) Select Envelope in Orientation. or Comm. In Macintosh&#... (A) (A) Printing orientation (B) Make sure the flaps are folded. (3) Press the Feed Switch so that the Cover Guide is set the printer driver setting properly. Important Be sure to 10 envelopes can also select the paper source with Macintosh" on the left side of the Paper Support). 2...
Quick Start Guide
Page 36
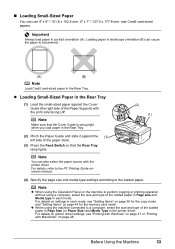
... in the wrong direction. Important Be sure to the PC Printing Guide on page 48. 32 Before Using the Machine Note For details on printer driver settings, see "Printing with Windows" on page 47 or "Printing with Macintosh" on - The flap of the envelope. (A) (1) (2) (3) Press the Feed Switch ... the Cassette. z Loading Envelopes in Media Type. (2) Select the size for envelopes. screen manual. (3) (B) (B) Printing orientation 3 Specify the settings in the printer driver. (1) Select Envelope in the Cassette 1 Prepare the envelopes. For details, refer to set the printer...
... in the wrong direction. Important Be sure to the PC Printing Guide on page 48. 32 Before Using the Machine Note For details on printer driver settings, see "Printing with Windows" on page 47 or "Printing with Macintosh" on - The flap of the envelope. (A) (1) (2) (3) Press the Feed Switch ... the Cassette. z Loading Envelopes in Media Type. (2) Select the size for envelopes. screen manual. (3) (B) (B) Printing orientation 3 Specify the settings in the printer driver. (1) Select Envelope in the Cassette 1 Prepare the envelopes. For details, refer to set the printer...
Quick Start Guide
Page 37
Important Always load paper in the printer driver. z When using a computer, select the size and type of the loaded paper in Page ... in the Rear Tray. „ Loading Small-Sized Paper You can also select the paper source with the printer driver. Note Make sure that the Rear Tray lamp lights. For details on page 44 for the copy mode and "...x 6" / 101.6 x 152.4 mm, 5" x 7" / 127.0 x 177.8 mm, and Credit card-sized papers. For details on printer driver settings, see "Setting Items" on page 36 for the memory card mode. Note z When using the Operation Panel on page 48.
Important Always load paper in the printer driver. z When using a computer, select the size and type of the loaded paper in Page ... in the Rear Tray. „ Loading Small-Sized Paper You can also select the paper source with the printer driver. Note Make sure that the Rear Tray lamp lights. For details on page 44 for the copy mode and "...x 6" / 101.6 x 152.4 mm, 5" x 7" / 127.0 x 177.8 mm, and Credit card-sized papers. For details on printer driver settings, see "Setting Items" on page 36 for the memory card mode. Note z When using the Operation Panel on page 48.
Quick Start Guide
Page 38
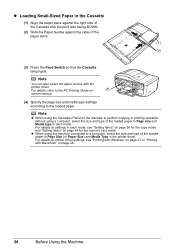
... paper stack. (1) (2) (3) Press the Feed Switch so that the Cassette lamp lights. For details on settings in each mode. For details on printer driver settings, see "Printing with Windows" on page 47 or "Printing with Macintosh" on the machine to perform copying or printing operation without using a computer,...in each mode, see "Setting Items" on page 36 for the memory card mode. Note You can also select the paper source with the printer driver. z When using the Operation Panel on page 48. 34 Before Using the Machine z Loading Small-Sized Paper in the Cassette (1) Align the ...
... paper stack. (1) (2) (3) Press the Feed Switch so that the Cassette lamp lights. For details on settings in each mode. For details on printer driver settings, see "Printing with Windows" on page 47 or "Printing with Macintosh" on the machine to perform copying or printing operation without using a computer,...in each mode, see "Setting Items" on page 36 for the memory card mode. Note You can also select the paper source with the printer driver. z When using the Operation Panel on page 48. 34 Before Using the Machine z Loading Small-Sized Paper in the Cassette (1) Align the ...
Quick Start Guide
Page 51
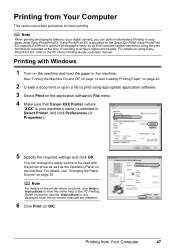
... Easy-PhotoPrint EX is provided on -screen manual. Printing from Your Computer This section describes procedure for basic printing. Printing with the printer driver as well as the Operation Panel on page 20. 2 Create a document or open a file to print using the print information recorded at... of shooting to achieve higher print quality. Note For details on the printer driver functions, click Help or Instructions to be used with Windows 1 Turn on the application software's File menu. 4 Make sure that Canon XXX Printer (where "XXX" is your digital camera, you can change the...
... Easy-PhotoPrint EX is provided on -screen manual. Printing from Your Computer This section describes procedure for basic printing. Printing with the printer driver as well as the Operation Panel on page 20. 2 Create a document or open a file to print using the print information recorded at... of shooting to achieve higher print quality. Note For details on the printer driver functions, click Help or Instructions to be used with Windows 1 Turn on the application software's File menu. 4 Make sure that Canon XXX Printer (where "XXX" is your digital camera, you can change the...

Quick Start Guide
Page 52
For details, see "Changing the Paper Source" on -screen manual. Note For details on the printer driver functions, click to view the PC Printing Guide on page 25. See "Turning the Machine On and Off" on page 14 and "Loading Printing Paper" ... loaded paper in Paper Size. 6 Click OK. 7 Select Print on the application software's File menu. 8 Select Quality & Media in the machine. Printing with the printer driver as well as the Operation Panel on the machine. You can change the paper source to print using appropriate application software. 3 Select Page Setup on...
For details, see "Changing the Paper Source" on -screen manual. Note For details on the printer driver functions, click to view the PC Printing Guide on page 25. See "Turning the Machine On and Off" on page 14 and "Loading Printing Paper" ... loaded paper in Paper Size. 6 Click OK. 7 Select Print on the application software's File menu. 8 Select Quality & Media in the machine. Printing with the printer driver as well as the Operation Panel on the machine. You can change the paper source to print using appropriate application software. 3 Select Page Setup on...

Quick Start Guide
Page 68
...z When the machine is connected to select Device settings, then press the OK button. z If you connect the machine to a computer with the MP Drivers installed, the date and time setting will be copied from the computer to select Date/time setting, then press the OK button. The FAX menu... screen is displayed. (2) Use the [ or ] button to a computer with the MP Drivers installed, the setting will be copied to select Maintenance/settings, then press the OK button. z To delete an entire entry: Press and hold the [ button...
...z When the machine is connected to select Device settings, then press the OK button. z If you connect the machine to a computer with the MP Drivers installed, the date and time setting will be copied from the computer to select Date/time setting, then press the OK button. The FAX menu... screen is displayed. (2) Use the [ or ] button to a computer with the MP Drivers installed, the setting will be copied to select Maintenance/settings, then press the OK button. z To delete an entire entry: Press and hold the [ button...

Quick Start Guide
Page 93
For details, refer to the FAX Driver Guide onscreen manual. „ Sending/Receiving Using ECM This machine is not compatible with ECM, the fax will be sent/ received in the standard mode. ... to tone dialing, refer to the instruction manual supplied with ECM, ECM automatically corrects errors and resend the fax. Refer to finish using the fax driver from Your Computer (Windows only) If your telephone. 5 Use the telephone to press the number by following the message. 6 Hang up the handset to tone...
For details, refer to the FAX Driver Guide onscreen manual. „ Sending/Receiving Using ECM This machine is not compatible with ECM, the fax will be sent/ received in the standard mode. ... to tone dialing, refer to the instruction manual supplied with ECM, ECM automatically corrects errors and resend the fax. Refer to finish using the fax driver from Your Computer (Windows only) If your telephone. 5 Use the telephone to press the number by following the message. 6 Hang up the handset to tone...
Quick Start Guide
Page 118
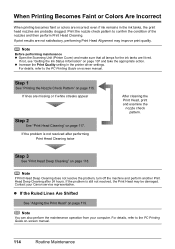
When Printing Becomes Faint or Colors Are Incorrect When printing becomes faint or colors are incorrect even if ink remains in the printer driver settings. Print the nozzle check pattern to the PC Printing Guide on-screen manual. 114 Routine Maintenance If not, see "Getting ...Step 1 See "Printing the Nozzle Check Pattern" on page 119. Contact your computer. Note You can also perform the maintenance operation from your Canon service representative. Note Before performing maintenance z Open the Scanning Unit (Printer Cover) and make sure that all lamps for the ink tanks are ...
When Printing Becomes Faint or Colors Are Incorrect When printing becomes faint or colors are incorrect even if ink remains in the printer driver settings. Print the nozzle check pattern to the PC Printing Guide on-screen manual. 114 Routine Maintenance If not, see "Getting ...Step 1 See "Printing the Nozzle Check Pattern" on page 119. Contact your computer. Note You can also perform the maintenance operation from your Canon service representative. Note Before performing maintenance z Open the Scanning Unit (Printer Cover) and make sure that all lamps for the ink tanks are ...
Quick Start Guide
Page 135
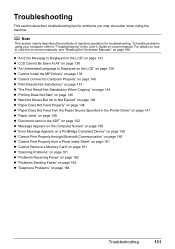
... 133 z "LCD Cannot Be Seen At All" on page 138 z "An Unintended Language Is Displayed on the LCD" on page 138 z "Cannot Install the MP Drivers" on page 139 z "Cannot Connect to "Troubleshooting" in the ADF" on page 152 z "Message Appears on the Computer Screen" on page 156 z "Error Message Appears... Not Ejected" on page 146 z "Paper Does Not Feed Properly" on page 146 z "Paper Does Not Feed from the Paper Source Specified in the Printer Driver" on page 147 z "Paper Jams" on page 148 z "Document Jams in the User's Guide on page 168.
... 133 z "LCD Cannot Be Seen At All" on page 138 z "An Unintended Language Is Displayed on the LCD" on page 138 z "Cannot Install the MP Drivers" on page 139 z "Cannot Connect to "Troubleshooting" in the ADF" on page 152 z "Message Appears on the Computer Screen" on page 156 z "Error Message Appears... Not Ejected" on page 146 z "Paper Does Not Feed Properly" on page 146 z "Paper Does Not Feed from the Paper Source Specified in the Printer Driver" on page 147 z "Paper Jams" on page 148 z "Document Jams in the User's Guide on page 168.


