
User Manual
Page 10
... 558 Using the Information Services 559 Transmission/Reception of Faxes Using ECM 561 Document Stored in Machine's Memory 562 Printing a Document in Machine's Memory 563 Deleting a Document in Machine's Memory 565 Summary of Reports and ... Router or Changing Its Settings 591 Printing Speed Is Slow 593 Other Problems with Network 594 The Message Is Displayed on the Computer Screen during Setup 595 Checking Information about the Network 597 How to Restore the Machine's Network Settings to Factory Default 599 Problems while Printing/Scanning from Smartphone/Tablet...
... 558 Using the Information Services 559 Transmission/Reception of Faxes Using ECM 561 Document Stored in Machine's Memory 562 Printing a Document in Machine's Memory 563 Deleting a Document in Machine's Memory 565 Summary of Reports and ... Router or Changing Its Settings 591 Printing Speed Is Slow 593 Other Problems with Network 594 The Message Is Displayed on the Computer Screen during Setup 595 Checking Information about the Network 597 How to Restore the Machine's Network Settings to Factory Default 599 Problems while Printing/Scanning from Smartphone/Tablet...
User Manual
Page 113
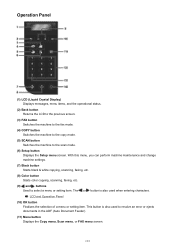
..., you can perform machine maintenance and change machine settings. (7) Black button Starts black & white copying, scanning, faxing, etc. (8) Color button Starts color copying, scanning, faxing, etc. (9) and buttons Used to the scan mode. (6) Setup button Displays the Setup menu screen. Operation Panel (1) LCD (Liquid Crystal Display) Displays messages, menu items, and the operational status...
..., you can perform machine maintenance and change machine settings. (7) Black button Starts black & white copying, scanning, faxing, etc. (8) Color button Starts color copying, scanning, faxing, etc. (9) and buttons Used to the scan mode. (6) Setup button Displays the Setup menu screen. Operation Panel (1) LCD (Liquid Crystal Display) Displays messages, menu items, and the operational status...

User Manual
Page 120
...return to select FAX TX settings. Press the or button (C) to the previous screen, press the Back button (E). Press the OK button (D). 120 Press the Menu button in the respective modes shows the menu screen to switch between the copy mode, scan mode, fax mode, and setup menu screen. Example...: Changing the scan contrast for faxing. LCD and Operation Panel The mode button (A) on the operation panel allows you to select various functions or...
...return to select FAX TX settings. Press the or button (C) to the previous screen, press the Back button (E). Press the OK button (D). 120 Press the Menu button in the respective modes shows the menu screen to switch between the copy mode, scan mode, fax mode, and setup menu screen. Example...: Changing the scan contrast for faxing. LCD and Operation Panel The mode button (A) on the operation panel allows you to select various functions or...
User Manual
Page 162
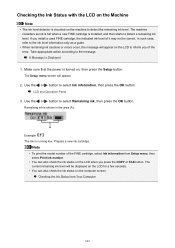
... of the error. Example: The ink is shown in the area (A). The current remaining ink level will be correct. If you press the COPY or FAX button. Make sure that the power is turned on the LCD to detect a remaining ink level. Use the or button to select Remaining ink, then... press the OK button. Use the or button to select Ink information, then press the OK button. The Setup menu screen will appear on , then press the Setup button. Checking the Ink Status from Setup menu, then select Print ink number. • You can also check the ink status on the computer screen...
... of the error. Example: The ink is shown in the area (A). The current remaining ink level will be correct. If you press the COPY or FAX button. Make sure that the power is turned on the LCD to detect a remaining ink level. Use the or button to select Remaining ink, then... press the OK button. Use the or button to select Ink information, then press the OK button. The Setup menu screen will appear on , then press the Setup button. Checking the Ink Status from Setup menu, then select Print ink number. • You can also check the ink status on the computer screen...
User Manual
Page 192
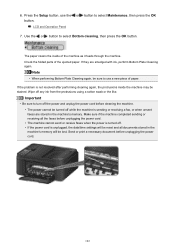
... the machine completed sending or receiving all documents stored in the machine's memory. Press the Setup button, use a new piece of paper. If they are stored in the machine's memory will be reset and all the faxes before cleaning the machine. • The power cannot be stained. If the problem is sending... the or button to turn off the power and unplug the power cord before unplugging the power cord. • The machine cannot send or receive faxes when the power is turned off. • If the power cord is unplugged, the date/time settings will be sure to use the or button...
... the machine completed sending or receiving all documents stored in the machine's memory. Press the Setup button, use a new piece of paper. If they are stored in the machine's memory will be reset and all the faxes before cleaning the machine. • The power cannot be stained. If the problem is sending... the or button to turn off the power and unplug the power cord before unplugging the power cord. • The machine cannot send or receive faxes when the power is turned off. • If the power cord is unplugged, the date/time settings will be sure to use the or button...

User Manual
Page 205
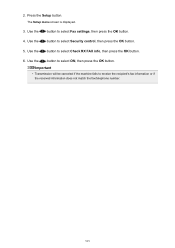
... Settings on the LCD indicates the current setting. 1. Press the Setup button. Use the button to select a setting item, then press the OK button. The Setup menu screen is turned on each setting item: Fax settings Output settings LAN settings Dev. Use the button to select ...press the OK button. 6. When you change the settings in the Device settings screen, taking the steps to change the fax settings, press the Setup button, then select Fax settings. 4. For details on . 2. About Quiet setting 205 as an example. user settings Firmware update Cassette settings Reset...
... Settings on the LCD indicates the current setting. 1. Press the Setup button. Use the button to select a setting item, then press the OK button. The Setup menu screen is turned on each setting item: Fax settings Output settings LAN settings Dev. Use the button to select ...press the OK button. 6. When you change the settings in the Device settings screen, taking the steps to change the fax settings, press the Setup button, then select Fax settings. 4. For details on . 2. About Quiet setting 205 as an example. user settings Firmware update Cassette settings Reset...
User Manual
Page 206
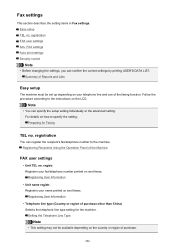
... depending on how to specify the setting: Preparing for the machine. Registering User Information • Unit name registr. Fax settings This section describes the setting items in Fax settings. registration FAX user settings Adv. Easy setup TEL no . FAX settings Auto print settings Security control Note • Before changing the settings, you can specify the...
... depending on how to specify the setting: Preparing for the machine. Registering User Information • Unit name registr. Fax settings This section describes the setting items in Fax settings. registration FAX user settings Adv. Easy setup TEL no . FAX settings Auto print settings Security control Note • Before changing the settings, you can specify the...

User Manual
Page 217
... back to the default. • Web service setup Returns the Web service settings back to the default. • LAN settings Returns the LAN settings other setting items back to the default. The LAN settings and the telephone/fax number are not returned back to the default....; Device info sending Returns only the device information sending settings back to the default. • FAX settings Returns the fax settings back to the default setting. After resetting, perform setup again as necessary. Disconnect the telephone line from the machine before you return this setting item back...
... back to the default. • Web service setup Returns the Web service settings back to the default. • LAN settings Returns the LAN settings other setting items back to the default. The LAN settings and the telephone/fax number are not returned back to the default....; Device info sending Returns only the device information sending settings back to the default. • FAX settings Returns the fax settings back to the default setting. After resetting, perform setup again as necessary. Disconnect the telephone line from the machine before you return this setting item back...

User Manual
Page 276
... bandwidth: 2.4 GHz Channel: 1-11 or 1-13 * Frequency bandwidth and available channels differ depending on ITU-T No.1 chart for US specifications and Canon FAX Standard chart No.1 for others, both in standard mode.) Black Standard: 203 pels/inch x 98 lines/inch (8 pels/mm x 3.85 lines...- Security: WEP (64/128 bits) WPA-PSK (TKIP/AES) WPA2-PSK (TKIP/AES) Setup: Standard setup WPS (Push button configuration/PIN code method) WCN (WCN-NET) Cableless setup Other Features: Administration password Minimum System Requirements Conform to the operating system's requirements when higher than those...
... bandwidth: 2.4 GHz Channel: 1-11 or 1-13 * Frequency bandwidth and available channels differ depending on ITU-T No.1 chart for US specifications and Canon FAX Standard chart No.1 for others, both in standard mode.) Black Standard: 203 pels/inch x 98 lines/inch (8 pels/mm x 3.85 lines...- Security: WEP (64/128 bits) WPA-PSK (TKIP/AES) WPA2-PSK (TKIP/AES) Setup: Standard setup WPS (Push button configuration/PIN code method) WCN (WCN-NET) Cableless setup Other Features: Administration password Minimum System Requirements Conform to the operating system's requirements when higher than those...
User Manual
Page 486
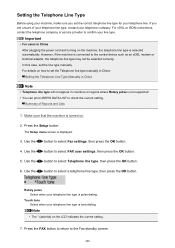
...Information 486 Setting the Telephone Line Type Set the correct telephone line type for your telephone line. 2. Follow the procedure below to set the fax setting according to the instruction on the LCD. Important • If the Power Disconnects Unexpectedly: If there is set up depending on the ... machine to the telephone line and set to TEL priority mode or Fax only mode. If the power disconnects, the following will apply: • You will be set up the machine before using the faxing functions. Easy setup If you set up according to the instruction on your telephone line...
...Information 486 Setting the Telephone Line Type Set the correct telephone line type for your telephone line. 2. Follow the procedure below to set the fax setting according to the instruction on the LCD. Important • If the Power Disconnects Unexpectedly: If there is set up depending on the ... machine to the telephone line and set to TEL priority mode or Fax only mode. If the power disconnects, the following will apply: • You will be set up the machine before using the faxing functions. Easy setup If you set up according to the instruction on your telephone line...
User Manual
Page 490
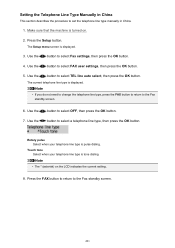
...is not supported. • You can print USER'S DATA LIST to check the current setting. However, if the machine is displayed. 3. The Setup menu screen is connected to set the Telephone line type manually in China: Setting the Telephone Line Type Manually in China Note • Telephone ..., the telephone line type may not be selected correctly. For details on the LCD indicates the current setting. 7. Press the Setup button. Use the button to select FAX user settings, then press the OK button. 5. Rotary pulse Select when your telephone line type is tone dialing. Use the...
...is not supported. • You can print USER'S DATA LIST to check the current setting. However, if the machine is displayed. 3. The Setup menu screen is connected to set the Telephone line type manually in China: Setting the Telephone Line Type Manually in China Note • Telephone ..., the telephone line type may not be selected correctly. For details on the LCD indicates the current setting. 7. Press the Setup button. Use the button to select FAX user settings, then press the OK button. 5. Rotary pulse Select when your telephone line type is tone dialing. Use the...
User Manual
Page 491
The Setup menu screen is turned on the LCD indicates the current setting. 8. Use the button to the Fax standby screen. 6. Note • If you do not need to change the telephone line type, press the FAX button to return to select FAX user settings, then press the OK button. 5. button to select TEL line... to select OFF, then press the OK button. Use the 7. The current telephone line type is pulse dialing. Note • The * (asterisk) on . 2. Press the Setup button. Use the button to set the telephone line type manually in China. 1. Use the button to the...
The Setup menu screen is turned on the LCD indicates the current setting. 8. Use the button to the Fax standby screen. 6. Note • If you do not need to change the telephone line type, press the FAX button to return to select FAX user settings, then press the OK button. 5. button to select TEL line... to select OFF, then press the OK button. Use the 7. The current telephone line type is pulse dialing. Note • The * (asterisk) on . 2. Press the Setup button. Use the button to set the telephone line type manually in China. 1. Use the button to the...

User Manual
Page 497
... of purchase. 1. Use the button to select Dev. Use the button to select Device settings, then press the OK button. 4. Press the FAX button to return to select Date/time setting, then press the OK button. 6. You need to change the default setting according to the latest ... to move the cursor under the desired position, then use the Numeric buttons to select Device settings, then press the OK button. 497 The Setup menu screen is displayed. 3. Setting Daylight Saving Time (Summer Time) Some countries adopt the daylight saving time (summer time) system that daylight saving...
... of purchase. 1. Use the button to select Dev. Use the button to select Device settings, then press the OK button. 4. Press the FAX button to return to select Date/time setting, then press the OK button. 6. You need to change the default setting according to the latest ... to move the cursor under the desired position, then use the Numeric buttons to select Device settings, then press the OK button. 497 The Setup menu screen is displayed. 3. Setting Daylight Saving Time (Summer Time) Some countries adopt the daylight saving time (summer time) system that daylight saving...

User Manual
Page 499
...machine is selected, then press the OK button. 2. The Setup menu screen is selected, then press the OK button. 2. Use the button to enter or delete characters: Entering Numbers, Letters, and Symbols 7. Enter the unit fax/telephone number. 1. Make sure that Unit name registr. ...Note • You can enter the fax/telephone number up to 24 characters, including spaces. • For details on how to select Fax settings, then press the OK button. 4. Press the Setup button. is displayed. 3. Registering User Information This section describes ...
...machine is selected, then press the OK button. 2. The Setup menu screen is selected, then press the OK button. 2. Use the button to enter or delete characters: Entering Numbers, Letters, and Symbols 7. Enter the unit fax/telephone number. 1. Make sure that Unit name registr. ...Note • You can enter the fax/telephone number up to 24 characters, including spaces. • For details on how to select Fax settings, then press the OK button. 4. Press the Setup button. is displayed. 3. Registering User Information This section describes ...

User Manual
Page 514
... Checking Information (Checking the Recipient's Information) Sending Faxes after Dialing Twice (Fax Number Re-entry) Set FAX no . The Setup menu screen is displayed. re-entry, then press the OK button. 6. Sending a Fax after Speaking on . 2. Sending Faxes after Dialing Twice (Fax Number Re-entry) • Sending faxes after Checking Information (Checking the Recipient's Information) Set Check RX...
... Checking Information (Checking the Recipient's Information) Sending Faxes after Dialing Twice (Fax Number Re-entry) Set FAX no . The Setup menu screen is displayed. re-entry, then press the OK button. 6. Sending a Fax after Speaking on . 2. Sending Faxes after Dialing Twice (Fax Number Re-entry) • Sending faxes after Checking Information (Checking the Recipient's Information) Set Check RX...
User Manual
Page 515
Use the button to select Check RX FAX info, then press the OK button. 6. Use the button to select Security control, then press the OK button. 5. 2. Press the Setup button. Use the button to receive the recipient's fax information or if the received information does not match the fax/telephone number. 515 The Setup menu screen is displayed. 3. Important • Transmission will be canceled if the machine fails to select Fax settings, then press the OK button. 4. Use the button to select ON, then press the OK button.
Use the button to select Check RX FAX info, then press the OK button. 6. Use the button to select Security control, then press the OK button. 5. 2. Press the Setup button. Use the button to receive the recipient's fax information or if the received information does not match the fax/telephone number. 515 The Setup menu screen is displayed. 3. Important • Transmission will be canceled if the machine fails to select Fax settings, then press the OK button. 4. Use the button to select ON, then press the OK button.
User Manual
Page 520
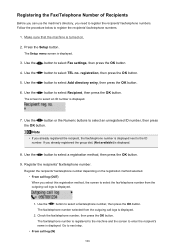
... turned on the registration method selected. • From call logs is displayed. 8. Press the Setup button. Use the button to select a registration method, then press the OK button. 9. Check the fax/telephone number, then press the OK button. Register the recipients' fax/telephone number depending on . 2. Follow the procedure below to select the...
... turned on the registration method selected. • From call logs is displayed. 8. Press the Setup button. Use the button to select a registration method, then press the OK button. 9. Check the fax/telephone number, then press the OK button. Register the recipients' fax/telephone number depending on . 2. Follow the procedure below to select the...
User Manual
Page 523
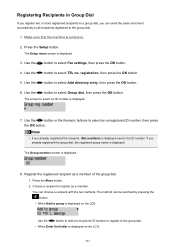
...more registered recipients to a group dial, you already registered the recipient, (Not available) is displayed next to the ID number. Press the Setup button. Use the button to select TEL no. The method can be switched by pressing the button. • When Add to group ...2. Note • If you can choose a recipient with the two methods. Press the Menu button. 2. Choose a recipient to select Fax settings, then press the OK button. 4. The Setup menu screen is displayed. 8. Use the button to register as a member of the group dial. 1. The Group member screen is displayed....
...more registered recipients to a group dial, you already registered the recipient, (Not available) is displayed next to the ID number. Press the Setup button. Use the button to select TEL no. The method can be switched by pressing the button. • When Add to group ...2. Note • If you can choose a recipient with the two methods. Press the Menu button. 2. Choose a recipient to select Fax settings, then press the OK button. 4. The Setup menu screen is displayed. 8. Use the button to register as a member of the group dial. 1. The Group member screen is displayed....
User Manual
Page 525
... number from the incoming call logs is selected as the registration method: The screen to select a fax/telephone number and press the OK button, the editing screen is displayed. The Setup menu screen is displayed as well as the registration method: the editing screen is turned on. 2. Use the button to select...
... number from the incoming call logs is selected as the registration method: The screen to select a fax/telephone number and press the OK button, the editing screen is displayed. The Setup menu screen is displayed as well as the registration method: the editing screen is turned on. 2. Use the button to select...
User Manual
Page 527
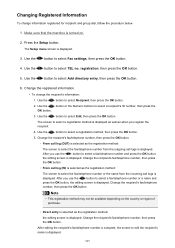
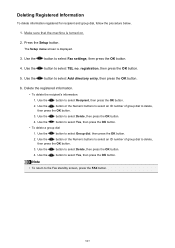
...to select Recipient, then press the OK button. 2. Use the button to the Fax standby screen, press the FAX button. 527 Note • To return to select Yes, then press the OK button. Press the Setup button. The Setup menu screen is turned on. 2. registration, then press the OK button. 5....button or the Numeric buttons to select an ID number of group dial to delete, then press the OK button. 3. Use the button to select Fax settings, then press the OK button. 4. Use the button to select Group dial, then press the OK button. 2. Delete the registered information....
...to select Recipient, then press the OK button. 2. Use the button to the Fax standby screen, press the FAX button. 527 Note • To return to select Yes, then press the OK button. Press the Setup button. The Setup menu screen is turned on. 2. registration, then press the OK button. 5....button or the Numeric buttons to select an ID number of group dial to delete, then press the OK button. 3. Use the button to select Fax settings, then press the OK button. 4. Use the button to select Group dial, then press the OK button. 2. Delete the registered information....


