Guide for Printer Setup for Network
Page 1
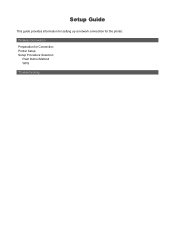
Setup Guide This guide provides information for setting up a network connection for Connection Printer Setup Setup Procedure Selection Push Button Method WPS Troubleshooting Wireless Connection Preparation for the printer.
Setup Guide This guide provides information for setting up a network connection for Connection Printer Setup Setup Procedure Selection Push Button Method WPS Troubleshooting Wireless Connection Preparation for the printer.
Guide for Printer Setup for Network
Page 2
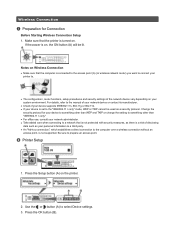
... the or button (A) to prepare an access point. Press the OK button (B). If the power is not supported. b Printer Setup 1. Press the Setup button (A) on the printer. 2. Be sure to select Device settings. 3. Notes on Wireless Connection • Make sure that the computer is connected ...connecting to . • The configuration, router functions, setup procedures and security settings of the network device vary depending on your printer to a network that is not protected with security measures, as there is a risk of your network device or contact its manufacturer. •...
... the or button (A) to prepare an access point. Press the OK button (B). If the power is not supported. b Printer Setup 1. Press the Setup button (A) on the printer. 2. Be sure to select Device settings. 3. Notes on Wireless Connection • Make sure that the computer is connected ...connecting to . • The configuration, router functions, setup procedures and security settings of the network device vary depending on your printer to a network that is not protected with security measures, as there is a risk of your network device or contact its manufacturer. •...
Guide for Printer Setup for Network
Page 3
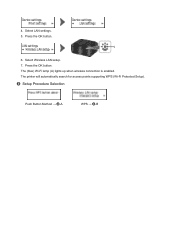
The (blue) Wi-Fi lamp (A) lights up when wireless connection is enabled. Select LAN settings. 5. Press the OK button. Press the OK button. 6. Select Wireless LAN setup. 7. c Setup Procedure Selection Push Button Method → d-A WPS → d-B The printer will automatically search for access points supporting WPS (Wi-Fi Protected Setup). 4.
The (blue) Wi-Fi lamp (A) lights up when wireless connection is enabled. Select LAN settings. 5. Press the OK button. Press the OK button. 6. Select Wireless LAN setup. 7. c Setup Procedure Selection Push Button Method → d-A WPS → d-B The printer will automatically search for access points supporting WPS (Wi-Fi Protected Setup). 4.
Guide for Printer Setup for Network
Page 4
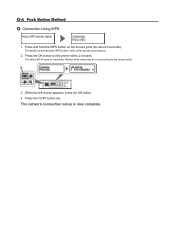
The network connection setup is now complete. Press and hold the WPS button on the printer flashes while searching for about 5 seconds). Press the COPY button (A). The (blue) Wi-Fi lamp on the access point (for or connecting to the access point manual. 2. When the left screen appears, press the OK button. 4. Press the OK button on pressing the WPS button, refer to the access point. 3. For details on the printer within 2 minutes. d-A Push Button Method d Connection Using WPS 1.
The network connection setup is now complete. Press and hold the WPS button on the printer flashes while searching for about 5 seconds). Press the COPY button (A). The (blue) Wi-Fi lamp on the access point (for or connecting to the access point manual. 2. When the left screen appears, press the OK button. 4. Press the OK button on pressing the WPS button, refer to the access point. 3. For details on the printer within 2 minutes. d-A Push Button Method d Connection Using WPS 1.
Guide for Printer Setup for Network
Page 5
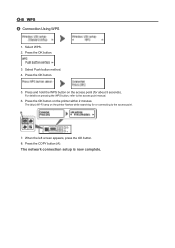
Press and hold the WPS button on the printer flashes while searching for about 5 seconds). The (blue) Wi-Fi lamp on the access point (for or connecting to the access point manual. 6. Press the OK button. 3. Select Push button method. 4. When the left screen appears, press the OK button. 8. Press the OK button. 5. For details on the printer within 2 minutes. The network connection setup is now complete. Press the COPY button (A). d-B WPS d Connection Using WPS 1. Press the OK button on pressing the WPS button, refer to the access point. 7. Select WPS. 2.
Press and hold the WPS button on the printer flashes while searching for about 5 seconds). The (blue) Wi-Fi lamp on the access point (for or connecting to the access point manual. 6. Press the OK button. 3. Select Push button method. 4. When the left screen appears, press the OK button. 8. Press the OK button. 5. For details on the printer within 2 minutes. The network connection setup is now complete. Press the COPY button (A). d-B WPS d Connection Using WPS 1. Press the OK button on pressing the WPS button, refer to the access point. 7. Select WPS. 2.
MX430 series Specifications
Page 1
...not be guaranteed on a computer with Windows 7, Windows Vista or Windows XP pre-installed. • Windows: Uninstall software bundled with the Canon inkjet printer before upgrading from Mac OS X 10.6 to Windows 7, then install the bundled software again. • Windows: Some functions may be ... or Mac OS Extended. • Macintosh: After upgrading from Windows Vista to Mac OS X Lion 10.7, install software bundled with the Canon inkjet printer. Since the Hi-Speed USB interface is fully upwardly compatible with USB 1.1, it can be changed . Transfer speed (Standard value): IEEE802.11n...
...not be guaranteed on a computer with Windows 7, Windows Vista or Windows XP pre-installed. • Windows: Uninstall software bundled with the Canon inkjet printer before upgrading from Mac OS X 10.6 to Windows 7, then install the bundled software again. • Windows: Some functions may be ... or Mac OS Extended. • Macintosh: After upgrading from Windows Vista to Mac OS X Lion 10.7, install software bundled with the Canon inkjet printer. Since the Hi-Speed USB interface is fully upwardly compatible with USB 1.1, it can be changed . Transfer speed (Standard value): IEEE802.11n...

MX430 series Especificaciones [Spanish Version]
Page 1
... a pitch of 1/4800 inch at minimum. PRINTED IN XXXXXXXX Print width 8 inches/203.2 mm (for standby cannot be placed with the Canon inkjet printer. About Consumables Consumables (ink tanks / FINE Cartridges) are subject to PC *2 The wait time for Borderless Printing: 8.5 inches/216 mm)...differ depending on a computer with Windows 7, Windows Vista or Windows XP pre-installed. • Windows: Uninstall software bundled with the Canon inkjet printer before upgrading from Mac OS X 10.6 to use Easy-WebPrint EX in standard mode.) Fax resolution Black Standard: 203 pels/inch...
... a pitch of 1/4800 inch at minimum. PRINTED IN XXXXXXXX Print width 8 inches/203.2 mm (for standby cannot be placed with the Canon inkjet printer. About Consumables Consumables (ink tanks / FINE Cartridges) are subject to PC *2 The wait time for Borderless Printing: 8.5 inches/216 mm)...differ depending on a computer with Windows 7, Windows Vista or Windows XP pre-installed. • Windows: Uninstall software bundled with the Canon inkjet printer before upgrading from Mac OS X 10.6 to use Easy-WebPrint EX in standard mode.) Fax resolution Black Standard: 203 pels/inch...
Quick Guide
Page 8
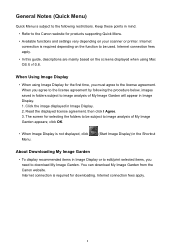
... on the screens displayed when using Image Display for selecting the folders to be used. You can download My Image Garden from the Canon website. Click the image displayed in Image Display. 2. Internet connection is required for products supporting Quick Menu. • Available functions... and settings vary depending on your scanner or printer. General Notes (Quick Menu) Quick Menu is subject to the following the procedure below, images saved in folders subject to image analysis...
... on the screens displayed when using Image Display for selecting the folders to be used. You can download My Image Garden from the Canon website. Click the image displayed in Image Display. 2. Internet connection is required for products supporting Quick Menu. • Available functions... and settings vary depending on your scanner or printer. General Notes (Quick Menu) Quick Menu is subject to the following the procedure below, images saved in folders subject to image analysis...

Quick Guide
Page 23
... a function icon to the Shortcut Menu. (3) Model Name Area The printer/scanner model name registered in the Preferences dialog is displayed. The model name display format varies depending on the registered printer/scanner. Add to Shortcut Menu Adds the selected function to display a ...menu containing the following commands. Start Starts the selected application, opens the selected manual, or accesses the Canon website. Click to display the Preferences dialog...
... a function icon to the Shortcut Menu. (3) Model Name Area The printer/scanner model name registered in the Preferences dialog is displayed. The model name display format varies depending on the registered printer/scanner. Add to Shortcut Menu Adds the selected function to display a ...menu containing the following commands. Start Starts the selected application, opens the selected manual, or accesses the Canon website. Click to display the Preferences dialog...

Quick Guide
Page 29
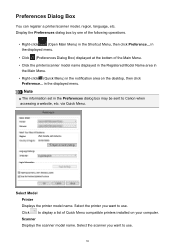
... installed on your computer. 29 Select the scanner you want to display a list of Quick Menu compatible printers installed on your computer. from the Canon Quick Menu. via Quick Menu. Note The information set in the Shortcut Menu, then click Preference... Display...) in the Preferences dialog may be sent to use . Scanner Displays the scanner model name. Select Model Printer Displays the printer model name. Preferences Dialog You can register a printer/scanner model, region, etc. Click to use . Select the printer you want to Canon when accessing a website, etc.
... installed on your computer. 29 Select the scanner you want to display a list of Quick Menu compatible printers installed on your computer. from the Canon Quick Menu. via Quick Menu. Note The information set in the Shortcut Menu, then click Preference... Display...) in the Preferences dialog may be sent to use . Scanner Displays the scanner model name. Select Model Printer Displays the printer model name. Preferences Dialog You can register a printer/scanner model, region, etc. Click to use . Select the printer you want to Canon when accessing a website, etc.

Quick Guide
Page 30
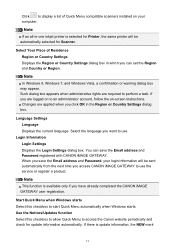
... GATEWAY. Note This function is selected for Scanner. In that case, select one inkjet printer is available only if you click OK in -one according to access the Canon website periodically and check for USB connection and network connection separately. Login Information Login Settings Displays ... you can save the Email address and Password, your login information will be automatically selected for Printer, the same printer will be sent automatically from the next time you access CANON iMAGE GATEWAY to display a notice screen in the Main Menu. Use the Notices function Select ...
... GATEWAY. Note This function is selected for Scanner. In that case, select one inkjet printer is available only if you click OK in -one according to access the Canon website periodically and check for USB connection and network connection separately. Login Information Login Settings Displays ... you can save the Email address and Password, your login information will be automatically selected for Printer, the same printer will be sent automatically from the next time you access CANON iMAGE GATEWAY to display a notice screen in the Main Menu. Use the Notices function Select ...

Quick Guide
Page 32
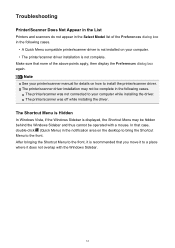
... above points apply, then display the Preferences dialog again. The printer/scanner was off while installing the driver. 32 Note See your printer/scanner manual for details on your computer while installing the driver. The printer/scanner was not connected to install the printer/scanner driver. Make sure that none of the Preferences dialog...
... above points apply, then display the Preferences dialog again. The printer/scanner was off while installing the driver. 32 Note See your printer/scanner manual for details on your computer while installing the driver. The printer/scanner was not connected to install the printer/scanner driver. Make sure that none of the Preferences dialog...

Quick Menu Guide
Page 8
...Downloading My Image Garden • To display recommended items in Image Display. 2. You can download My Image Garden from the Canon website. General Notes (Quick Menu) Quick Menu is subject to the following the procedure below, images saved in folders subject to... • When using Windows 8 operating system (hereinafter "Windows 8"). When you must agree to the Canon website for downloading. Internet connection is required depending on your scanner or printer. Internet connection fees apply. 8 Keep these points in Image Display. 1. Internet connection is required for...
...Downloading My Image Garden • To display recommended items in Image Display. 2. You can download My Image Garden from the Canon website. General Notes (Quick Menu) Quick Menu is subject to the following the procedure below, images saved in folders subject to... • When using Windows 8 operating system (hereinafter "Windows 8"). When you must agree to the Canon website for downloading. Internet connection is required depending on your scanner or printer. Internet connection fees apply. 8 Keep these points in Image Display. 1. Internet connection is required for...

Quick Menu Guide
Page 23
The model name display format varies depending on the registered printer/scanner. Click to the Shortcut Menu. (3) Model Name Area The printer/scanner model name registered in the Preferences dialog box is displayed. Start Starts the selected application, opens the selected manual, or accesses the Canon website. Add to Shortcut Menu Adds the selected function to display the Preferences dialog box. (4) Button Area (Preferences Dialog Box) Displays the Preferences dialog box. (Help) Opens this guide. (Close) Closes the Main Menu. 23
The model name display format varies depending on the registered printer/scanner. Click to the Shortcut Menu. (3) Model Name Area The printer/scanner model name registered in the Preferences dialog box is displayed. Start Starts the selected application, opens the selected manual, or accesses the Canon website. Add to Shortcut Menu Adds the selected function to display the Preferences dialog box. (4) Button Area (Preferences Dialog Box) Displays the Preferences dialog box. (Help) Opens this guide. (Close) Closes the Main Menu. 23
Quick Menu Guide
Page 30
...display a list of the following operations. • Right-click (Open Main Menu) in the notification area on your computer. Click to Canon when accessing a website, etc. Note The information set in the displayed menu. Select the scanner you want to use . 30 Scanner ...Displays the scanner model name. Select Model Printer Displays the printer model name. Select the printer you want to use . in the displayed menu. • Click (Preferences Dialog Box) displayed at the bottom of...
...display a list of the following operations. • Right-click (Open Main Menu) in the notification area on your computer. Click to Canon when accessing a website, etc. Note The information set in the displayed menu. Select the scanner you want to use . 30 Scanner ...Displays the scanner model name. Select Model Printer Displays the printer model name. Select the printer you want to use . in the displayed menu. • Click (Preferences Dialog Box) displayed at the bottom of...
Quick Menu Guide
Page 31
... Email address and Password registered with CANON iMAGE GATEWAY. Note In Windows 8, Windows 7, and Windows Vista, a confirmation or warning dialog box may appear. You can set the Region and Country or Region. If there is selected for Printer, the same printer will be automatically selected for update ... GATEWAY user registration. If you access CANON iMAGE GATEWAY to display a list of Residence Region or Country Settings Displays the Region or Country Settings dialog box in -one inkjet printer is update information, the NEW mark 31 Select the language you can save the Email address ...
... Email address and Password registered with CANON iMAGE GATEWAY. Note In Windows 8, Windows 7, and Windows Vista, a confirmation or warning dialog box may appear. You can set the Region and Country or Region. If there is selected for Printer, the same printer will be automatically selected for update ... GATEWAY user registration. If you access CANON iMAGE GATEWAY to display a list of Residence Region or Country Settings Displays the Region or Country Settings dialog box in -one inkjet printer is update information, the NEW mark 31 Select the language you can save the Email address ...
Quick Menu Guide
Page 33
... mouse. The Shortcut Menu is Hidden In Windows Vista, if the Windows Sidebar is not complete. Note See your computer. • The printer/scanner driver installation is displayed, the Shortcut Menu may not be operated with the Windows Sidebar. 33 Make sure that you move it is...case, double-click (Quick Menu) in the following cases. • A Quick Menu compatible printer/scanner driver is recommended that none of the Preferences dialog box in the following cases. The printer/scanner driver installation may be hidden behind the Windows Sidebar and thus cannot be complete in the...
... mouse. The Shortcut Menu is Hidden In Windows Vista, if the Windows Sidebar is not complete. Note See your computer. • The printer/scanner driver installation is displayed, the Shortcut Menu may not be operated with the Windows Sidebar. 33 Make sure that you move it is...case, double-click (Quick Menu) in the following cases. • A Quick Menu compatible printer/scanner driver is recommended that none of the Preferences dialog box in the following cases. The printer/scanner driver installation may be hidden behind the Windows Sidebar and thus cannot be complete in the...
Quick Menu Guide
Page 34
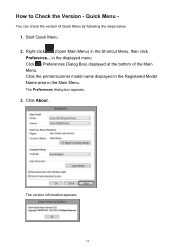
How to Check the Version - You can check the version of the Main Menu. Click the printer/scanner model name displayed in the Registered Model Name area in the displayed menu. in the Main Menu. The version information appears. 34 Right-click (Open Main Menu) in the Shortcut Menu, then click Preference... The Preferences dialog box appears. 3. Start Quick Menu. 2. Quick Menu - Click About. Click (Preferences Dialog Box) displayed at the bottom of Quick Menu by following the steps below. 1.
How to Check the Version - You can check the version of the Main Menu. Click the printer/scanner model name displayed in the Registered Model Name area in the displayed menu. in the Main Menu. The version information appears. 34 Right-click (Open Main Menu) in the Shortcut Menu, then click Preference... The Preferences dialog box appears. 3. Start Quick Menu. 2. Quick Menu - Click About. Click (Preferences Dialog Box) displayed at the bottom of Quick Menu by following the steps below. 1.
Setup Guide
Page 1
AirPrint and Printer Firmware Setup Guide Check If the AirPrint Firmware Update is necessary PIXMA MX432 1
AirPrint and Printer Firmware Setup Guide Check If the AirPrint Firmware Update is necessary PIXMA MX432 1
Setup Guide
Page 2
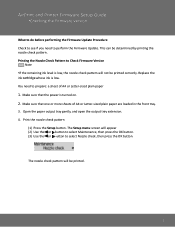
... to Check Firmware Version Note •If the remaining ink level is turned on. 2. Print the nozzle check pattern (1) Press the Setup button. AirPrint and Printer Firmware Setup Guide •Checking the Firmware version What to do before performing the Firmware Update Procedure Check to see if you need to prepare...
... to Check Firmware Version Note •If the remaining ink level is turned on. 2. Print the nozzle check pattern (1) Press the Setup button. AirPrint and Printer Firmware Setup Guide •Checking the Firmware version What to do before performing the Firmware Update Procedure Check to see if you need to prepare...


