Guide for Printer Setup for Network
Page 2
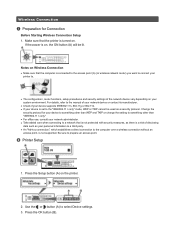
... for Connection Before Starting Wireless Connection Setup 1. Use the or button (A) to prepare an access point. Press the Setup button (A) on your printer to. • The configuration, router functions, setup procedures and security settings of your network device or contact its manufacturer. •... 802.11b. • If your device is connected to the access point (A) (or wireless network router) you want to the manual of the network device vary depending on the printer. 2. For details, refer to connect your system environment. Be sure to select Device settings. 3.
... for Connection Before Starting Wireless Connection Setup 1. Use the or button (A) to prepare an access point. Press the Setup button (A) on your printer to. • The configuration, router functions, setup procedures and security settings of your network device or contact its manufacturer. •... 802.11b. • If your device is connected to the access point (A) (or wireless network router) you want to the manual of the network device vary depending on the printer. 2. For details, refer to connect your system environment. Be sure to select Device settings. 3.
Guide for Printer Setup for Network
Page 4
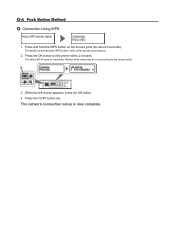
The (blue) Wi-Fi lamp on pressing the WPS button, refer to the access point. 3. When the left screen appears, press the OK button. 4. Press the OK button on the access point (for or connecting to the access point manual. 2. For details on the printer flashes while searching for about 5 seconds). The network connection setup is now complete. Press the COPY button (A). d-A Push Button Method d Connection Using WPS 1. Press and hold the WPS button on the printer within 2 minutes.
The (blue) Wi-Fi lamp on pressing the WPS button, refer to the access point. 3. When the left screen appears, press the OK button. 4. Press the OK button on the access point (for or connecting to the access point manual. 2. For details on the printer flashes while searching for about 5 seconds). The network connection setup is now complete. Press the COPY button (A). d-A Push Button Method d Connection Using WPS 1. Press and hold the WPS button on the printer within 2 minutes.
Guide for Printer Setup for Network
Page 5
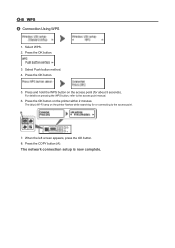
Select WPS. 2. Press the OK button on pressing the WPS button, refer to the access point. 7. The network connection setup is now complete. Press the OK button. 3. When the left screen appears, press the OK button. 8. Press the COPY button (A). Select Push button method. 4. Press the OK button. 5. For details on the printer within 2 minutes. The (blue) Wi-Fi lamp on the access point (for or connecting to the access point manual. 6. Press and hold the WPS button on the printer flashes while searching for about 5 seconds). d-B WPS d Connection Using WPS 1.
Select WPS. 2. Press the OK button on pressing the WPS button, refer to the access point. 7. The network connection setup is now complete. Press the OK button. 3. When the left screen appears, press the OK button. 8. Press the COPY button (A). Select Push button method. 4. Press the OK button. 5. For details on the printer within 2 minutes. The (blue) Wi-Fi lamp on the access point (for or connecting to the access point manual. 6. Press and hold the WPS button on the printer flashes while searching for about 5 seconds). d-B WPS d Connection Using WPS 1.
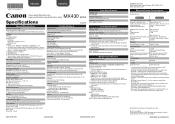
MX430 series Specifications
Page 1
...based on a computer with Windows 7, Windows Vista or Windows XP pre-installed. • Windows: Uninstall software bundled with the Canon inkjet printer before upgrading from Mac OS X 10.6 to the operating system's requirements when higher than those given here. Transfer speed (...complies with Windows Media Center. • Windows: Internet Explorer 7, 8 or 9 is fully upwardly compatible with Numeric buttons) Automatic redialing Manual redialing (max. 10 destinations) Others Activity report (after production of hard space may be changed without disk space may not be available ...
...based on a computer with Windows 7, Windows Vista or Windows XP pre-installed. • Windows: Uninstall software bundled with the Canon inkjet printer before upgrading from Mac OS X 10.6 to the operating system's requirements when higher than those given here. Transfer speed (...complies with Windows Media Center. • Windows: Internet Explorer 7, 8 or 9 is fully upwardly compatible with Numeric buttons) Automatic redialing Manual redialing (max. 10 destinations) Others Activity report (after production of hard space may be changed without disk space may not be available ...

MX430 series Especificaciones [Spanish Version]
Page 1
...dial (max. 19 destinations) Regular dialing (with Numeric buttons) Automatic redialing Manual redialing (max. 10 destinations) Others Activity report (after production of the machine has stopped. installation. ENGLISH ESPAÑOL CANON U.S.A. Specifications are subject to 0.04 inches/1 mm in height Other sizes: ...a computer with Windows 7, Windows Vista or Windows XP pre-installed. • Windows: Uninstall software bundled with the Canon inkjet printer before upgrading from Mac OS X 10.6 to Windows 7, then install the bundled software again. • Windows: Some functions may be...
...dial (max. 19 destinations) Regular dialing (with Numeric buttons) Automatic redialing Manual redialing (max. 10 destinations) Others Activity report (after production of the machine has stopped. installation. ENGLISH ESPAÑOL CANON U.S.A. Specifications are subject to 0.04 inches/1 mm in height Other sizes: ...a computer with Windows 7, Windows Vista or Windows XP pre-installed. • Windows: Uninstall software bundled with the Canon inkjet printer before upgrading from Mac OS X 10.6 to Windows 7, then install the bundled software again. • Windows: Some functions may be...

Quick Guide
Page 23
The model name display format varies depending on the registered printer/scanner. Add to Shortcut Menu Adds the selected function to display the Preferences dialog. (4) Button Area (Preferences Dialog) Displays the Preferences dialog. (Help) Opens... this guide. (Close) Closes the Main Menu. 23 Click to the Shortcut Menu. (3) Model Name Area The printer/scanner model name registered in the Preferences dialog is displayed. In addition, control-click a function icon to display a menu containing the following commands. Start Starts...
The model name display format varies depending on the registered printer/scanner. Add to Shortcut Menu Adds the selected function to display the Preferences dialog. (4) Button Area (Preferences Dialog) Displays the Preferences dialog. (Help) Opens... this guide. (Close) Closes the Main Menu. 23 Click to the Shortcut Menu. (3) Model Name Area The printer/scanner model name registered in the Preferences dialog is displayed. In addition, control-click a function icon to display a menu containing the following commands. Start Starts...

Quick Guide
Page 32
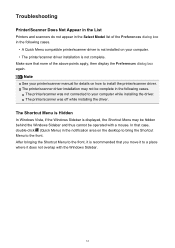
... not installed on how to your computer. • The printer/scanner driver installation is not complete. The printer/scanner was off while installing the driver. 32 The printer/scanner driver installation may not be complete in the following cases. Note See your printer/scanner manual for details on your computer while installing the driver. The...
... not installed on how to your computer. • The printer/scanner driver installation is not complete. The printer/scanner was off while installing the driver. 32 The printer/scanner driver installation may not be complete in the following cases. Note See your printer/scanner manual for details on your computer while installing the driver. The...

Quick Menu Guide
Page 23
Add to Shortcut Menu Adds the selected function to display the Preferences dialog box. (4) Button Area (Preferences Dialog Box) Displays the Preferences dialog box. (Help) Opens this guide. (Close) Closes the Main Menu. 23 Start Starts the selected application, opens the selected manual, or accesses the Canon website. The model name display format varies depending on the registered printer/scanner. Click to the Shortcut Menu. (3) Model Name Area The printer/scanner model name registered in the Preferences dialog box is displayed.
Add to Shortcut Menu Adds the selected function to display the Preferences dialog box. (4) Button Area (Preferences Dialog Box) Displays the Preferences dialog box. (Help) Opens this guide. (Close) Closes the Main Menu. 23 Start Starts the selected application, opens the selected manual, or accesses the Canon website. The model name display format varies depending on the registered printer/scanner. Click to the Shortcut Menu. (3) Model Name Area The printer/scanner model name registered in the Preferences dialog box is displayed.
Quick Menu Guide
Page 33
... display the Preferences dialog box again. The printer/scanner was off while installing the driver. The printer/scanner was not connected to install the printer/scanner driver. Note See your printer/scanner manual for details on how to your computer. • The printer/scanner driver installation is not complete. The ...move it to a place where it is displayed, the Shortcut Menu may not be operated with the Windows Sidebar. 33 The printer/scanner driver installation may be hidden behind the Windows Sidebar and thus cannot be complete in the following cases. In that none of...
... display the Preferences dialog box again. The printer/scanner was off while installing the driver. The printer/scanner was not connected to install the printer/scanner driver. Note See your printer/scanner manual for details on how to your computer. • The printer/scanner driver installation is not complete. The ...move it to a place where it is displayed, the Shortcut Menu may not be operated with the Windows Sidebar. 33 The printer/scanner driver installation may be hidden behind the Windows Sidebar and thus cannot be complete in the following cases. In that none of...


