

Getting Started
Page 3
..., remove all the orange tapes and the protective sheets. 12 3 4 5 6 7 8 □ Choosing a Location Color Black FINE cartridges power cord telephone line cable • Manuals • Setup CD-ROM (containing the drivers, applications and on-screen manuals) • Warranty • Do not install the machine where an object may fall into the Rear Tray...
..., remove all the orange tapes and the protective sheets. 12 3 4 5 6 7 8 □ Choosing a Location Color Black FINE cartridges power cord telephone line cable • Manuals • Setup CD-ROM (containing the drivers, applications and on-screen manuals) • Warranty • Do not install the machine where an object may fall into the Rear Tray...
Getting Started
Page 13
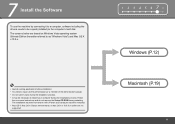
... Vista") and Mac OS X v.10.5.x. • Quit all running applications before installation. • You need to log on -screen instructions and do not remove the Setup CD-ROM during restarting. Follow the on as the administrator (or a member of the Administrators group). • Do not switch users during the installation process. • It...
... Vista") and Mac OS X v.10.5.x. • Quit all running applications before installation. • You need to log on -screen instructions and do not remove the Setup CD-ROM during restarting. Follow the on as the administrator (or a member of the Administrators group). • Do not switch users during the installation process. • It...
Getting Started
Page 14
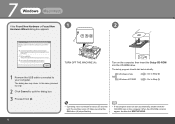
... appear, double-click MSETUP4.EXE. In this case, proceed from . 2 Click Cancel to Step . The setup program should start automatically, double-click the CD-ROM icon on the computer, then insert the Setup CD-ROM into the CD-ROM drive. 7 Windows Macintosh If the Found New Hardware or Found New 1 2 Hardware Wizard dialog box appears: A 1 Remove the USB...
... appear, double-click MSETUP4.EXE. In this case, proceed from . 2 Click Cancel to Step . The setup program should start automatically, double-click the CD-ROM icon on the computer, then insert the Setup CD-ROM into the CD-ROM drive. 7 Windows Macintosh If the Found New Hardware or Found New 1 2 Hardware Wizard dialog box appears: A 1 Remove the USB...
Getting Started
Page 20
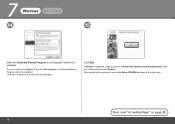
If Restart is displayed, make sure that the Restart the system now (recommended) check box is selected, then click Restart. Next, read "8 Loading Paper" on the machine's functionality.) Click Exit. After restarting the computer, remove the Setup CD-ROM and keep it in a safe place. If you can agree, click Agree. 7 Windows Macintosh 14 15 When the Extended Survey Program screen appears, confirm the message. If you click Do not agree, the Extended Survey Program will not be installed. (This has no effect on page 24! 18
If Restart is displayed, make sure that the Restart the system now (recommended) check box is selected, then click Restart. Next, read "8 Loading Paper" on the machine's functionality.) Click Exit. After restarting the computer, remove the Setup CD-ROM and keep it in a safe place. If you can agree, click Agree. 7 Windows Macintosh 14 15 When the Extended Survey Program screen appears, confirm the message. If you click Do not agree, the Extended Survey Program will not be installed. (This has no effect on page 24! 18

Getting Started
Page 21
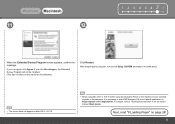
Make sure the machine is located on the back center of the machine. 19 7 Windows Macintosh 1 2 1 2 3 4 5 678 3 Connect the machine to the computer with a USB cable. Turn on . Double-click the Setup icon. If the CD-ROM folder does not open automatically, double-click the CANON_IJ icon on the desktop. • The USB port is turned on the computer, then insert the Setup CD-ROM into the CDROM drive.
Make sure the machine is located on the back center of the machine. 19 7 Windows Macintosh 1 2 1 2 3 4 5 678 3 Connect the machine to the computer with a USB cable. Turn on . Double-click the Setup icon. If the CD-ROM folder does not open automatically, double-click the CANON_IJ icon on the desktop. • The USB port is turned on the computer, then insert the Setup CD-ROM into the CDROM drive.
Getting Started
Page 25
After restarting the computer, remove the Setup CD-ROM and keep it is necessary to the computer, it in the on Image Capture under Applications. Next, read "8 Loading Paper" on the machine's functionality.) Click ...
After restarting the computer, remove the Setup CD-ROM and keep it is necessary to the computer, it in the on Image Capture under Applications. Next, read "8 Loading Paper" on the machine's functionality.) Click ...


