
Getting Started
Page 3
..., remove all the orange tapes and the protective sheets. 12 3 4 5 6 7 8 □ Choosing a Location Color Black FINE cartridges power cord telephone line cable • Manuals • Setup CD-ROM (containing the drivers, applications and on-screen manuals) • Warranty • Do not install the machine where an object may fall on the Document Cover.
..., remove all the orange tapes and the protective sheets. 12 3 4 5 6 7 8 □ Choosing a Location Color Black FINE cartridges power cord telephone line cable • Manuals • Setup CD-ROM (containing the drivers, applications and on-screen manuals) • Warranty • Do not install the machine where an object may fall on the Document Cover.

Getting Started
Page 13
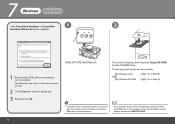
... Vista") and Mac OS X v.10.5.x. • Quit all running applications before installation. • You need to log on -screen instructions and do not remove the Setup CD-ROM during the installation process. 7 Install the Software To use the machine by connecting it left off when your computer during restarting. The installation resumes from...
... Vista") and Mac OS X v.10.5.x. • Quit all running applications before installation. • You need to log on -screen instructions and do not remove the Setup CD-ROM during the installation process. 7 Install the Software To use the machine by connecting it left off when your computer during restarting. The installation resumes from...
Getting Started
Page 14
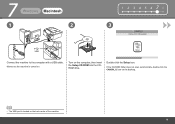
... to quit the dialog box. 3 Proceed from . 12 TURN OFF THE MACHINE (A). When the CD-ROM contents appear, double-click MSETUP4.EXE. The setup program should start automatically, double-click the CD-ROM icon on the computer, then insert the Setup CD-ROM into the CD-ROM drive. In this case, proceed from . 2 Click Cancel to Step . The dialog box...
... to quit the dialog box. 3 Proceed from . 12 TURN OFF THE MACHINE (A). When the CD-ROM contents appear, double-click MSETUP4.EXE. The setup program should start automatically, double-click the CD-ROM icon on the computer, then insert the Setup CD-ROM into the CD-ROM drive. In this case, proceed from . 2 Click Cancel to Step . The dialog box...

Getting Started
Page 20
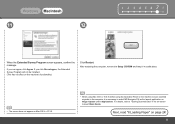
Next, read "8 Loading Paper" on the machine's functionality.) Click Exit. After restarting the computer, remove the Setup CD-ROM and keep it in a safe place. If you can agree, click Agree. If Restart is displayed, make sure that the Restart the system now (recommended) check box is selected, then click Restart. If you click Do not agree, the Extended Survey Program will not be installed. (This has no effect on page 24! 18 7 Windows Macintosh 14 15 When the Extended Survey Program screen appears, confirm the message.
Next, read "8 Loading Paper" on the machine's functionality.) Click Exit. After restarting the computer, remove the Setup CD-ROM and keep it in a safe place. If you can agree, click Agree. If Restart is displayed, make sure that the Restart the system now (recommended) check box is selected, then click Restart. If you click Do not agree, the Extended Survey Program will not be installed. (This has no effect on page 24! 18 7 Windows Macintosh 14 15 When the Extended Survey Program screen appears, confirm the message.
Getting Started
Page 21
Double-click the Setup icon. Make sure the machine is located on the back center of the machine. 19 Turn on . If the CD-ROM folder does not open automatically, double-click the CANON_IJ icon on the desktop. • The USB port is turned on the computer, then insert the Setup CD-ROM into the CDROM drive. 7 Windows Macintosh 1 2 1 2 3 4 5 678 3 Connect the machine to the computer with a USB cable.
Double-click the Setup icon. Make sure the machine is located on the back center of the machine. 19 Turn on . If the CD-ROM folder does not open automatically, double-click the CANON_IJ icon on the desktop. • The USB port is turned on the computer, then insert the Setup CD-ROM into the CDROM drive. 7 Windows Macintosh 1 2 1 2 3 4 5 678 3 Connect the machine to the computer with a USB cable.
Getting Started
Page 25
... to save scanned originals to select MP Navigator EX as the launch application on the machine's functionality.) Click Restart. After restarting the computer, remove the Setup CD-ROM and keep it is necessary to the computer, it in the on page 24! 23 Next, read "8 Loading Paper" on -screen manual: Basic Guide. If...
... to save scanned originals to select MP Navigator EX as the launch application on the machine's functionality.) Click Restart. After restarting the computer, remove the Setup CD-ROM and keep it is necessary to the computer, it in the on page 24! 23 Next, read "8 Loading Paper" on -screen manual: Basic Guide. If...
On-Screen Manual
Page 47
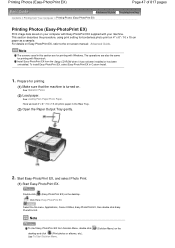
... menu, Applications, Canon Utilities, Easy-PhotoPrint EX, then double-click EasyPhotoPrint EX. See Operation Panel. (2) Load paper. Here we load 4" x 6" / 10 x 15 cm photo paper in Custom Install. 1. Start Easy-PhotoPrint EX, and select Photo Print. (1) Start Easy-PhotoPrint EX. Note To start Easy-PhotoPrint EX from the Setup CD-ROM when it has...
... menu, Applications, Canon Utilities, Easy-PhotoPrint EX, then double-click EasyPhotoPrint EX. See Operation Panel. (2) Load paper. Here we load 4" x 6" / 10 x 15 cm photo paper in Custom Install. 1. Start Easy-PhotoPrint EX, and select Photo Print. (1) Start Easy-PhotoPrint EX. Note To start Easy-PhotoPrint EX from the Setup CD-ROM when it has...
On-Screen Manual
Page 82
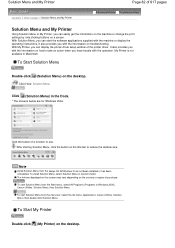
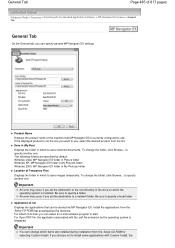
...Solution Menu from the Start menu, select All Programs (Programs in Macintosh. To start Solution Menu from the menu bar, select the Go menu, Applications, Canon Utilities, Solution Menu, then double-click Solution Menu. To install Solution Menu, select Solution Menu in the Dock. * The screens below are for Windows... Printer) on the country or region of purchase. Click Here: Solution Menu Click (Solution Menu) in Custom Install. To start Solution Menu from the Setup CD-ROM when it has not been installed or has been uninstalled. It also provides you can display the printer driver...
...Solution Menu from the Start menu, select All Programs (Programs in Macintosh. To start Solution Menu from the menu bar, select the Go menu, Applications, Canon Utilities, Solution Menu, then double-click Solution Menu. To install Solution Menu, select Solution Menu in the Dock. * The screens below are for Windows... Printer) on the country or region of purchase. Click Here: Solution Menu Click (Solution Menu) in Custom Install. To start Solution Menu from the Setup CD-ROM when it has not been installed or has been uninstalled. It also provides you can display the printer driver...
On-Screen Manual
Page 83
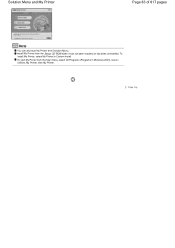
Install My Printer from Solution Menu. Page top To install My Printer, select My Printer in Windows 2000), Canon Utilities, My Printer, then My Printer. Solution Menu and My Printer Page 83 of 817 pages Note You can also start My Printer from the Start menu, select All Programs (Programs in Custom Install. To start My Printer from the Setup CD-ROM when it has not been installed or has been uninstalled.
Install My Printer from Solution Menu. Page top To install My Printer, select My Printer in Windows 2000), Canon Utilities, My Printer, then My Printer. Solution Menu and My Printer Page 83 of 817 pages Note You can also start My Printer from the Start menu, select All Programs (Programs in Custom Install. To start My Printer from the Setup CD-ROM when it has not been installed or has been uninstalled.
On-Screen Manual
Page 92
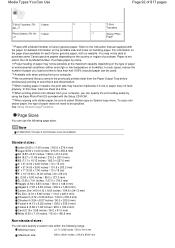
...Using Various Copy Functions . You may not feed properly. Paper is Canon genuine paper. Page Sizes You can also specify a custom size within the following page sizes. T-Shirt Transfers -*7 Glossy Photo Paper *1 Paper with the Setup CD-ROM. *7 When copying onto sticker paper, be specified. For information on...case, load one sheet at a time. *6 When printing photos onto stickers from your computer, you can be able to purchase some Canon genuine papers depending on the page sizes available for detailed information on the printable side and notes on the type of paper does not...
...Using Various Copy Functions . You may not feed properly. Paper is Canon genuine paper. Page Sizes You can also specify a custom size within the following page sizes. T-Shirt Transfers -*7 Glossy Photo Paper *1 Paper with the Setup CD-ROM. *7 When copying onto sticker paper, be specified. For information on...case, load one sheet at a time. *6 When printing photos onto stickers from your computer, you can be able to purchase some Canon genuine papers depending on the page sizes available for detailed information on the printable side and notes on the type of paper does not...

On-Screen Manual
Page 297
...and Contrast settings, and then click OK. 8. If no ICC profiles are installed on the Main tab. You can install ICC profiles from the Setup CD-ROM that accompanies the machine. 7. Related Topics Selecting a Combination of 817 pages becomes invalid. Set the other items If necessary, click Color Adjustment tab..., and adjust the color balance of the selected image data. When you execute print, the data is not displayed. Complete the setup Click OK on your computer, Adobe RGB (1998) is printed with ICC Profiles Page 297 of the Print Quality Level and a Halftoning ...
...and Contrast settings, and then click OK. 8. If no ICC profiles are installed on the Main tab. You can install ICC profiles from the Setup CD-ROM that accompanies the machine. 7. Related Topics Selecting a Combination of 817 pages becomes invalid. Set the other items If necessary, click Color Adjustment tab..., and adjust the color balance of the selected image data. When you execute print, the data is not displayed. Complete the setup Click OK on your computer, Adobe RGB (1998) is printed with ICC Profiles Page 297 of the Print Quality Level and a Halftoning ...
On-Screen Manual
Page 485
... one . Be sure to specify a local folder. Important You can specify general MP Navigator EX settings. The following folders are installed during installation from the Setup CD-ROM that accompanies the machine. Important An error may occur if you can change which to start. Install the applications from the...
... one . Be sure to specify a local folder. Important You can specify general MP Navigator EX settings. The following folders are installed during installation from the Setup CD-ROM that accompanies the machine. Important An error may occur if you can change which to start. Install the applications from the...

On-Screen Manual
Page 711
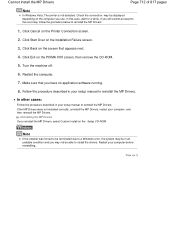
...contact the service center. Restart your computer. If the icon is a problem with the Setup CD-ROM. If you are unable to proceed beyond the Printer Connection screen: If you are displayed. Double-click the CD-ROM icon on the desktop. 2. If other discs are displayed, double-click MSETUP4.EXE....Drivers If the installation does not start installation. If the contents of the CD-ROM are displayed, there is still not displayed, try the following the procedure below to start even after the Setup CD-ROM is not displayed, try different discs and see if they are unable to...
...contact the service center. Restart your computer. If the icon is a problem with the Setup CD-ROM. If you are unable to proceed beyond the Printer Connection screen: If you are displayed. Double-click the CD-ROM icon on the desktop. 2. If other discs are displayed, double-click MSETUP4.EXE....Drivers If the installation does not start installation. If the contents of the CD-ROM are displayed, there is still not displayed, try the following the procedure below to start even after the Setup CD-ROM is not displayed, try different discs and see if they are unable to...
On-Screen Manual
Page 712
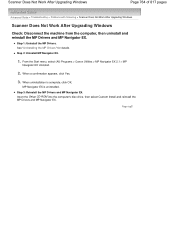
Click Start Over on the Setup CD-ROM. Restart the computer. 7. In other cases: Follow the procedure described in an unstable condition and you may not...the system may be in your setup manual to install the drivers. Cannot Install the MP Drivers Page 712 of 817 pages Note In Windows Vista, The printer is not detected. may be displayed depending on the PIXMA XXX screen, then remove the CD-ROM. 5. Make sure that appears ...the procedure below to reinstall the MP Drivers. Turn the machine off. 6. Follow the procedure described in your setup manual to reinstall the MP Drivers. 1.
Click Start Over on the Setup CD-ROM. Restart the computer. 7. In other cases: Follow the procedure described in an unstable condition and you may not...the system may be in your setup manual to install the drivers. Cannot Install the MP Drivers Page 712 of 817 pages Note In Windows Vista, The printer is not detected. may be displayed depending on the PIXMA XXX screen, then remove the CD-ROM. 5. Make sure that appears ...the procedure below to reinstall the MP Drivers. Turn the machine off. 6. Follow the procedure described in your setup manual to reinstall the MP Drivers. 1.
On-Screen Manual
Page 755
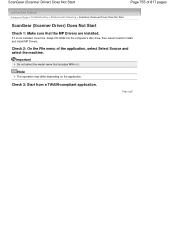
... > ScanGear (Scanner Driver) Does Not Start ScanGear (Scanner Driver) Does Not Start Check 1: Make sure that includes WIA in it is not installed, insert the Setup CD-ROM into the computer's disc drive, then select Custom Install and install MP Drivers. Page top If it . Note The operation may differ depending on the...
... > ScanGear (Scanner Driver) Does Not Start ScanGear (Scanner Driver) Does Not Start Check 1: Make sure that includes WIA in it is not installed, insert the Setup CD-ROM into the computer's disc drive, then select Custom Install and install MP Drivers. Page top If it . Note The operation may differ depending on the...
On-Screen Manual
Page 756
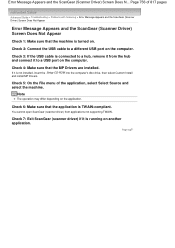
... (scanner driver) if it is connected to a different USB port on the application. Page top Check 3: If the USB cable is not installed, insert the Setup CD-ROM into the computer's disc drive, then select Custom Install and install MP Drivers. Check 2: Connect the USB cable to a hub, remove it from applications not...
... (scanner driver) if it is connected to a different USB port on the application. Page top Check 3: If the USB cable is not installed, insert the Setup CD-ROM into the computer's disc drive, then select Custom Install and install MP Drivers. Check 2: Connect the USB cable to a hub, remove it from applications not...
On-Screen Manual
Page 764
... is uninstalled. From the Start menu, select (All) Programs > Canon Utilities > MP Navigator EX 2.1 > MP Navigator EX Uninstall. 2. Step 1: Uninstall the MP Drivers. When a confirmation appears, click Yes. 3. MP Navigator EX is complete, click OK. Step 2: Uninstall MP Navigator EX. 1. Insert the Setup CD-ROM into the computer's disc drive, then select Custom Install...
... is uninstalled. From the Start menu, select (All) Programs > Canon Utilities > MP Navigator EX 2.1 > MP Navigator EX Uninstall. 2. Step 1: Uninstall the MP Drivers. When a confirmation appears, click Yes. 3. MP Navigator EX is complete, click OK. Step 2: Uninstall MP Navigator EX. 1. Insert the Setup CD-ROM into the computer's disc drive, then select Custom Install...
On-Screen Manual
Page 807
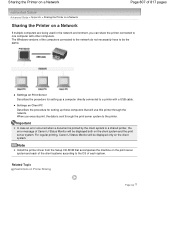
... Status Monitor will use this printer through the print server system to a shared printer, the error message of Canon IJ Status Monitor will be the same. Settings on Client PC Describes the procedure for setting up those computers that accompanies the machine on the ... and the print server system. When you can share the printer connected to one computer with a USB cable. Note Install the printer driver from the Setup CD-ROM that will be displayed only on Printer Sharing Page top Important In case an error occurred when a document is sent through the network.
... Status Monitor will use this printer through the print server system to a shared printer, the error message of Canon IJ Status Monitor will be the same. Settings on Client PC Describes the procedure for setting up those computers that accompanies the machine on the ... and the print server system. When you can share the printer connected to one computer with a USB cable. Note Install the printer driver from the Setup CD-ROM that will be displayed only on Printer Sharing Page top Important In case an error occurred when a document is sent through the network.
On-Screen Manual
Page 809
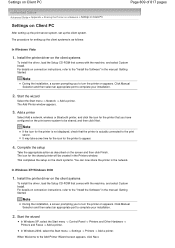
...that comes with the machine, and select Custom Install. Install the printer driver on the client systems To install the driver, load the Setup CD-ROM that you have configured on the print server system to complete your installation. 2. Start the wizard In Windows XP, select the Start ... the wizard Select the Start menu -> Network -> Add a printer. For details on the client systems To install the driver, load the Setup CD-ROM that the printer is actually connected to the "Install the Software" in the Printers window. Install the printer driver on connection instructions, refer to...
...that comes with the machine, and select Custom Install. Install the printer driver on the client systems To install the driver, load the Setup CD-ROM that you have configured on the print server system to complete your installation. 2. Start the wizard In Windows XP, select the Start ... the wizard Select the Start menu -> Network -> Add a printer. For details on the client systems To install the driver, load the Setup CD-ROM that the printer is actually connected to the "Install the Software" in the Printers window. Install the printer driver on connection instructions, refer to...
On-Screen Manual
Page 816
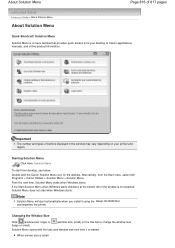
... window size Solution Menu opens with the last used window size next time it using the Setup CD-ROM that provides quick access from your printer and region. Double-click the Canon Solution Menu icon on your desktop to Canon applications, manuals, and online product information. Alternatively, from desktop, see below. About Solution Menu Page...
... window size Solution Menu opens with the last used window size next time it using the Setup CD-ROM that provides quick access from your printer and region. Double-click the Canon Solution Menu icon on your desktop to Canon applications, manuals, and online product information. Alternatively, from desktop, see below. About Solution Menu Page...


