MX300 series Quick Start Guide
Page 5
... 92 Problems Receiving Faxes 92 Problems Sending Faxes 94 Telephone Problems 95 Appendix 96 How to Use the Documentation Provided..... 96 Reading the On-screen Manuals 97 Specifications 98 Safety Precautions 102 Legal Limitations on Use of Your Product and Use of Images 105...
... 92 Problems Receiving Faxes 92 Problems Sending Faxes 94 Telephone Problems 95 Appendix 96 How to Use the Documentation Provided..... 96 Reading the On-screen Manuals 97 Specifications 98 Safety Precautions 102 Legal Limitations on Use of Your Product and Use of Images 105...
MX300 series Quick Start Guide
Page 8
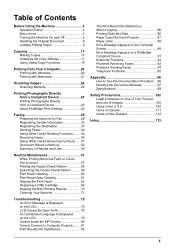
... 72) BOTTOM CLEANING (page 73) 4 Before Using the Machine z Direct Printing mode is displayed only when a PictBridge compliant device is connected to the User's Guide on-screen manual. Menu Items Press the Menu button to display the menu items. You can specify the special copy settings, various fax settings, or perform the...
... 72) BOTTOM CLEANING (page 73) 4 Before Using the Machine z Direct Printing mode is displayed only when a PictBridge compliant device is connected to the User's Guide on-screen manual. Menu Items Press the Menu button to display the menu items. You can specify the special copy settings, various fax settings, or perform the...
MX300 series Quick Start Guide
Page 9
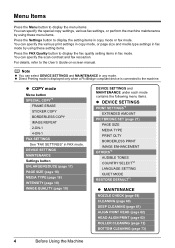
...52) PRINT MEMORY LIST PRINT DOCUMENT DELETE DOCUMENT PRNT REPORT/LIST (page 55) ACTIVITY REPORT SPEED DIAL LIST USER'S DATA LIST MEMORY LIST CODED DIAL REGIST (page 37) USER SETTINGS (page 32) DATE/TIME SETTING DATE DISPLAY*1 SUMMER TIME SET*2 UNIT TEL NUMBER UNIT NAME TX TERMINAL...page 41) z SCAN mode Menu button DEVICE SETTINGS MAINTENANCE z Direct Printing mode Menu button DEVICE SETTINGS MAINTENANCE *1 For details, refer to the User's Guide on-screen manual. *2 This setting may not be available depending on the country or region of purchase. *3 US and Canada only. Before Using the Machine...
...52) PRINT MEMORY LIST PRINT DOCUMENT DELETE DOCUMENT PRNT REPORT/LIST (page 55) ACTIVITY REPORT SPEED DIAL LIST USER'S DATA LIST MEMORY LIST CODED DIAL REGIST (page 37) USER SETTINGS (page 32) DATE/TIME SETTING DATE DISPLAY*1 SUMMER TIME SET*2 UNIT TEL NUMBER UNIT NAME TX TERMINAL...page 41) z SCAN mode Menu button DEVICE SETTINGS MAINTENANCE z Direct Printing mode Menu button DEVICE SETTINGS MAINTENANCE *1 For details, refer to the User's Guide on-screen manual. *2 This setting may not be available depending on the country or region of purchase. *3 US and Canada only. Before Using the Machine...
MX300 series Quick Start Guide
Page 12
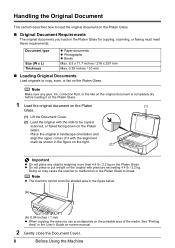
z Do not press or put weight on the original with the alignment mark as shown in the User's Guide on the printable area of it on the Platen Glass. 1 Load the original document on the Platen (1) Glass. (1) Lift the Document Cover. (2) Load the ... section describes how to load the original document on the Platen Glass. „ Original Document Requirements The original documents you can scan depends on -screen manual. 2 Gently close the Document Cover. 8 Before Using the Machine
z Do not press or put weight on the original with the alignment mark as shown in the User's Guide on the printable area of it on the Platen Glass. 1 Load the original document on the Platen (1) Glass. (1) Lift the Document Cover. (2) Load the ... section describes how to load the original document on the Platen Glass. „ Original Document Requirements The original documents you can scan depends on -screen manual. 2 Gently close the Document Cover. 8 Before Using the Machine
MX300 series Quick Start Guide
Page 14
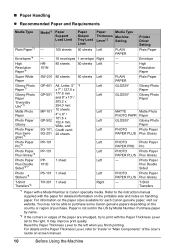
..." of the User's Guide on the country or region of the paper are smudged, try to the right. Refer to the instruction manual supplied with the Paper Thickness Lever set to print with the paper for each Canon genuine paper, visit our website. Paper is Canon specialty media. ...PAPER PLUS Plus Glossy Photo Paper Plus Double Sided*4*7 PP101D 1 sheet Left - It may not be able to purchase some Canon genuine papers depending on -screen manual. 10 Before Using the Machine „ Paper Handling z Recommended Paper and Requirements Media Type Plain Paper*3 Envelopes*4 Model*1 Paper...
..." of the User's Guide on the country or region of the paper are smudged, try to the right. Refer to the instruction manual supplied with the Paper Thickness Lever set to print with the paper for each Canon genuine paper, visit our website. Paper is Canon specialty media. ...PAPER PLUS Plus Glossy Photo Paper Plus Double Sided*4*7 PP101D 1 sheet Left - It may not be able to purchase some Canon genuine papers depending on -screen manual. 10 Before Using the Machine „ Paper Handling z Recommended Paper and Requirements Media Type Plain Paper*3 Envelopes*4 Model*1 Paper...
MX300 series Quick Start Guide
Page 15
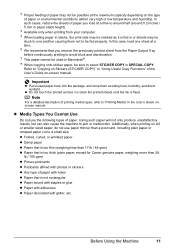
... Damp paper z Paper that is too thin (weighing less than 17 lb / 64 gsm) z Paper that is too thick (plain paper, except for Canon genuine paper, weighing more than a post card, including plain paper or notepad paper cut to select STICKER COPY in SPECIAL COPY. Additionally, when printing on... the previously printed sheet from your computer. *5 When loading paper in stacks, the print side may be marked as it is fed in the User's Guide onscreen manual. z Media Types You Cannot Use Do not use paper thinner than 28 lb / 105 gsm) z Picture postcards z Postcards affixed with photos or ...
... Damp paper z Paper that is too thin (weighing less than 17 lb / 64 gsm) z Paper that is too thick (plain paper, except for Canon genuine paper, weighing more than a post card, including plain paper or notepad paper cut to select STICKER COPY in SPECIAL COPY. Additionally, when printing on... the previously printed sheet from your computer. *5 When loading paper in stacks, the print side may be marked as it is fed in the User's Guide onscreen manual. z Media Types You Cannot Use Do not use paper thinner than 28 lb / 105 gsm) z Picture postcards z Postcards affixed with photos or ...
MX300 series Quick Start Guide
Page 17
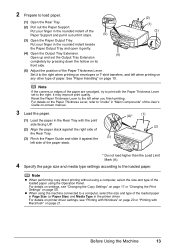
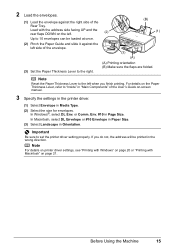
It may improve print quality. Reset the Paper Thickness Lever to "Inside" in "Main Components" of the User's Guide on-screen manual. 3 Load the paper. (1) Load the paper in the printer driver. For details on the Paper Thickness Lever, refer to the left when printing on any ...
It may improve print quality. Reset the Paper Thickness Lever to "Inside" in "Main Components" of the User's Guide on-screen manual. 3 Load the paper. (1) Load the paper in the printer driver. For details on the Paper Thickness Lever, refer to the left when printing on any ...
MX300 series Quick Start Guide
Page 19
... Thickness Lever, refer to "Inside" in Media Type. (2) Select the size for envelopes. Load with Macintosh" on -screen manual. 3 Specify the settings in the printer driver. (1) Select Envelope in "Main Components" of the User's Guide on page 21. In Macintosh, select DL Envelope or #10 Envelope in Paper Size. (3) Select Landscape in...
... Thickness Lever, refer to "Inside" in Media Type. (2) Select the size for envelopes. Load with Macintosh" on -screen manual. 3 Specify the settings in the printer driver. (1) Select Envelope in "Main Components" of the User's Guide on page 21. In Macintosh, select DL Envelope or #10 Envelope in Paper Size. (3) Select Landscape in...

MX300 series Quick Start Guide
Page 21
... page 6. 2 Press the COPY button. 3 Load paper. Ex: 1.ENLARGE/REDUCE PRESET RATIO PRESET RATIO / ZOOM / FIT-TO-PAGE Copying 17 z The settings of the User's Guide onscreen manual. Press the Settings button repeatedly to switch the item to set. Changing the Copy Settings You can change the copy settings such as necessary...
... page 6. 2 Press the COPY button. 3 Load paper. Ex: 1.ENLARGE/REDUCE PRESET RATIO PRESET RATIO / ZOOM / FIT-TO-PAGE Copying 17 z The settings of the User's Guide onscreen manual. Press the Settings button repeatedly to switch the item to set. Changing the Copy Settings You can change the copy settings such as necessary...
MX300 series Quick Start Guide
Page 23
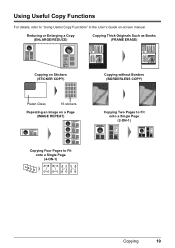
Using Useful Copy Functions For details, refer to Fit onto a Single Page (4-ON-1) Copying 19 Reducing or Enlarging a Copy (ENLARGE/REDUCE) Copying Thick Originals Such as Books (FRAME ERASE) Copying on Stickers (STICKER COPY) Platen Glass 16 stickers Repeating an Image on a Page (IMAGE REPEAT) Copying without Borders (BORDERLESS COPY) Copying Two Pages to Fit onto a Single Page (2-ON-1) Copying Four Pages to "Using Useful Copy Functions" in the User's Guide on-screen manual.
Using Useful Copy Functions For details, refer to Fit onto a Single Page (4-ON-1) Copying 19 Reducing or Enlarging a Copy (ENLARGE/REDUCE) Copying Thick Originals Such as Books (FRAME ERASE) Copying on Stickers (STICKER COPY) Platen Glass 16 stickers Repeating an Image on a Page (IMAGE REPEAT) Copying without Borders (BORDERLESS COPY) Copying Two Pages to Fit onto a Single Page (2-ON-1) Copying Four Pages to "Using Useful Copy Functions" in the User's Guide on-screen manual.
MX300 series Quick Start Guide
Page 26
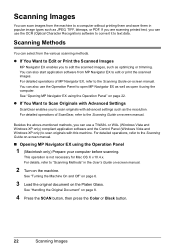
...as optimizing or trimming. Scanning Images You can scan images from the machine to a computer without printing them and save them in the User's Guide on-screen manual. 2 Turn on the machine. You can select from MP Navigator EX to edit or print the scanned images. For detailed operations ... it using the computer. Scanning Methods You can also use the OCR (Optical Character Recognition) software to the Scanning Guide on-screen manual. For detailed operations, refer to scan originals with this machine. Besides the above-mentioned methods, you to the Scanning Guide on-screen...
...as optimizing or trimming. Scanning Images You can scan images from the machine to a computer without printing them and save them in the User's Guide on-screen manual. 2 Turn on the machine. You can select from MP Navigator EX to edit or print the scanned images. For detailed operations ... it using the computer. Scanning Methods You can also use the OCR (Optical Character Recognition) software to the Scanning Guide on-screen manual. For detailed operations, refer to scan originals with this machine. Besides the above-mentioned methods, you to the Scanning Guide on-screen...
MX300 series Quick Start Guide
Page 34
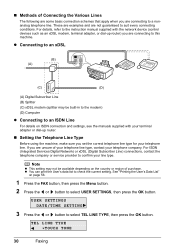
...you set the correct telephone line type for your terminal adapter or dial-up router) you are connecting to a nonanalog telephone line. See "Printing the User's Data List" on page 56. 1 Press the FAX button, then press the Menu button. 2 Press the [ or ] button to suit every... connecting conditions. For details, refer to the instruction manual supplied with your telephone line. „ Methods of Connecting the Various Lines The following are some basic connection schemes that apply when you are connecting...
...you set the correct telephone line type for your terminal adapter or dial-up router) you are connecting to a nonanalog telephone line. See "Printing the User's Data List" on page 56. 1 Press the FAX button, then press the Menu button. 2 Press the [ or ] button to suit every... connecting conditions. For details, refer to the instruction manual supplied with your telephone line. „ Methods of Connecting the Various Lines The following are some basic connection schemes that apply when you are connecting...
MX300 series Quick Start Guide
Page 36
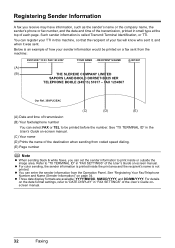
... fax/telephone number You can select FAX or TEL to "DATE DISPLAY" in "FAX SETTINGS" of the User's Guide on-screen manual. For details on -screen manual. (C) Your name (D) Prints the name of the destination when sending from coded speed dialing. (E) Page ...know who sent it, and when it was sent. Below is not printed. See "TX TERMINAL ID" in the User's Guide on the date format settings, refer to be printed on page 34. z Three date display formats are ... can set the sender information to "TX TERMINAL ID" in "FAX SETTINGS" of the User's Guide onscreen manual. 32 Faxing
... fax/telephone number You can select FAX or TEL to "DATE DISPLAY" in "FAX SETTINGS" of the User's Guide on-screen manual. For details on -screen manual. (C) Your name (D) Prints the name of the destination when sending from coded speed dialing. (E) Page ...know who sent it, and when it was sent. Below is not printed. See "TX TERMINAL ID" in the User's Guide on the date format settings, refer to be printed on page 34. z Three date display formats are ... can set the sender information to "TX TERMINAL ID" in "FAX SETTINGS" of the User's Guide onscreen manual. 32 Faxing
MX300 series Quick Start Guide
Page 38
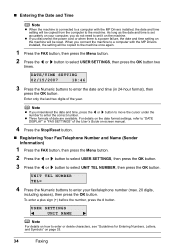
...misentered the date and time, press the [ or ] button to move the cursor under the number to enter the correct number. For details on -screen manual. 4 Press the Stop/Reset button. „ Registering Your Fax/Telephone Number and Name (Sender Information) 1 Press the FAX button, then press the Menu... button. 2 Press the [ or ] button to select USER SETTINGS, then press the OK button. 3 Press the [ or ] button to select UNIT TEL NUMBER, then press the OK button. „ Entering the Date...
...misentered the date and time, press the [ or ] button to move the cursor under the number to enter the correct number. For details on -screen manual. 4 Press the Stop/Reset button. „ Registering Your Fax/Telephone Number and Name (Sender Information) 1 Press the FAX button, then press the Menu... button. 2 Press the [ or ] button to select USER SETTINGS, then press the OK button. 3 Press the [ or ] button to select UNIT TEL NUMBER, then press the OK button. „ Entering the Date...

MX300 series Quick Start Guide
Page 48
...; Sending/Receiving Using ECM This machine is enabled, transmission speed may slow down depending on -screen manual. For details, refer to send/receive faxes in "FAX SETTINGS" of the User's Guide on the line or connection conditions. 44 Faxing ECM automatically corrects errors caused by connection troubles, cross-checking the sending and...
...; Sending/Receiving Using ECM This machine is enabled, transmission speed may slow down depending on -screen manual. For details, refer to send/receive faxes in "FAX SETTINGS" of the User's Guide on the line or connection conditions. 44 Faxing ECM automatically corrects errors caused by connection troubles, cross-checking the sending and...

MX300 series Quick Start Guide
Page 51
The entire message should be set the receiving mode of the User's Guide on -screen manual. z If you have subscribed to Duplex Ringing service in "FAX SETTINGS" of the machine to TEL PRIORITY MODE. Refer to "FAX PRIORITY MODE" in Hong ... will be modified to control how the machine handles incoming calls. z If You Are Using a Single Telephone Line for a specified length of the User's Guide on -screen manual. If you set to receive faxes automatically after the specified ring time has elapsed Faxing 47 Important When answering a voice call will ring. z The...
The entire message should be set the receiving mode of the User's Guide on -screen manual. z If you have subscribed to Duplex Ringing service in "FAX SETTINGS" of the machine to TEL PRIORITY MODE. Refer to "FAX PRIORITY MODE" in Hong ... will be modified to control how the machine handles incoming calls. z If You Are Using a Single Telephone Line for a specified length of the User's Guide on -screen manual. If you set to receive faxes automatically after the specified ring time has elapsed Faxing 47 Important When answering a voice call will ring. z The...

MX300 series Quick Start Guide
Page 52
... answer the call. (C) Fax: The fax is received automatically when the machine detects the registered fax ring pattern. Note For details on -screen manual. Contact your telephone company. Pick up the handset to a Distinctive Ring Pattern Detection (DRPD) Service with Your Telephone Company (US and Canada only...pattern assigned by your telephone company for details. 48 Faxing Pick up the handset to "DRPD:FAX RNG PAT" in "FAX SETTINGS" of the User's Guide on the setting the ring pattern of this feature, you order the DRPD service. z If You Subscribe to answer the call. (C)...
... answer the call. (C) Fax: The fax is received automatically when the machine detects the registered fax ring pattern. Note For details on -screen manual. Contact your telephone company. Pick up the handset to a Distinctive Ring Pattern Detection (DRPD) Service with Your Telephone Company (US and Canada only...pattern assigned by your telephone company for details. 48 Faxing Pick up the handset to "DRPD:FAX RNG PAT" in "FAX SETTINGS" of the User's Guide on the setting the ring pattern of this feature, you order the DRPD service. z If You Subscribe to answer the call. (C)...
MX300 series Quick Start Guide
Page 55
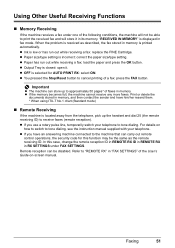
... When the problem is low or has run out while receiving a fax: load the paper and press the OK button. For details on -screen manual. Remote reception can store up the handset and dial 25 (the remote receiving ID) to receive faxes (remote reception). z You pressed the Stop/Reset... button to cancel printing of the User's Guide on how to switch to tone dialing, see the instruction manual supplied with your telephone to tone dialing. z OFF is closed: open it in RX SETTINGS under FAX SETTINGS. z ...
... When the problem is low or has run out while receiving a fax: load the paper and press the OK button. For details on -screen manual. Remote reception can store up the handset and dial 25 (the remote receiving ID) to receive faxes (remote reception). z You pressed the Stop/Reset... button to cancel printing of the User's Guide on how to switch to tone dialing, see the instruction manual supplied with your telephone to tone dialing. z OFF is closed: open it in RX SETTINGS under FAX SETTINGS. z ...

MX300 series Quick Start Guide
Page 59
...See "User's Data List" on page 52. If enabled, prints after each fax reception. See "RX Report" on page 56. „ Activity Report Prints the history of the machine and the registered sender information. You can be printed from the machine. z Printing the Activity Report Manually 1 Press... press the OK button. 3 Press the [ or ] button to "ACTIVITY REPORT" in "FAX SETTINGS" of the Registered Destination" on -screen manual. Faxing 55 See "Document Stored in the machine's memory. The machine is printed. Refer to print an Activity report after each fax transmission. Coded...
...See "User's Data List" on page 52. If enabled, prints after each fax reception. See "RX Report" on page 56. „ Activity Report Prints the history of the machine and the registered sender information. You can be printed from the machine. z Printing the Activity Report Manually 1 Press... press the OK button. 3 Press the [ or ] button to "ACTIVITY REPORT" in "FAX SETTINGS" of the Registered Destination" on -screen manual. Faxing 55 See "Document Stored in the machine's memory. The machine is printed. Refer to print an Activity report after each fax transmission. Coded...
MX300 series Quick Start Guide
Page 60
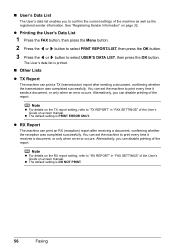
..., you can set the machine to print every time it receives a document, or only when an error occurs. See "Registering Sender Information" on -screen manual. z Printing the User's Data List 1 Press the FAX button, then press the Menu button. 2 Press the [ or ] button to select PRNT REPORT/LIST, then press the OK...
..., you can set the machine to print every time it receives a document, or only when an error occurs. See "Registering Sender Information" on -screen manual. z Printing the User's Data List 1 Press the FAX button, then press the Menu button. 2 Press the [ or ] button to select PRNT REPORT/LIST, then press the OK...


