MultiPASS MP370/360 Software Guide
Page 1
... dialog box) Setting the paper type and print quality/[Main] tab Setting page size and number of the machine with the WIA driver (Windows XP only) Faxing (Fax model only) Go To P.108 Click! Sending a fax Registering or editing a recipient in the Address Book Contents About... this guide, MP360/ MP370 is referred to as the "machine," and MP390 as a print profile/[Profiles] tab Cleaning and machine settings/[Maintenance] tab Checking the status...
... dialog box) Setting the paper type and print quality/[Main] tab Setting page size and number of the machine with the WIA driver (Windows XP only) Faxing (Fax model only) Go To P.108 Click! Sending a fax Registering or editing a recipient in the Address Book Contents About... this guide, MP360/ MP370 is referred to as the "machine," and MP390 as a print profile/[Profiles] tab Cleaning and machine settings/[Maintenance] tab Checking the status...
MultiPASS MP370/360 Software Guide
Page 2
... pages 79 Scanning two or more small documents at one time 82 Setting preferences and scanning with ScanGear MP 87 Scanning with the WIA driver (Windows XP only 106 4: Faxing (Fax model only)....... 109 Sending a fax 109 Registering or editing a recipient in the Address Book 114 5: Troubleshooting 122 Problems outputting 122...
... pages 79 Scanning two or more small documents at one time 82 Setting preferences and scanning with ScanGear MP 87 Scanning with the WIA driver (Windows XP only 106 4: Faxing (Fax model only)....... 109 Sending a fax 109 Registering or editing a recipient in the Address Book 114 5: Troubleshooting 122 Problems outputting 122...

MultiPASS MP370/360 Software Guide
Page 3
... respective owners. 1 For example, Windows 2000/XP stands for reference or supplementary information. Control Panel operations in Windows XP appear in this guide, but if necessary Windows 2000/ Me/98 dialog boxes are the property of Canon Inc. OmniPage is a registered trademark... is used . NOTE Indicates items for Windows 2000 and Windows XP. All rights reserved. Symbols used in this guide. [ ] Dialog box and window names, items in whole or part, without the prior written consent of Canon Inc. Microsoft, Windows, Exchange, Outlook, and Outlook Express are...
... respective owners. 1 For example, Windows 2000/XP stands for reference or supplementary information. Control Panel operations in Windows XP appear in this guide, but if necessary Windows 2000/ Me/98 dialog boxes are the property of Canon Inc. OmniPage is a registered trademark... is used . NOTE Indicates items for Windows 2000 and Windows XP. All rights reserved. Symbols used in this guide. [ ] Dialog box and window names, items in whole or part, without the prior written consent of Canon Inc. Microsoft, Windows, Exchange, Outlook, and Outlook Express are...

MultiPASS MP370/360 Software Guide
Page 4
... operating system: Microsoft®Word: Windows 98 Windows Me Windows 2000 Windows XP Word The information described in this guide is subject to ensure that this guide is free of this guide, product and model names are abbreviated as we are constantly improving our products, if you need an exact specification, please contact Canon. Canon Inc.
... operating system: Microsoft®Word: Windows 98 Windows Me Windows 2000 Windows XP Word The information described in this guide is subject to ensure that this guide is free of this guide, product and model names are abbreviated as we are constantly improving our products, if you need an exact specification, please contact Canon. Canon Inc.

MultiPASS MP370/360 Software Guide
Page 6
...or more (150 MB or more recommended) MP Drivers: 50 MB or more MP Toolbox: 15 MB or more recommended) NOTE • Canon cannot guarantee the performance with all computers standard-equipped with a USB2.0 Hi-Speed interface. For the most up-to a computer equipped with ... To use it as a USB Full-Speed (USB1.1-equivalent) interface. 4 Use a cable supporting USB 2.0. Operating system Microsoft Windows 2000 Professional (Service Pack 4 or later) Microsoft Windows XP Professional/Home Edition (Service Pack 1 or later) CPU Pentium/Celeron 566 MHz processor or higher Required RAM 128 MB or...
...or more (150 MB or more recommended) MP Drivers: 50 MB or more MP Toolbox: 15 MB or more recommended) NOTE • Canon cannot guarantee the performance with all computers standard-equipped with a USB2.0 Hi-Speed interface. For the most up-to a computer equipped with ... To use it as a USB Full-Speed (USB1.1-equivalent) interface. 4 Use a cable supporting USB 2.0. Operating system Microsoft Windows 2000 Professional (Service Pack 4 or later) Microsoft Windows XP Professional/Home Edition (Service Pack 1 or later) CPU Pentium/Celeron 566 MHz processor or higher Required RAM 128 MB or...

MultiPASS MP370/360 Software Guide
Page 7
...Full-Speed (USB 1.1 equivalent) In order to use the Full-Speed mode, the machine must have User privileges or greater. When using Windows 2000/XP When installing, you must be connected to a computer equipped with a standard USB Full-Speed interface. For how to the ... images to obtain them, please consult Microsoft. Operating system CPU Microsoft Windows 98 Microsoft Windows Me Microsoft Windows 2000 Professional (Service Pack 1 or later) Pentium/Celeron 233 MHz processor or higher Microsoft Windows XP Pentium/Celeron 300 MHz Professional/Home Edition processor or higher Required...
...Full-Speed (USB 1.1 equivalent) In order to use the Full-Speed mode, the machine must have User privileges or greater. When using Windows 2000/XP When installing, you must be connected to a computer equipped with a standard USB Full-Speed interface. For how to the ... images to obtain them, please consult Microsoft. Operating system CPU Microsoft Windows 98 Microsoft Windows Me Microsoft Windows 2000 Professional (Service Pack 1 or later) Pentium/Celeron 233 MHz processor or higher Microsoft Windows XP Pentium/Celeron 300 MHz Professional/Home Edition processor or higher Required...
MultiPASS MP370/360 Software Guide
Page 8
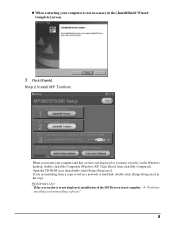
screen appears. NOTE If there is a copy of the MultiPASS Suite software installed on your computer, delete this version before installing the new version. • When installing the software in Windows 2000/XP, you are currently running. 4 Insert the Setup CD-ROM into your disk drive. Install ...disk, double-click [Setup (Setup.exe)] in the [Setup] screen. [Setup] screen If this screen is not displayed, on the Windows desktop, double-click [My Computer] (Windows XP: Click [Start], then click [My Computer]). IMPORTANT • Do not install the software on the network drive. • ...
screen appears. NOTE If there is a copy of the MultiPASS Suite software installed on your computer, delete this version before installing the new version. • When installing the software in Windows 2000/XP, you are currently running. 4 Insert the Setup CD-ROM into your disk drive. Install ...disk, double-click [Setup (Setup.exe)] in the [Setup] screen. [Setup] screen If this screen is not displayed, on the Windows desktop, double-click [My Computer] (Windows XP: Click [Start], then click [My Computer]). IMPORTANT • Do not install the software on the network drive. • ...
MultiPASS MP370/360 Software Guide
Page 10
... installing and uninstalling software" 8 z When restarting your computer and this screen is not displayed or you are installing from a copy saved on the Windows desktop, double-click [My Computer] (Windows XP: Click [Start], then click [My Computer]). If you have closed it, on a network or hard disk, double-click [Setup (Setup.exe...
... installing and uninstalling software" 8 z When restarting your computer and this screen is not displayed or you are installing from a copy saved on the Windows desktop, double-click [My Computer] (Windows XP: Click [Start], then click [My Computer]). If you have closed it, on a network or hard disk, double-click [Setup (Setup.exe...
MultiPASS MP370/360 Software Guide
Page 14
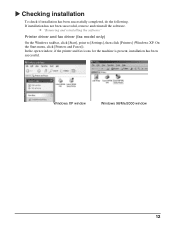
X Checking installation To check if installation has been successfully completed, do the following. J "Removing and reinstalling the software" Printer driver and fax driver (fax model only) On the Windows taskbar, click [Start], point to [Settings], then click [Printers] (Windows XP: On the Start menu, click [Printers and Faxes]). Windows XP window Windows 98/Me/2000 window 12 If installation has not been successful, remove and reinstall the software. In the open window, if the printer and fax icons for the machine is present, installation has been successful.
X Checking installation To check if installation has been successfully completed, do the following. J "Removing and reinstalling the software" Printer driver and fax driver (fax model only) On the Windows taskbar, click [Start], point to [Settings], then click [Printers] (Windows XP: On the Start menu, click [Printers and Faxes]). Windows XP window Windows 98/Me/2000 window 12 If installation has not been successful, remove and reinstall the software. In the open window, if the printer and fax icons for the machine is present, installation has been successful.
MultiPASS MP370/360 Software Guide
Page 15
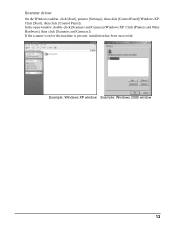
If the scanner icon for the machine is present, installation has been successful. Example: Windows XP window Example: Windows 2000 window 13 Scanner driver On the Windows taskbar, click [Start], point to [Settings], then click [Control Panel](Windows XP: Click [Start], then click [Control Panel]). In the open window, double-click [Scanners and Cameras](Windows XP: Click [Printers and Other Hardware], then click [Scanners and Cameras]).
If the scanner icon for the machine is present, installation has been successful. Example: Windows XP window Example: Windows 2000 window 13 Scanner driver On the Windows taskbar, click [Start], point to [Settings], then click [Control Panel](Windows XP: Click [Start], then click [Control Panel]). In the open window, double-click [Scanners and Cameras](Windows XP: Click [Printers and Other Hardware], then click [Scanners and Cameras]).
MultiPASS MP370/360 Software Guide
Page 16
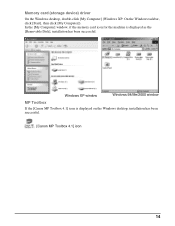
Memory card (storage device) driver On the Windows desktop, double-click [My Computer] (Windows XP: On the Windows taskbar, click [Start], then click [My Computer]). Windows XP window Windows 98/Me/2000 window MP Toolbox If the [Canon MP Toolbox 4.1] icon is displayed as the [Removable Disk], installation has been successful. In the [My Computer] window, if the memory card icon for the machine is displayed on the Windows desktop, installation has been successful. [Canon MP Toolbox 4.1] icon 14
Memory card (storage device) driver On the Windows desktop, double-click [My Computer] (Windows XP: On the Windows taskbar, click [Start], then click [My Computer]). Windows XP window Windows 98/Me/2000 window MP Toolbox If the [Canon MP Toolbox 4.1] icon is displayed as the [Removable Disk], installation has been successful. In the [My Computer] window, if the memory card icon for the machine is displayed on the Windows desktop, installation has been successful. [Canon MP Toolbox 4.1] icon 14
MultiPASS MP370/360 Software Guide
Page 17
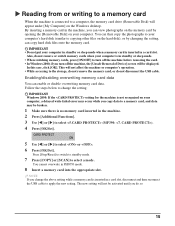
...in standby or sleep mode. • When switching memory cards, press [ON/OFF] to turn off the machine before removing the card. • In Windows 2000, if you turn off the machine, the [Unsafe Removal of Device] screen will not affect the machine or computer's operation. • While accessing ...not remove the memory card, or do not disconnect the USB cable. NOTE If you change the setting: IMPORTANT Windows 2000: If the setting for the machine is not recognized on the Windows desktop. Follow the steps below to change the above setting while a memory card is inserted in the machine. ...
...in standby or sleep mode. • When switching memory cards, press [ON/OFF] to turn off the machine before removing the card. • In Windows 2000, if you turn off the machine, the [Unsafe Removal of Device] screen will not affect the machine or computer's operation. • While accessing ...not remove the memory card, or do not disconnect the USB cable. NOTE If you change the setting: IMPORTANT Windows 2000: If the setting for the machine is not recognized on the Windows desktop. Follow the steps below to change the above setting while a memory card is inserted in the machine. ...
MultiPASS MP370/360 Software Guide
Page 18
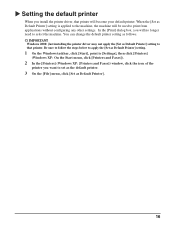
... steps below to apply the [Set as Default Printer] setting. 1 On the Windows taskbar, click [Start], point to [Settings], then click [Printers] (Windows XP: On the Start menu, click [Printers and Faxes]). 2 In the [Printers] (Windows XP: [Printers and Faxes]) window, click the icon of the printer you will no longer need to set..., click [Set as Default Printer] setting is applied to print from applications without configuring any other settings. When the [Set as Default Printer]. 16 IMPORTANT Windows 2000: Just installing the printer driver may not apply the [Set as follows.
... steps below to apply the [Set as Default Printer] setting. 1 On the Windows taskbar, click [Start], point to [Settings], then click [Printers] (Windows XP: On the Start menu, click [Printers and Faxes]). 2 In the [Printers] (Windows XP: [Printers and Faxes]) window, click the icon of the printer you will no longer need to set..., click [Set as Default Printer] setting is applied to print from applications without configuring any other settings. When the [Set as Default Printer]. 16 IMPORTANT Windows 2000: Just installing the printer driver may not apply the [Set as follows.

MultiPASS MP370/360 Software Guide
Page 19
...remove them. To remove the MP Toolbox 1 Quit all of the open applications, including virus checkers. 2 On the Windows taskbar, click [Start], point to [(All) Programs], [Canon], then [MP Drivers]. Then click [Uninstall Toolbox]. 3 Follow the on the computer as an Administrator, or have ...Click [X] at the upper-right of Device] screen appears. If a message appears confirming whether to delete.], select the machine ([MP370 Series], [MP360 Series], or [MP390 Series]), then click [Perform]. Click [OK]. IMPORTANT If you restarted your computer in order. To reinstall the software ...
...remove them. To remove the MP Toolbox 1 Quit all of the open applications, including virus checkers. 2 On the Windows taskbar, click [Start], point to [(All) Programs], [Canon], then [MP Drivers]. Then click [Uninstall Toolbox]. 3 Follow the on the computer as an Administrator, or have ...Click [X] at the upper-right of Device] screen appears. If a message appears confirming whether to delete.], select the machine ([MP370 Series], [MP360 Series], or [MP390 Series]), then click [Perform]. Click [OK]. IMPORTANT If you restarted your computer in order. To reinstall the software ...
MultiPASS MP370/360 Software Guide
Page 20
... printing 30 Poster printing ...31 Duplex printing ...34 Duplex printing and binding a document into a booklet (Booklet printing 32 Setting background printing (Windows 98/Me only 35 Selecting a stamp/[Stamp/Background] tab 36 Creating or changing a stamp 37 Specifying the text and color of a text stamp... (Windows 2000/XP 38 Specifying an image for a graphic stamp (Windows 2000/XP 39 Specifying the text and color of a stamp (Windows 98/Me 40 Changing the placement and rotation of a stamp 42 To change the ...
... printing 30 Poster printing ...31 Duplex printing ...34 Duplex printing and binding a document into a booklet (Booklet printing 32 Setting background printing (Windows 98/Me only 35 Selecting a stamp/[Stamp/Background] tab 36 Creating or changing a stamp 37 Specifying the text and color of a text stamp... (Windows 2000/XP 38 Specifying an image for a graphic stamp (Windows 2000/XP 39 Specifying the text and color of a stamp (Windows 98/Me 40 Changing the placement and rotation of a stamp 42 To change the ...
MultiPASS MP370/360 Software Guide
Page 21
2 Aligning the print head 54 Printing the nozzle check pattern 56 Resetting the ink counter 57 Setting for slow-drying paper (Custom Settings 58 Controlling operating noise (Quiet Mode 59 Checking the status of the machine with the BJ Status Monitor 60 To start the BJ Status Monitor 60 To cancel printing...61 To display a list of printing jobs 62 Sharing the printer and using it on a network 63 Setting up the printer for sharing 63 Installing the printer driver on a client system 63 Sharing the printer in Windows 2000/XP 64
2 Aligning the print head 54 Printing the nozzle check pattern 56 Resetting the ink counter 57 Setting for slow-drying paper (Custom Settings 58 Controlling operating noise (Quiet Mode 59 Checking the status of the machine with the BJ Status Monitor 60 To start the BJ Status Monitor 60 To cancel printing...61 To display a list of printing jobs 62 Sharing the printer and using it on a network 63 Setting up the printer for sharing 63 Installing the printer driver on a client system 63 Sharing the printer in Windows 2000/XP 64
MultiPASS MP370/360 Software Guide
Page 24
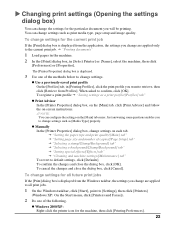
...media type, page setup and image quality. J "Setting the paper type and print quality/[Main] tab" J "Setting page size and number of the following. z Windows 2000/XP: Right-click the printer icon for the current print job If the [Print] dialog box is displayed from the...want to retrieve, then click [Retrieve from the application, the settings you change settings for all print jobs. 1 On the Windows taskbar, click [Start], point to [Settings], then click [Printers] (Windows XP: On the Start menu, click [Printers and Faxes]). 2 Do one of the methods below to change the settings for...
...media type, page setup and image quality. J "Setting the paper type and print quality/[Main] tab" J "Setting page size and number of the following. z Windows 2000/XP: Right-click the printer icon for the current print job If the [Print] dialog box is displayed from the...want to retrieve, then click [Retrieve from the application, the settings you change settings for all print jobs. 1 On the Windows taskbar, click [Start], point to [Settings], then click [Printers] (Windows XP: On the Start menu, click [Printers and Faxes]). 2 Do one of the methods below to change the settings for...
MultiPASS MP370/360 Software Guide
Page 25
... page size and number of the methods below to default settings, click [Defaults]. To confirm the changes and close the dialog box, click [Cancel]. 23 z Windows 98/Me: Right-click the printer icon for the machine, then click [Properties]. When asked to retrieve, then click [Retrieve from Profiles].
... page size and number of the methods below to default settings, click [Defaults]. To confirm the changes and close the dialog box, click [Cancel]. 23 z Windows 98/Me: Right-click the printer icon for the machine, then click [Properties]. When asked to retrieve, then click [Retrieve from Profiles].
MultiPASS MP370/360 Software Guide
Page 28
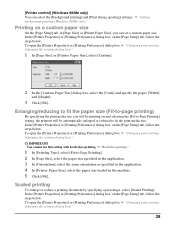
...], then click [Set]. 2 In the [Manual Color Adjustment] dialog box, move the sliders to activate the color correction function built into Windows. Dithering is not printed properly (in a fixed pattern. In the photograph and illustration at the upper left or right to adjust color balance... to be selected. The following changes are made . Diffusion creates halftones by arranging image pixels randomly. z [Reduce spool data size] (Windows 2000/XP only) You can roughly check the changes made in the [Printer Properties] or [Printing Preferences] dialog box, on the application...
...], then click [Set]. 2 In the [Manual Color Adjustment] dialog box, move the sliders to activate the color correction function built into Windows. Dithering is not printed properly (in a fixed pattern. In the photograph and illustration at the upper left or right to adjust color balance... to be selected. The following changes are made . Diffusion creates halftones by arranging image pixels randomly. z [Reduce spool data size] (Windows 2000/XP only) You can roughly check the changes made in the [Printer Properties] or [Printing Preferences] dialog box, on the application...
MultiPASS MP370/360 Software Guide
Page 31
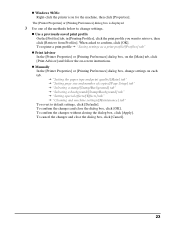
... Size], select [Custom]. 2 In the [Custom Paper Size] dialog box, select the [Units] and specify the paper [Width] and [Height]. 3 Click [OK]. J "Setting background printing (Windows 98/Me only)" Printing on a custom paper size On the [Page Setup] tab, in [Page Size] or [Printer Paper Size], you will be automatically enlarged...], select the same orientation as specified in the application. 4 In [Printer Paper Size], select the paper size loaded in the machine. 5 Click [OK]. [Printer control] (Windows 98/Me only) You can set a custom paper size.
... Size], select [Custom]. 2 In the [Custom Paper Size] dialog box, select the [Units] and specify the paper [Width] and [Height]. 3 Click [OK]. J "Setting background printing (Windows 98/Me only)" Printing on a custom paper size On the [Page Setup] tab, in [Page Size] or [Printer Paper Size], you will be automatically enlarged...], select the same orientation as specified in the application. 4 In [Printer Paper Size], select the paper size loaded in the machine. 5 Click [OK]. [Printer control] (Windows 98/Me only) You can set a custom paper size.


