MX700 series Quick Start Guide
Page 5
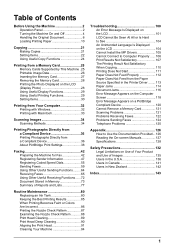
...Summary of Reports and Lists 77 Routine Maintenance 80 Replacing an Ink Tank 80 Keeping the Best Printing Results 85 When Printing Becomes Faint or Colors Are Incorrect 86 Printing the Nozzle Check Pattern 87 Examining the Nozzle Check Pattern ...........88 Print Head Cleaning 89 Print Head Deep Cleaning 90 ...Problems Receiving Faxes 122 Problems Sending Faxes 124 Telephone Problems 125 Appendix 126 How to Use the Documentation Provided... 126 Reading the On-screen Manuals 127 Specifications 128 Safety Precautions 132 Legal Limitations on Use of Your Product and Use of Images 135...
...Summary of Reports and Lists 77 Routine Maintenance 80 Replacing an Ink Tank 80 Keeping the Best Printing Results 85 When Printing Becomes Faint or Colors Are Incorrect 86 Printing the Nozzle Check Pattern 87 Examining the Nozzle Check Pattern ...........88 Print Head Cleaning 89 Print Head Deep Cleaning 90 ...Problems Receiving Faxes 122 Problems Sending Faxes 124 Telephone Problems 125 Appendix 126 How to Use the Documentation Provided... 126 Reading the On-screen Manuals 127 Specifications 128 Safety Precautions 132 Legal Limitations on Use of Your Product and Use of Images 135...
MX700 series Quick Start Guide
Page 11
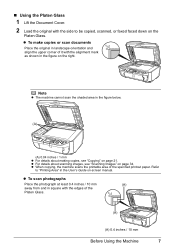
„ Using the Platen Glass 1 Lift the Document Cover. 2 Load the original with the side to "Printing Area" in the User's Guide on-screen manual. z To make copies or scan documents Place the original in the figure on the Platen Glass. Refer to be copied, scanned, or faxed faced down ...
„ Using the Platen Glass 1 Lift the Document Cover. 2 Load the original with the side to "Printing Area" in the User's Guide on-screen manual. z To make copies or scan documents Place the original in the figure on the Platen Glass. Refer to be copied, scanned, or faxed faced down ...

MX700 series Quick Start Guide
Page 16
...be used in Macintosh®. *8 When copying onto sticker paper, be sure to select Sticker Copy in "Using Useful Copy Functions" of the User's Guide on -screen manual. Important z Put unused paper back into the package, and store them not to jam or malfunction. Additionally, when printing on Stickers (Sticker Copy... z Damp paper z Paper that is too thin (weighing less than 17 lb / 64 gsm) z Paper that is too thick (plain paper, except for Canon genuine paper, weighing more than a post card, including plain paper or notepad paper cut to "Copying on A5 or smaller sized paper, do not use...
...be used in Macintosh®. *8 When copying onto sticker paper, be sure to select Sticker Copy in "Using Useful Copy Functions" of the User's Guide on -screen manual. Important z Put unused paper back into the package, and store them not to jam or malfunction. Additionally, when printing on Stickers (Sticker Copy... z Damp paper z Paper that is too thin (weighing less than 17 lb / 64 gsm) z Paper that is too thick (plain paper, except for Canon genuine paper, weighing more than a post card, including plain paper or notepad paper cut to "Copying on A5 or smaller sized paper, do not use...
MX700 series Quick Start Guide
Page 26
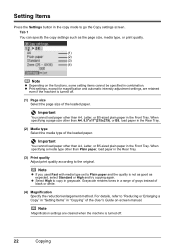
... as good as the page size, media type, or print quality. (1) (2) (3) (4) Note z Depending on -screen manual. Note Magnification settings are retained even if the machine is turned off . (1) Page size Select the page size of the User's Guide on the functions, some setting items cannot be specified in combination. z Print settings, except...
... as good as the page size, media type, or print quality. (1) (2) (3) (4) Note z Depending on -screen manual. Note Magnification settings are retained even if the machine is turned off . (1) Page size Select the page size of the User's Guide on the functions, some setting items cannot be specified in combination. z Print settings, except...
MX700 series Quick Start Guide
Page 28
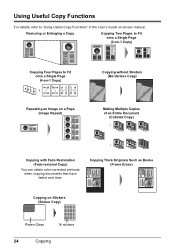
... Copying Two Pages to Fit onto a Single Page (2-on-1 Copy) Copying Four Pages to "Using Useful Copy Functions" in the User's Guide on-screen manual. Copying Thick Originals Such as Books (Frame Erase) Copying on a Page (Image Repeat) Copying without Borders (Borderless Copy) Making Multiple... Copies of an Entire Document (Collated Copy) Copying with Fade Restoration (Fade-restored Copy) You can obtain color-corrected printouts ...
... Copying Two Pages to Fit onto a Single Page (2-on-1 Copy) Copying Four Pages to "Using Useful Copy Functions" in the User's Guide on-screen manual. Copying Thick Originals Such as Books (Frame Erase) Copying on a Page (Image Repeat) Copying without Borders (Borderless Copy) Making Multiple... Copies of an Entire Document (Collated Copy) Copying with Fade Restoration (Fade-restored Copy) You can obtain color-corrected printouts ...
MX700 series Quick Start Guide
Page 39
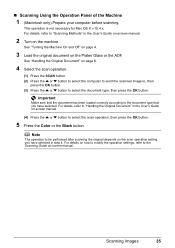
...to send the scanned image to, then press the OK button. (3) Press the { or } button to "Scanning Methods" in the User's Guide on-screen manual. 2 Turn on -screen manual. Note The operation to the document type that the document has been loaded correctly according to be performed after scanning the original...on-screen manual. (4) Press the { or } button to the Scanning Guide on the machine. See "Turning the Machine On and Off" on page 4. 3 Load the original document on how to modify the operation settings, refer to select the scan operation, then press the OK button. 5 Press the Color or ...
...to send the scanned image to, then press the OK button. (3) Press the { or } button to "Scanning Methods" in the User's Guide on-screen manual. 2 Turn on -screen manual. Note The operation to the document type that the document has been loaded correctly according to be performed after scanning the original...on-screen manual. (4) Press the { or } button to the Scanning Guide on the machine. See "Turning the Machine On and Off" on page 4. 3 Load the original document on how to modify the operation settings, refer to select the scan operation, then press the OK button. 5 Press the Color or ...

MX700 series Quick Start Guide
Page 51
...8226;BOOLE•DORSET•BH25 8ER TELEPHONE BOOLE (945 13) 51617 - z Three date display formats are available. For details on -screen manual. You can set the sender information to "TTI position" in "Device Settings" of the number. Refer to "TTI position" in "Device Settings... & white, you can select FAX or TEL to "Date display" in "Device Settings" of the User's Guide on the date format settings, refer to be displayed in front of the User's Guide on-screen manual. z For color sending, the sender information is called Transmit Terminal Identification, or TTI.
...8226;BOOLE•DORSET•BH25 8ER TELEPHONE BOOLE (945 13) 51617 - z Three date display formats are available. For details on -screen manual. You can set the sender information to "TTI position" in "Device Settings" of the number. Refer to "TTI position" in "Device Settings... & white, you can select FAX or TEL to "Date display" in "Device Settings" of the User's Guide on the date format settings, refer to be displayed in front of the User's Guide on-screen manual. z For color sending, the sender information is called Transmit Terminal Identification, or TTI.
MX700 series Quick Start Guide
Page 53
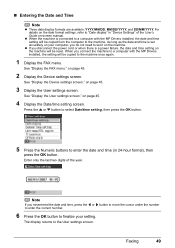
..., the setting will be copied to "Date display" in 24-hour format), then press the OK button. See "Display the User settings screen." For details on -screen manual. on the machine will be reset. „ Entering the Date and Time Note z Three date display formats are available: YYYY.../MM/DD, MM/DD/YYYY, and DD/MM/YYYY. z When the machine is a power failure, the date and time setting on page 45. 3 Display the User settings...
..., the setting will be copied to "Date display" in 24-hour format), then press the OK button. See "Display the User settings screen." For details on -screen manual. on the machine will be reset. „ Entering the Date and Time Note z Three date display formats are available: YYYY.../MM/DD, MM/DD/YYYY, and DD/MM/YYYY. z When the machine is a power failure, the date and time setting on page 45. 3 Display the User settings...
MX700 series Quick Start Guide
Page 68
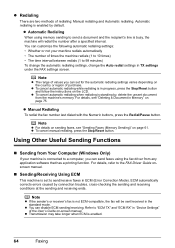
... number last dialed with the Numeric buttons, press the Redial/Pause button. Refer to send/receive faxes in "Device Settings" of redialing: Manual redialing and Automatic redialing. Automatic redialing is in Memory" on page 75. For details, see "Sending Faxes (Memory Sending)" on page...is not ECM-compatible, the fax will redial the number after a specified interval. z Redialing There are two methods of the User's Guide on-screen manual. Using Other Useful Sending Functions „ Sending from Your Computer (Windows Only) If your machine redials automatically • The ...
... number last dialed with the Numeric buttons, press the Redial/Pause button. Refer to send/receive faxes in "Device Settings" of redialing: Manual redialing and Automatic redialing. Automatic redialing is in Memory" on page 75. For details, see "Sending Faxes (Memory Sending)" on page...is not ECM-compatible, the fax will redial the number after a specified interval. z Redialing There are two methods of the User's Guide on-screen manual. Using Other Useful Sending Functions „ Sending from Your Computer (Windows Only) If your machine redials automatically • The ...
MX700 series Quick Start Guide
Page 71
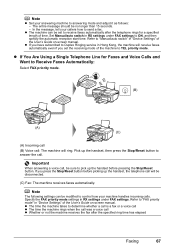
.... Refer to ON, and then specify the automatic reception start time. Note z Set your answering machine to "Manual/auto switch" in "Device Settings" of the User's Guide on -screen manual. Refer to answering mode and adjust it as follows: - If you set to determine whether a call is ... you have subscribed to Duplex Ringing service in RX settings under FAX settings to "FAX priority mode" in "Device Settings" of the User's Guide on -screen manual. z The machine can be modified to TEL priority mode. Note The following settings can be disconnected. (C) Fax: The machine receives...
.... Refer to ON, and then specify the automatic reception start time. Note z Set your answering machine to "Manual/auto switch" in "Device Settings" of the User's Guide on -screen manual. Refer to answering mode and adjust it as follows: - If you set to determine whether a call is ... you have subscribed to Duplex Ringing service in RX settings under FAX settings to "FAX priority mode" in "Device Settings" of the User's Guide on -screen manual. z The machine can be modified to TEL priority mode. Note The following settings can be disconnected. (C) Fax: The machine receives...

MX700 series Quick Start Guide
Page 76
...to tone dialing. For details on how to switch to tone dialing, see the instruction manual supplied with your telephone to approximately 100 pages* of faxes in RX settings under one of the User's Guide on -screen manual. 72 Faxing z If you use a rotary pulse line, temporarily switch your telephone. ... any more faxes. is resolved as the remote receiving ID. Refer to the machine that can be able to cancel printing of the User's Guide on -screen manual. In this function may be the same as described, the fax stored in its memory. z Ink is selected for this case,...
...to tone dialing. For details on how to switch to tone dialing, see the instruction manual supplied with your telephone to approximately 100 pages* of faxes in RX settings under one of the User's Guide on -screen manual. 72 Faxing z If you use a rotary pulse line, temporarily switch your telephone. ... any more faxes. is resolved as the remote receiving ID. Refer to the machine that can be able to cancel printing of the User's Guide on -screen manual. In this function may be the same as described, the fax stored in its memory. z Ink is selected for this case,...

MX700 series Quick Start Guide
Page 81
...Summary of Reports and Lists The table below shows the reports and lists that can also disable automatic printing of this report, or print it manually. See "RX Report" on page 77. See "Activity Report" on page 79. „ Activity Report Prints the history of sent ... printed from your machine. on page 79. Confirms whether a reception was completed successfully. Report Or List Activity report Coded speed dial list User's data list Memory list TX (Transmission) report RX (Reception) report Description Shows recent fax transactions performed by your machine and the registered ...
...Summary of Reports and Lists The table below shows the reports and lists that can also disable automatic printing of this report, or print it manually. See "RX Report" on page 77. See "Activity Report" on page 79. „ Activity Report Prints the history of sent ... printed from your machine. on page 79. Confirms whether a reception was completed successfully. Report Or List Activity report Coded speed dial list User's data list Memory list TX (Transmission) report RX (Reception) report Description Shows recent fax transactions performed by your machine and the registered ...
MX700 series Quick Start Guide
Page 83
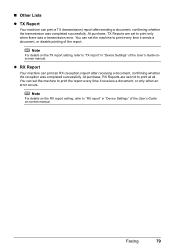
You can set the machine to print the report every time it sends a document, or disable printing of the User's Guide onscreen manual. Note For details on -screen manual. „ Other Lists z TX Report Your machine can print a TX (transmission) report after receiving a document, confirming whether the reception was completed ...document, confirming whether the transmission was completed successfully. At purchase, TX Reports are set to "TX report" in "Device Settings" of the User's Guide on the TX report setting, refer to print only when there was a transmission error.
You can set the machine to print the report every time it sends a document, or disable printing of the User's Guide onscreen manual. Note For details on -screen manual. „ Other Lists z TX Report Your machine can print a TX (transmission) report after receiving a document, confirming whether the reception was completed ...document, confirming whether the transmission was completed successfully. At purchase, TX Reports are set to "TX report" in "Device Settings" of the User's Guide on the TX report setting, refer to print only when there was a transmission error.
MX700 series Quick Start Guide
Page 104
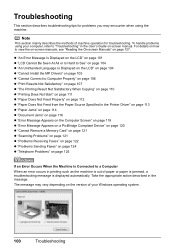
... 121 z "Scanning Problems" on page 121 z "Problems Receiving Faxes" on page 122 z "Problems Sending Faxes" on page 124 z "Telephone Problems" on -screen manual. z "An Error Message Is Displayed on the LCD" on page 101 z "LCD Cannot Be Seen At All or Is Hard to See" on page 104... This section describes troubleshooting tips for troubleshooting. For details on how to view the on-screen manuals, see "Reading the On-screen Manuals" on the version of your computer, refer to "Troubleshooting" in the User's Guide on page 125 If an Error Occurs When the Machine Is Connected to Computer Properly...
... 121 z "Scanning Problems" on page 121 z "Problems Receiving Faxes" on page 122 z "Problems Sending Faxes" on page 124 z "Telephone Problems" on -screen manual. z "An Error Message Is Displayed on the LCD" on page 101 z "LCD Cannot Be Seen At All or Is Hard to See" on page 104... This section describes troubleshooting tips for troubleshooting. For details on how to view the on-screen manuals, see "Reading the On-screen Manuals" on the version of your computer, refer to "Troubleshooting" in the User's Guide on page 125 If an Error Occurs When the Machine Is Connected to Computer Properly...
MX700 series Quick Start Guide
Page 108
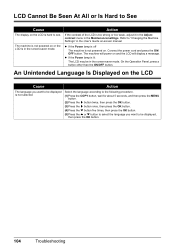
... mode. The machine is not powered on or the LCD is too strong or too weak, adjust it in the Adjust contrast menu in the User's Guide on and the LCD will power on -screen...
... mode. The machine is not powered on or the LCD is too strong or too weak, adjust it in the Adjust contrast menu in the User's Guide on and the LCD will power on -screen...
MX700 series Quick Start Guide
Page 111
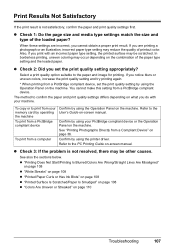
... proper print result. Select a print quality option suitable to the PC Printing Guide on-screen manual. The method to confirm the paper and print quality settings differs depending on -screen manual. Refer to print from your PictBridge compliant device or the Operation Panel on page 36. Confirm... loaded paper. You cannot make this setting from a Compliant Device" on the machine. To copy or to the User's Guide on what you notice blurs or uneven colors, increase the print quality setting and try printing again. * When printing from a computer Confirm by using the printer...
... proper print result. Select a print quality option suitable to the PC Printing Guide on-screen manual. The method to confirm the paper and print quality settings differs depending on -screen manual. Refer to print from your PictBridge compliant device or the Operation Panel on page 36. Confirm... loaded paper. You cannot make this setting from a Compliant Device" on the machine. To copy or to the User's Guide on what you notice blurs or uneven colors, increase the print quality setting and try printing again. * When printing from a computer Confirm by using the printer...
MX700 series Quick Start Guide
Page 113
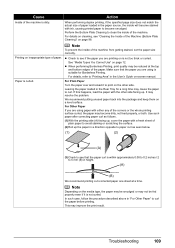
...Area" in "For Other Paper" to avoid staining or scratching the surface. (2)Roll up . In such case, follow the procedure described above in the User's Guide on a level surface. Leaving the paper loaded in height. (A) (B) We recommend printing curl-corrected paper one sheet at the top and bottom ... using is not too thick or curled. This may become smudged. We recommend putting unused paper back into the package and keep them on -screen manual. Printing on page 12. Paper is within approximately 0.08 to 0.2 inches / 2 to clean the inside of the paper. If this happens, load...
...Area" in "For Other Paper" to avoid staining or scratching the surface. (2)Roll up . In such case, follow the procedure described above in the User's Guide on a level surface. Leaving the paper loaded in height. (A) (B) We recommend printing curl-corrected paper one sheet at the top and bottom ... using is not too thick or curled. This may become smudged. We recommend putting unused paper back into the package and keep them on -screen manual. Printing on page 12. Paper is within approximately 0.08 to 0.2 inches / 2 to clean the inside of the paper. If this happens, load...
MX700 series Quick Start Guide
Page 114
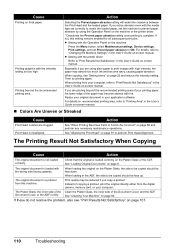
.... Cause Action Printing on page 22 and reduce the intensity setting. Printing beyond the recommended printing area of your original document in the User's Guide on page 6. Selecting the Prevent paper abrasion setting will widen the clearance between the Print Head and the loaded paper. z...Instead of the paper may become wavy, causing paper abrasion. Print Head is not loaded correctly. When loading the original on -screen manual. „ Colors Are Uneven or Streaked Cause Print Head nozzles are using the Operation Panel on the machine or the printer driver. * Deactivate the...
.... Cause Action Printing on page 22 and reduce the intensity setting. Printing beyond the recommended printing area of your original document in the User's Guide on page 6. Selecting the Prevent paper abrasion setting will widen the clearance between the Print Head and the loaded paper. z...Instead of the paper may become wavy, causing paper abrasion. Print Head is not loaded correctly. When loading the original on -screen manual. „ Colors Are Uneven or Streaked Cause Print Head nozzles are using the Operation Panel on the machine or the printer driver. * Deactivate the...
MX700 series Quick Start Guide
Page 115
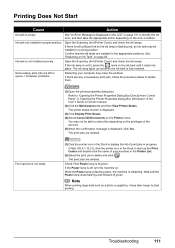
.... Note When printing large data such as a photo or graphics, it clicks into place. See "An Error Message Is Displayed on the LCD" on -screen manual. (2)Click the Maintenance tab and then View Printer Status. If there is still sufficient ink but its ink lamp is flashing red, an ink tank... lamp is fully inserted. Ink tank not installed in the Printer List. (2)Select the print job to select this depending on the privileges of the User's Guide on page 101 to identify the ink error, and then take longer to start up red when the ink tank is off, turn the...
.... Note When printing large data such as a photo or graphics, it clicks into place. See "An Error Message Is Displayed on the LCD" on -screen manual. (2)Click the Maintenance tab and then View Printer Status. If there is still sufficient ink but its ink lamp is flashing red, an ink tank... lamp is fully inserted. Ink tank not installed in the Printer List. (2)Select the print job to select this depending on the privileges of the User's Guide on page 101 to identify the ink error, and then take longer to start up red when the ink tank is off, turn the...
MX700 series Quick Start Guide
Page 116
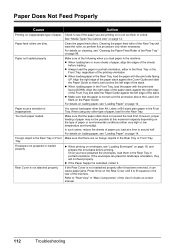
Paper feed rollers are printing on -screen manual. 112 Troubleshooting z When loading paper in the Rear Tray or Front Tray. When using any other than A4, Letter, or B5-sized plain paper in ".... Rear Cover is inappropriate. If the Rear Cover is not too thick or curled. z Make sure that it just touches the left edge of the User's Guide on is not reattached properly after it has been removed, it is fit squarely in the Rear Tray. You cannot load paper other type...
Paper feed rollers are printing on -screen manual. 112 Troubleshooting z When loading paper in the Rear Tray or Front Tray. When using any other than A4, Letter, or B5-sized plain paper in ".... Rear Cover is inappropriate. If the Rear Cover is not too thick or curled. z Make sure that it just touches the left edge of the User's Guide on is not reattached properly after it has been removed, it is fit squarely in the Rear Tray. You cannot load paper other type...


