MX700 series Quick Start Guide
Page 93
... twice, try Print Head Deep Cleaning. Print Head Cleaning starts. Cleaning the Print Head consumes ink, so perform Print Head Cleaning only when necessary. 1 Make sure that cleaning the Print Head causes used ink to select Yes and then press the OK button. Note that the machine is displayed. (6) ...the printed nozzle check pattern. Print Head Cleaning Clean the Print Head if lines are missing or if white streaks appear in the ink absorber. Do not perform any other operations until Print Head Cleaning finishes. The pattern print confirmation screen is turned on, open the Paper...
... twice, try Print Head Deep Cleaning. Print Head Cleaning starts. Cleaning the Print Head consumes ink, so perform Print Head Cleaning only when necessary. 1 Make sure that cleaning the Print Head causes used ink to select Yes and then press the OK button. Note that the machine is displayed. (6) ...the printed nozzle check pattern. Print Head Cleaning Clean the Print Head if lines are missing or if white streaks appear in the ink absorber. Do not perform any other operations until Print Head Cleaning finishes. The pattern print confirmation screen is turned on, open the Paper...

MX700 series Quick Start Guide
Page 94
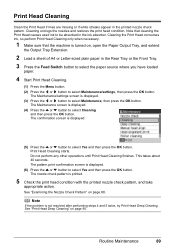
...open the Paper Output Tray, and extend the Output Tray Extension. 2 Load a sheet of A4 or Letter-sized plain paper in the ink absorber. Contact your Canon service representative. 90 Routine Maintenance The Maintenance/settings screen is displayed. (3) Press the [ or ] button to select Yes and then press ...Do not perform any other operations until Print Head Deep Cleaning finishes. Print Head Deep Cleaning starts. If a particular color is not printed properly, replace the ink tank of the Print Head. (1) Print the nozzle check pattern to select Deep cleaning and then press the OK ...
...open the Paper Output Tray, and extend the Output Tray Extension. 2 Load a sheet of A4 or Letter-sized plain paper in the ink absorber. Contact your Canon service representative. 90 Routine Maintenance The Maintenance/settings screen is displayed. (3) Press the [ or ] button to select Yes and then press ...Do not perform any other operations until Print Head Deep Cleaning finishes. Print Head Deep Cleaning starts. If a particular color is not printed properly, replace the ink tank of the Print Head. (1) Print the nozzle check pattern to select Deep cleaning and then press the OK ...

MX700 series Quick Start Guide
Page 106
... too long. Remove the device." z The machine may have to turn on your Canon service representative as early as possible. (You will need to cancel automatic redialing, wait until the ink absorber is nearly full. "Document size is not color-compatible. Press the OK button to Send in properly, or Dial tone detect is...
... too long. Remove the device." z The machine may have to turn on your Canon service representative as early as possible. (You will need to cancel automatic redialing, wait until the ink absorber is nearly full. "Document size is not color-compatible. Press the OK button to Send in properly, or Dial tone detect is...
MX700 series Quick Start Guide
Page 114
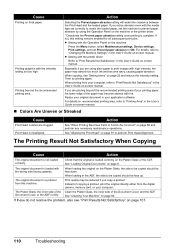
...Press the Menu button, select Maintenance/settings, Device settings, Print settings, and set too high. Action See "When Printing Becomes Faint or Colors Are Incorrect" on page 94. See "Cleaning Your Machine" on page 86 and perform any necessary maintenance operations. If you are printing ...Results Not Satisfactory" in the User's Guide on -screen manual. See "Loading Original Documents" on -screen manual. Print quality may absorb too much ink and become stained with high intensity, the paper may be reduced if you are clogged. The Platen Glass, the inner side of ...
...Press the Menu button, select Maintenance/settings, Device settings, Print settings, and set too high. Action See "When Printing Becomes Faint or Colors Are Incorrect" on page 94. See "Cleaning Your Machine" on page 86 and perform any necessary maintenance operations. If you are printing ...Results Not Satisfactory" in the User's Guide on -screen manual. See "Loading Original Documents" on -screen manual. Print quality may absorb too much ink and become stained with high intensity, the paper may be reduced if you are clogged. The Platen Glass, the inner side of ...

MX700 series Quick Start Guide
Page 123
... the Network Setup Guide to reinstall the MP Drivers. „ Error No.: 1700/1710 Is Displayed Cause The ink absorber is not selected in to the network with the relay device. Action See ""The waste ink absorber is connected via a USB hub. "" on the Print dialog box. Press [OK] to "Checking Information about the...
... the Network Setup Guide to reinstall the MP Drivers. „ Error No.: 1700/1710 Is Displayed Cause The ink absorber is not selected in to the network with the relay device. Action See ""The waste ink absorber is connected via a USB hub. "" on the Print dialog box. Press [OK] to "Checking Information about the...

MX700 series Quick Start Guide
Page 124
..., contact the manufacturer. For details on how to resolve the error, see "An Error Message Is Displayed on the LCD" on Canon-brand PictBridge compliant devices. Close the Scanning Unit (Printer Cover) on the LCD and take the appropriate action to clear the error.... type error" "Paper jam" "Printer cover open" "No print head" "Waste tank full" / "Ink absorber full" "No ink" / "Ink cassette error" "Ink Error" "Hardware Error" Action If the machine is installed. See "Replacing an Ink Tank" on the camera. Load paper in the Rear Tray, and select Continue* in the display on...
..., contact the manufacturer. For details on how to resolve the error, see "An Error Message Is Displayed on the LCD" on Canon-brand PictBridge compliant devices. Close the Scanning Unit (Printer Cover) on the LCD and take the appropriate action to clear the error.... type error" "Paper jam" "Printer cover open" "No print head" "Waste tank full" / "Ink absorber full" "No ink" / "Ink cassette error" "Ink Error" "Hardware Error" Action If the machine is installed. See "Replacing an Ink Tank" on the camera. Load paper in the Rear Tray, and select Continue* in the display on...


