
MX300 series Quick Start Guide
Page 6
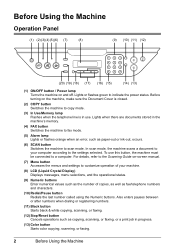
...button Switches the machine to copy mode. (3) In Use/Memory lamp Flashes when the telephone line is in progress. (13) Color button Starts color copying, scanning, or faxing. 2 Before Using the Machine Also enters pauses between or after numbers when dialing or registering numbers. (11) ... button Accesses the menus and settings to customize operation of copies, as well as paper-out or ink-out, occurs. (6) SCAN button Switches the machine to scan mode. In scan mode, the machine scans a document to your machine. (8) LCD (Liquid Crystal Display) Displays messages, menu selections, and ...
...button Switches the machine to copy mode. (3) In Use/Memory lamp Flashes when the telephone line is in progress. (13) Color button Starts color copying, scanning, or faxing. 2 Before Using the Machine Also enters pauses between or after numbers when dialing or registering numbers. (11) ... button Accesses the menus and settings to customize operation of copies, as well as paper-out or ink-out, occurs. (6) SCAN button Switches the machine to scan mode. In scan mode, the machine scans a document to your machine. (8) LCD (Liquid Crystal Display) Displays messages, menu selections, and ...
MX300 series Quick Start Guide
Page 12
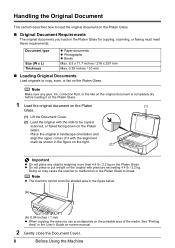
...x 11.7 inches / 216 x 297 mm Max. 0.39 inches / 10 mm „ Loading Original Documents Load originals to copy, scan, or fax on the Platen Glass. Note Make sure any glue, ink, correction fluid, or the like on the original document is completely dry before loading it with the side to be... copied, scanned, or faxed facing down on the Platen Glass. Handling the Original Document This section describes how...
...x 11.7 inches / 216 x 297 mm Max. 0.39 inches / 10 mm „ Loading Original Documents Load originals to copy, scan, or fax on the Platen Glass. Note Make sure any glue, ink, correction fluid, or the like on the original document is completely dry before loading it with the side to be... copied, scanned, or faxed facing down on the Platen Glass. Handling the Original Document This section describes how...
MX300 series Quick Start Guide
Page 68
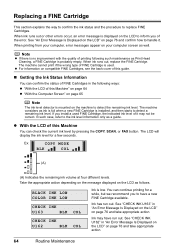
... You can confirm the status of it . In such case, refer to detect the remaining ink level. You can check the current ink level by pressing the COPY, SCAN, or FAX button. See "CHECK INK U163" in "An Error Message Is Displayed on the LCD" on page 76 and take appropriate... If there is no improvement with the quality of printing following ways: z "With the LCD of the error. BLACK INK LOW COLOR INK LOW CHECK INK U163 BLK COL CHECK INK U162 BLK COL Ink is displayed on page 76 and confirm how to inform you install a used . See "An Error Message Is Displayed ...
... You can confirm the status of it . In such case, refer to detect the remaining ink level. You can check the current ink level by pressing the COPY, SCAN, or FAX button. See "CHECK INK U163" in "An Error Message Is Displayed on the LCD" on page 76 and take appropriate... If there is no improvement with the quality of printing following ways: z "With the LCD of the error. BLACK INK LOW COLOR INK LOW CHECK INK U163 BLK COL CHECK INK U162 BLK COL Ink is displayed on page 76 and confirm how to inform you install a used . See "An Error Message Is Displayed ...
MX300 series Quick Start Guide
Page 71
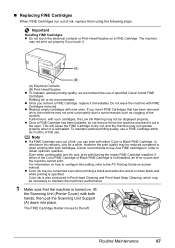
...Cartridges removed. Color ink is also consumed in whichever ink remains, only for a while. z Once a FINE Cartridge has been installed, do not remove it from the machine and leave it immediately. This will cause the FINE Cartridge to when printing with either of specified Canon brand FINE ... properly. The FINE Cartridge Holder moves to the PC Printing Guide on , lift the Scanning Unit (Printer Cover) with new ones. z Once you can print with both hands, then pull the Scanning Unit Support (A) down into place. z Replace empty cartridges with both cartridges. „...
...Cartridges removed. Color ink is also consumed in whichever ink remains, only for a while. z Once a FINE Cartridge has been installed, do not remove it from the machine and leave it immediately. This will cause the FINE Cartridge to when printing with either of specified Canon brand FINE ... properly. The FINE Cartridge Holder moves to the PC Printing Guide on , lift the Scanning Unit (Printer Cover) with new ones. z Once you can print with both hands, then pull the Scanning Unit Support (A) down into place. z Replace empty cartridges with both cartridges. „...
MX300 series Quick Start Guide
Page 72
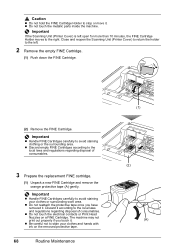
...right. z Do not reattach the protective tape once you touch it . z Do not touch the metallic parts inside the machine. Important If the Scanning Unit (Printer Cover) is left . 2 Remove the empty FINE Cartridge. (1) Push down the FINE Cartridge. (2) Remove the FINE Cartridge. Important...Maintenance (1) (2) (A) Caution z Do not hold the FINE Cartridge Holder to avoid staining your clothes and hands with ink on a FINE Cartridge. Close and reopen the Scanning Unit (Printer Cover) to return the holder to the local laws and regulations regarding disposal of consumables. 3 Prepare ...
...right. z Do not reattach the protective tape once you touch it . z Do not touch the metallic parts inside the machine. Important If the Scanning Unit (Printer Cover) is left . 2 Remove the empty FINE Cartridge. (1) Push down the FINE Cartridge. (2) Remove the FINE Cartridge. Important...Maintenance (1) (2) (A) Caution z Do not hold the FINE Cartridge Holder to avoid staining your clothes and hands with ink on a FINE Cartridge. Close and reopen the Scanning Unit (Printer Cover) to return the holder to the local laws and regulations regarding disposal of consumables. 3 Prepare ...
MX300 series Quick Start Guide
Page 80
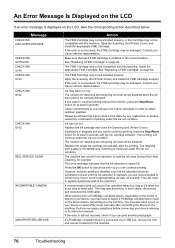
... (Printer Cover) and install the appropriate FINE Cartridge. See "Replacing a FINE Cartridge" on page 64. Replace the ink cartridge and close the Scanning Unit (Printer Cover). If printing is in the correct position. Press the OK button to cancel the error so you... connecting it to the machine. Contact your Canon service representative. Please be advised that Canon shall not be damaged. You may have run out. Message CHECK INK U051/U052/U053/U059 CHECK INK U075/U076 CHECK INK U140 CHECK INK U150 CHECK INK U162 CHECK INK U163 REQ. When printing from a PictBridge ...
... (Printer Cover) and install the appropriate FINE Cartridge. See "Replacing a FINE Cartridge" on page 64. Replace the ink cartridge and close the Scanning Unit (Printer Cover). If printing is in the correct position. Press the OK button to cancel the error so you... connecting it to the machine. Contact your Canon service representative. Please be advised that Canon shall not be damaged. You may have run out. Message CHECK INK U051/U052/U053/U059 CHECK INK U075/U076 CHECK INK U140 CHECK INK U150 CHECK INK U162 CHECK INK U163 REQ. When printing from a PictBridge ...
MX300 series Quick Start Guide
Page 95
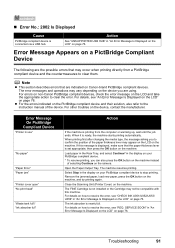
...countermeasures to resolve the error, see "An Error Message Is Displayed on the LCD" on Canon-brand PictBridge compliant devices. Troubleshooting 91 Note z This section describes errors that are the possible... Displayed on the LCD" on your PictBridge compliant device to resolve the error, see "CHECK INK U051/U052/U053/ U059" in the display on your PictBridge compliant device. * To resume ... Select Stop in "An Error Message Is Displayed on the LCD" on the camera. Close the Scanning Unit (Printer Cover) on the device, contact the manufacturer. z For the errors indicated on the...
...countermeasures to resolve the error, see "An Error Message Is Displayed on the LCD" on Canon-brand PictBridge compliant devices. Troubleshooting 91 Note z This section describes errors that are the possible... Displayed on the LCD" on your PictBridge compliant device to resolve the error, see "CHECK INK U051/U052/U053/ U059" in the display on your PictBridge compliant device. * To resume ... Select Stop in "An Error Message Is Displayed on the LCD" on the camera. Close the Scanning Unit (Printer Cover) on the device, contact the manufacturer. z For the errors indicated on the...

MX300 series Quick Start Guide
Page 96
...and unplug the power cord of the power cord, press the ON/OFF button to resend the fax. Press the ON/OFF button to your Canon service representative. Either print or delete documents in memory (see "Printing or Deleting a Document in Memory" on page 55. z Print the ... Refer to the Scanning Guide on the LCD and take the appropriate action to free up memory. An error requiring servicing may not be compatible with this machine. There was an error during reception. Error Message On PictBridge Compliant Device "No ink"/ "Ink cassette error" "Hardware Error" "Printer error" ...
...and unplug the power cord of the power cord, press the ON/OFF button to resend the fax. Press the ON/OFF button to your Canon service representative. Either print or delete documents in memory (see "Printing or Deleting a Document in Memory" on page 55. z Print the ... Refer to the Scanning Guide on the LCD and take the appropriate action to free up memory. An error requiring servicing may not be compatible with this machine. There was an error during reception. Error Message On PictBridge Compliant Device "No ink"/ "Ink cassette error" "Hardware Error" "Printer error" ...

MX300 series Quick Start Guide
Page 102
...Zoom Copy Specifications 1 - 99 pages 9 positions, Auto intensity (AE copy) 25% - 400% (1% unit) Scanner driver Maximum scanning size Scanning resolution Gradation (Input/Output) Scan Specifications TWAIN / WIA (Windows Vista and Windows XP only) A4/Letter, 8.5" x 11.7" / 216 x 297 mm Optical ...Print width Acoustic noise level Operating environment Storage environment Power supply Power consumption External dimensions Weight Canon FINE Cartridges General Specifications 4800 (horizontal)* x 1200 (vertical) * Ink droplets can be placed with a pitch of 1/4800 inch at USB Full-Speed (USB...
...Zoom Copy Specifications 1 - 99 pages 9 positions, Auto intensity (AE copy) 25% - 400% (1% unit) Scanner driver Maximum scanning size Scanning resolution Gradation (Input/Output) Scan Specifications TWAIN / WIA (Windows Vista and Windows XP only) A4/Letter, 8.5" x 11.7" / 216 x 297 mm Optical ...Print width Acoustic noise level Operating environment Storage environment Power supply Power consumption External dimensions Weight Canon FINE Cartridges General Specifications 4800 (horizontal)* x 1200 (vertical) * Ink droplets can be placed with a pitch of 1/4800 inch at USB Full-Speed (USB...

MX300 series Quick Start Guide
Page 117
... PictBridge print settings 25 R Replacing a FINE Cartridge 64 ink status information 64 Routine Maintenance 57 S Safety Precautions 102 Scanning Images 22 Specialty Media 9 Specifications 98 copy 98 fax 99 general 98 PictBridge 100 scan 98 telephone 99 System Requirements 101 T Troubleshooting 75 Turning... off the Machine 6 Turning on the Machine 6 Index 113 Index A Appendix 96 B Before Using the Machine 2 C Canon U.S.A., ...
... PictBridge print settings 25 R Replacing a FINE Cartridge 64 ink status information 64 Routine Maintenance 57 S Safety Precautions 102 Scanning Images 22 Specialty Media 9 Specifications 98 copy 98 fax 99 general 98 PictBridge 100 scan 98 telephone 99 System Requirements 101 T Troubleshooting 75 Turning... off the Machine 6 Turning on the Machine 6 Index 113 Index A Appendix 96 B Before Using the Machine 2 C Canon U.S.A., ...
MX300 series Easy Setup Instructions
Page 1
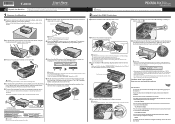
...left slot B. For details on the Operation Panel to select the language for the Color FINE Cartridge, inserting it . • Be careful not to stain your hands or surrounding work area with ink on the removed protective tape. Document Cover Office All-In-One Important When cleaning...in the Quick Start Guide. 2 Install the FINE Cartridges a Remove the Black FINE Cartridge from its original position, and then gently close the Scanning Unit (Printer Cover) with both hands. c Insert the Black FINE Cartridge slightly slanted into the right slot C . Remove the Telephone connector ...
...left slot B. For details on the Operation Panel to select the language for the Color FINE Cartridge, inserting it . • Be careful not to stain your hands or surrounding work area with ink on the removed protective tape. Document Cover Office All-In-One Important When cleaning...in the Quick Start Guide. 2 Install the FINE Cartridges a Remove the Black FINE Cartridge from its original position, and then gently close the Scanning Unit (Printer Cover) with both hands. c Insert the Black FINE Cartridge slightly slanted into the right slot C . Remove the Telephone connector ...


