Getting Started
Page 3
... Setup 30 Confirm Connection Status 33 Install the Software 35 Install the Software (Registration 42 Install the Software (Information 46 After Installing the Machine 48 Loading Paper 48 Introduction of Manuals 51 Solution Menu 52 Try Using the Machine 53 Print Photos from a Memory Card 54 Try Copying 57 Print Photos from...
... Setup 30 Confirm Connection Status 33 Install the Software 35 Install the Software (Registration 42 Install the Software (Information 46 After Installing the Machine 48 Loading Paper 48 Introduction of Manuals 51 Solution Menu 52 Try Using the Machine 53 Print Photos from a Memory Card 54 Try Copying 57 Print Photos from...
Getting Started
Page 14
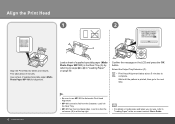
... so that the cut corner (B) is printed, then go to the next step. 12 Hardware Setup • Be sure to complete. Load it in "Loading Paper" on the LCD and press the OK button. Align the Print Head 1 2 A B Align the Print Head for alignment. This takes about 5 minutes to use , refer ...to in the Rear Tray. • MP-101 has front and back sides. Use a sheet of supplied specialty paper (Matte Photo Paper MP-101) in the Rear Tray (A) by referring to steps to "Loading Paper" in the on-screen manual: Basic Guide. Wait until the pattern is at the top right. • For ...
... so that the cut corner (B) is printed, then go to the next step. 12 Hardware Setup • Be sure to complete. Load it in "Loading Paper" on the LCD and press the OK button. Align the Print Head 1 2 A B Align the Print Head for alignment. This takes about 5 minutes to use , refer ...to in the Rear Tray. • MP-101 has front and back sides. Use a sheet of supplied specialty paper (Matte Photo Paper MP-101) in the Rear Tray (A) by referring to steps to "Loading Paper" in the on-screen manual: Basic Guide. Wait until the pattern is at the top right. • For ...
Getting Started
Page 15
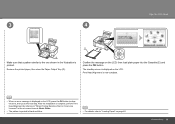
.... The standby screen is displayed on the LCD, then load plain paper into the Cassette (E) and press the OK button. Print Head Alignment is now complete. • When an error message is printed. Remove the printed paper, then close the Paper Output Tray (D). After the installation is complete, perform Print... similar to the one shown in black and blue. • For details, refer to "Loading Paper" on the LCD, press the OK button to clear the error, then go to "When Printing Becomes Faint or Colors are Incorrect" in the on-screen manual: Basic Guide. • The pattern is printed...
.... The standby screen is displayed on the LCD, then load plain paper into the Cassette (E) and press the OK button. Print Head Alignment is now complete. • When an error message is printed. Remove the printed paper, then close the Paper Output Tray (D). After the installation is complete, perform Print... similar to the one shown in black and blue. • For details, refer to "Loading Paper" on the LCD, press the OK button to clear the error, then go to "When Printing Becomes Faint or Colors are Incorrect" in the on-screen manual: Basic Guide. • The pattern is printed...
Getting Started
Page 22
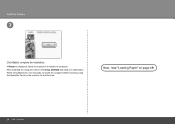
When using Macintosh, it in a safe place. Next, read "Loading Paper" on the machine for the first time. If Restart is necessary to restart the computer before scanning using the Operation Panel on page 48! 20 USB Connection Install the Software 7 Click Exit to restart the computer. After restarting the computer, remove the Setup CD-ROM and keep it is displayed, follow the instruction to complete the installation.
When using Macintosh, it in a safe place. Next, read "Loading Paper" on the machine for the first time. If Restart is necessary to restart the computer before scanning using the Operation Panel on page 48! 20 USB Connection Install the Software 7 Click Exit to restart the computer. After restarting the computer, remove the Setup CD-ROM and keep it is displayed, follow the instruction to complete the installation.
Getting Started
Page 48
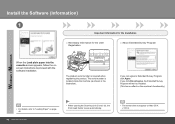
...the Extended Survey Program will not be installed. (This has no effect on the machine's functionality.) • For details, refer to "Loading Paper" on page 48. 46 Network Connection • When opening the Scanning Unit (Cover) (A), the Print Head Holder moves automatically. &#... 1 Important Information for the Installation □ Necessary Information for the User Registration A □ About Extended Survey Program When the Load plain paper into the cassette screen appears, follow the onscreen instructions to Extended Survey Program, click Agree. If you can agree to proceed with...
...the Extended Survey Program will not be installed. (This has no effect on the machine's functionality.) • For details, refer to "Loading Paper" on page 48. 46 Network Connection • When opening the Scanning Unit (Cover) (A), the Print Head Holder moves automatically. &#... 1 Important Information for the Installation □ Necessary Information for the User Registration A □ About Extended Survey Program When the Load plain paper into the cassette screen appears, follow the onscreen instructions to Extended Survey Program, click Agree. If you can agree to proceed with...
Getting Started
Page 50
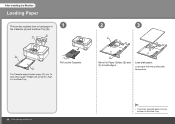
To print photo paper / Hagaki (D), be sure to load it in 1 the Cassette (A) and the Rear Tray (B). Pull out the Cassette. Load plain paper. Load paper with the printing side facing down. 48 After Installing the Machine • To print on specialty paper, be sure to load it in the Rear Tray. E Move the Paper Guides (E) and (F) to load paper in the Rear Tray. After Installing the Machine Loading Paper This section explains how to both edges. D B 2 3 F A C The Cassette supports plain paper (C) only.
To print photo paper / Hagaki (D), be sure to load it in 1 the Cassette (A) and the Rear Tray (B). Pull out the Cassette. Load plain paper. Load paper with the printing side facing down. 48 After Installing the Machine • To print on specialty paper, be sure to load it in the Rear Tray. E Move the Paper Guides (E) and (F) to load paper in the Rear Tray. After Installing the Machine Loading Paper This section explains how to both edges. D B 2 3 F A C The Cassette supports plain paper (C) only.
Getting Started
Page 51
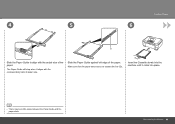
Insert the Cassette slowly into the machine until it aligns with the actual size of the paper. Slide the Paper Guide against left edge of the paper. After Installing the Machine 49 The Paper Guide will stop when it clicks into place. • There may be a little space between the Paper Guide and the paper stack. Make sure that the paper stack does not exceed the line (G). Loading Paper 4 5 6 G Slide the Paper Guide to align with the corresponding mark of paper size.
Insert the Cassette slowly into the machine until it aligns with the actual size of the paper. Slide the Paper Guide against left edge of the paper. After Installing the Machine 49 The Paper Guide will stop when it clicks into place. • There may be a little space between the Paper Guide and the paper stack. Make sure that the paper stack does not exceed the line (G). Loading Paper 4 5 6 G Slide the Paper Guide to align with the corresponding mark of paper size.
Getting Started
Page 52
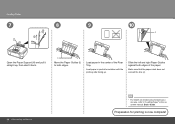
Load paper in the center of the paper. Slide the left and right Paper Guides against both edges. I Move the Paper Guides (I) to "Loading Paper" in portrait orientation with the printing side facing up , then slant it back. Make sure that the paper stack does not exceed the line (J). 50 After Installing...; For details on media sizes and types you can use, refer to both edges of the Rear Tray. Load paper in the onscreen manual: Basic Guide. Preparation for printing is now complete! Loading Paper 7 8 9 3 2 H 1 10 J Open the Paper Support (H) and pull it straight up .
Load paper in the center of the paper. Slide the left and right Paper Guides against both edges. I Move the Paper Guides (I) to "Loading Paper" in portrait orientation with the printing side facing up , then slant it back. Make sure that the paper stack does not exceed the line (J). 50 After Installing...; For details on media sizes and types you can use, refer to both edges of the Rear Tray. Load paper in the onscreen manual: Basic Guide. Preparation for printing is now complete! Loading Paper 7 8 9 3 2 H 1 10 J Open the Paper Support (H) and pull it straight up .
Getting Started
Page 57
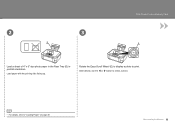
Rotate the Easy-Scroll Wheel (E) to display a photo to "Loading Paper" on page 48. After Installing the Machine 55 2 3 D Print Photos from a Memory Card E Load a sheet of 4" x 6" size photo paper in the Rear Tray (D) in portrait orientation. Load paper with the printing side facing up. Alternatively, use the [ or ] button to select a photo. • For details, refer to print.
Rotate the Easy-Scroll Wheel (E) to display a photo to "Loading Paper" on page 48. After Installing the Machine 55 2 3 D Print Photos from a Memory Card E Load a sheet of 4" x 6" size photo paper in the Rear Tray (D) in portrait orientation. Load paper with the printing side facing up. Alternatively, use the [ or ] button to select a photo. • For details, refer to print.
Getting Started
Page 59
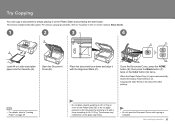
...document face-down and align it with a force exceeding 4.4 lb / 2.0 kg. I ). Remove the document after printing. • For details, refer to "Loading Paper" on page 48. • Do not place objects weighing 4.4 lb / 2.0 kg or more on the Platen Glass (D), or do not apply pressure to "... extend the Output Tray Extension (I H G Close the Document Cover, press the HOME button (E), then press the Black button (F) twice or the Color button (G) twice. Copying will start button. After Installing the Machine 57 The scanner may malfunction or the glass may break. • Do not ...
...document face-down and align it with a force exceeding 4.4 lb / 2.0 kg. I ). Remove the document after printing. • For details, refer to "Loading Paper" on page 48. • Do not place objects weighing 4.4 lb / 2.0 kg or more on the Platen Glass (D), or do not apply pressure to "... extend the Output Tray Extension (I H G Close the Document Cover, press the HOME button (E), then press the Black button (F) twice or the Color button (G) twice. Copying will start button. After Installing the Machine 57 The scanner may malfunction or the glass may break. • Do not ...
Getting Started
Page 60
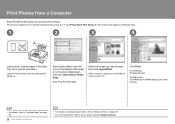
... Select the image you to the on-screen manual: Advanced Guide. For Windows: Printing will start printing. • For details, refer to "Loading Paper" on page 48. 58 After Installing the Machine • For details on starting Solution Menu, refer to "Solution Menu" on page 52.... information, refer to print photos easily. Print Photos from the icon on the desktop (Windows) or on Windows Vista. 1 2 3 4 A Load a sheet of photo paper in the Rear Tray (A) in portrait orientation. Start Solution Menu from a Computer Easy-PhotoPrint EX allows you want to start . When a photo ...
... Select the image you to the on-screen manual: Advanced Guide. For Windows: Printing will start printing. • For details, refer to "Loading Paper" on page 48. 58 After Installing the Machine • For details on starting Solution Menu, refer to "Solution Menu" on page 52.... information, refer to print photos easily. Print Photos from the icon on the desktop (Windows) or on Windows Vista. 1 2 3 4 A Load a sheet of photo paper in the Rear Tray (A) in portrait orientation. Start Solution Menu from a Computer Easy-PhotoPrint EX allows you want to start . When a photo ...


