Obtaining the Password For Your Existing Wireless Network (Mac OS X)
Page 1
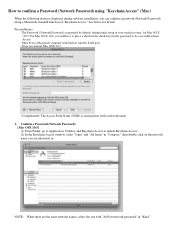
...will have to place a check in the check box for the password to confirm a Password (Network Password) using "Keychain Access" (Mac) When the following dialog is displayed during initial setup of "Keychain Access." The Access Point Name (SSID) is registered by default, during software installation..., you are the same network names, select the one with a network name. 1. See below for Mac OS X v10.5. How to...
...will have to place a check in the check box for the password to confirm a Password (Network Password) using "Keychain Access" (Mac) When the following dialog is displayed during initial setup of "Keychain Access." The Access Point Name (SSID) is registered by default, during software installation..., you are the same network names, select the one with a network name. 1. See below for Mac OS X v10.5. How to...

Obtaining the Password For Your Existing Wireless Network (Mac OS X)
Page 3
... fine.) 2. To use the printer together with the multiple Access Points, click the Manual Setup button for Mac Users" included in Show password. 2. If the same network names are not using ). For the setup method, see "Getting Started for the setup instead of them. (Either one of the Connect button. the one . 3. In such...
... fine.) 2. To use the printer together with the multiple Access Points, click the Manual Setup button for Mac Users" included in Show password. 2. If the same network names are not using ). For the setup method, see "Getting Started for the setup instead of them. (Either one of the Connect button. the one . 3. In such...
Easy Setup Instructions For Apple AirPort Wireless Networks
Page 1
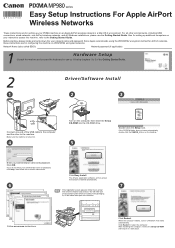
...Canon IJ Network Tool starts automatically. You will need your product serial number which is turned on. 4 Turn on WPA/WPA2 encrypted networks. Click Restart to register your product. Also for setting up your PIXMA machine on an Apple AirPort wireless network in a safe place. Network Name (also called SSID): Network... Started Guide. Since Apple recommends using the WPA/WPA2 encryption method for AirPort networks, these instructions are for configuring the machine on the computer, then insert the Setup CD-ROM into the CD-ROM drive. Click OK. Make sure the machine...
...Canon IJ Network Tool starts automatically. You will need your product serial number which is turned on. 4 Turn on WPA/WPA2 encrypted networks. Click Restart to register your product. Also for setting up your PIXMA machine on an Apple AirPort wireless network in a safe place. Network Name (also called SSID): Network... Started Guide. Since Apple recommends using the WPA/WPA2 encryption method for AirPort networks, these instructions are for configuring the machine on the computer, then insert the Setup CD-ROM into the CD-ROM drive. Click OK. Make sure the machine...
Easy Setup Instructions For Apple AirPort Wireless Networks
Page 3
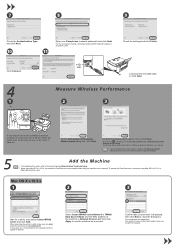
...printer to the printed manual: Network Setup Troubleshooting. • When using Mac OS X v.10.5.x, the machine's Card Slots are not accessible when using Mac OS X v.10.5.x, a USB cable must be used . Confirm that is canonijnetwork. Select Canon MP980 series Network in TWAIN Data Source Name and... the MAC address of the communication status is performed again. 5 Add the Machine • To troubleshoot the setup, refer to add, make sure the kind listed for a ...
...printer to the printed manual: Network Setup Troubleshooting. • When using Mac OS X v.10.5.x, the machine's Card Slots are not accessible when using Mac OS X v.10.5.x, a USB cable must be used . Confirm that is canonijnetwork. Select Canon MP980 series Network in TWAIN Data Source Name and... the MAC address of the communication status is performed again. 5 Add the Machine • To troubleshoot the setup, refer to add, make sure the kind listed for a ...
Getting Started
Page 14
...; Notes on -screen instructions and click OK, and do not remove the Setup CDROM during installation. • It may appear that Canon software is attempting to access the network. Disable the access point's IP address • The configuration, router functions, setup procedures and security functions of your security software is turned on your environment...
...; Notes on -screen instructions and click OK, and do not remove the Setup CDROM during installation. • It may appear that Canon software is attempting to access the network. Disable the access point's IP address • The configuration, router functions, setup procedures and security functions of your security software is turned on your environment...

Getting Started
Page 23
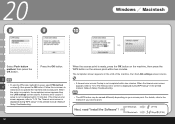
Windows XP/2000 Go to the following procedure. If the machine is displayed during setup" in the printed manual: Network Setup Troubleshooting. 21 Go to Step . USB • If no connection is established even after Connect is clicked, refer to Step . Windows Vista Go to "5.6 The ..., the Set (A) Printer IP Address screen does not appear. Windows 5 6 Detect the Machine C Connect the machine to the When the Set Printer IP Address screen network device with a LAN cable appears, click Connect. (A), then click Yes.
Windows XP/2000 Go to the following procedure. If the machine is displayed during setup" in the printed manual: Network Setup Troubleshooting. 21 Go to Step . USB • If no connection is established even after Connect is clicked, refer to Step . Windows Vista Go to "5.6 The ..., the Set (A) Printer IP Address screen does not appear. Windows 5 6 Detect the Machine C Connect the machine to the When the Set Printer IP Address screen network device with a LAN cable appears, click Connect. (A), then click Yes.

Getting Started
Page 24
... remove the USB cable, then click Finish. • If the error message appears, refer to "8 Changing the port name" in the printed manual: Network Setup Troubleshooting. • If Unsafe Removal of the Card Slot dialog box appears, specify the drive letter, then click Next. For details, refer to "5 The... following screen is displayed, click OK. Next, read "13 Information" on page 31! 10 7 Windows XP/2000 Windows 8 C USB When the Network Setup of Device is displayed during setup" in the printed manual: Network Setup Troubleshooting. 22 • To change the port name, click View...
... remove the USB cable, then click Finish. • If the error message appears, refer to "8 Changing the port name" in the printed manual: Network Setup Troubleshooting. • If Unsafe Removal of the Card Slot dialog box appears, specify the drive letter, then click Next. For details, refer to "5 The... following screen is displayed, click OK. Next, read "13 Information" on page 31! 10 7 Windows XP/2000 Windows 8 C USB When the Network Setup of Device is displayed during setup" in the printed manual: Network Setup Troubleshooting. 22 • To change the port name, click View...
Getting Started
Page 26
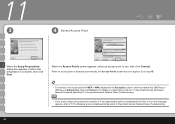
... in the Encryption column, enter the network key (WEP key or WPA key) in Network Key, then click Connect. For details on network keys, refer to "3.1 About Network Key (Windows)/ Network Password (Macintosh)" in the printed manual: Network Setup Troubleshooting. • If you want to... is complete, then click Next. 11 3 4 Detect Access Point E When the Setup Preparations dialog box appears, confirm that preparation is displayed during setup" in the printed manual: Network Setup Troubleshooting. 24 When an access point is detected automatically, the Access Points screen does not...
... in the Encryption column, enter the network key (WEP key or WPA key) in Network Key, then click Connect. For details on network keys, refer to "3.1 About Network Key (Windows)/ Network Password (Macintosh)" in the printed manual: Network Setup Troubleshooting. • If you want to... is complete, then click Next. 11 3 4 Detect Access Point E When the Setup Preparations dialog box appears, confirm that preparation is displayed during setup" in the printed manual: Network Setup Troubleshooting. 24 When an access point is detected automatically, the Access Points screen does not...
Getting Started
Page 27
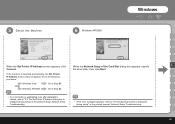
...When the Set Printer IP Address screen appears, click When the Network Setup of the Card Slot dialog box appears, specify E Connect. If the machine is displayed during setup" in the printed manual: Network Setup Troubleshooting. • If the error message appears, refer to the... following screen is displayed during setup" in the printed manual: Network Setup Troubleshooting. 25 Windows XP/2000 Go to Step . &#...
...When the Set Printer IP Address screen appears, click When the Network Setup of the Card Slot dialog box appears, specify E Connect. If the machine is displayed during setup" in the printed manual: Network Setup Troubleshooting. • If the error message appears, refer to the... following screen is displayed during setup" in the printed manual: Network Setup Troubleshooting. 25 Windows XP/2000 Go to Step . &#...

Getting Started
Page 28
For details, refer to "8 Changing the port name" in the location where you will use it, and turn on it. • To change the port name, click View Setup Results, then click Set Port Name. Turn off the machine, then place the machine in the printed manual: Network Setup Troubleshooting. • If Unsafe Removal of Device is displayed, click OK. 26 11 7 8 USB E When the Setup Completion dialog box appears, remove the USB cable, then click Next.
For details, refer to "8 Changing the port name" in the location where you will use it, and turn on it. • To change the port name, click View Setup Results, then click Set Port Name. Turn off the machine, then place the machine in the printed manual: Network Setup Troubleshooting. • If Unsafe Removal of Device is displayed, click OK. 26 11 7 8 USB E When the Setup Completion dialog box appears, remove the USB cable, then click Next.
Getting Started
Page 32
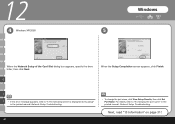
For details, refer to "5 The following screen is displayed during setup" in the printed manual: Network Setup Troubleshooting. Next, read "13 Information" on page 31! 12 4 Windows XP/2000 Windows 5 When the Network Setup of the Card Slot dialog box appears, specify the drive letter, then click Next. I J • If the error message appears, refer to "8 Changing the port name" in the printed manual: Network Setup Troubleshooting. 30 • To change the port name, click View Setup Results, then click Set Port Name. G When the Setup Completion screen appears, click Finish.
For details, refer to "5 The following screen is displayed during setup" in the printed manual: Network Setup Troubleshooting. Next, read "13 Information" on page 31! 12 4 Windows XP/2000 Windows 5 When the Network Setup of the Card Slot dialog box appears, specify the drive letter, then click Next. I J • If the error message appears, refer to "8 Changing the port name" in the printed manual: Network Setup Troubleshooting. 30 • To change the port name, click View Setup Results, then click Set Port Name. G When the Setup Completion screen appears, click Finish.
Getting Started
Page 43
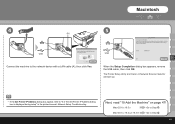
... Printer Setup Utility and Canon IJ Network Scanner Selector will start up. • If the Set Printer IP Address dialog box appear, refer to the network device with a LAN cable (A), then click Yes. Macintosh 4 5 (A) USB Connect the machine to "5.6 The Set Printer IP Address dialog box is displayed during setup" in the printed manual: Network Setup Troubleshooting...
... Printer Setup Utility and Canon IJ Network Scanner Selector will start up. • If the Set Printer IP Address dialog box appear, refer to the network device with a LAN cable (A), then click Yes. Macintosh 4 5 (A) USB Connect the machine to "5.6 The Set Printer IP Address dialog box is displayed during setup" in the printed manual: Network Setup Troubleshooting...
Getting Started
Page 44
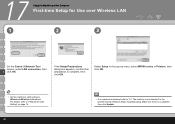
... to Wireless LAN active beforehand. 17 Setup the Machine and the Computer First-time Setup for Use over Wireless LAN 1 2 3 On the Canon IJ Network Tool screen, select LAN connection, then F click OK. Select Setup in the pop-up menu, select MP980 series in the printed manual: Network Setup Troubleshooting. If the Setup Preparations dialog box appears, confirm that...
... to Wireless LAN active beforehand. 17 Setup the Machine and the Computer First-time Setup for Use over Wireless LAN 1 2 3 On the Canon IJ Network Tool screen, select LAN connection, then F click OK. Select Setup in the pop-up menu, select MP980 series in the printed manual: Network Setup Troubleshooting. If the Setup Preparations dialog box appears, confirm that...
Getting Started
Page 45
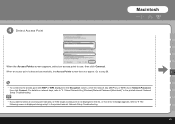
For details on network keys, refer to "3.1 About Network Key (Windows)/Network Password (Macintosh)" in the printed manual: Network Setup Troubleshooting. • If you want to select an access point manually, or if the target access point is not displayed in the list, or..., then click Connect. Go to the access point with WEP or WPA displayed in the Encryption column, enter the network key (WEP key or WPA key) in the printed manual: Network Setup Troubleshooting. 43 4 Detect Access Point Macintosh When the Access Points screen appears, select an access point to "5 The following ...
For details on network keys, refer to "3.1 About Network Key (Windows)/Network Password (Macintosh)" in the printed manual: Network Setup Troubleshooting. • If you want to select an access point manually, or if the target access point is not displayed in the list, or..., then click Connect. Go to the access point with WEP or WPA displayed in the Encryption column, enter the network key (WEP key or WPA key) in the printed manual: Network Setup Troubleshooting. 43 4 Detect Access Point Macintosh When the Access Points screen appears, select an access point to "5 The following ...
Getting Started
Page 46
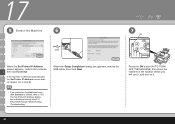
... it, and turn on it. 44 Press the ON button (A) TO TURN OFF THE MACHINE, then place the machine in the printed manual: Network Setup Troubleshooting. When the Setup Completion dialog box appears, remove the USB cable, then click Next. • If no connection is established even after Connect is detected automatically, the...
... it, and turn on it. 44 Press the ON button (A) TO TURN OFF THE MACHINE, then place the machine in the printed manual: Network Setup Troubleshooting. When the Setup Completion dialog box appears, remove the USB cable, then click Next. • If no connection is established even after Connect is detected automatically, the...
Getting Started
Page 54
... the timeout error screen appears, refer to "5.12 The Timeout error screen is displayed during WPS setup" in the printed manual: Network Setup Troubleshooting. 52 When the access point is displayed during WPS setup" in the printed manual: Network Setup Troubleshooting. • The WPS button may be named differently depending on -screen is complete, the completion...
... the timeout error screen appears, refer to "5.12 The Timeout error screen is displayed during WPS setup" in the printed manual: Network Setup Troubleshooting. 52 When the access point is displayed during WPS setup" in the printed manual: Network Setup Troubleshooting. • The WPS button may be named differently depending on -screen is complete, the completion...

Getting Started
Page 63
... basic operations and gives an introduction to set up and use your machine. 61 Also includes "Troubleshooting" information for your machine. Getting Started (this manual) Network Setup Troubleshooting Basic Guide (on-screen manual) Advanced Guide (on-screen manual) Describes how to other functions available. Introduces the machine and its functions, the included...
... basic operations and gives an introduction to set up and use your machine. 61 Also includes "Troubleshooting" information for your machine. Getting Started (this manual) Network Setup Troubleshooting Basic Guide (on-screen manual) Advanced Guide (on-screen manual) Describes how to other functions available. Introduces the machine and its functions, the included...
Network Setup Troubleshooting
Page 2
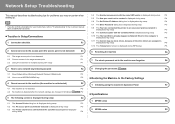
... to the target access point P.1 2.3 Using the machine in a multiple access point setup P.1 3 How to set a network key/network password P.2 3.1 About Network Key (Windows)/Network Password (Macintosh) P.2 3.2 How to set a WEP/WPA/WPA2 key P.2 4 ...setup P.6 5.12 The Timeout error screen is displayed during WPS setup P.6 6 Re-setting the machine P.6 7 The admin password set to the machine was forgotten P.6 8 Changing the port name P.6 ■ Restoring the Machine to the Factory Settings 1 Initializing using the machine's Operation Panel P.7 ■ Specifications 1 MP980...
... to the target access point P.1 2.3 Using the machine in a multiple access point setup P.1 3 How to set a network key/network password P.2 3.1 About Network Key (Windows)/Network Password (Macintosh) P.2 3.2 How to set a WEP/WPA/WPA2 key P.2 4 ...setup P.6 5.12 The Timeout error screen is displayed during WPS setup P.6 6 Re-setting the machine P.6 7 The admin password set to the machine was forgotten P.6 8 Changing the port name P.6 ■ Restoring the Machine to the Factory Settings 1 Initializing using the machine's Operation Panel P.7 ■ Specifications 1 MP980...
Network Setup Troubleshooting
Page 7
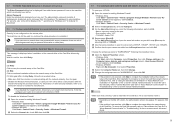
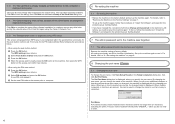
... click Change settings in TCP/UDP. After installation is complete, to mount the Card Slot using the Canon IJ Network Tool, refer to "Cannot Mount the Card Slot" in "About Network Communication" in "Troubleshooting" of the Card Slot. Admin Password Enter the administrator password you disabled the ... Change the workgroup name to "WORKGROUP", then click OK. • If the problem is not resolved, click Skip to complete the setup without the network setup of disclosing data such as you did in step c except for selecting UDP in the Computer name, domain, and workgroup settings column....
... click Change settings in TCP/UDP. After installation is complete, to mount the Card Slot using the Canon IJ Network Tool, refer to "Cannot Mount the Card Slot" in "About Network Communication" in "Troubleshooting" of the Card Slot. Admin Password Enter the administrator password you disabled the ... Change the workgroup name to "WORKGROUP", then click OK. • If the problem is not resolved, click Skip to complete the setup without the network setup of disclosing data such as you did in step c except for selecting UDP in the Computer name, domain, and workgroup settings column....
Network Setup Troubleshooting
Page 8
...name 8.1 Changing the port name To change the name of the Card Slot dialog box. 5.11 The Cannot map any drive letter and try the network setup of alphanumeric characters and be lost after initialization. d When the access point is not completed within two minutes. • When using the push ... push button method, and 10 minutes for the PIN code method). Port Name Port names should consist of the Card Slot again using the Canon IJ Network Tool. 5.12 The Timeout error screen is already available. To set will be no longer than 21 characters, excluding the prefix. By changing...
...name 8.1 Changing the port name To change the name of the Card Slot dialog box. 5.11 The Cannot map any drive letter and try the network setup of alphanumeric characters and be lost after initialization. d When the access point is not completed within two minutes. • When using the push ... push button method, and 10 minutes for the PIN code method). Port Name Port names should consist of the Card Slot again using the Canon IJ Network Tool. 5.12 The Timeout error screen is already available. To set will be no longer than 21 characters, excluding the prefix. By changing...


