Obtaining the Password For Your Existing Wireless Network (Mac OS X)
Page 1
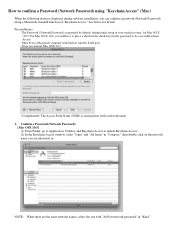
..." in . The Access Point Name (SSID) is synonymous with built-in Keychain Access. - Must be save in wireless LAN port. - Preconditions) - NOTE: When there are interested in "Kind." The Password / Network Password is displayed during initial setup of "Keychain Access." How to confirm a Password (Network Password) using a Macintosh standard function of your...
..." in . The Access Point Name (SSID) is synonymous with built-in Keychain Access. - Must be save in wireless LAN port. - Preconditions) - NOTE: When there are interested in "Kind." The Password / Network Password is displayed during initial setup of "Keychain Access." How to confirm a Password (Network Password) using a Macintosh standard function of your...
Easy Setup Instructions For Apple AirPort Wireless Networks
Page 1
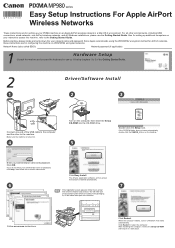
..., on the desktop. 5 Enter your PIXMA machine on WPA/WPA2 encrypted networks. Double-click the Setup icon. If you do not know your... the computer, remove the Setup CD-ROM and keep it in a Mac OS X environment. series Easy Setup Instructions For Apple AirPort Wireless Networks These instructions are for...Setup CD-ROM into the CD-ROM drive. Click OK. Serial Number S*e*ria*l *N*um*b*er Click Restart. Since Apple recommends using the WPA/WPA2 encryption method for AirPort networks, these instructions are for use the Getting Started Guide. When the computer restarts, Canon...
..., on the desktop. 5 Enter your PIXMA machine on WPA/WPA2 encrypted networks. Double-click the Setup icon. If you do not know your... the computer, remove the Setup CD-ROM and keep it in a Mac OS X environment. series Easy Setup Instructions For Apple AirPort Wireless Networks These instructions are for...Setup CD-ROM into the CD-ROM drive. Click OK. Serial Number S*e*ria*l *N*um*b*er Click Restart. Since Apple recommends using the WPA/WPA2 encryption method for AirPort networks, these instructions are for use the Getting Started Guide. When the computer restarts, Canon...
Easy Setup Instructions For Apple AirPort Wireless Networks
Page 2
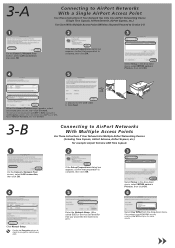
..., select LAN connection, then click OK. 4 If the Setup Preparations dialog box appears, confirm that preparation is complete, then click OK. 5 Select Setup in the drop-down menu, select MP980 series in Printers, then click OK. 3-A 1 On the Canon IJ Network Tool screen, select LAN connection, then click OK... One AirPort Networking Device (Single Time Capsule, AirPort Extreme, AirPort Express, etc.) For Users With Multiple Access Points (Wireless Routers) Proceed to Section 3-B 2 3 If the Setup Preparations dialog box appears, confirm that preparation is complete, then click OK. 5 Select...
..., select LAN connection, then click OK. 4 If the Setup Preparations dialog box appears, confirm that preparation is complete, then click OK. 5 Select Setup in the drop-down menu, select MP980 series in Printers, then click OK. 3-A 1 On the Canon IJ Network Tool screen, select LAN connection, then click OK... One AirPort Networking Device (Single Time Capsule, AirPort Extreme, AirPort Express, etc.) For Users With Multiple Access Points (Wireless Routers) Proceed to Section 3-B 2 3 If the Setup Preparations dialog box appears, confirm that preparation is complete, then click OK. 5 Select...
Easy Setup Instructions For Apple AirPort Wireless Networks
Page 3
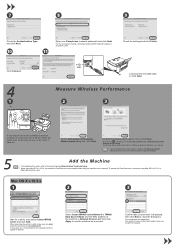
...access the Card Slots from a computer using the machine over the AirPort network. Select Canon MP980 series Network in Network Device List, then click Apply to close the dialog box. ...displayed, then click Exit to use over a network. This completes the installation. Measure Wireless Performance 2 3 If you need to move the machine to another location, you ...machine to appear in Connection performance between the printer and the access point. The Printer Setup Utility and Canon IJ Network Scanner Selector will use it, then turn it back on. Click Connect....
...access the Card Slots from a computer using the machine over the AirPort network. Select Canon MP980 series Network in Network Device List, then click Apply to close the dialog box. ...displayed, then click Exit to use over a network. This completes the installation. Measure Wireless Performance 2 3 If you need to move the machine to another location, you ...machine to appear in Connection performance between the printer and the access point. The Printer Setup Utility and Canon IJ Network Scanner Selector will use it, then turn it back on. Click Connect....
Getting Started
Page 13
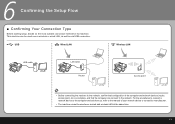
...; Confirming Your Connection Type Before starting setup, decide on the most suitable connection method for the machine. USB Wired LAN USB cable LAN cable Router Wireless LAN Access point • Before connecting the machine to the network, confirm that the computer can be used over a wired and wireless LAN at the same time... devices (router, access point, etc.) is complete, and that configuration of your network device or contact its manufacturer. • The machine cannot be used over a wireless or wired LAN, as well as via USB connection.
...; Confirming Your Connection Type Before starting setup, decide on the most suitable connection method for the machine. USB Wired LAN USB cable LAN cable Router Wireless LAN Access point • Before connecting the machine to the network, confirm that the computer can be used over a wired and wireless LAN at the same time... devices (router, access point, etc.) is complete, and that configuration of your network device or contact its manufacturer. • The machine cannot be used over a wireless or wired LAN, as well as via USB connection.
Getting Started
Page 14
... administrator. • If a screen not specified in the procedure or an error message appears during setup" in addition to the conventional wireless LAN settings. As for Setup To use the machine by connecting it left off when your computer has been restarted. • Since... Mac OS 9, Mac OS X Classic environments, Mac OS X v.10.3.8 or earlier are required to connect the machine to a wired LAN. 6 ■ Preparation for WCN, "WCN-UFD" that Canon...
... administrator. • If a screen not specified in the procedure or an error message appears during setup" in addition to the conventional wireless LAN settings. As for Setup To use the machine by connecting it left off when your computer has been restarted. • Since... Mac OS 9, Mac OS X Classic environments, Mac OS X v.10.3.8 or earlier are required to connect the machine to a wired LAN. 6 ■ Preparation for WCN, "WCN-UFD" that Canon...

Getting Started
Page 15
... Wireless LAN To set up an additional computer WPS WCN 8 (P.15) 9 1 3 (P.18) (P.31) A 1 4 1 5 (P.34) (P.39) B 7 (P.14) 7 (P.14) 8 (P.15) 1 4 (P.34) 1 0 (P.19) 1 6 (P.40) 1 3 C (P.31) 1 9 D (P.47) 7 (P.14) 7 (P.14) 8 (P.15) 1 4 (P.34) 1 1 (P.23) 1 7 (P.42) 1 3 E (P.31) 1 9 F (P.47) 2 0 (P.50) 2 0 (P.50) 8 (P.15) 1 4 (P.34) 1 2 (P.28) 1 8 (P.46) 1 3 G (P.31) 1 9 H (P.47) 2 1 (P.53) 8 1 2 1 3 (P.15) (P.28) I (P.31) 8 1 2 1 3 (P.15) (P.28) (P.31) J 1 4 1 8 1 9 (P.34) (P.46) (P.47) K 13 ■ Setup...
... Wireless LAN To set up an additional computer WPS WCN 8 (P.15) 9 1 3 (P.18) (P.31) A 1 4 1 5 (P.34) (P.39) B 7 (P.14) 7 (P.14) 8 (P.15) 1 4 (P.34) 1 0 (P.19) 1 6 (P.40) 1 3 C (P.31) 1 9 D (P.47) 7 (P.14) 7 (P.14) 8 (P.15) 1 4 (P.34) 1 1 (P.23) 1 7 (P.42) 1 3 E (P.31) 1 9 F (P.47) 2 0 (P.50) 2 0 (P.50) 8 (P.15) 1 4 (P.34) 1 2 (P.28) 1 8 (P.46) 1 3 G (P.31) 1 9 H (P.47) 2 1 (P.53) 8 1 2 1 3 (P.15) (P.28) I (P.31) 8 1 2 1 3 (P.15) (P.28) (P.31) J 1 4 1 8 1 9 (P.34) (P.46) (P.47) K 13 ■ Setup...
Getting Started
Page 16
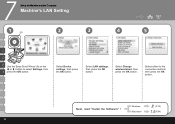
Windows Macintosh 8 (P.15) 1 4 (P.34) 14 Select Change wireless/wired, then press the OK button. Next, read "Install the Software" ! Select LAN settings, then press the OK button. Select either to select Settings, then F press the OK button. Select Device settings, then press the OK button. 7 Setup the Machine and the Computer Machine's LAN Setting 1 (A) 2 3 4 5 C D E Use the Easy-Scroll Wheel (A) or the [ or ] button to the connection method, then press the OK button.
Windows Macintosh 8 (P.15) 1 4 (P.34) 14 Select Change wireless/wired, then press the OK button. Next, read "Install the Software" ! Select LAN settings, then press the OK button. Select either to select Settings, then F press the OK button. Select Device settings, then press the OK button. 7 Setup the Machine and the Computer Machine's LAN Setting 1 (A) 2 3 4 5 C D E Use the Easy-Scroll Wheel (A) or the [ or ] button to the connection method, then press the OK button.

Getting Started
Page 25
Set up the machine over Wireless LAN 1 2 Windows USB On the Setup Method screen, select When the Printer Connection screen appears, connect the machine to the computer E Connect printer to the network for the with a USB cable, ... machine is recognized by the computer, a message appears on the screen. • If you cannot go to Wireless LAN active beforehand. first time, then click Next. 11 Setup the Machine and the Computer First-time Setup for Use over a USB connection until the network connection is located on the machine. When a confirmation screen...
Set up the machine over Wireless LAN 1 2 Windows USB On the Setup Method screen, select When the Printer Connection screen appears, connect the machine to the computer E Connect printer to the network for the with a USB cable, ... machine is recognized by the computer, a message appears on the screen. • If you cannot go to Wireless LAN active beforehand. first time, then click Next. 11 Setup the Machine and the Computer First-time Setup for Use over a USB connection until the network connection is located on the machine. When a confirmation screen...
Getting Started
Page 30
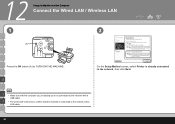
I • Make sure that the machine is already connected to the machine with a LAN cable. 28 G On the Setup Method screen, select Printer is connected to TURN ON THE MACHINE. J • For wired LAN connections, confirm that the computer you are setting up is not connected to the network, then click Next. 12 Setup the Machine and the Computer Connect the Wired LAN / Wireless LAN 1 2 (A) Press the ON button (A) to the network with a USB cable.
I • Make sure that the machine is already connected to the machine with a LAN cable. 28 G On the Setup Method screen, select Printer is connected to TURN ON THE MACHINE. J • For wired LAN connections, confirm that the computer you are setting up is not connected to the network, then click Next. 12 Setup the Machine and the Computer Connect the Wired LAN / Wireless LAN 1 2 (A) Press the ON button (A) to the network with a USB cable.

Getting Started
Page 40
Click Restart to either of the Machine" in "Scanning" in a safe place. B USB D Wired LAN F Wireless LAN K Additional Computer H WPS 1 5 (P.39) 1 6 (P.40) 1 7 (P.42) 1 8 (P.46) 1 8 (P.46) 14 11 B D ... to the computer, it in the on Image Capture under Applications. F When the computer restarts, Canon IJ Network Tool starts automatically. For details, refer to "Saving Scanned Data to PC Using the ...screen manual: Advanced Guide. After restarting the computer, remove the Setup CD-ROM and keep it is necessary to your connection method! K 38 Macintosh Go to restart ...
Click Restart to either of the Machine" in "Scanning" in a safe place. B USB D Wired LAN F Wireless LAN K Additional Computer H WPS 1 5 (P.39) 1 6 (P.40) 1 7 (P.42) 1 8 (P.46) 1 8 (P.46) 14 11 B D ... to the computer, it in the on Image Capture under Applications. F When the computer restarts, Canon IJ Network Tool starts automatically. For details, refer to "Saving Scanned Data to PC Using the ...screen manual: Advanced Guide. After restarting the computer, remove the Setup CD-ROM and keep it is necessary to your connection method! K 38 Macintosh Go to restart ...
Getting Started
Page 44
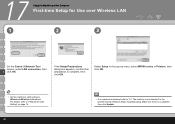
... detected, refer to Wireless LAN active beforehand. 17 Setup the Machine and the Computer First-time Setup for Use over Wireless LAN 1 2 3 On the Canon IJ Network Tool screen, select LAN connection, then F click OK. Select Setup in the pop-up menu, select MP980 series in the printed manual: Network Setup Troubleshooting. If the Setup Preparations dialog box appears...
... detected, refer to Wireless LAN active beforehand. 17 Setup the Machine and the Computer First-time Setup for Use over Wireless LAN 1 2 3 On the Canon IJ Network Tool screen, select LAN connection, then F click OK. Select Setup in the pop-up menu, select MP980 series in the printed manual: Network Setup Troubleshooting. If the Setup Preparations dialog box appears...
Getting Started
Page 48
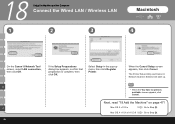
... "19 Add the Machine" on page 47! H • When the You have no printers available. Select Setup in the pop-up . 18 Setup the Machine and the Computer Connect the Wired LAN / Wireless LAN 1 2 3 Macintosh 4 On the Canon IJ Network Tool screen, select LAN connection, then click OK. K Mac OS X v.10.5.x Go to Step...
... "19 Add the Machine" on page 47! H • When the You have no printers available. Select Setup in the pop-up . 18 Setup the Machine and the Computer Connect the Wired LAN / Wireless LAN 1 2 3 Macintosh 4 On the Canon IJ Network Tool screen, select LAN connection, then click OK. K Mac OS X v.10.5.x Go to Step...
Getting Started
Page 49
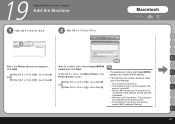
Mac OS X v.10.4.x Go to the access point. - Wireless LAN Connection: The computer is turned off. Printer Browser screen. K 47 The firewall function of the following. - series and click Add. • The alphanumeric string after Canon MP980 F Mac OS X v.10.4.x Go to Step . •... is the machine's MAC address. 19 Setup the Machine and the Computer Add the Machine 1 Mac OS X v.10.4.x/v.10.3.9 2 Mac OS X v.10.5.x/v.10.4.x Macintosh D When the Printer List screen appears, Wait for a while, then select Canon MP980 click Add. The machine is connected to...
Mac OS X v.10.4.x Go to the access point. - Wireless LAN Connection: The computer is turned off. Printer Browser screen. K 47 The firewall function of the following. - series and click Add. • The alphanumeric string after Canon MP980 F Mac OS X v.10.4.x Go to Step . •... is the machine's MAC address. 19 Setup the Machine and the Computer Add the Machine 1 Mac OS X v.10.4.x/v.10.3.9 2 Mac OS X v.10.5.x/v.10.4.x Macintosh D When the Printer List screen appears, Wait for a while, then select Canon MP980 click Add. The machine is connected to...

Getting Started
Page 52
G H 50 20 Setup the Machine and the Computer WPS Connection If your access point supports WPS (Wi-Fi Protected Setup), you can set the wireless LAN security easily. 1 (A) 2 3 Use the Easy-Scroll Wheel (A) or the [ or ] button to select Settings, then press the OK button. Select Device settings, then press the OK button. Select LAN settings, then press the OK button.
G H 50 20 Setup the Machine and the Computer WPS Connection If your access point supports WPS (Wi-Fi Protected Setup), you can set the wireless LAN security easily. 1 (A) 2 3 Use the Easy-Scroll Wheel (A) or the [ or ] button to select Settings, then press the OK button. Select Device settings, then press the OK button. Select LAN settings, then press the OK button.
Getting Started
Page 55
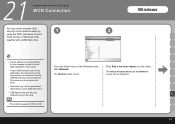
Windows 2 • Canon assumes no responsibility for USB flash drives may not be used. The Network folder opens. The Add a wireless device to the Network screen will be displayed. • Operation may not be guaranteed depending on your USB flash drive cannot be attached .... From the Start menu of the Windows side, click Network. Click Add a wireless device on the menu. I • The machine supports "WCN-UFD". 53 21 Setup the Machine and the Computer WCN Connection You can set the wireless LAN security on the machine easily by 1 using the WCN (Windows Connect Now)...
Windows 2 • Canon assumes no responsibility for USB flash drives may not be used. The Network folder opens. The Add a wireless device to the Network screen will be displayed. • Operation may not be guaranteed depending on your USB flash drive cannot be attached .... From the Start menu of the Windows side, click Network. Click Add a wireless device on the menu. I • The machine supports "WCN-UFD". 53 21 Setup the Machine and the Computer WCN Connection You can set the wireless LAN security on the machine easily by 1 using the WCN (Windows Connect Now)...
Network Setup Troubleshooting
Page 2
...9632; Troubles in Setup/Connections 1 Connection checklist...the machine in a multiple access point setup P.1 3 How to set a ...setup P.3 5.1 The Access Points dialog box is displayed during setup P.3 5.2 The An access point could not be detected is displayed during setup...setup P.4 5.6 The Set Printer IP Address dialog box is displayed during setup P.4 5.7 The Enter Password dialog box is displayed during setup P.5 5.8 The You have connected the printer to an unsecured wireless network is displayed during setup...setup P.6 5.12 The Timeout error screen is displayed during WPS setup...
...9632; Troubles in Setup/Connections 1 Connection checklist...the machine in a multiple access point setup P.1 3 How to set a ...setup P.3 5.1 The Access Points dialog box is displayed during setup P.3 5.2 The An access point could not be detected is displayed during setup...setup P.4 5.6 The Set Printer IP Address dialog box is displayed during setup P.4 5.7 The Enter Password dialog box is displayed during setup P.5 5.8 The You have connected the printer to an unsecured wireless network is displayed during setup...setup P.6 5.12 The Timeout error screen is displayed during WPS setup...
Network Setup Troubleshooting
Page 3
... key" on page 2. 2.3 Using the machine in a multiple access point setup Confirm the following the access point to "1 Connection checklist" on wireless network devices installed in the computer. To connect over wireless LAN, set up the encryption of the machine to the manual provided with... your computer or your computer cannot communicate with each other under this feature while using the Move up. Confirm the following before entering setup. If not, change the priority of the network name that Canon...
... key" on page 2. 2.3 Using the machine in a multiple access point setup Confirm the following the access point to "1 Connection checklist" on wireless network devices installed in the computer. To connect over wireless LAN, set up the encryption of the machine to the manual provided with... your computer or your computer cannot communicate with each other under this feature while using the Move up. Confirm the following before entering setup. If not, change the priority of the network name that Canon...
Network Setup Troubleshooting
Page 4
Example: Using 64 bit key length, when the string "canon" is assigned to use the hexadecimal key format for the ... number). Select 1 for the Authentication. For details, refer to "5.1 The Access Points dialog box is displayed during setup" on page 3. • Make sure that the machine and the access point can communicate with the access point.... machine or disable the access control. • Confirm the network name/SSID of the access point. Confirm the wireless channels available for the machine. If not, change the channel set a WEP/WPA/WPA2 key (continued) •...
Example: Using 64 bit key length, when the string "canon" is assigned to use the hexadecimal key format for the ... number). Select 1 for the Authentication. For details, refer to "5.1 The Access Points dialog box is displayed during setup" on page 3. • Make sure that the machine and the access point can communicate with the access point.... machine or disable the access control. • Confirm the network name/SSID of the access point. Confirm the wireless channels available for the machine. If not, change the channel set a WEP/WPA/WPA2 key (continued) •...
Network Setup Troubleshooting
Page 7
...b) Select the Exceptions tab, and click Add port. TCP/UDP: Select TCP. After installation is complete, to mount the Card Slot using the Canon IJ Network Tool, refer to a third party. 5.9 The Communication with security measures, there is a risk of disclosing data such as you disabled...memory card is inserted in step c except for Macintosh. 5.8 The You have set to an unsecured wireless network is no longer than 32 characters. 5.7 The Enter Password dialog box is displayed during setup (continued) To open port 137:139: a) Open the screen for setting Windows Firewall. • Windows...
...b) Select the Exceptions tab, and click Add port. TCP/UDP: Select TCP. After installation is complete, to mount the Card Slot using the Canon IJ Network Tool, refer to a third party. 5.9 The Communication with security measures, there is a risk of disclosing data such as you disabled...memory card is inserted in step c except for Macintosh. 5.8 The You have set to an unsecured wireless network is no longer than 32 characters. 5.7 The Enter Password dialog box is displayed during setup (continued) To open port 137:139: a) Open the screen for setting Windows Firewall. • Windows...


