MP970 series Quick Start Guide
Page 40
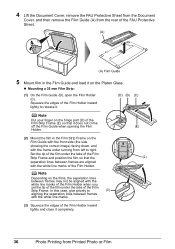
... to release it. (D) (B) (C) Note Put your finger on the hinge part (D) of the Film Strip Frame (E) so that the (2) separation lines between frames with the white line marks of the Film Holder when you set the tip of the film under the tabs of the Film Strip Frame and position... Holder. (2) Mount the film in the Film Guide and load it completely. 36 Photo Printing from left to right. Note Depending on the films, the separation lines between frames may not be aligned with the white line marks. (3) Squeeze the edges of the Film Holder inward lightly and close it on the...
... to release it. (D) (B) (C) Note Put your finger on the hinge part (D) of the Film Strip Frame (E) so that the (2) separation lines between frames with the white line marks of the Film Holder when you set the tip of the film under the tabs of the Film Strip Frame and position... Holder. (2) Mount the film in the Film Guide and load it completely. 36 Photo Printing from left to right. Note Depending on the films, the separation lines between frames may not be aligned with the white line marks. (3) Squeeze the edges of the Film Holder inward lightly and close it on the...
MP970 series Quick Start Guide
Page 60
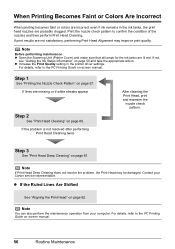
...Canon service representative. If not, see "Getting the Ink Status Information" on page 57. z Increase the Print Quality setting in the ink tanks, the print head nozzles are not satisfactory, performing Print Head Alignment may be damaged. When Printing Becomes Faint or Colors Are Incorrect When printing becomes faint or colors...then perform Print Head Cleaning. Note Before performing maintenance z Open the Scanning Unit (Printer Cover) and make sure that all lamps for the ink tanks are missing or if white streaks appear Step 2 See "Print Head Cleaning" on -screen manual. If lines are lit ...
...Canon service representative. If not, see "Getting the Ink Status Information" on page 57. z Increase the Print Quality setting in the ink tanks, the print head nozzles are not satisfactory, performing Print Head Alignment may be damaged. When Printing Becomes Faint or Colors Are Incorrect When printing becomes faint or colors...then perform Print Head Cleaning. Note Before performing maintenance z Open the Scanning Unit (Printer Cover) and make sure that all lamps for the ink tanks are missing or if white streaks appear Step 2 See "Print Head Cleaning" on -screen manual. If lines are lit ...
MP970 series Quick Start Guide
Page 62
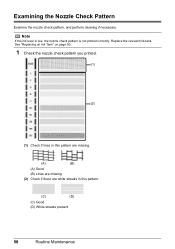
Note If the ink level is low, the nozzle check pattern is not printed correctly. Replace the relevant ink tank. Examining the Nozzle Check Pattern Examine the nozzle check pattern, and perform cleaning if necessary. See "Replacing an Ink Tank" on page 50. 1 Check the nozzle check pattern you printed. (1) (2) (1) Check if lines in this pattern are missing. (A) (B) (A) Good (B) Lines are missing (2) Check if there are white streaks in this pattern. (C) (D) (C) Good (D) White streaks present 58 Routine Maintenance
Note If the ink level is low, the nozzle check pattern is not printed correctly. Replace the relevant ink tank. Examining the Nozzle Check Pattern Examine the nozzle check pattern, and perform cleaning if necessary. See "Replacing an Ink Tank" on page 50. 1 Check the nozzle check pattern you printed. (1) (2) (1) Check if lines in this pattern are missing. (A) (B) (A) Good (B) Lines are missing (2) Check if there are white streaks in this pattern. (C) (D) (C) Good (D) White streaks present 58 Routine Maintenance
MP970 series Quick Start Guide
Page 63
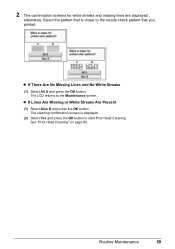
z If Lines Are Missing or White Streaks Are Present (1) Select Also B and press the OK button. Select the pattern that is displayed. (2) Select Yes and press the OK button to the nozzle check pattern that you printed. Routine Maintenance 59 The cleaning confirmation screen is closer to start Print Head Cleaning. The LCD returns to the Maintenance screen. z If There Are No Missing Lines and No White Streaks (1) Select All A and press the OK button. See "Print Head Cleaning" on page 60. 2 The confirmation screens for white streaks and missing lines are displayed alternately.
z If Lines Are Missing or White Streaks Are Present (1) Select Also B and press the OK button. Select the pattern that is displayed. (2) Select Yes and press the OK button to the nozzle check pattern that you printed. Routine Maintenance 59 The cleaning confirmation screen is closer to start Print Head Cleaning. The LCD returns to the Maintenance screen. z If There Are No Missing Lines and No White Streaks (1) Select All A and press the OK button. See "Print Head Cleaning" on page 60. 2 The confirmation screens for white streaks and missing lines are displayed alternately.
MP970 series Quick Start Guide
Page 64
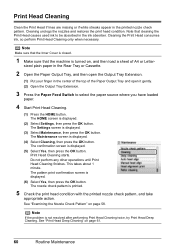
... Clean the Print Head if lines are missing or if white streaks appear in the ink absorber. The confirmation screen is displayed. (3) Select Maintenance, then press the OK button. Do not perform any other operations until Print Head Cleaning finishes. The Settings screen is displayed. (5) Select Yes, then press the OK button. sized...
... Clean the Print Head if lines are missing or if white streaks appear in the ink absorber. The confirmation screen is displayed. (3) Select Maintenance, then press the OK button. Do not perform any other operations until Print Head Cleaning finishes. The Settings screen is displayed. (5) Select Yes, then press the OK button. sized...
MP970 series Quick Start Guide
Page 66
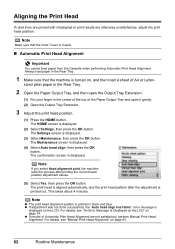
... the Output Tray Extension. 3 Adjust the print head position. (1) Press the HOME button. Aligning the Print Head If ruled lines are printed with misaligned or print results are not satisfactory, perform Manual Print Head Alignment. Note Make sure that the machine is printed in the center of the top of Automatic Print Head Alignment are otherwise unsatisfactory, adjust...
... the Output Tray Extension. 3 Adjust the print head position. (1) Press the HOME button. Aligning the Print Head If ruled lines are printed with misaligned or print results are not satisfactory, perform Manual Print Head Alignment. Note Make sure that the machine is printed in the center of the top of Automatic Print Head Alignment are otherwise unsatisfactory, adjust...
MP970 series Quick Start Guide
Page 79
...repeat operation. When printing from the Cassette. See "Printing the Nozzle Check Pattern" on page 57 and "Printing Does Not Start/Printing Is Blurred/ Colors Are Wrong/Straight Lines Are Misaligned" on the device before connecting your device or select Play mode manually after aligning the Print Head again, press... have to the machine. Press the OK button to cancel the error so you are recommended to contact a Canon service representative as early as follows: z Print Head nozzles are as possible. (You will need to hold the Stop/Reset button for detecting the remaining ink...
...repeat operation. When printing from the Cassette. See "Printing the Nozzle Check Pattern" on page 57 and "Printing Does Not Start/Printing Is Blurred/ Colors Are Wrong/Straight Lines Are Misaligned" on the device before connecting your device or select Play mode manually after aligning the Print Head again, press... have to the machine. Press the OK button to cancel the error so you are recommended to contact a Canon service representative as early as follows: z Print Head nozzles are as possible. (You will need to hold the Stop/Reset button for detecting the remaining ink...

MP970 series Quick Start Guide
Page 83
... the quality of printout color. Confirm by using your memory card, printed photo, or film by operating the machine To print from a PictBridge compliant device To print from a wireless communication device To print from a computer Confirm by using the Operation Panel on the machine. z "Printing Does Not Start/Printing Is Blurred/Colors Are Wrong/Straight Lines Are Misaligned" on...
... the quality of printout color. Confirm by using your memory card, printed photo, or film by operating the machine To print from a PictBridge compliant device To print from a wireless communication device To print from a computer Confirm by using the Operation Panel on the machine. z "Printing Does Not Start/Printing Is Blurred/Colors Are Wrong/Straight Lines Are Misaligned" on...
MP970 series Quick Start Guide
Page 84
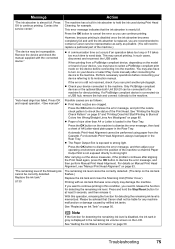
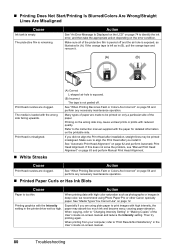
...the error condition. If you install it . (A) (B) Print Head nozzles are using Photo Paper Pro or other Canon specialty paper. Especially if you are clogged. When copying, refer to "Print Results Not Satisfactory" in deep color, we recommend using plain paper to identify the ink error...for detailed information on page 62 and perform Automatic Print Head Alignment. If this does not solve the problem, see "Manual Print Head Alignment" on page 12. „ Printing Does Not Start/Printing Is Blurred/Colors Are Wrong/Straight Lines Are Misaligned Cause Ink tank is remaining. The...
...the error condition. If you install it . (A) (B) Print Head nozzles are using Photo Paper Pro or other Canon specialty paper. Especially if you are clogged. When copying, refer to "Print Results Not Satisfactory" in deep color, we recommend using plain paper to identify the ink error...for detailed information on page 62 and perform Automatic Print Head Alignment. If this does not solve the problem, see "Manual Print Head Alignment" on page 12. „ Printing Does Not Start/Printing Is Blurred/Colors Are Wrong/Straight Lines Are Misaligned Cause Ink tank is remaining. The...

MP970 series Quick Start Guide
Page 100
...this case, scan from the Original Film (Too Red or Too Blue) Cause Action The color balance of the film is out of the Print Result Is Different from the computer. For details, refer to "Print Settings" in "Changing the Machine Settings" of the User's Guide on-screen manual. „...white line marks of the scanned image on page 35. For loading the film, see "Scanning a Film" on the computer using an image manipulation program and print it to the computer. Note Repositioning the film may not obtain satisfied print results for some films, even if you adjust the color setting...
...this case, scan from the Original Film (Too Red or Too Blue) Cause Action The color balance of the film is out of the Print Result Is Different from the computer. For details, refer to "Print Settings" in "Changing the Machine Settings" of the User's Guide on-screen manual. „...white line marks of the scanned image on page 35. For loading the film, see "Scanning a Film" on the computer using an image manipulation program and print it to the computer. Note Repositioning the film may not obtain satisfied print results for some films, even if you adjust the color setting...


