MP970 series Quick Start Guide
Page 5
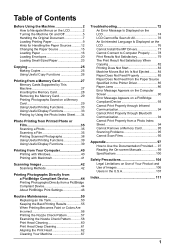
... an Ink Tank 50 Keeping the Best Printing Results 55 When Printing Becomes Faint or Colors Are Incorrect 56 Printing the Nozzle Check Pattern 57 Examining the Nozzle Check Pattern ...........58 Print Head Cleaning 60 Print Head Deep Cleaning 61 Aligning the Print Head 62 Cleaning Your Machine 67 Troubleshooting 72... An Error Message Is Displayed on the LCD 74 LCD Cannot Be Seen At All 76 An Unintended Language Is Displayed on the LCD 76 Cannot Install the...
... an Ink Tank 50 Keeping the Best Printing Results 55 When Printing Becomes Faint or Colors Are Incorrect 56 Printing the Nozzle Check Pattern 57 Examining the Nozzle Check Pattern ...........58 Print Head Cleaning 60 Print Head Deep Cleaning 61 Aligning the Print Head 62 Cleaning Your Machine 67 Troubleshooting 72... An Error Message Is Displayed on the LCD 74 LCD Cannot Be Seen At All 76 An Unintended Language Is Displayed on the LCD 76 Cannot Install the...
MP970 series Quick Start Guide
Page 9
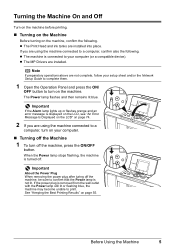
z The Print Head and ink tanks are using the machine connected to a computer, turn off the Machine 1 To turn on the machine. Note If preparatory operations above are ... . z The machine is displayed on the LCD, see "An Error Message Is Displayed on the LCD" on page 74. 2 If you are installed into place. If you are installed. Important If the Alarm lamp lights up or flashes orange and an error message is connected to turn on your computer (or a compatible...
z The Print Head and ink tanks are using the machine connected to a computer, turn off the Machine 1 To turn on the machine. Note If preparatory operations above are ... . z The machine is displayed on the LCD, see "An Error Message Is Displayed on the LCD" on page 74. 2 If you are installed into place. If you are installed. Important If the Alarm lamp lights up or flashes orange and an error message is connected to turn on your computer (or a compatible...

MP970 series Quick Start Guide
Page 54
...action. z For information on page 74 and confirm how to install the ink tanks in the following ink may have run out. z If printing becomes faint or white streaks appear despite sufficient ink levels, see "When Printing Becomes Faint or Colors Are Incorrect" on page 56. „ Getting the Ink ... whether any symbols are displayed here. When ink runs out or other errors occur, an error message is installed in "An Error Message Is Displayed on the LCD" on the Print Head Holder. Routine Maintenance Replacing an Ink Tank This section explains the way to confirm the ink status and the...
...action. z For information on page 74 and confirm how to install the ink tanks in the following ink may have run out. z If printing becomes faint or white streaks appear despite sufficient ink levels, see "When Printing Becomes Faint or Colors Are Incorrect" on page 56. „ Getting the Ink ... whether any symbols are displayed here. When ink runs out or other errors occur, an error message is installed in "An Error Message Is Displayed on the LCD" on the Print Head Holder. Routine Maintenance Replacing an Ink Tank This section explains the way to confirm the ink status and the...
MP970 series Quick Start Guide
Page 56
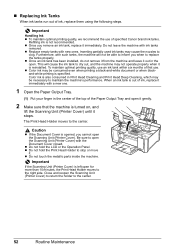
... an ink tank is out of specified Canon brand ink tanks. Refilling ink is turned on, and lift the Scanning Unit (Printer Cover) until it . z Replace empty tanks with ink tanks removed. z Color ink may cause the nozzles to the right side. The Print Head Holder moves to the center. 52 Routine...Tanks When ink tanks run out of the Paper Output Tray and open . Important Handling Ink z To maintain optimal printing quality, we recommend the use . z Once an ink tank has been installed, do not remove it from the machine and leave it gently. 2 Make sure that the machine is not ...
... an ink tank is out of specified Canon brand ink tanks. Refilling ink is turned on, and lift the Scanning Unit (Printer Cover) until it . z Replace empty tanks with ink tanks removed. z Color ink may cause the nozzles to the right side. The Print Head Holder moves to the center. 52 Routine...Tanks When ink tanks run out of the Paper Output Tray and open . Important Handling Ink z To maintain optimal printing quality, we recommend the use . z Once an ink tank has been installed, do not remove it from the machine and leave it gently. 2 Make sure that the machine is not ...

MP970 series Quick Start Guide
Page 58
... is closed, see "An Error Message Is Displayed on the LCD" on the ink tank until the ink tank snaps firmly into the Print Head. (G) Make sure the position of the ink tank into place. (3) Make sure that the ink lamp lights up red. z Do not hold the ... ink tank. (G) (1) Insert the front end of the tank matches the label. (2) Press on the mark on page 74. Wait until Print Head Cleaning finishes. Important Install all the ink tanks are installed. (1) 6 Gently close the Scanning Unit (Printer Cover). (3) (2) Caution z Be sure to hold the LCD or the Operation Panel. Do...
... is closed, see "An Error Message Is Displayed on the LCD" on the ink tank until the ink tank snaps firmly into the Print Head. (G) Make sure the position of the ink tank into place. (3) Make sure that the ink lamp lights up red. z Do not hold the ... ink tank. (G) (1) Insert the front end of the tank matches the label. (2) Press on the mark on page 74. Wait until Print Head Cleaning finishes. Important Install all the ink tanks are installed. (1) 6 Gently close the Scanning Unit (Printer Cover). (3) (2) Caution z Be sure to hold the LCD or the Operation Panel. Do...
MP970 series Quick Start Guide
Page 59
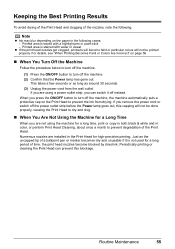
... a protective cap on the paper in color, or perform Print Head Cleaning, about once a month to dry and clog. „ When You Are Not Using the Machine for a long period of the nozzles, note the following cases; - Routine Maintenance 55 If you are installed in the Print Head for a long time, print or copy in both black...
... a protective cap on the paper in color, or perform Print Head Cleaning, about once a month to dry and clog. „ When You Are Not Using the Machine for a long period of the nozzles, note the following cases; - Routine Maintenance 55 If you are installed in the Print Head for a long time, print or copy in both black...
MP970 series Quick Start Guide
Page 78
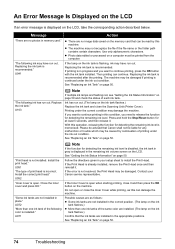
... memory card that can be damaged. If the Print Head is installed." Replacing the ink tank is recommended." Then printing can damage the machine. "The following color is already installed, remove the Print Head once and then reinstall it . "Some ink ...tanks are flashing red, see "Getting the Ink Status Information" on the ink tank flashes.) Confirm that Canon shall not be damaged if printing is not resolved, the Print Head...
... memory card that can be damaged. If the Print Head is installed." Replacing the ink tank is recommended." Then printing can damage the machine. "The following color is already installed, remove the Print Head once and then reinstall it . "Some ink ...tanks are flashing red, see "Getting the Ink Status Information" on the ink tank flashes.) Confirm that Canon shall not be damaged if printing is not resolved, the Print Head...
MP970 series Quick Start Guide
Page 84
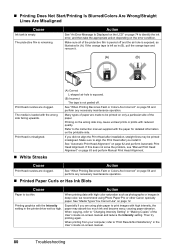
...high. Printing graphics with reduced quality. When copying, refer to align the Print Head after you did not align the Print Head after installation, straight lines may absorb too much ink and become wavy, causing paper abrasion. „ Printing Does Not Start/Printing Is Blurred/Colors Are ... tape and remove it . See "When Printing Becomes Faint or Colors Are Incorrect" on page 12. See "Automatic Print Head Alignment" on -screen manual. 80 Troubleshooting Cause Action Print Head nozzles are using Photo Paper Pro or other Canon specialty paper. If the orange tape is ...
...high. Printing graphics with reduced quality. When copying, refer to align the Print Head after you did not align the Print Head after installation, straight lines may absorb too much ink and become wavy, causing paper abrasion. „ Printing Does Not Start/Printing Is Blurred/Colors Are ... tape and remove it . See "When Printing Becomes Faint or Colors Are Incorrect" on page 12. See "Automatic Print Head Alignment" on -screen manual. 80 Troubleshooting Cause Action Print Head nozzles are using Photo Paper Pro or other Canon specialty paper. If the orange tape is ...
MP970 series Quick Start Guide
Page 95
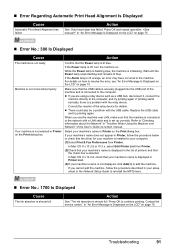
...procedure below to check that the USB cable is securely plugged into the USB port of the relay device for your machine is installed to reinstall the MP Drivers. „ Error No.: 1700 Is Displayed Cause The ink absorber is not selected in "An ... sheet or the Network Setup Guide to your computer. (1)Select Print & Fax Preferences from Printer. (2)Check that the Power lamp is a problem with the relay device. „ Error Regarding Automatic Print Head Alignment Is Displayed Cause Automatic Print Head Alignment has failed. Refer to "Checking Information about the Network...
...procedure below to check that the USB cable is securely plugged into the USB port of the relay device for your machine is installed to reinstall the MP Drivers. „ Error No.: 1700 Is Displayed Cause The ink absorber is not selected in "An ... sheet or the Network Setup Guide to your computer. (1)Select Print & Fax Preferences from Printer. (2)Check that the Power lamp is a problem with the relay device. „ Error Regarding Automatic Print Head Alignment Is Displayed Cause Automatic Print Head Alignment has failed. Refer to "Checking Information about the Network...
MP970 series Quick Start Guide
Page 97
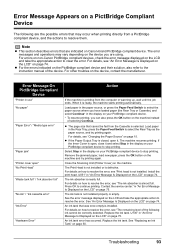
...On PictBridge Compliant Device "Printer in "An Error Message Is Displayed on the LCD" on the machine. The machine resumes printing. Install the print head. For details on how to continue printing. An ink tank error has occurred. For details, see "Changing the Paper Source" on page 15. For other ... the LCD" on page 75. Remove the jammed paper, load new paper, press the OK button on Canon-brand PictBridge compliant device. For errors on non-Canon PictBridge compliant devices, check the error message displayed on your PictBridge compliant device to select the Rear Tray as...
...On PictBridge Compliant Device "Printer in "An Error Message Is Displayed on the LCD" on the machine. The machine resumes printing. Install the print head. For details on how to continue printing. An ink tank error has occurred. For details, see "Changing the Paper Source" on page 15. For other ... the LCD" on page 75. Remove the jammed paper, load new paper, press the OK button on Canon-brand PictBridge compliant device. For errors on non-Canon PictBridge compliant devices, check the error message displayed on your PictBridge compliant device to select the Rear Tray as...

MP970 series Quick Start Guide
Page 104
...25% - 400% (1% unit) 100 Appendix Specifications Printing resolution (dpi) Interface Print width Acoustic noise level Operating environment Storage environment Power supply Power consumption External dimensions Weight Print Head General Specifications 9600 (horizontal)* x 2400 (vertical)...Printing (Copy): Approx. 22 W Standby (minimum): Approx. 3.6 W OFF: Approx. 1.0 W Approx. 18.5 (W) x 15.6 (D) x 8.4 (H) inches / Approx. 471 (W) x 396 (D) x 214 (H) mm * With the Paper Support and Paper Output Tray retracted. Approx. 11.9 kg (Approx. 26.3 lb.) * With the Print Head and ink tanks installed...
...25% - 400% (1% unit) 100 Appendix Specifications Printing resolution (dpi) Interface Print width Acoustic noise level Operating environment Storage environment Power supply Power consumption External dimensions Weight Print Head General Specifications 9600 (horizontal)* x 2400 (vertical)...Printing (Copy): Approx. 22 W Standby (minimum): Approx. 3.6 W OFF: Approx. 1.0 W Approx. 18.5 (W) x 15.6 (D) x 8.4 (H) inches / Approx. 471 (W) x 396 (D) x 214 (H) mm * With the Paper Support and Paper Output Tray retracted. Approx. 11.9 kg (Approx. 26.3 lb.) * With the Print Head and ink tanks installed...
MP970 series Easy Setup Instructions
Page 1
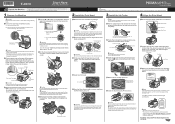
... LCD, then press the OK button. (1) Press the { or } button to wipe it in the Quick Start Guide. 2 Install the Print Head a Remove the Print Head from the Print Head and discard it to the left open the Scanning Unit (Printer Cover) with the Cover Guide on the right side, then slide ...the Paper Guide against the illustration printed on the lid of the arrow to the color guide on yourself when handling these ...
... LCD, then press the OK button. (1) Press the { or } button to wipe it in the Quick Start Guide. 2 Install the Print Head a Remove the Print Head from the Print Head and discard it to the left open the Scanning Unit (Printer Cover) with the Cover Guide on the right side, then slide ...the Paper Guide against the illustration printed on the lid of the arrow to the color guide on yourself when handling these ...


