MP970 series Quick Start Guide
Page 29
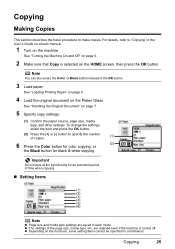
...On and Off" on page 5. 2 Make sure that Copy is turned off. z Depending on the HOME screen, then press the OK button. See "Loading Printing Paper" on page 9. 4 Load the original document on page 7. 5 Specify copy settings. (1) Confirm the paper source, page size, media type, and ...to specify the number of the OK button. 3 Load paper. Copying 25 Note You can also press the Color or Black button instead of copies. (1) 6 Press the Color button for color copying, or (2) the Black button for an extended period of the page size, media type, etc. z The settings of time when...
...On and Off" on page 5. 2 Make sure that Copy is turned off. z Depending on the HOME screen, then press the OK button. See "Loading Printing Paper" on page 9. 4 Load the original document on page 7. 5 Specify copy settings. (1) Confirm the paper source, page size, media type, and ...to specify the number of the OK button. 3 Load paper. Copying 25 Note You can also press the Color or Black button instead of copies. (1) 6 Press the Color button for color copying, or (2) the Black button for an extended period of the page size, media type, etc. z The settings of time when...
MP970 series Quick Start Guide
Page 30
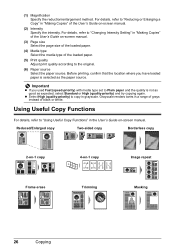
Before printing, confirm that the location where you used Fast (speed-priority) with media type set to "Changing Intensity Setting" in "Making Copies" of the User's Guide on -screen manual. (3) Page size Select the page size of the loaded paper. (4) Media type Select the media type of black or white. Reduced/Enlarged copy...
Before printing, confirm that the location where you used Fast (speed-priority) with media type set to "Changing Intensity Setting" in "Making Copies" of the User's Guide on -screen manual. (3) Page size Select the page size of the loaded paper. (4) Media type Select the media type of black or white. Reduced/Enlarged copy...

MP970 series Quick Start Guide
Page 36
under the following conditions: z Layout print is selected as on black areas. (7) Face brightener Brightens a darkened face on blue areas like effect. (13) Fade restoration*2 Corrects the color when printing photos that have faded or color cast over time. *1 Can be selected only in portraits caused by flash...the photo taken against the light. (8) Image optimizer*1 Corrects and smooths the jagged contours for printing. (9) Brightness Adjust brightness. (10) Contrast Adjust contrast. (11) Color hue Adjust color hue. Note It is selected in each mode. Under these conditions, even if both the ...
under the following conditions: z Layout print is selected as on black areas. (7) Face brightener Brightens a darkened face on blue areas like effect. (13) Fade restoration*2 Corrects the color when printing photos that have faded or color cast over time. *1 Can be selected only in portraits caused by flash...the photo taken against the light. (8) Image optimizer*1 Corrects and smooths the jagged contours for printing. (9) Brightness Adjust brightness. (10) Contrast Adjust contrast. (11) Color hue Adjust color hue. Note It is selected in each mode. Under these conditions, even if both the ...
MP970 series Quick Start Guide
Page 43
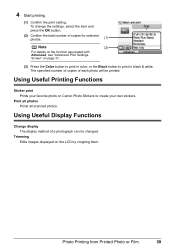
... on Canon Photo Stickers to print in black & white. Using Useful Printing Functions Sticker print Prints your own stickers. Using Useful Display Functions Change display The display method of copies for selected photos. (1) Note (2) For details on the function associated with Advanced, see "Advanced Print Settings Screen" on page 31. (3) Press the Color button to print in color, or the Black...
... on Canon Photo Stickers to print in black & white. Using Useful Printing Functions Sticker print Prints your own stickers. Using Useful Display Functions Change display The display method of copies for selected photos. (1) Note (2) For details on the function associated with Advanced, see "Advanced Print Settings Screen" on page 31. (3) Press the Color button to print in color, or the Black...

MP970 series Quick Start Guide
Page 51
...black areas. - z 35 mm Film Style Layout (Contact Printing Layout)*3: You can print 4 images on the model. - If you select Date, File No., or Both, the date and/or file number will be printed over the date printed by flash photography. z Date/File No. When you select Default, the most suitable correction for printing using a Canon...-brand PictBridge compliant device, the following two options are using the Photo opt. z N-up *3: Prints 20 images specified with a border. The following additional options may be printed even ...
...black areas. - z 35 mm Film Style Layout (Contact Printing Layout)*3: You can print 4 images on the model. - If you select Date, File No., or Both, the date and/or file number will be printed over the date printed by flash photography. z Date/File No. When you select Default, the most suitable correction for printing using a Canon...-brand PictBridge compliant device, the following two options are using the Photo opt. z N-up *3: Prints 20 images specified with a border. The following additional options may be printed even ...

MP970 series Quick Start Guide
Page 53
...to Default on the PictBridge compliant device when you want to make settings on black areas. (9) Image optimizer Corrects and smooths the jagged contours for printing. (10) Red eye correc. Layout (5) Photo opt. pro Automatically optimizes ...Print quality Select the print quality, when printing - For example, you can increase red or yellow to adjust the skin tone. (14) Effects Applies special effects to the photo, such as printing in portraits caused by flash photography. (11) Brightness Adjust brightness. (12) Contrast Adjust contrast. (13) Color hue Adjust color...
...to Default on the PictBridge compliant device when you want to make settings on black areas. (9) Image optimizer Corrects and smooths the jagged contours for printing. (10) Red eye correc. Layout (5) Photo opt. pro Automatically optimizes ...Print quality Select the print quality, when printing - For example, you can increase red or yellow to adjust the skin tone. (14) Effects Applies special effects to the photo, such as printing in portraits caused by flash photography. (11) Brightness Adjust brightness. (12) Contrast Adjust contrast. (13) Color hue Adjust color...
MP970 series Quick Start Guide
Page 56
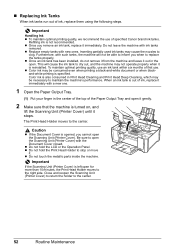
... Close and reopen the Scanning Unit (Printer Cover) to return the holder to the center. z Once you remove an ink tank, replace it . z Color ink may not operate properly when it is turned on, and lift the Scanning Unit (Printer Cover) until it immediately with a new one. 1 Open the...center of the top of specified Canon brand ink tanks. Caution z If the Document Cover is specified. z Do not hold the LCD or the Operation Panel. z Replace empty tanks with ink tanks removed. Inserting partially used ink tanks may be consumed even when printing a black-and-white document or when blackand...
... Close and reopen the Scanning Unit (Printer Cover) to return the holder to the center. z Once you remove an ink tank, replace it . z Color ink may not operate properly when it is turned on, and lift the Scanning Unit (Printer Cover) until it immediately with a new one. 1 Open the...center of the top of specified Canon brand ink tanks. Caution z If the Document Cover is specified. z Do not hold the LCD or the Operation Panel. z Replace empty tanks with ink tanks removed. Inserting partially used ink tanks may be consumed even when printing a black-and-white document or when blackand...
MP970 series Quick Start Guide
Page 59
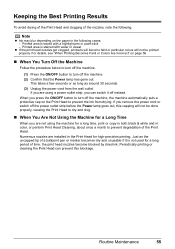
.../OFF button to prevent degradation of the Print Head. When you are using the machine for a long time, print or copy in both black & white and in the Print Head for high-precision printing. Numerous nozzles are not using a power outlet strip, you are installed in color, or perform Print Head Cleaning, about once a month to turn...
.../OFF button to prevent degradation of the Print Head. When you are using the machine for a long time, print or copy in both black & white and in the Print Head for high-precision printing. Numerous nozzles are not using a power outlet strip, you are installed in color, or perform Print Head Cleaning, about once a month to turn...
MP970 series Quick Start Guide
Page 66
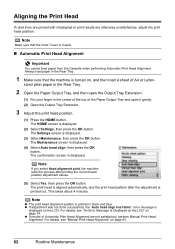
... Output Tray Extension. (1) Put your finger in the center of the top of Automatic Print Head Alignment are otherwise unsatisfactory, adjust the print head position. z If adjustment was not done successfully, the "Auto head align has ...Print Head Alignment. This takes about 4 minutes. For details, see "An Error Message Is Displayed on the LCD" on page 63. 62 Routine Maintenance The Maintenance screen is closed. „ Automatic Print Head Alignment Important You cannot feed paper from the Cassette when performing Automatic Print Head Alignment. Always load paper in black...
... Output Tray Extension. (1) Put your finger in the center of the top of Automatic Print Head Alignment are otherwise unsatisfactory, adjust the print head position. z If adjustment was not done successfully, the "Auto head align has ...Print Head Alignment. This takes about 4 minutes. For details, see "An Error Message Is Displayed on the LCD" on page 63. 62 Routine Maintenance The Maintenance screen is closed. „ Automatic Print Head Alignment Important You cannot feed paper from the Cassette when performing Automatic Print Head Alignment. Always load paper in black...
MP970 series Easy Setup Instructions
Page 1
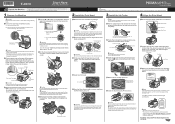
.... OK Note • The pattern is displayed on the LCD, press the Back button on the lid of the bag the print head comes in black and blue. • When Automatic Print Head Alignment cannot be executed correctly, the message "Auto head align has failed." Extension Document Cover Paper Support d Use the { ...screen. c Insert the ink tank into the right-hand slot and press the mark on the Print Head Lock Lever. Close and reopen the Scanning Unit (Printer Cover) to return the Holder to the color guide on the ink tank until the Power lamp stops flashing and remains lit blue. Once ...
.... OK Note • The pattern is displayed on the LCD, press the Back button on the lid of the bag the print head comes in black and blue. • When Automatic Print Head Alignment cannot be executed correctly, the message "Auto head align has failed." Extension Document Cover Paper Support d Use the { ...screen. c Insert the ink tank into the right-hand slot and press the mark on the Print Head Lock Lever. Close and reopen the Scanning Unit (Printer Cover) to return the Holder to the color guide on the ink tank until the Power lamp stops flashing and remains lit blue. Once ...


