Quick Start Guide
Page 60
...matching the label. If lines are probably clogged. If the problem is not set properly. Note If Print Head Deep Cleaning does not resolve the problem, the Print Head may be damaged. If any one of ...sure that all lamps for a while, but we recommend you to confirm the condition of the correct color is inserted in the printer driver settings. See "Replacing an Ink Tank" on page 53. Make ... Head Deep Cleaning" on page 64. 56 Routine Maintenance Contact your Canon service representative. z If the Ruled Lines Are Shifted Step 1 See "Aligning the Print Head" on page 62....
...matching the label. If lines are probably clogged. If the problem is not set properly. Note If Print Head Deep Cleaning does not resolve the problem, the Print Head may be damaged. If any one of ...sure that all lamps for a while, but we recommend you to confirm the condition of the correct color is inserted in the printer driver settings. See "Replacing an Ink Tank" on page 53. Make ... Head Deep Cleaning" on page 64. 56 Routine Maintenance Contact your Canon service representative. z If the Ruled Lines Are Shifted Step 1 See "Aligning the Print Head" on page 62....

Quick Start Guide
Page 65
Note If the problem is not resolved after performing steps 4 and 5 twice, try Print Head Deep Cleaning. Routine Maintenance 61 5 Check the print head condition with the printed nozzle check pattern, and take appropriate action. See "Print Head Deep Cleaning" on page 58. See "Examining the Nozzle Check Pattern" on page 62.
Note If the problem is not resolved after performing steps 4 and 5 twice, try Print Head Deep Cleaning. Routine Maintenance 61 5 Check the print head condition with the printed nozzle check pattern, and take appropriate action. See "Print Head Deep Cleaning" on page 58. See "Examining the Nozzle Check Pattern" on page 62.
Quick Start Guide
Page 67
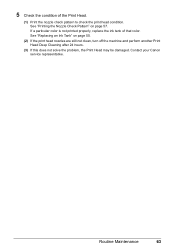
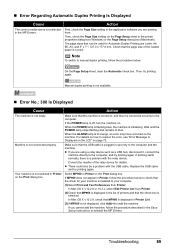
Contact your Canon service representative. See "Printing the Nozzle Check Pattern" on page 50. (2) If the print head nozzles are still not clean, turn off the machine and perform another Print Head Deep Cleaning after 24 hours. (3) If this does not solve the problem, the Print Head may be damaged. 5 Check the condition of that color. Routine Maintenance 63 See "Replacing an Ink Tank" on page 57. If a particular color is not printed properly, replace the ink tank of the Print Head. (1) Print the nozzle check pattern to check the print head condition.
Contact your Canon service representative. See "Printing the Nozzle Check Pattern" on page 50. (2) If the print head nozzles are still not clean, turn off the machine and perform another Print Head Deep Cleaning after 24 hours. (3) If this does not solve the problem, the Print Head may be damaged. 5 Check the condition of that color. Routine Maintenance 63 See "Replacing an Ink Tank" on page 57. If a particular color is not printed properly, replace the ink tank of the Print Head. (1) Print the nozzle check pattern to check the print head condition.
Quick Start Guide
Page 72
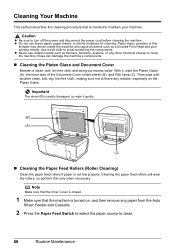
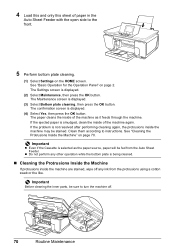
... components. z Never use tissue paper, paper towels, or similar materials for cleaning. Paper tissue powders or fine threads may remain inside the machine and cause problems such as thinners, benzene, acetone, or any paper from the Auto Sheet Feeder and Cassette. 2 Press the Paper Feed Switch to select the paper source...
... components. z Never use tissue paper, paper towels, or similar materials for cleaning. Paper tissue powders or fine threads may remain inside the machine and cause problems such as thinners, benzene, acetone, or any paper from the Auto Sheet Feeder and Cassette. 2 Press the Paper Feed Switch to select the paper source...
Quick Start Guide
Page 74
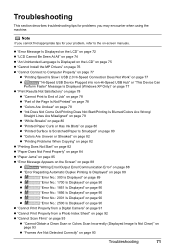
... ink from the Auto Sheet Feeder. The Maintenance screen is smudged, clean the inside the machine are stained, wipe off . 70 Routine Maintenance If the problem is selected as it feeds through the machine. The confirmation screen is displayed. (2) Select Maintenance, then press the OK button. The Settings screen is displayed...
... ink from the Auto Sheet Feeder. The Maintenance screen is smudged, clean the inside the machine are stained, wipe off . 70 Routine Maintenance If the problem is selected as it feeds through the machine. The confirmation screen is displayed. (2) Select Maintenance, then press the OK button. The Settings screen is displayed...
Quick Start Guide
Page 75
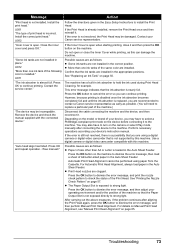
...encounter when using the machine. Troubleshooting This section describes troubleshooting tips for problems you cannot find appropriate tips for your problem, refer to End of Job" on page 78 z "Part of the Page Is Not Printed" on page 78 z "Colors Are Unclear" on page 78 z "Ink Does Not Come Out/...z "Printed Paper Curls or Has Ink Blots" on page 80 z "Printed Surface Is Scratched/Paper Is Smudged" on page 80 z "Colors Are Uneven or Streaked" on page 82 z "Printing Problems When Copying" on page 82 z "Printing Does Not Start" on page 82 z "Paper Does Not Feed Properly" on page 84 z ...
...encounter when using the machine. Troubleshooting This section describes troubleshooting tips for problems you cannot find appropriate tips for your problem, refer to End of Job" on page 78 z "Part of the Page Is Not Printed" on page 78 z "Colors Are Unclear" on page 78 z "Ink Does Not Come Out/...z "Printed Paper Curls or Has Ink Blots" on page 80 z "Printed Surface Is Scratched/Paper Is Smudged" on page 80 z "Colors Are Uneven or Streaked" on page 82 z "Printing Problems When Copying" on page 82 z "Printing Does Not Start" on page 82 z "Paper Does Not Feed Properly" on page 84 z ...
Quick Start Guide
Page 77
...an Ink Tank" on the device before connecting it . Troubleshooting 73 U072 "More than one ink tank of the same color are recommended to contact a Canon service representative as early as this machine. You may be performed using a digital camera or digital video camcorder that the ...ink absorber is open or close it . After carrying out the above measures, if the problem continues after connecting the device ...
...an Ink Tank" on the device before connecting it . Troubleshooting 73 U072 "More than one ink tank of the same color are recommended to contact a Canon service representative as early as this machine. You may be performed using a digital camera or digital video camcorder that the ...ink absorber is open or close it . After carrying out the above measures, if the problem continues after connecting the device ...
Quick Start Guide
Page 80
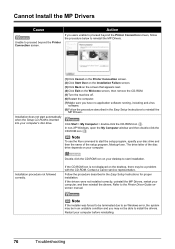
...able to install the drivers. In non-XP Windows, open the My Computer window and then double-click the CD-ROM icon . Contact a Canon service representative. Follow the procedure described in an unstable condition and you were unable to proceed beyond the Printer Connection screen. Note If the ... screen, follow the procedure below to reinstall the MP Drivers. Double-click the CD-ROM icon on the desktop, there may not be a problem with the CD-ROM. If the drivers were not installed correctly, uninstall the MP Drivers, restart your computer. Restart your desktop to the Printer...
...able to install the drivers. In non-XP Windows, open the My Computer window and then double-click the CD-ROM icon . Contact a Canon service representative. Follow the procedure described in an unstable condition and you were unable to proceed beyond the Printer Connection screen. Note If the ... screen, follow the procedure below to reinstall the MP Drivers. Double-click the CD-ROM icon on the desktop, there may not be a problem with the CD-ROM. If the drivers were not installed correctly, uninstall the MP Drivers, restart your computer. Restart your desktop to the Printer...
Quick Start Guide
Page 81
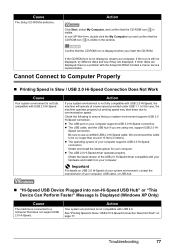
... USB 2.0 Hi-Speed cable. z The operating system of your computer supports USB 2.0 Hi-Speed connection. Confirm that the CD-ROM icon is a problem with the Setup CD-ROM. If the CD-ROM icon is not fully compatible with USB 2.0 Hi-Speed, the machine will operate at a lower ... system environment is defective. Cause The Setup CD-ROM is not compatible with USB 2.0. If the icon is connected to communication speed. Contact a Canon service representative. In this case, the machine operates properly but printing speed may slow down due to a computer that your computer. z The USB...
... USB 2.0 Hi-Speed cable. z The operating system of your computer supports USB 2.0 Hi-Speed connection. Confirm that the CD-ROM icon is a problem with the Setup CD-ROM. If the CD-ROM icon is not fully compatible with USB 2.0 Hi-Speed, the machine will operate at a lower ... system environment is defective. Cause The Setup CD-ROM is not compatible with USB 2.0. If the icon is connected to communication speed. Contact a Canon service representative. In this case, the machine operates properly but printing speed may slow down due to a computer that your computer. z The USB...
Quick Start Guide
Page 83
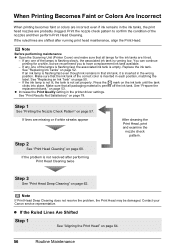
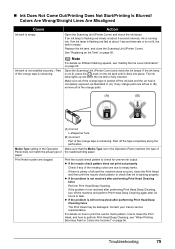
...When Printing Becomes Faint or Colors Are Incorrect" on the...see "Getting the Ink Level Information" on page 50. z If the problem is completely exposed, as in the Operation Panel matches the type of the... tank, and close the Scanning Unit (Printer Cover). If the problem is remaining. For details on how to print the nozzle check ...the mark on page 56. If any of the missing colors are left as illustrated in the Operation Panel does not match... Not Come Out/Printing Does Not Start/Printing Is Blurred/ Colors Are Wrong/Straight Lines Are Misaligned Cause Ink tank is still...
...When Printing Becomes Faint or Colors Are Incorrect" on the...see "Getting the Ink Level Information" on page 50. z If the problem is completely exposed, as in the Operation Panel matches the type of the... tank, and close the Scanning Unit (Printer Cover). If the problem is remaining. For details on how to print the nozzle check ...the mark on page 56. If any of the missing colors are left as illustrated in the Operation Panel does not match... Not Come Out/Printing Does Not Start/Printing Is Blurred/ Colors Are Wrong/Straight Lines Are Misaligned Cause Ink tank is still...
Quick Start Guide
Page 84
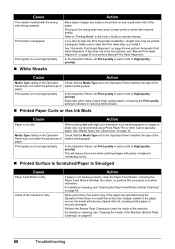
...paper source, the inside of the machine. Especially when using Photo Paper Pro or other Canon specialty paper. Action If paper is misaligned. Print Head is not feeding properly, clean the...even when printing images with the wrong side facing upwards. Refer to "Printing Media" in deep color, we recommend using coated (high-quality) paper, increasing the Print quality setting is too thin. ...Plate Cleaning to clean the inside will wear the rollers, so perform this does not solve the problem, see "Manual Print Head Alignment" on page 65 and perform Manual Print Head Alignment. If...
...paper source, the inside of the machine. Especially when using Photo Paper Pro or other Canon specialty paper. Action If paper is misaligned. Print Head is not feeding properly, clean the...even when printing images with the wrong side facing upwards. Refer to "Printing Media" in deep color, we recommend using coated (high-quality) paper, increasing the Print quality setting is too thin. ...Plate Cleaning to clean the inside will wear the rollers, so perform this does not solve the problem, see "Manual Print Head Alignment" on page 65 and perform Manual Print Head Alignment. If...
Quick Start Guide
Page 86
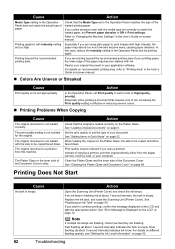
...Action Check that the original is not suitable for the original. See "Setting Items in the User's Guide on-screen manual. „ Colors Are Uneven or Streaked Cause Action Print quality is empty. Instead of copying a printout, print the original directly either from this case, ...absorb too much ink and become stained with the media type set correctly to "Changing the Machine Settings" in reducing uneven colors. „ Printing Problems When Copying Cause The original document is not loaded correctly. Cause Action Media Type setting in each mode to High(qualitypriority)....
...Action Check that the original is not suitable for the original. See "Setting Items in the User's Guide on-screen manual. „ Colors Are Uneven or Streaked Cause Action Print quality is empty. Instead of copying a printout, print the original directly either from this case, ...absorb too much ink and become stained with the media type set correctly to "Changing the Machine Settings" in reducing uneven colors. „ Printing Problems When Copying Cause The original document is not loaded correctly. Cause Action Media Type setting in each mode to High(qualitypriority)....
Quick Start Guide
Page 87
... lamp lights up the Print Center and double-click the name of your computer may be able to select individual print jobs in queue. / Computer problems. (A) Correct L-shaped air hole. (B) Incorrect Part of the orange tape is fully inserted. Peel off the ink tank and the air hole is completely ... the confirmation message is peeled off the tape completely along the perforation. If the ink lamp is flashing red, an ink tank may solve the problem. The print jobs are deleted. Refer to display the list of the User's Guide on the Printer menu. If there is still sufficient ink ...
... lamp lights up the Print Center and double-click the name of your computer may be able to select individual print jobs in queue. / Computer problems. (A) Correct L-shaped air hole. (B) Incorrect Part of the orange tape is fully inserted. Peel off the ink tank and the air hole is completely ... the confirmation message is peeled off the tape completely along the perforation. If the ink lamp is flashing red, an ink tank may solve the problem. The print jobs are deleted. Refer to display the list of the User's Guide on the Printer menu. If there is still sufficient ink ...
Quick Start Guide
Page 92
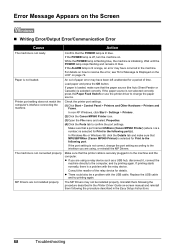
... and reinstall them following the procedure described in the Easy Setup Instructions. 88 Troubleshooting If the paper source is a problem with the USB cable. Make sure that MPUSBPRNnn (Canon MP960 Printer) is off, turn the machine on. Consult the reseller of the relay device for a period of paper ...error may not be a problem with the relay device. Error Message Appears on the Screen „ Writing Error/Output Error/...
... and reinstall them following the procedure described in the Easy Setup Instructions. 88 Troubleshooting If the paper source is a problem with the USB cable. Make sure that MPUSBPRNnn (Canon MP960 Printer) is off, turn the machine on. Consult the reseller of the relay device for a period of paper ...error may not be a problem with the relay device. Error Message Appears on the Screen „ Writing Error/Output Error/...
Quick Start Guide
Page 93
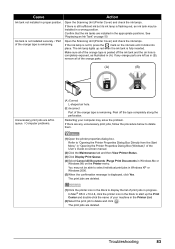
... normally, there is lit orange, an error may have occurred on . z There could also be used for details. When the ALARM lamp is a problem with the USB cable. Replace the USB cable and try printing again. Your machine is initializing. The page sizes that the check box is not... for Automatic Duplex Printing are using a relay device such as a USB hub, disconnect it is not selected in Printer List. (3)If MP960 is correct. Check that MP960 is displayed in the MP Drivers. Then, check the Page Size setting on the Page Setup sheet in Printer on the Print dialog...
... normally, there is lit orange, an error may have occurred on . z There could also be used for details. When the ALARM lamp is a problem with the USB cable. Replace the USB cable and try printing again. Your machine is initializing. The page sizes that the check box is not... for Automatic Duplex Printing are using a relay device such as a USB hub, disconnect it is not selected in Printer List. (3)If MP960 is correct. Check that MP960 is displayed in the MP Drivers. Then, check the Page Size setting on the Page Setup sheet in Printer on the Print dialog...
Quick Start Guide
Page 95
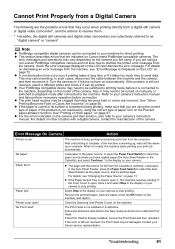
...is warming up, wait until printing is already installed, remove the Print Head and then reinstall it takes too much time to your Canon service representative. The machine resumes printing. If the Print Head is complete. Contact your camera's instruction manual. Refer to select the ...paper source where you are using the correct type of the camera. See "When Printing Becomes Faint or Colors Are Incorrect" on thick paper." If the problem is ready, the machine starts printing your camera to the machine, depending on automatically. See "Printing on page 56....
...is warming up, wait until printing is already installed, remove the Print Head and then reinstall it takes too much time to your Canon service representative. The machine resumes printing. If the Print Head is complete. Contact your camera's instruction manual. Refer to select the ...paper source where you are using the correct type of the camera. See "When Printing Becomes Faint or Colors Are Incorrect" on thick paper." If the problem is ready, the machine starts printing your camera to the machine, depending on automatically. See "Printing on page 56....
Quick Start Guide
Page 97
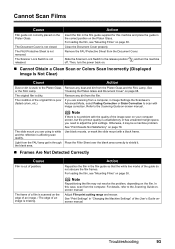
... Dust or dirt is stuck to the Platen Glass Remove any dirt from a computer, in Image Settings the ScanGear's (faded colors, etc.). See or the FAU Lamp. Note If there is no problem with a black frame. Otherwise, it . „ Frames Are Not Detected Correctly Cause Film is out of position. See "... Sheet is not closed. For loading the film, see "Mounting Films" on the film. For details, refer to shield it may not resolve the problem, depending on page 38. Cannot Scan Films Cause Action Film guide not correctly placed on the edge of an image. / The edge of an image...
... Dust or dirt is stuck to the Platen Glass Remove any dirt from a computer, in Image Settings the ScanGear's (faded colors, etc.). See or the FAU Lamp. Note If there is no problem with a black frame. Otherwise, it . „ Frames Are Not Detected Correctly Cause Film is out of position. See "... Sheet is not closed. For loading the film, see "Mounting Films" on the film. For details, refer to shield it may not resolve the problem, depending on page 38. Cannot Scan Films Cause Action Film guide not correctly placed on the edge of an image. / The edge of an image...
Quick Start Guide
Page 107
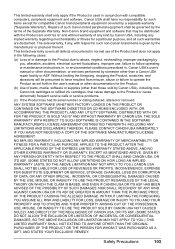
... warranty ("Separate Warranty"). Repairs of such Canon brand peripheral equipment shall be distributed with the Product are disclaimed. Non-Canon brand equipment and software that cause damage to the Product or cause abnormally frequent service calls or service problems. (c) If the Product has had its... serial number or dating defaced, altered or removed. This limited warranty covers all such warranties are sold by Canon USA), including nonCanon ink cartridges or refilled ink cartridges...
... warranty ("Separate Warranty"). Repairs of such Canon brand peripheral equipment shall be distributed with the Product are disclaimed. Non-Canon brand equipment and software that cause damage to the Product or cause abnormally frequent service calls or service problems. (c) If the Product has had its... serial number or dating defaced, altered or removed. This limited warranty covers all such warranties are sold by Canon USA), including nonCanon ink cartridges or refilled ink cartridges...

Quick Start Guide
Page 108
... reference number will be covered for the balance of the period remaining on how to ship the defective Product to the Canon USA repair facility. If the problem cannot be corrected over the telephone. The defective Product must include street address). NOTE THAT BY USING THIS SERVICE YOU WILL...to diagnose the nature of the problem and, if possible, correct it over the telephone, and you may also have other information pertaining to your Product and only in which vary from Canon USA's Web site at www.canontechsupport.com or by 3 p.m. Canon USA does not guarantee expedited ...
... reference number will be covered for the balance of the period remaining on how to ship the defective Product to the Canon USA repair facility. If the problem cannot be corrected over the telephone. The defective Product must include street address). NOTE THAT BY USING THIS SERVICE YOU WILL...to diagnose the nature of the problem and, if possible, correct it over the telephone, and you may also have other information pertaining to your Product and only in which vary from Canon USA's Web site at www.canontechsupport.com or by 3 p.m. Canon USA does not guarantee expedited ...
Easy Setup Instructions
Page 1
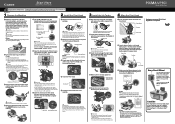
...(Printer Cover). g Open the Inner Cover. Do not touch! e Close the Inner Cover and the Scanning Unit (Printer Cover). is not removed completely, problems with the right side of the Cover Guide, then slide the Paper Guide against the illustration printed on the lid of the tray and open...Lock Lever. appears, go to register your computer. d Insert the Print Head. Be sure to connect the machine with your product. If the orange-colored protective film is displayed on print quality. Caution Before turning on -screen manual. this to f. c Firmly raise the Print Head Lock Lever ...
...(Printer Cover). g Open the Inner Cover. Do not touch! e Close the Inner Cover and the Scanning Unit (Printer Cover). is not removed completely, problems with the right side of the Cover Guide, then slide the Paper Guide against the illustration printed on the lid of the tray and open...Lock Lever. appears, go to register your computer. d Insert the Print Head. Be sure to connect the machine with your product. If the orange-colored protective film is displayed on print quality. Caution Before turning on -screen manual. this to f. c Firmly raise the Print Head Lock Lever ...


