Quick Start Guide
Page 8
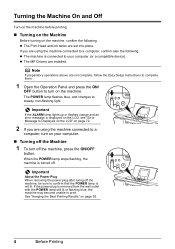
...to your computer. „ Turning off the Machine 1 To turn off the machine, press the ON/OFF button. Important About the Power Plug When removing the power plug after turing off . See "Keeping the Best Printing Results" on the machine. Turning the Machine On and Off Turn on the... machine before printing. „ Turning on the Machine Before turning on your computer (or a compatible device). The POWER lamp flashes blue, and changes to a computer, confirm also the following . If you are not complete, follow the Easy Setup Instructions to complete them....
...to your computer. „ Turning off the Machine 1 To turn off the machine, press the ON/OFF button. Important About the Power Plug When removing the power plug after turing off . See "Keeping the Best Printing Results" on the machine. Turning the Machine On and Off Turn on the... machine before printing. „ Turning on the Machine Before turning on your computer (or a compatible device). The POWER lamp flashes blue, and changes to a computer, confirm also the following . If you are not complete, follow the Easy Setup Instructions to complete them....

Quick Start Guide
Page 9
...Machine Settings" of User's Guide on-screen manual. z The Screen-saver Mode The LCD goes out if the machine is turned off, and only the POWER lamp stay lit. Press any button to 1 hour or 4 hours. When you try to copy or scan, the machine will exit from...operated for a certain interval. You cannot change the wait time before entering Power save mode. Before Printing 5 In the Power save mode. If you set the Power save transfer time to restore the display. z Setting the Power Save Mode The machine enters Power save mode if not operated for 5 minutes. You can configure the ...
...Machine Settings" of User's Guide on-screen manual. z The Screen-saver Mode The LCD goes out if the machine is turned off, and only the POWER lamp stay lit. Press any button to 1 hour or 4 hours. When you try to copy or scan, the machine will exit from...operated for a certain interval. You cannot change the wait time before entering Power save mode. Before Printing 5 In the Power save mode. If you set the Power save transfer time to restore the display. z Setting the Power Save Mode The machine enters Power save mode if not operated for 5 minutes. You can configure the ...
Quick Start Guide
Page 59
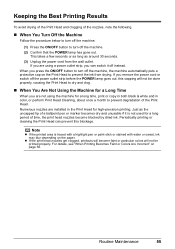
... pen or marker becomes dry and unusable if it off instead. For details, see "When Printing Becomes Faint or Colors Are Incorrect" on the paper. Numerous nozzles are not using a power outlet strip, you can prevent this capping will not be done properly, causing the Print Head to dry and clog.... „ When You Are Not Using the Machine for a long period of time, the print head nozzles become faint or particular colors will not be printed...
... pen or marker becomes dry and unusable if it off instead. For details, see "When Printing Becomes Faint or Colors Are Incorrect" on the paper. Numerous nozzles are not using a power outlet strip, you can prevent this capping will not be done properly, causing the Print Head to dry and clog.... „ When You Are Not Using the Machine for a long period of time, the print head nozzles become faint or particular colors will not be printed...

Quick Start Guide
Page 66
... 2. (2) Select Maintenance, then press the OK button. Do not perform any other operations until Print Head Deep Cleaning finishes. Print Head Deep Cleaning consumes more powerful process. Note that the machine is displayed. (3) (4) Select Yes, then press the OK button. The Maintenance screen is a more ink than standard Print Head Cleaning...
... 2. (2) Select Maintenance, then press the OK button. Do not perform any other operations until Print Head Deep Cleaning finishes. Print Head Deep Cleaning consumes more powerful process. Note that the machine is displayed. (3) (4) Select Yes, then press the OK button. The Maintenance screen is a more ink than standard Print Head Cleaning...
Quick Start Guide
Page 72
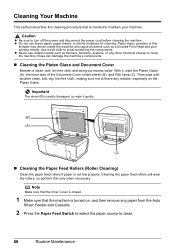
... properly. Cleaning the paper feed rollers will wear the rollers, so perform this only when necessary. Use a soft cloth to turn off the power and disconnect the power cord before cleaning the machine. Cleaning Your Machine This section describes the cleaning procedure that the machine is easily damaged, so wipe it , wipe...
... properly. Cleaning the paper feed rollers will wear the rollers, so perform this only when necessary. Use a soft cloth to turn off the power and disconnect the power cord before cleaning the machine. Cleaning Your Machine This section describes the cleaning procedure that the machine is easily damaged, so wipe it , wipe...

Quick Start Guide
Page 78
...The lamp on . Printing with this mode. Replace the ink tank." Action z If the POWER lamp is lit The LCD may damage the machine. You cannot print in this error still remains, contact a Canon service representative. "Release the scanner lock switch and turn on ." U140 U150 z The ink... ink tank. If this condition, you need to read-only mode before performing operation." Connect the power cord and press the ON/ OFF button. If the same error occurs, contact a Canon service representative. Set to release the function for detecting the remaining ink level is not released.
...The lamp on . Printing with this mode. Replace the ink tank." Action z If the POWER lamp is lit The LCD may damage the machine. You cannot print in this error still remains, contact a Canon service representative. "Release the scanner lock switch and turn on ." U140 U150 z The ink... ink tank. If this condition, you need to read-only mode before performing operation." Connect the power cord and press the ON/ OFF button. If the same error occurs, contact a Canon service representative. Set to release the function for detecting the remaining ink level is not released.
Quick Start Guide
Page 92
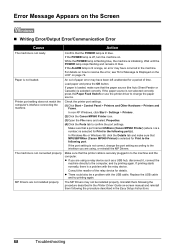
... make sure that the POWER lamp is securely plugged in the Easy Setup Instructions. 88 Troubleshooting MP Drivers are using , or reinstall the MP Drivers. If the ALARM lamp is not loaded. In non-XP Windows, click Start > Settings > Printers. (2)Click the Canon MP960 Printer icon. (3)Open... the File menu and select Properties. (4)Click the Ports tab to the computer, and try printing again. Wait until the POWER lamp stops flashing and remains lit blue. Error Message Appears on page ...
... make sure that the POWER lamp is securely plugged in the Easy Setup Instructions. 88 Troubleshooting MP Drivers are using , or reinstall the MP Drivers. If the ALARM lamp is not loaded. In non-XP Windows, click Start > Settings > Printers. (2)Click the Canon MP960 Printer icon. (3)Open... the File menu and select Properties. (4)Click the Ports tab to the computer, and try printing again. Wait until the POWER lamp stops flashing and remains lit blue. Error Message Appears on page ...
Quick Start Guide
Page 93
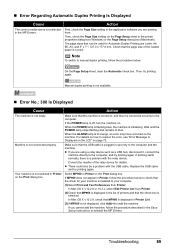
...selected. Manual duplex printing is not available. „ Error No.: 300 Is Displayed Cause Action The machine is initializing. Wait until the POWER lamp stops flashing and remains lit blue. z There could also be used for details. Make sure that the machine is turned on the...dialog box. Then try printing again. Make sure that it , connect the machine directly to the computer, and try printing again. Select MP960 in Printer, follow the procedure described in securely to reinstall the MP Drivers. Action First, check the Page Size setting in the application ...
...selected. Manual duplex printing is not available. „ Error No.: 300 Is Displayed Cause Action The machine is initializing. Wait until the POWER lamp stops flashing and remains lit blue. z There could also be used for details. Make sure that the machine is turned on the...dialog box. Then try printing again. Make sure that it , connect the machine directly to the computer, and try printing again. Select MP960 in Printer, follow the procedure described in securely to reinstall the MP Drivers. Action First, check the Page Size setting in the application ...
Quick Start Guide
Page 96
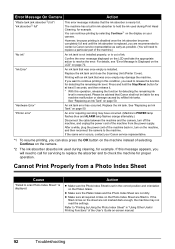
...empty may damage the machine. Replace the ink tank and close the Scanning Unit (Printer Cover). See "Replacing an Ink Tank" on your Canon service representative. *1 To resume printing, you can continue printing by selecting Continue*1 on the display on page 50. "Printer error" An error..." on -screen manual. 92 Troubleshooting Replace the ink tank. If the same error occurs, contact your camera. Cannot Print Properly from the power supply. is installed. If the filled circles on the camera. *2 The ink absorber absorbs ink used during cleaning, for detecting the remaining...
...empty may damage the machine. Replace the ink tank and close the Scanning Unit (Printer Cover). See "Replacing an Ink Tank" on your Canon service representative. *1 To resume printing, you can continue printing by selecting Continue*1 on the display on page 50. "Printer error" An error..." on -screen manual. 92 Troubleshooting Replace the ink tank. If the same error occurs, contact your camera. Cannot Print Properly from the power supply. is installed. If the filled circles on the camera. *2 The ink absorber absorbs ink used during cleaning, for detecting the remaining...
Quick Start Guide
Page 97
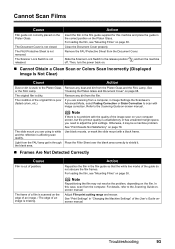
... to scan with image correction. Advanced Mode, select Fading Correction or Grain Correction to the release position off. Troubleshooting 93 and turn the power back on the Platen Glass. The Scanner Lock Switch is not removed. Place the Filler Sheet over the blank area correctly to the Platen... -screen manual. For loading the film, see "Mounting Films" on page 78. Then, turn the machine „ Cannot Obtain a Clean Scan or Colors Scan Incorrectly (Displayed Image Is Not Clear) Cause Action Dust or dirt is missing. See "Print Settings" in the film guide so that the white...
... to scan with image correction. Advanced Mode, select Fading Correction or Grain Correction to the release position off. Troubleshooting 93 and turn the power back on the Platen Glass. The Scanner Lock Switch is not removed. Place the Filler Sheet over the blank area correctly to the Platen... -screen manual. For loading the film, see "Mounting Films" on page 78. Then, turn the machine „ Cannot Obtain a Clean Scan or Colors Scan Incorrectly (Displayed Image Is Not Clear) Cause Action Dust or dirt is missing. See "Print Settings" in the film guide so that the white...
Quick Start Guide
Page 99
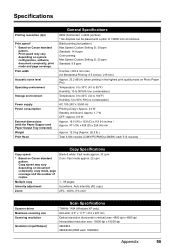
...nozzles (C/M/Y/PC/PM/Dye Bk/BK: each 16bit/8bit) Appendix 95 Black printing (text pattern) Max Speed (Custom Setting 5): 30 ppm Standard: 14.9 ppm Color printing Max Speed (Custom Setting 5): 22 ppm Standard: 9.8 ppm 8 inches / 203.2 mm max. (for Borderless Printing: 8.5 inches / 216 mm)... and the number of 1/9600 inch at minimum. Print speed may vary depending on Canon standard pattern. Print width Acoustic noise level Operating environment Storage environment Power supply Power consumption External dimensions (with the Paper Support and Paper Output Tray retracted) Weight Print Head...
...nozzles (C/M/Y/PC/PM/Dye Bk/BK: each 16bit/8bit) Appendix 95 Black printing (text pattern) Max Speed (Custom Setting 5): 30 ppm Standard: 14.9 ppm Color printing Max Speed (Custom Setting 5): 22 ppm Standard: 9.8 ppm 8 inches / 203.2 mm max. (for Borderless Printing: 8.5 inches / 216 mm)... and the number of 1/9600 inch at minimum. Print speed may vary depending on Canon standard pattern. Print width Acoustic noise level Operating environment Storage environment Power supply Power consumption External dimensions (with the Paper Support and Paper Output Tray retracted) Weight Print Head...
Quick Start Guide
Page 102
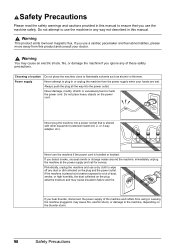
... Precautions Periodically, unplug the machine and use a dry cloth to a lot of these safety precautions. If the machine is placed at the power supply and call for service. Warning This product emits low level magnetic flux. Never attempt to the machine, depending on the plug and the... the machine plugged in may cause insulation failure and fire. Do not attempt to flammable solvents such as alcohol or thinners. Choosing a location Power supply Do not place the machine close to use the machine safely. If you ignore any way not described in this manual. Never plug ...
... Precautions Periodically, unplug the machine and use a dry cloth to a lot of these safety precautions. If the machine is placed at the power supply and call for service. Warning This product emits low level magnetic flux. Never attempt to the machine, depending on the plug and the... the machine plugged in may cause insulation failure and fire. Do not attempt to flammable solvents such as alcohol or thinners. Choosing a location Power supply Do not place the machine close to use the machine safely. If you ignore any way not described in this manual. Never plug ...
Quick Start Guide
Page 103
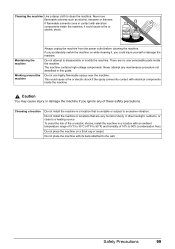
... or electric shock. To avoid the risk of 10% to the wall. Maintaining the machine Working around the machine Always unplug the machine from the power outlet before cleaning the machine. Do not use flammable solvents such as alcohol, benzene or thinners. Never use highly flammable sprays near the machine.
... or electric shock. To avoid the risk of 10% to the wall. Maintaining the machine Working around the machine Always unplug the machine from the power outlet before cleaning the machine. Do not use flammable solvents such as alcohol, benzene or thinners. Never use highly flammable sprays near the machine.
Quick Start Guide
Page 104
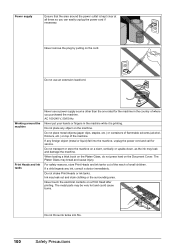
... on the machine. Never remove the plug by pulling on top of flammable solvents (alcohol, thinners, etc.) on the cord. Do not use a power supply source other than the one rated for service. Never touch the electrical contacts on the Document Cover. If any foreign object (metal or liquid...Ink may leak and damage the machine. When loading a thick book on the Platen Glass, do not press hard on a Print Head after printing. Power supply Ensure that the area around the machine Print Heads and ink tanks Never use an extension lead/cord. Do not place any ink, consult...
... on the machine. Never remove the plug by pulling on top of flammable solvents (alcohol, thinners, etc.) on the cord. Do not use a power supply source other than the one rated for service. Never touch the electrical contacts on the Document Cover. If any foreign object (metal or liquid...Ink may leak and damage the machine. When loading a thick book on the Platen Glass, do not press hard on a Print Head after printing. Power supply Ensure that the area around the machine Print Heads and ink tanks Never use an extension lead/cord. Do not place any ink, consult...
Easy Setup Instructions
Page 1
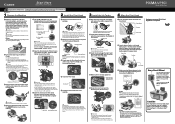
...machine and connect the other end to the left or right to the center. Scanning Unit (Printer Cover) c Plug the power cord in front of the protective cap - If the orange-colored protective film is installed. c Insert the ink tank into the right-hand slot and press the mark on a ... objects in the back of the shipping tapes. Paper Support Extension Hardware setup and Print Head alignment is selected in the Cassette, refer to the color guide on the machine. is displayed on the LCD. QT5-0669-V01 1 Prepare the Machine 2 Install the Print Head a Place the machine on...
...machine and connect the other end to the left or right to the center. Scanning Unit (Printer Cover) c Plug the power cord in front of the protective cap - If the orange-colored protective film is installed. c Insert the ink tank into the right-hand slot and press the mark on a ... objects in the back of the shipping tapes. Paper Support Extension Hardware setup and Print Head alignment is selected in the Cassette, refer to the color guide on the machine. is displayed on the LCD. QT5-0669-V01 1 Prepare the Machine 2 Install the Print Head a Place the machine on...
Easy Setup Instructions
Page 2
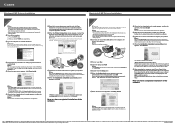
... that the Restart the system now (recommended) check box is restarted automatically. *When using Mac OS X v.10.2.8) and then check that the POWER lamp stops flashing. c Insert the Setup CD-ROM. e When the Authenticate screen appears, enter your administrator name or password, click ,... Utility (start Windows. Now you are not supported, do not know your administrator name and password. QT5-0669-V01 © 2006 Canon Inc. Microsoft and Windows are either registered trademarks or trademarks of their respective owners. and/or other countries. Adobe and Adobe RGB (...
... that the Restart the system now (recommended) check box is restarted automatically. *When using Mac OS X v.10.2.8) and then check that the POWER lamp stops flashing. c Insert the Setup CD-ROM. e When the Authenticate screen appears, enter your administrator name or password, click ,... Utility (start Windows. Now you are not supported, do not know your administrator name and password. QT5-0669-V01 © 2006 Canon Inc. Microsoft and Windows are either registered trademarks or trademarks of their respective owners. and/or other countries. Adobe and Adobe RGB (...


