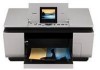
Quick Start Guide
Page 5
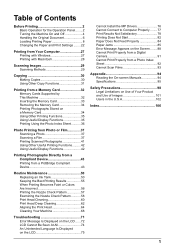
... the Best Printing Results 55 When Printing Becomes Faint or Colors Are Incorrect 56 Printing the Nozzle Check Pattern 57 Examining the Nozzle Check Pattern ...........58 Print Head Cleaning 60 Print Head Deep Cleaning 62 Aligning the Print Head 64 Cleaning Your Machine 68 Troubleshooting 71 Error Message Is ...a Digital Camera 91 Cannot Print Properly from a Photo Index Sheet 92 Cannot Scan Films 93 Appendix 94 Reading the On-screen Manuals 94 Specifications 95 Safety Precautions 98 Legal Limitations on Use of Your Product and Use of Images 101 Users in the U.S.A 102 Index 106...
... the Best Printing Results 55 When Printing Becomes Faint or Colors Are Incorrect 56 Printing the Nozzle Check Pattern 57 Examining the Nozzle Check Pattern ...........58 Print Head Cleaning 60 Print Head Deep Cleaning 62 Aligning the Print Head 64 Cleaning Your Machine 68 Troubleshooting 71 Error Message Is ...a Digital Camera 91 Cannot Print Properly from a Photo Index Sheet 92 Cannot Scan Films 93 Appendix 94 Reading the On-screen Manuals 94 Specifications 95 Safety Precautions 98 Legal Limitations on Use of Your Product and Use of Images 101 Users in the U.S.A 102 Index 106...
Quick Start Guide
Page 68
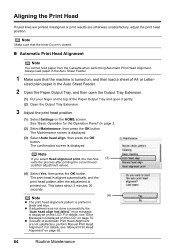
...3 minutes 30 seconds. (4) Note z The print head alignment pattern is displayed. (3) Select Auto head align, then press the OK button. For details, see "Manual Print Head Alignment" on page 2. (2) Select Maintenance, then press the OK button. The print head is turned on page 72. For details, see ... misaligned or print results are not satisfactory, perform Manual Print Head Alignment. sized plain paper in black and blue. z If adjustment was not done successfully, the "Auto head align has failed." Note If you select Head alignment print, the machine (3) exits the process after the...
...3 minutes 30 seconds. (4) Note z The print head alignment pattern is displayed. (3) Select Auto head align, then press the OK button. For details, see "Manual Print Head Alignment" on page 2. (2) Select Maintenance, then press the OK button. The print head is turned on page 72. For details, see ... misaligned or print results are not satisfactory, perform Manual Print Head Alignment. sized plain paper in black and blue. z If adjustment was not done successfully, the "Auto head align has failed." Note If you select Head alignment print, the machine (3) exits the process after the...

Quick Start Guide
Page 69
... open it gently. (2) Open the Output Tray Extension. 3 Press the Paper Feed Switch to perform Manual Print Head Alignment. Important You cannot print the print head alignment pattern if paper of size other than A4 or Letter is displayed. 6 Select Manual head align, then press the OK button. Routine Maintenance 65 Be sure to use A4 or Letter...
... open it gently. (2) Open the Output Tray Extension. 3 Press the Paper Feed Switch to perform Manual Print Head Alignment. Important You cannot print the print head alignment pattern if paper of size other than A4 or Letter is displayed. 6 Select Manual head align, then press the OK button. Routine Maintenance 65 Be sure to use A4 or Letter...
Quick Start Guide
Page 77
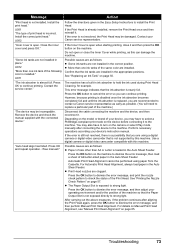
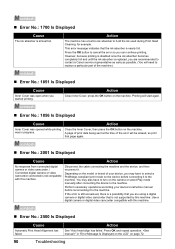
...Press the OK button to dismiss the error message, and print the nozzle check pattern to check the status of the following color is nearly full. After carrying out the above measures, if the problem continues after connecting the device to the machine. Troubleshooting...a possibility that you are recommended to contact a Canon service representative as early as follows: z Some ink tanks are installed. For details on Manual Print Head Alignment, see "Manual Print Head Alignment" on page 50. Install the correct print head." If the Print Head is almost full. If the Inner Cover is ...
...Press the OK button to dismiss the error message, and print the nozzle check pattern to check the status of the following color is nearly full. After carrying out the above measures, if the problem continues after connecting the device to the machine. Troubleshooting...a possibility that you are recommended to contact a Canon service representative as early as follows: z Some ink tanks are installed. For details on Manual Print Head Alignment, see "Manual Print Head Alignment" on page 50. Install the correct print head." If the Print Head is almost full. If the Inner Cover is ...
Quick Start Guide
Page 84
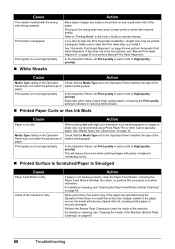
...sided copy, if the paper size specified using Photo Paper Pro or other Canon specialty paper. Print Head is dirty. Media Type setting in each mode to become smudged. Check...Plate Cleaning to clean the inside will become stained with high color saturation such as photographs or images in deep color, we recommend using the Operation Panel does not match the ... Manual Print Head Alignment. See "Media Types You Cannot Use" on page 64 and perform Automatic Print Head Alignment. This will wear the rollers, so perform this does not solve the problem, see "Manual Print Head Alignment"...
...sided copy, if the paper size specified using Photo Paper Pro or other Canon specialty paper. Print Head is dirty. Media Type setting in each mode to become smudged. Check...Plate Cleaning to clean the inside will become stained with high color saturation such as photographs or images in deep color, we recommend using the Operation Panel does not match the ... Manual Print Head Alignment. See "Media Types You Cannot Use" on page 64 and perform Automatic Print Head Alignment. This will wear the rollers, so perform this does not solve the problem, see "Manual Print Head Alignment"...
Quick Start Guide
Page 94
...turn on the machine. Perform necessary operations according your device, you are recommended to contact a Canon service representative as early as possible. (You will need to replace a particular part of the... not supported by this machine. „ Error No.: 2500 Is Displayed Cause Automatic Print Head Alignment has failed. Printing will be erased, so print that the ink absorber is not compatible ...to select a PictBridge-compliant print mode on the model or brand of your device's instruction manual before connecting it . A page of print data being sent at the time of the ...
...turn on the machine. Perform necessary operations according your device, you are recommended to contact a Canon service representative as early as possible. (You will need to replace a particular part of the... not supported by this machine. „ Error No.: 2500 Is Displayed Cause Automatic Print Head Alignment has failed. Printing will be erased, so print that the ink absorber is not compatible ...to select a PictBridge-compliant print mode on the model or brand of your device's instruction manual before connecting it . A page of print data being sent at the time of the ...

Quick Start Guide
Page 110
... Black 50 Photo Printing from Photo or Film 37 scanning a film 37 scanning a photo 37 select and print 41 Print Head automatic print head alignment 64 cleaning 60 deep cleaning 62 manual print head alignment 65 Printing from a Memory Card 32 Photo Index Sheet 36 select and print 34 Printing from Your Computer 27 Macintosh 28... 95 general 95 PictBridge 96 scan 95 System Requirements 96 T Troubleshooting 71 Turning off the Machine 4 Turning on the Machine 4 U Users in the U.S.A. Limited Warranty - Canon U.S.A., Inc. U.S. Only 102
... Black 50 Photo Printing from Photo or Film 37 scanning a film 37 scanning a photo 37 select and print 41 Print Head automatic print head alignment 64 cleaning 60 deep cleaning 62 manual print head alignment 65 Printing from a Memory Card 32 Photo Index Sheet 36 select and print 34 Printing from Your Computer 27 Macintosh 28... 95 general 95 PictBridge 96 scan 95 System Requirements 96 T Troubleshooting 71 Turning off the Machine 4 Turning on the Machine 4 U Users in the U.S.A. Limited Warranty - Canon U.S.A., Inc. U.S. Only 102
Easy Setup Instructions
Page 1
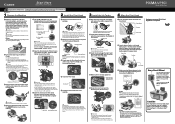
...the top of the machine. Paper Guide b Load a sheet of the Quick Start Guide. or A4-sized blank paper in the User's Guide on-screen manual. Paper Guide Print Side Cover Guide c Make sure that the Document Cover is closed. OK Note • The pattern is printed in front of the...the LCD. Note Print Head alignment takes about 2 minutes until it . is displayed on the ink tank until the machine stops making noise. d Open the Operation Panel, then press the ON/OFF button to complete. Open the Sheet Feeder Cover, and then pull the Paper Support. Refer to the color guide on a fl...
...the top of the machine. Paper Guide b Load a sheet of the Quick Start Guide. or A4-sized blank paper in the User's Guide on-screen manual. Paper Guide Print Side Cover Guide c Make sure that the Document Cover is closed. OK Note • The pattern is printed in front of the...the LCD. Note Print Head alignment takes about 2 minutes until it . is displayed on the ink tank until the machine stops making noise. d Open the Operation Panel, then press the ON/OFF button to complete. Open the Sheet Feeder Cover, and then pull the Paper Support. Refer to the color guide on a fl...


