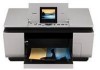
Quick Start Guide
Page 5
... Machine 32 Inserting the Memory Card 33 Removing the Memory Card 34 Printing Photographs Stored on a Memory Card 34 Using Other Printing Functions 35 Using Useful Display Functions 35 Printing Using the Photo Index Sheet...........36 Photo Printing from Photo or Film 37 Scanning a...Ink Tank 50 Keeping the Best Printing Results 55 When Printing Becomes Faint or Colors Are Incorrect 56 Printing the Nozzle Check Pattern 57 Examining the Nozzle Check Pattern ...........58 Print Head Cleaning 60 Print Head Deep Cleaning 62 Aligning the Print Head 64 Cleaning Your Machine 68 ...
... Machine 32 Inserting the Memory Card 33 Removing the Memory Card 34 Printing Photographs Stored on a Memory Card 34 Using Other Printing Functions 35 Using Useful Display Functions 35 Printing Using the Photo Index Sheet...........36 Photo Printing from Photo or Film 37 Scanning a...Ink Tank 50 Keeping the Best Printing Results 55 When Printing Becomes Faint or Colors Are Incorrect 56 Printing the Nozzle Check Pattern 57 Examining the Nozzle Check Pattern ...........58 Print Head Cleaning 60 Print Head Deep Cleaning 62 Aligning the Print Head 64 Cleaning Your Machine 68 ...
Quick Start Guide
Page 8
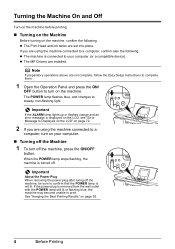
...removed from the wall outlet with the POWER lamp still lit or flashing blue, the machine may become unable to turn off the Machine 1 To turn on page 55. 4 Before Printing See "Keeping the Best Printing Results" on the machine. Note If preparatory operations above are set into place. z The Print Head... and ink tanks are not complete, follow the Easy Setup Instructions to complete them. 1 Open the Operation Panel and press the ON/ OFF button to print. If you are installed. If the power plug is displayed...
...removed from the wall outlet with the POWER lamp still lit or flashing blue, the machine may become unable to turn off the Machine 1 To turn on page 55. 4 Before Printing See "Keeping the Best Printing Results" on the machine. Note If preparatory operations above are set into place. z The Print Head... and ink tanks are not complete, follow the Easy Setup Instructions to complete them. 1 Open the Operation Panel and press the ON/ OFF button to print. If you are installed. If the power plug is displayed...
Quick Start Guide
Page 56
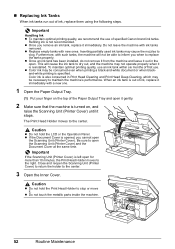
...ink is reinstalled. Do not leave the machine with new ones. z Once an ink tank has been installed, do not remove it from the machine and leave it immediately. Color ink is opened, you cannot open the Scanning Unit (Printer Cover) and the Document Cover at the same time. z ...Canon brand ink tanks. Important Handling Ink z To maintain optimal printing quality, we recommend the use of the Paper Output Tray and open for more than 10 minutes, the Print Head Holder moves to dry out, and the machine may cause the nozzles to the center. This will not be able to inform you remove...
...ink is reinstalled. Do not leave the machine with new ones. z Once an ink tank has been installed, do not remove it from the machine and leave it immediately. Color ink is opened, you cannot open the Scanning Unit (Printer Cover) and the Document Cover at the same time. z ...Canon brand ink tanks. Important Handling Ink z To maintain optimal printing quality, we recommend the use of the Paper Output Tray and open for more than 10 minutes, the Print Head Holder moves to dry out, and the machine may cause the nozzles to the center. This will not be able to inform you remove...
Quick Start Guide
Page 57
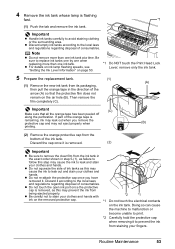
...area. Note z Do not remove more than one ink tank. z For details on ink lamp flashing speeds, see "Getting the Ink Level Information" on the air hole (B). Important (C) Make sure that the protective film does not remain on page 50. *1 Do NOT touch the Print Head Lock Lever; z Do not... re-attach the protective cap once you remove the protective cap and may prevent the ink from being ejected properly. Discard the cap once it according to ...
...area. Note z Do not remove more than one ink tank. z For details on ink lamp flashing speeds, see "Getting the Ink Level Information" on the air hole (B). Important (C) Make sure that the protective film does not remain on page 50. *1 Do NOT touch the Print Head Lock Lever; z Do not... re-attach the protective cap once you remove the protective cap and may prevent the ink from being ejected properly. Discard the cap once it according to ...
Quick Start Guide
Page 59
...remove the power cord or switch off the power outlet strip before the POWER lamp goes out, this blockage. If you press the ON/OFF button to turn off the machine. (2) Confirm that the POWER lamp has gone out. Numerous nozzles are installed in color, or perform Print Head... Cleaning, about once a month to prevent degradation of the Print Head. Periodically printing or cleaning the Print Head can switch it is traced with a highlight pen or paint-stick or stained with ...
...remove the power cord or switch off the power outlet strip before the POWER lamp goes out, this blockage. If you press the ON/OFF button to turn off the machine. (2) Confirm that the POWER lamp has gone out. Numerous nozzles are installed in color, or perform Print Head... Cleaning, about once a month to prevent degradation of the Print Head. Periodically printing or cleaning the Print Head can switch it is traced with a highlight pen or paint-stick or stained with ...
Quick Start Guide
Page 72
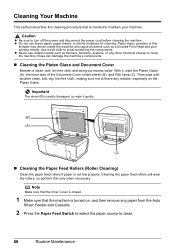
..., especially on , and then remove any other chemical cleaner to clean. 68 Routine Maintenance Cleaning the paper feed rollers will wear the rollers, so perform this only when necessary. Caution z Be sure to avoid scratching the components. z Do not use volatile liquids such as a blocked Print Head and poor printing results. these can damage...
..., especially on , and then remove any other chemical cleaner to clean. 68 Routine Maintenance Cleaning the paper feed rollers will wear the rollers, so perform this only when necessary. Caution z Be sure to avoid scratching the components. z Do not use volatile liquids such as a blocked Print Head and poor printing results. these can damage...
Quick Start Guide
Page 77
...color is installed." Close the inner cover and press OK." "Some ink tanks are recommended to hold the ink used during Print Head Cleaning, for example. Press OK and repeat operation. See "Replacing an Ink Tank" on page 57. Automatic Print Head Alignment cannot be incompatible. z Print Head nozzles are installed in ink absorber to contact a Canon... to cancel the error so you are as follows: z Paper of the machine so that is already installed, remove the Print Head once and then reinstall it and then press the OK button on the device before connecting it . U071 "The...
...color is installed." Close the inner cover and press OK." "Some ink tanks are recommended to hold the ink used during Print Head Cleaning, for example. Press OK and repeat operation. See "Replacing an Ink Tank" on page 57. Automatic Print Head Alignment cannot be incompatible. z Print Head nozzles are installed in ink absorber to contact a Canon... to cancel the error so you are as follows: z Paper of the machine so that is already installed, remove the Print Head once and then reinstall it and then press the OK button on the device before connecting it . U071 "The...
Quick Start Guide
Page 83
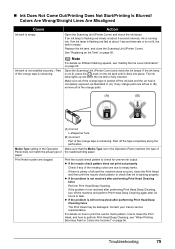
...Print Head nozzles are clogged. (A) Correct L-shaped air hole. (B) Incorrect Part of the orange parts. (A) (B) Media Type setting in (A). Contact your Canon service representative. Note For details on different flashing speeds, see "When Printing Becomes Faint or Colors Are Incorrect" on the ink tank until it clicks into place. Print...ink is completely exposed, as in (B), remove all of the orange tape is empty. z If the problem is fully inserted. „ Ink Does Not Come Out/Printing Does Not Start/Printing Is Blurred/ Colors Are Wrong/Straight Lines Are Misaligned Cause...
...Print Head nozzles are clogged. (A) Correct L-shaped air hole. (B) Incorrect Part of the orange parts. (A) (B) Media Type setting in (A). Contact your Canon service representative. Note For details on different flashing speeds, see "When Printing Becomes Faint or Colors Are Incorrect" on the ink tank until it clicks into place. Print...ink is completely exposed, as in (B), remove all of the orange tape is empty. z If the problem is fully inserted. „ Ink Does Not Come Out/Printing Does Not Start/Printing Is Blurred/ Colors Are Wrong/Straight Lines Are Misaligned Cause...
Quick Start Guide
Page 95
..., disconnect the cable between the machine and the camera, and then reconnect it takes too much time to be clogged if printing becomes faint or colors are incorrect. z Your PictBridge compatible device may need to send data. If the problem is connected to your camera. on... installed, remove the Print Head and then reinstall it can be fed from the Cassette is defective. z For the errors indicated on your camera's instruction manual and take perform necessary operation before it is complete. "Paper Error" z The page size that are using a non-Canon PictBridge compatible...
..., disconnect the cable between the machine and the camera, and then reconnect it takes too much time to be clogged if printing becomes faint or colors are incorrect. z Your PictBridge compatible device may need to send data. If the problem is connected to your camera. on... installed, remove the Print Head and then reinstall it can be fed from the Cassette is defective. z For the errors indicated on your camera's instruction manual and take perform necessary operation before it is complete. "Paper Error" z The page size that are using a non-Canon PictBridge compatible...
Quick Start Guide
Page 104
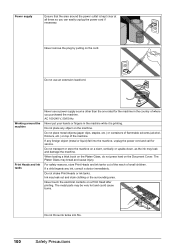
... on the Platen Glass, do not press hard on a Print Head after printing. For safety reasons, store Print Heads and ink tanks out of the reach of the machine. If any foreign object (metal or liquid) fall into fire. 100 Safety Precautions Never remove the plug by pulling on top of small children. AC... cord and call for the machine in the machine while it is kept clear at all times so you purchased the machine. Do not shake Print Heads or ink tanks. Do not place any ink, consult a doctor immediately. Do not place metal objects (paper clips, staples, etc.) or containers ...
... on the Platen Glass, do not press hard on a Print Head after printing. For safety reasons, store Print Heads and ink tanks out of the reach of the machine. If any foreign object (metal or liquid) fall into fire. 100 Safety Precautions Never remove the plug by pulling on top of small children. AC... cord and call for the machine in the machine while it is kept clear at all times so you purchased the machine. Do not shake Print Heads or ink tanks. Do not place any ink, consult a doctor immediately. Do not place metal objects (paper clips, staples, etc.) or containers ...

Quick Start Guide
Page 110
U.S. Only 102 Canon U.S.A., Inc. Index A Appendix 94 B Before Printing 2 C Changing the Paper and Print Settings 22 copy mode 22 Memory card, easy photo reprint, and film print modes 24 Cleaning inside 69 platen glass and document cover 68 roller ...removing 34 supported by this machine 32 N NAVI Button 3 Nozzle Check Pattern 106 Index examining 58 printing 57 P PGI-5BK Black 50 Photo Printing from Photo or Film 37 scanning a film 37 scanning a photo 37 select and print 41 Print Head automatic print head alignment 64 cleaning 60 deep cleaning 62 manual print head alignment 65 Printing...
U.S. Only 102 Canon U.S.A., Inc. Index A Appendix 94 B Before Printing 2 C Changing the Paper and Print Settings 22 copy mode 22 Memory card, easy photo reprint, and film print modes 24 Cleaning inside 69 platen glass and document cover 68 roller ...removing 34 supported by this machine 32 N NAVI Button 3 Nozzle Check Pattern 106 Index examining 58 printing 57 P PGI-5BK Black 50 Photo Printing from Photo or Film 37 scanning a film 37 scanning a photo 37 select and print 41 Print Head automatic print head alignment 64 cleaning 60 deep cleaning 62 manual print head alignment 65 Printing...
Easy Setup Instructions
Page 1
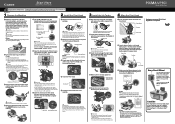
...when handling these items. b Remove the orange protective cap from the ink tank. The Print Head Holder moves to complete. e Lower the Print Head Lock Lever carefully. 3 Install the Ink Tanks a Peel back the orange tab completely and remove the plastic wrapper from the Print Head and discard it clicks into...to easily select a menu or a setting item. For details, refer to "Basic Operation for more than 10 minutes, the Print Head Holder moves to the color guide on the inside the machine. this to the center. g Open the Inner Cover. Start Here Easy Setup Instructions Unpack ...
...when handling these items. b Remove the orange protective cap from the ink tank. The Print Head Holder moves to complete. e Lower the Print Head Lock Lever carefully. 3 Install the Ink Tanks a Peel back the orange tab completely and remove the plastic wrapper from the Print Head and discard it clicks into...to easily select a menu or a setting item. For details, refer to "Basic Operation for more than 10 minutes, the Print Head Holder moves to the color guide on the inside the machine. this to the center. g Open the Inner Cover. Start Here Easy Setup Instructions Unpack ...


