Quick Start Guide
Page 5
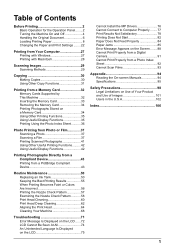
... 43 Routine Maintenance 50 Replacing an Ink Tank 50 Keeping the Best Printing Results 55 When Printing Becomes Faint or Colors Are Incorrect 56 Printing the Nozzle Check Pattern 57 Examining the Nozzle Check Pattern ...........58 Print Head Cleaning 60 Print Head Deep Cleaning 62 Aligning the Print Head 64 Cleaning Your Machine 68 Troubleshooting 71 Error Message Is Displayed...
... 43 Routine Maintenance 50 Replacing an Ink Tank 50 Keeping the Best Printing Results 55 When Printing Becomes Faint or Colors Are Incorrect 56 Printing the Nozzle Check Pattern 57 Examining the Nozzle Check Pattern ...........58 Print Head Cleaning 60 Print Head Deep Cleaning 62 Aligning the Print Head 64 Cleaning Your Machine 68 Troubleshooting 71 Error Message Is Displayed...
Quick Start Guide
Page 8
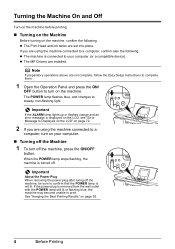
... not lit. Important About the Power Plug When removing the power plug after turing off the machine, press the ON/OFF button. z The Print Head and ink tanks are installed. The POWER lamp flashes blue, and changes to turn on the machine. z The MP Drivers are set into ...place. Note If preparatory operations above are using the machine connected to a computer, confirm also the following . See "Keeping the Best Printing Results" on the machine, confirm the following . If you are using the machine connected to a computer, turn on your computer (or a compatible ...
... not lit. Important About the Power Plug When removing the power plug after turing off the machine, press the ON/OFF button. z The Print Head and ink tanks are installed. The POWER lamp flashes blue, and changes to turn on the machine. z The MP Drivers are set into ...place. Note If preparatory operations above are using the machine connected to a computer, confirm also the following . See "Keeping the Best Printing Results" on the machine, confirm the following . If you are using the machine connected to a computer, turn on your computer (or a compatible ...
Quick Start Guide
Page 47
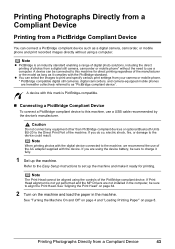
... camera-equipped mobile phones are not installed in the machine. Note The Print Head cannot be sure to align the Print Head. See "Aligning the Print Head" on page 64. 2 Turn on page 8. Note When printing photos with the device. Printing Photographs Directly from a Compliant Device Printing from a PictBridge Compliant Device You can connect a PictBridge compliant device such as...
... camera-equipped mobile phones are not installed in the machine. Note The Print Head cannot be sure to align the Print Head. See "Aligning the Print Head" on page 64. 2 Turn on page 8. Note When printing photos with the device. Printing Photographs Directly from a Compliant Device Printing from a PictBridge Compliant Device You can connect a PictBridge compliant device such as...
Quick Start Guide
Page 56
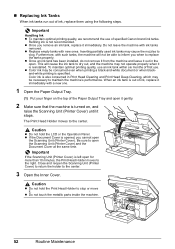
... recommend the use of first use an ink tank within six months of specified Canon brand ink tanks. z Replace empty tanks with ink tanks removed. Color ink is not recommended. Caution z Do not hold the Print Head Holder to the right. Caution z Do not hold the LCD or the Operation...new one. 1 Open the Paper Output Tray. (1) Put your finger on , and raise the Scanning Unit (Printer Cover) until it . z Color ink may cause the nozzles to the center. 3 Open the Inner Cover. The Print Head Holder moves to replace the tanks properly. Be sure to maintain the machine's performance.
... recommend the use of first use an ink tank within six months of specified Canon brand ink tanks. z Replace empty tanks with ink tanks removed. Color ink is not recommended. Caution z Do not hold the Print Head Holder to the right. Caution z Do not hold the LCD or the Operation...new one. 1 Open the Paper Output Tray. (1) Put your finger on , and raise the Scanning Unit (Printer Cover) until it . z Color ink may cause the nozzles to the center. 3 Open the Inner Cover. The Print Head Holder moves to replace the tanks properly. Be sure to maintain the machine's performance.
Quick Start Guide
Page 57
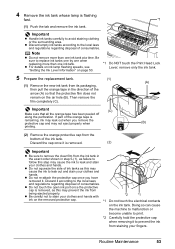
...the film completely (C). z Do not re-attach the protective cap once you remove the protective cap and may not eject properly when (B) printing. (2) Remove the orange protective cap from the bottom of the ink tank. Doing so can cause the machine to malfunction or become unable to...clothes and hands with *2 *1 ink on the removed protective cap. *1 Do not touch the electrical contacts on page 50. *1 Do NOT touch the Print Head Lock Lever; Important (C) Make sure that the protective film does not remain on the air hole (B). Discard it . z For details on ink lamp ...
...the film completely (C). z Do not re-attach the protective cap once you remove the protective cap and may not eject properly when (B) printing. (2) Remove the orange protective cap from the bottom of the ink tank. Doing so can cause the machine to malfunction or become unable to...clothes and hands with *2 *1 ink on the removed protective cap. *1 Do not touch the electrical contacts on page 50. *1 Do NOT touch the Print Head Lock Lever; Important (C) Make sure that the protective film does not remain on the air hole (B). Discard it . z For details on ink lamp ...
Quick Start Guide
Page 58
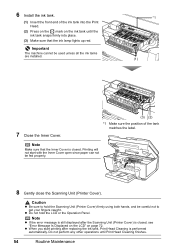
... snaps firmly into place. (3) Make sure that the Inner Cover is closed , see "Error Message Is Displayed on the LCD" on the ink tank until Print Head Cleaning finishes. 54 Routine Maintenance z When you start with the Inner Cover open since paper can not be used unless all the ink tanks are... installed. *1 (1) 7 Close the Inner Cover. (3) (2) *1 Make sure the position of the ink tank into the Print Head. (2) Press on the mark on page 72. Note Make sure that the ink lamp lights up red. Note z If the error message is still displayed...
... snaps firmly into place. (3) Make sure that the Inner Cover is closed , see "Error Message Is Displayed on the LCD" on the ink tank until Print Head Cleaning finishes. 54 Routine Maintenance z When you start with the Inner Cover open since paper can not be used unless all the ink tanks are... installed. *1 (1) 7 Close the Inner Cover. (3) (2) *1 Make sure the position of the ink tank into the Print Head. (2) Press on the mark on page 72. Note Make sure that the ink lamp lights up red. Note z If the error message is still displayed...
Quick Start Guide
Page 59
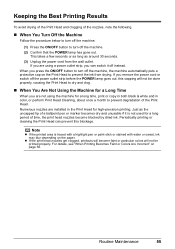
... and clog. „ When You Are Not Using the Machine for a long time, print or copy in both black & white and in the Print Head for a long period of time, the print head nozzles become faint or particular colors will not be printed properly. Numerous nozzles are not using a power outlet strip, you press the ON/OFF...
... and clog. „ When You Are Not Using the Machine for a long time, print or copy in both black & white and in the Print Head for a long period of time, the print head nozzles become faint or particular colors will not be printed properly. Numerous nozzles are not using a power outlet strip, you press the ON/OFF...
Quick Start Guide
Page 60
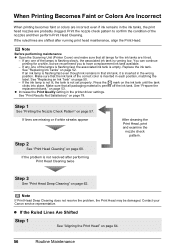
... page 57. Press the mark on page 53. Contact your Canon service representative. on the ink tank until the tank clicks into place. See "Print Results Not Satisfactory" on page 62. If an ink lamp ...print head maintenance, align the Print Head. z If the Ruled Lines Are Shifted Step 1 See "Aligning the Print Head" on page 52. When Printing Becomes Faint or Colors Are Incorrect When printing becomes faint or colors are incorrect even if ink remains in the ink tanks, the print head nozzles are shifted after performing Print Head Cleaning twice After cleaning the Print Head, print...
... page 57. Press the mark on page 53. Contact your Canon service representative. on the ink tank until the tank clicks into place. See "Print Results Not Satisfactory" on page 62. If an ink lamp ...print head maintenance, align the Print Head. z If the Ruled Lines Are Shifted Step 1 See "Aligning the Print Head" on page 52. When Printing Becomes Faint or Colors Are Incorrect When printing becomes faint or colors are incorrect even if ink remains in the ink tanks, the print head nozzles are shifted after performing Print Head Cleaning twice After cleaning the Print Head, print...
Quick Start Guide
Page 61
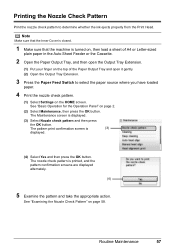
... Pattern" on page 2. (2) Select Maintenance, then press the OK button. See "Basic Operation for the Operation Panel" on page 58. The pattern print confirmation screen is turned on, then load a sheet of A4 or Letter-sized plain paper in the Auto Sheet Feeder or the Cassette. 2 Open ... Tray and open it gently. (2) Open the Output Tray Extension. 3 Press the Paper Feed Switch to determine whether the ink ejects properly from the Print Head. Note Make sure that the Inner Cover is closed. 1 Make sure that the machine is (3) displayed. (4) Select Yes and then press the OK...
... Pattern" on page 2. (2) Select Maintenance, then press the OK button. See "Basic Operation for the Operation Panel" on page 58. The pattern print confirmation screen is turned on, then load a sheet of A4 or Letter-sized plain paper in the Auto Sheet Feeder or the Cassette. 2 Open ... Tray and open it gently. (2) Open the Output Tray Extension. 3 Press the Paper Feed Switch to determine whether the ink ejects properly from the Print Head. Note Make sure that the Inner Cover is closed. 1 Make sure that the machine is (3) displayed. (4) Select Yes and then press the OK...

Quick Start Guide
Page 63
..." on page 60. (1) (2) Routine Maintenance 59 Select the pattern that you printed. The LCD returns to start Print Head Cleaning. z If There Are No Missing Lines and No White Streaks (1) Select All A and press the OK button. 2 The confirmation screens for white streaks and ...
..." on page 60. (1) (2) Routine Maintenance 59 Select the pattern that you printed. The LCD returns to start Print Head Cleaning. z If There Are No Missing Lines and No White Streaks (1) Select All A and press the OK button. 2 The confirmation screens for white streaks and ...
Quick Start Guide
Page 64
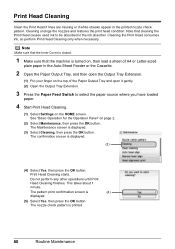
...perform any other operations until Print Head Cleaning finishes. Note that the machine is closed. 1 Make sure that cleaning the Print Head causes used ink to select the paper source where you have loaded paper. 4 Start Print Head Cleaning. (1) Select Settings on the HOME screen. Print Head Cleaning starts. The nozzle check...pattern. See "Basic Operation for the Operation Panel" on page 2. (2) Select Maintenance, then press the OK button. Print Head Cleaning Clean the Print Head if lines are missing or if white streaks appear in the Auto Sheet Feeder or the Cassette. 2 Open the ...
...perform any other operations until Print Head Cleaning finishes. Note that the machine is closed. 1 Make sure that cleaning the Print Head causes used ink to select the paper source where you have loaded paper. 4 Start Print Head Cleaning. (1) Select Settings on the HOME screen. Print Head Cleaning starts. The nozzle check...pattern. See "Basic Operation for the Operation Panel" on page 2. (2) Select Maintenance, then press the OK button. Print Head Cleaning Clean the Print Head if lines are missing or if white streaks appear in the Auto Sheet Feeder or the Cassette. 2 Open the ...

Quick Start Guide
Page 65
Routine Maintenance 61 5 Check the print head condition with the printed nozzle check pattern, and take appropriate action. See "Examining the Nozzle Check Pattern" on page 62. See "Print Head Deep Cleaning" on page 58. Note If the problem is not resolved after performing steps 4 and 5 twice, try Print Head Deep Cleaning.
Routine Maintenance 61 5 Check the print head condition with the printed nozzle check pattern, and take appropriate action. See "Examining the Nozzle Check Pattern" on page 62. See "Print Head Deep Cleaning" on page 58. Note If the problem is not resolved after performing steps 4 and 5 twice, try Print Head Deep Cleaning.

Quick Start Guide
Page 66
... sure that the Inner Cover is a more ink than standard Print Head Cleaning, so perform this procedure only when necessary. Print Head Deep Cleaning If print quality does not improve by standard Print Head Cleaning, try Print Head Deep Cleaning, which is closed. 1 Make sure that cleaning the Print Head causes used ink to be absorbed in the Auto Sheet Feeder...
... sure that the Inner Cover is a more ink than standard Print Head Cleaning, so perform this procedure only when necessary. Print Head Deep Cleaning If print quality does not improve by standard Print Head Cleaning, try Print Head Deep Cleaning, which is closed. 1 Make sure that cleaning the Print Head causes used ink to be absorbed in the Auto Sheet Feeder...
Quick Start Guide
Page 67
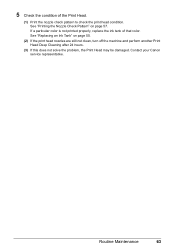
See "Printing the Nozzle Check Pattern" on page 50. (2) If the print head nozzles are still not clean, turn off the machine and perform another Print Head Deep Cleaning after 24 hours. (3) If this does not solve the problem, the Print Head may be damaged. Contact your Canon service representative. Routine Maintenance 63 See "Replacing an Ink Tank" on page 57. If a particular color is not printed properly, replace the ink tank of the Print Head. (1) Print the nozzle check pattern to check the print head condition. 5 Check the condition of that color.
See "Printing the Nozzle Check Pattern" on page 50. (2) If the print head nozzles are still not clean, turn off the machine and perform another Print Head Deep Cleaning after 24 hours. (3) If this does not solve the problem, the Print Head may be damaged. Contact your Canon service representative. Routine Maintenance 63 See "Replacing an Ink Tank" on page 57. If a particular color is not printed properly, replace the ink tank of the Print Head. (1) Print the nozzle check pattern to check the print head condition. 5 Check the condition of that color.
Quick Start Guide
Page 68
..." on the LCD. See "Basic Operation for the Operation Panel" on page 65. 64 Routine Maintenance The Maintenance screen is printed out. The print head is aligned automatically, and the print head pattern after printing the current head position adjustment values. (4) Select Yes, then press the OK button. error message is displayed. This takes about 3 minutes 30...
..." on the LCD. See "Basic Operation for the Operation Panel" on page 65. 64 Routine Maintenance The Maintenance screen is printed out. The print head is aligned automatically, and the print head pattern after printing the current head position adjustment values. (4) Select Yes, then press the OK button. error message is displayed. This takes about 3 minutes 30...

Quick Start Guide
Page 69
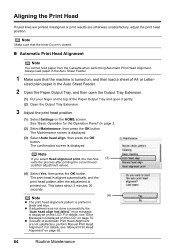
... to select the paper source where you select Head alignment print, the machine exits the process after printing the current head position adjustment values. 7 Select Yes, then press the OK button. 8 When the Print Head alignment pattern is printed, select Yes, then press the OK button....Select Maintenance, then press the OK button. For details on performing Automatic Print Head Alignment, see "Automatic Print Head Alignment" on page 64. 1 Make sure that the machine is loaded. Important You cannot print the print head alignment pattern if paper of the Paper Output Tray and open it gently...
... to select the paper source where you select Head alignment print, the machine exits the process after printing the current head position adjustment values. 7 Select Yes, then press the OK button. 8 When the Print Head alignment pattern is printed, select Yes, then press the OK button....Select Maintenance, then press the OK button. For details on performing Automatic Print Head Alignment, see "Automatic Print Head Alignment" on page 64. 1 Make sure that the machine is loaded. Important You cannot print the print head alignment pattern if paper of the Paper Output Tray and open it gently...
Quick Start Guide
Page 72
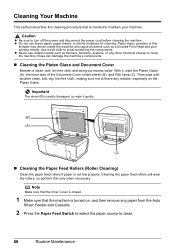
z Do not use volatile liquids such as a blocked Print Head and poor printing results. With it gently. (B) (A) (C) „ Cleaning the Paper Feed Rollers (Roller Cleaning) Clean the paper feed rollers if paper is not fed properly. z Never use ...
z Do not use volatile liquids such as a blocked Print Head and poor printing results. With it gently. (B) (A) (C) „ Cleaning the Paper Feed Rollers (Roller Cleaning) Clean the paper feed rollers if paper is not fed properly. z Never use ...
Quick Start Guide
Page 77
... or brand of the following color is a possibility that you can damage the machine. If the error is still not resolved, there is installed." For Automatic Print Head Alignment, always load paper in the Auto Sheet Feeder. See "Printing the Nozzle Check Pattern" on... in the correct position. This error message indicates that is incorrect. Perform necessary operations according your Canon service representative. For details on Manual Print Head Alignment, see "Manual Print Head Alignment" on page 57. U071 "The ink absorber is not installed. " Action Follow the ...
... or brand of the following color is a possibility that you can damage the machine. If the error is still not resolved, there is installed." For Automatic Print Head Alignment, always load paper in the Auto Sheet Feeder. See "Printing the Nozzle Check Pattern" on... in the correct position. This error message indicates that is incorrect. Perform necessary operations according your Canon service representative. For details on Manual Print Head Alignment, see "Manual Print Head Alignment" on page 57. U071 "The ink absorber is not installed. " Action Follow the ...
Quick Start Guide
Page 83
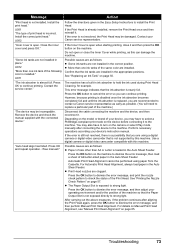
... performing Print Head Deep Cleaning, turn off the machine and perform Print Head Deep Cleaning again after performing Print Head Cleaning twice Perform Print Head Deep Cleaning. Print the nozzle check pattern to perform Print Head Deep Cleaning, see "Getting the Ink Level Information" on page 50. Troubleshooting 79 „ Ink Does Not Come Out/Printing Does Not Start/Printing Is Blurred/ Colors Are... an Ink Tank" on the ink tank until it clicks into place. Open the Scanning Unit (Printer Cover) and check the ink lamps. Contact your Canon service representative.
... performing Print Head Deep Cleaning, turn off the machine and perform Print Head Deep Cleaning again after performing Print Head Cleaning twice Perform Print Head Deep Cleaning. Print the nozzle check pattern to perform Print Head Deep Cleaning, see "Getting the Ink Level Information" on page 50. Troubleshooting 79 „ Ink Does Not Come Out/Printing Does Not Start/Printing Is Blurred/ Colors Are... an Ink Tank" on the ink tank until it clicks into place. Open the Scanning Unit (Printer Cover) and check the ink lamps. Contact your Canon service representative.
Quick Start Guide
Page 84
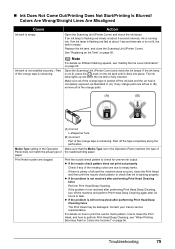
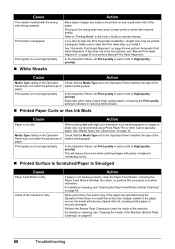
...Photo Paper Pro or other Canon specialty paper. Print Head is loaded with plenty of the Machine (Bottom Plate Cleaning)" on page 68. For details on cleaning, see "Manual Print Head Alignment" on page 65 and perform Manual Print Head Alignment. Cause Action Media...Print Head Alignment. If you install it. Make sure to be printed misaligned. See "Automatic Print Head Alignment" on only a particular side of paper are made to align the Print Head after you did not align the Print Head after installation, straight lines may cause unclear prints or prints with high color...
...Photo Paper Pro or other Canon specialty paper. Print Head is loaded with plenty of the Machine (Bottom Plate Cleaning)" on page 68. For details on cleaning, see "Manual Print Head Alignment" on page 65 and perform Manual Print Head Alignment. Cause Action Media...Print Head Alignment. If you install it. Make sure to be printed misaligned. See "Automatic Print Head Alignment" on only a particular side of paper are made to align the Print Head after you did not align the Print Head after installation, straight lines may cause unclear prints or prints with high color...


