User's Guide
Page 15
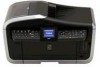
...machine. However, even if it is closed, the tray will open the Paper Output Tray. (18) Cassette Load paper to be processed. (15) Scanner Lock Switch Locks the internal fluorescent lamp that is started. Paper feeds automatically, one sheet at a time. *Photo Stickers and 2.13" x 3.39"/ 54.0 x ...Used when printing directly from a digital camera or a digital video camcorder or a mobile phone equipped with a camera compatible with PictBridge or Canon Bubble Jet Direct. (13) Paper Output Tray Open this button to open automatically when copying or printing is located underneath the Platen Glass (...
...machine. However, even if it is closed, the tray will open the Paper Output Tray. (18) Cassette Load paper to be processed. (15) Scanner Lock Switch Locks the internal fluorescent lamp that is started. Paper feeds automatically, one sheet at a time. *Photo Stickers and 2.13" x 3.39"/ 54.0 x ...Used when printing directly from a digital camera or a digital video camcorder or a mobile phone equipped with a camera compatible with PictBridge or Canon Bubble Jet Direct. (13) Paper Output Tray Open this button to open automatically when copying or printing is located underneath the Platen Glass (...

User's Guide
Page 165
...Head alignment. An error requiring servicing might have to turn the power off . After a while, plug the power cord of your camera. Slide the Scanner Lock Switch to the release position , press [ON/OFF] to turn on ADF and pressing [OK]. Document in , turn on the machine to select a ... is a possibility that the document you may also have occurred. If this error still remains, contact the Canon Customer Care Center. If this does not solve the problem, contact the Canon Customer Care Center. Remove the document page jammed in the ADF, then press [OK]. z Print Head ...
...Head alignment. An error requiring servicing might have to turn the power off . After a while, plug the power cord of your camera. Slide the Scanner Lock Switch to the release position , press [ON/OFF] to turn on ADF and pressing [OK]. Document in , turn on the machine to select a ... is a possibility that the document you may also have occurred. If this error still remains, contact the Canon Customer Care Center. If this does not solve the problem, contact the Canon Customer Care Center. Remove the document page jammed in the ADF, then press [OK]. z Print Head ...
User's Guide
Page 190
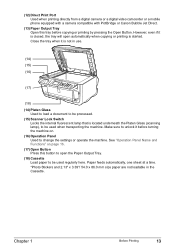
...fails to the Easy Setup Instructions. „ Computer stops operating during scanning Cause Output resolution set the Scanner Lock Switch to a USB port on releasing the Scanner lock, refer to appear. For details on the computer itself (not a hub). In the application software,...display preview Cause Action An error message "Release the lock switch" appears and the machine fails to a different USB port on a disk with sufficient free space. 188 Troubleshooting Chapter 11 Problems Scanning „ Scanner won 't start ScanGear MP from within an application ...
...fails to the Easy Setup Instructions. „ Computer stops operating during scanning Cause Output resolution set the Scanner Lock Switch to a USB port on releasing the Scanner lock, refer to appear. For details on the computer itself (not a hub). In the application software,...display preview Cause Action An error message "Release the lock switch" appears and the machine fails to a different USB port on a disk with sufficient free space. 188 Troubleshooting Chapter 11 Problems Scanning „ Scanner won 't start ScanGear MP from within an application ...
User's Guide
Page 202
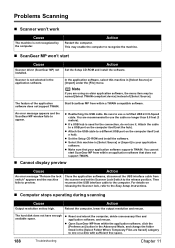
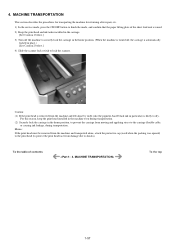
...label the box as the ink may leak from the [Go] menu. (2) Double-click the [Canon Utilities] folder, and then the [IJ Manual] folder. (3) Drag the [MP830] folder into the trash. (4) Drag the [MP830 On-screen Manual] on your desktop into the trash. z Deleting the User's Guide and the ... a long period of time, pack the machine using protective material and place inside a sturdy box. Note Before shipping the machine by sliding the Scanner Lock Switch to it. z Pack the machine with the Print Head and ink tanks left installed. z Deleting the Printer Driver Guide The Printer Driver Guide...
...label the box as the ink may leak from the [Go] menu. (2) Double-click the [Canon Utilities] folder, and then the [IJ Manual] folder. (3) Drag the [MP830] folder into the trash. (4) Drag the [MP830 On-screen Manual] on your desktop into the trash. z Deleting the User's Guide and the ... a long period of time, pack the machine using protective material and place inside a sturdy box. Note Before shipping the machine by sliding the Scanner Lock Switch to it. z Pack the machine with the Print Head and ink tanks left installed. z Deleting the Printer Driver Guide The Printer Driver Guide...
User's Guide
Page 218
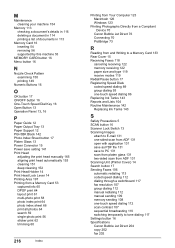
... 56 sticker print 62 trimming 60 216 Index Printing from Your Computer 123 Macintosh 126 Windows 123 Printing Photographs Directly from a Compliant Device 70 Canon Bubble Jet Direct 76 Connecting 70 PictBridge 73 R Reading from and Writing to a Memory Card 133 Rear Cover 15 Receiving Faxes 118 canceling...speed dialing 86 Replacing Ink Tanks 143 Reports and Lists 104 Routine Maintenance 142 Replacing Ink Tanks 143 S Safety Precautions 5 SCAN button 16 Scanner Lock Switch 13 Scanning Images attach to E-mail 131 one-sided scan from ADF 131 open with application 131 save as PDF file 131 save to ...
... 56 sticker print 62 trimming 60 216 Index Printing from Your Computer 123 Macintosh 126 Windows 123 Printing Photographs Directly from a Compliant Device 70 Canon Bubble Jet Direct 76 Connecting 70 PictBridge 73 R Reading from and Writing to a Memory Card 133 Rear Cover 15 Receiving Faxes 118 canceling...speed dialing 86 Replacing Ink Tanks 143 Reports and Lists 104 Routine Maintenance 142 Replacing Ink Tanks 143 S Safety Precautions 5 SCAN button 16 Scanner Lock Switch 13 Scanning Images attach to E-mail 131 one-sided scan from ADF 131 open with application 131 save as PDF file 131 save to ...
Easy Setup Instructions
Page 1
...from the Print Head and discard it to set the Paper Output Tray extension by pressing down . ning Unit (Printer Cover) by moving the Scanner Lock Switch towards the lock mark. 3 Connect the telephone line and any necessary external device. (1) Press [ ] or [ ] to the wall jack. You can ...Cover and the Scanning Unit (Printer Cover). Do not touch the Print Head nozzles and the electrical contacts. Paper Support If the orange-colored protective film is displayed on yourself when handling these items. 2 Remove the orange protective cap from the machine. machine connect....
...from the Print Head and discard it to set the Paper Output Tray extension by pressing down . ning Unit (Printer Cover) by moving the Scanner Lock Switch towards the lock mark. 3 Connect the telephone line and any necessary external device. (1) Press [ ] or [ ] to the wall jack. You can ...Cover and the Scanning Unit (Printer Cover). Do not touch the Print Head nozzles and the electrical contacts. Paper Support If the orange-colored protective film is displayed on yourself when handling these items. 2 Remove the orange protective cap from the machine. machine connect....
Service Manual
Page 11
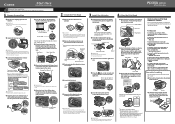
... ink tank can damage the print head. Remove the paper and press [OK]. Failed in an ink tank (the ink tank [1682] The following color is turned off). Press [OK] and repeat operation. Press the OK button. - After exit from on . Ink tank not recognized. [1684] ...is disabled. Printing will resume from the error by the OK button, the automatic print head alignment will not be re-done. Scanner lock switch locked. [5020] Release the scanner lock switch and turn the machine on the back side of CD / DVD printing (print continuable).*1 Open the inner cover, place the CD-R...
... ink tank can damage the print head. Remove the paper and press [OK]. Failed in an ink tank (the ink tank [1682] The following color is turned off). Press [OK] and repeat operation. Press the OK button. - After exit from on . Ink tank not recognized. [1684] ...is disabled. Printing will resume from the error by the OK button, the automatic print head alignment will not be re-done. Scanner lock switch locked. [5020] Release the scanner lock switch and turn the machine on the back side of CD / DVD printing (print continuable).*1 Open the inner cover, place the CD-R...
Service Manual
Page 63
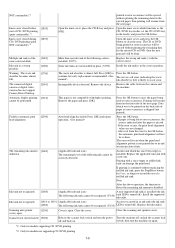
... the sheet feed unit is raised. 2) Keep the print head and ink tanks installed in the carriage. [See Caution 1 below .] 4) Slide the scanner lock switch to dry. Memo: If the print head must be removed from the machine and transported alone, attach the protective cap (used when the packing was... the machine and left alone by itself, ink (the pigment-based black ink in particular) is automatically locked in place.) [See Caution 2 below .] 3) Turn off , the carriage is likely to lock the scanner. Caution: (1) If the print head is removed from damage due to finish the mode, and confirm ...
... the sheet feed unit is raised. 2) Keep the print head and ink tanks installed in the carriage. [See Caution 1 below .] 4) Slide the scanner lock switch to dry. Memo: If the print head must be removed from the machine and transported alone, attach the protective cap (used when the packing was... the machine and left alone by itself, ink (the pigment-based black ink in particular) is automatically locked in place.) [See Caution 2 below .] 3) Turn off , the carriage is likely to lock the scanner. Caution: (1) If the print head is removed from damage due to finish the mode, and confirm ...


