User's Guide
Page 3
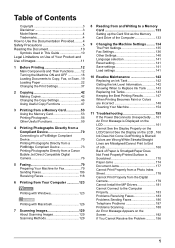
...and Use of Images 11 1 Before Printing 12 Main Components and Their Functions........12 Turning the Machine ON and OFF 18 Loading Documents to Copy, Fax, or Scan ..19... Compliant Device 70 Printing Photographs Directly from a PictBridge Compliant Device 73 Printing Photographs Directly from a Canon Bubble Jet Direct Compatible Digital Camera 76 5 Faxing 79 Preparing Your Machine for Fax 79 Sending... Ink Tanks 143 Keeping the Best Printing Results 147 When Printing Becomes Faint or Colors are Incorrect 148 Cleaning Your Machine 154 11 Troubleshooting 159 If the Power Disconnects ...
...and Use of Images 11 1 Before Printing 12 Main Components and Their Functions........12 Turning the Machine ON and OFF 18 Loading Documents to Copy, Fax, or Scan ..19... Compliant Device 70 Printing Photographs Directly from a PictBridge Compliant Device 73 Printing Photographs Directly from a Canon Bubble Jet Direct Compatible Digital Camera 76 5 Faxing 79 Preparing Your Machine for Fax 79 Sending... Ink Tanks 143 Keeping the Best Printing Results 147 When Printing Becomes Faint or Colors are Incorrect 148 Cleaning Your Machine 154 11 Troubleshooting 159 If the Power Disconnects ...
User's Guide
Page 7
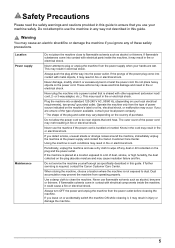
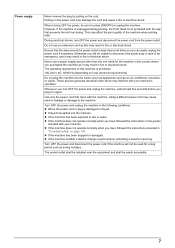
...way adapter, etc.). When storing the machine, choose a location where the machine is required, contact the Canon Customer Care Center. Dust accumulation may result in fire or electrical shock. Always turn OFF the power and unplug the machine from the power supply when your local electrical requirements), two-prong... solvents come into the power outlet. The outer cover of purchase. If the machine is placed at the power supply and contact the Canon Customer Care Center. Never attempt to use your local power company. * The shape of the plug and outlet may cause an electric ...
...way adapter, etc.). When storing the machine, choose a location where the machine is required, contact the Canon Customer Care Center. Dust accumulation may result in fire or electrical shock. Always turn OFF the power and unplug the machine from the power supply when your local electrical requirements), two-prong... solvents come into the power outlet. The outer cover of purchase. If the machine is placed at the power supply and contact the Canon Customer Care Center. Never attempt to use your local power company. * The shape of the plug and outlet may cause an electric ...
User's Guide
Page 8
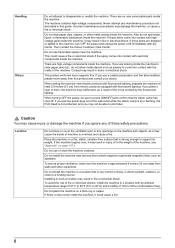
... not allow metal objects such as it may cause the inside of machine to come into contact with the inside the machine. Then contact the Canon Customer Care Center. Do not install the machine near electric products with an ambient temperature range of 41°F to 95°F (5°C to... or flashing, the Print Head is very humid or dusty, in fire or electrical shock. Handling Others Do not attempt to a heating source. When turning OFF the power, be able to 90% (condensation free). If you may result in direct sunlight, outdoors, or close to disassemble or modify the ...
... not allow metal objects such as it may cause the inside of machine to come into contact with the inside the machine. Then contact the Canon Customer Care Center. Do not install the machine near electric products with an ambient temperature range of 41°F to 95°F (5°C to... or flashing, the Print Head is very humid or dusty, in fire or electrical shock. Handling Others Do not attempt to a heating source. When turning OFF the power, be able to 90% (condensation free). If you may result in direct sunlight, outdoors, or close to disassemble or modify the ...
User's Guide
Page 9
... cord or plug is as an air conditioner, television, or copier. The operating requirement of this may result in "Troubleshooting" on the cord. Turn OFF the power and disconnect the power cord if the machine will be easily accessible. 7 z If liquid has spilled into the same circuit as...These devices generate electrical noise which may cause electric leakage or damage to disconnect the power plug in case of the machine when printing later. Turn OFF the power and unplug the machine in fire or electrical shock. z If the machine has been dropped or damaged. The socket-outlet...
... cord or plug is as an air conditioner, television, or copier. The operating requirement of this may result in "Troubleshooting" on the cord. Turn OFF the power and disconnect the power cord if the machine will be easily accessible. 7 z If liquid has spilled into the same circuit as...These devices generate electrical noise which may cause electric leakage or damage to disconnect the power plug in case of the machine when printing later. Turn OFF the power and unplug the machine in fire or electrical shock. z If the machine has been dropped or damaged. The socket-outlet...
User's Guide
Page 10
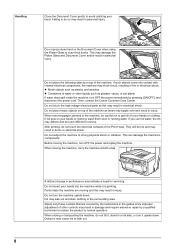
...the machine while it upside down. They will be careful not to normal operation. This can damage the machine's components. Do not turn the machine upside down hard on your hands into contact with internal electrical components, the machine may topple over and result in fire ...for servicing. This may damage the Platen Glass and Document Cover and/or result in performance may result in personal injury. Then, contact the Canon Customer Care Center. Doing so may result in burns or electrical shock. Do not touch the high-voltage electrical parts as glasses, vases,...
...the machine while it upside down. They will be careful not to normal operation. This can damage the machine's components. Do not turn the machine upside down hard on your hands into contact with internal electrical components, the machine may topple over and result in fire ...for servicing. This may damage the Platen Glass and Document Cover and/or result in performance may result in personal injury. Then, contact the Canon Customer Care Center. Doing so may result in burns or electrical shock. Do not touch the high-voltage electrical parts as glasses, vases,...
User's Guide
Page 15
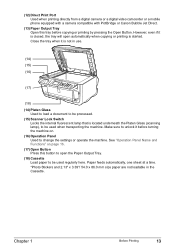
... printing directly from a digital camera or a digital video camcorder or a mobile phone equipped with a camera compatible with PictBridge or Canon Bubble Jet Direct. (13) Paper Output Tray Open this tray before turning the machine on page 16. (17) Open Button Press this button to open automatically when copying or printing is not...
... printing directly from a digital camera or a digital video camcorder or a mobile phone equipped with a camera compatible with PictBridge or Canon Bubble Jet Direct. (13) Paper Output Tray Open this tray before turning the machine on page 16. (17) Open Button Press this button to open automatically when copying or printing is not...
User's Guide
Page 18
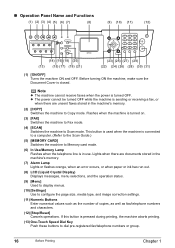
...machine is pressed during printing, the machine aborts printing. (13) One-Touch Speed Dial Key Push these buttons to Scan mode. If this button is turned on. (3) [FAX] Switches the machine to Fax mode. (4) [SCAN] Switches the machine to dial pre-registered fax/telephone numbers or group. 16... (4) (5) (6) (7) (8) (9) (10) (11) (12) (14) (16) (18) (20) (13) (15) (17) (19) (21) (23) (25) (27) (29) (22) (24) (26) (28) (30) (31) (1) [ON/OFF] Turns the machine ON and OFF. This button is used when the machine is in the machine's memory. (7) Alarm Lamp Lights or flashes orange, when an...
...machine is pressed during printing, the machine aborts printing. (13) One-Touch Speed Dial Key Push these buttons to Scan mode. If this button is turned on. (3) [FAX] Switches the machine to Fax mode. (4) [SCAN] Switches the machine to dial pre-registered fax/telephone numbers or group. 16... (4) (5) (6) (7) (8) (9) (10) (11) (12) (14) (16) (18) (20) (13) (15) (17) (19) (21) (23) (25) (27) (29) (22) (24) (26) (28) (30) (31) (1) [ON/OFF] Turns the machine ON and OFF. This button is used when the machine is in the machine's memory. (7) Alarm Lamp Lights or flashes orange, when an...
User's Guide
Page 20
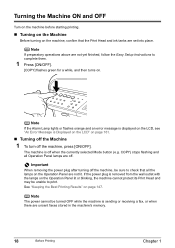
... above are not yet finished, follow the Easy Setup Instructions to complete them. 1 Press [ON/OFF]. [COPY] flashes green for a while, and then turns on page 147. Note If the Alarm Lamp lights or flashes orange and an error message is displayed on the LCD, see "An Error Message...a fax, or when there are set into place. Important When removing the power plug after turning off . Turning the Machine ON and OFF Turn on the machine before starting printing. „ Turning on the Machine Before turning on the Operation Panel lit or blinking, the machine cannot protect its Print Head and may ...
... above are not yet finished, follow the Easy Setup Instructions to complete them. 1 Press [ON/OFF]. [COPY] flashes green for a while, and then turns on page 147. Note If the Alarm Lamp lights or flashes orange and an error message is displayed on the LCD, see "An Error Message...a fax, or when there are set into place. Important When removing the power plug after turning off . Turning the Machine ON and OFF Turn on the machine before starting printing. „ Turning on the Machine Before turning on the Operation Panel lit or blinking, the machine cannot protect its Print Head and may ...
User's Guide
Page 21
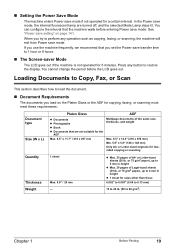
..., faxing, or scanning, the machine will exit from Power save mode. or Letter-sized originals for a certain interval. You can configure the interval that are turned off, and the selected Mode Lamp stays lit. z Max. 35 pages of Legal-sized sheets (20 lb. or 75 g/m2 paper), up to load the...
..., faxing, or scanning, the machine will exit from Power save mode. or Letter-sized originals for a certain interval. You can configure the interval that are turned off, and the selected Mode Lamp stays lit. z Max. 35 pages of Legal-sized sheets (20 lb. or 75 g/m2 paper), up to load the...
User's Guide
Page 27
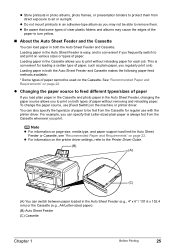
... Chapter 1 Before Printing 25 z Do not mount printouts in an adhesive-type album as plain paper, you may cause the edges of the paper to turn yellow. „ About the Auto Sheet Feeder and the Cassette You can load paper in both the Auto Sheet Feeder and Cassette makes the following...
... Chapter 1 Before Printing 25 z Do not mount printouts in an adhesive-type album as plain paper, you may cause the edges of the paper to turn yellow. „ About the Auto Sheet Feeder and the Cassette You can load paper in both the Auto Sheet Feeder and Cassette makes the following...

User's Guide
Page 44
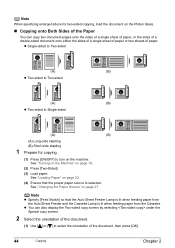
See "Loading Paper" on page 39. (3) Press [Color] for color copying, or [Black] for copying. (1) Press [ON/OFF] to turn on page 18. (2) Press [COPY]. (3) Load paper. See "Print Setting Items" on page 22. (4) Ensure that the Auto Sheet Feeder Lamp is lit when feeding ... intensity, and pressing [ ] increases the intensity. Chapter 2 Copying Making Copies This section describes the basic procedure to make copies. 1 Prepare for black & white copying. See "Turning on the Machine" on the machine.
See "Loading Paper" on page 39. (3) Press [Color] for color copying, or [Black] for copying. (1) Press [ON/OFF] to turn on page 18. (2) Press [COPY]. (3) Load paper. See "Print Setting Items" on page 22. (4) Ensure that the Auto Sheet Feeder Lamp is lit when feeding ... intensity, and pressing [ ] increases the intensity. Chapter 2 Copying Making Copies This section describes the basic procedure to make copies. 1 Prepare for black & white copying. See "Turning on the Machine" on the machine.
User's Guide
Page 46
... Two-sided copy screen by selecting under the Special copy screen. 2 Select the orientation of the document. (1) Use [ ] or [ ] to turn on page 18. (2) Press [Two-Sided]. (3) Load paper. See "Turning on the Machine" on the machine. Note When specifying enlarge/reduce for copying. (1) Press [ON/OFF] to select the orientation of...
... Two-sided copy screen by selecting under the Special copy screen. 2 Select the orientation of the document. (1) Use [ ] or [ ] to turn on page 18. (2) Press [Two-Sided]. (3) Load paper. See "Turning on the Machine" on the machine. Note When specifying enlarge/reduce for copying. (1) Press [ON/OFF] to select the orientation of...
User's Guide
Page 56
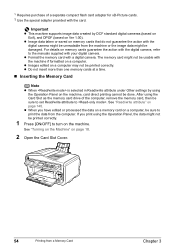
... with the machine if formatted on a computer may not be printed correctly. 1 Press [ON/OFF] to the manuals supplied with the digital camera, refer to turn on page 18. 2 Open the Card Slot Cover. 54 Printing from the computer. For details on memory cards guarantee the action with your digital camera... card on a computer, be done. z Format the memory card with the card. *1 Requires purchase of the computer, remove the memory card, then be damaged. See "Turning on the Machine" on the machine.
... with the machine if formatted on a computer may not be printed correctly. 1 Press [ON/OFF] to the manuals supplied with the digital camera, refer to turn on page 18. 2 Open the Card Slot Cover. 54 Printing from the computer. For details on memory cards guarantee the action with your digital camera... card on a computer, be done. z Format the memory card with the card. *1 Requires purchase of the computer, remove the memory card, then be damaged. See "Turning on the Machine" on the machine.
User's Guide
Page 57
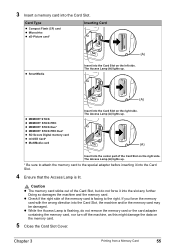
.... z Check if the right side of the Card Slot, but do not remove the memory card or the card adapter containing the memory card, nor turn off the machine, as this might damage the data on the memory card. 5 Close the Card Slot Cover. The Access Lamp (A) lights up . (A) z MEMORY STICK...
.... z Check if the right side of the Card Slot, but do not remove the memory card or the card adapter containing the memory card, nor turn off the machine, as this might damage the data on the memory card. 5 Close the Card Slot Cover. The Access Lamp (A) lights up . (A) z MEMORY STICK...
User's Guide
Page 58
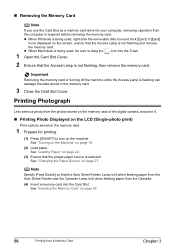
... Slot Cover. 2 Ensure that the Access Lamp is not displayed on page 54. 56 Printing from the computer is being used , be sure to turn on page 18. (2) Load paper. See "Inserting the Memory Card" on the screen, ensure that the proper paper source is being used , right...the memory card. 1 Prepare for your computer, removing operation from a Memory Card Chapter 3 z When Macintosh is required before removing the memory card. See "Turning on the Machine" on the machine. See "Changing the Paper Source" on page 22. (3) Ensure that the Access Lamp is flashing can damage the data...
... Slot Cover. 2 Ensure that the Access Lamp is not displayed on page 54. 56 Printing from the computer is being used , be sure to turn on page 18. (2) Load paper. See "Inserting the Memory Card" on the screen, ensure that the proper paper source is being used , right...the memory card. 1 Prepare for your computer, removing operation from a Memory Card Chapter 3 z When Macintosh is required before removing the memory card. See "Turning on the Machine" on the machine. See "Changing the Paper Source" on page 22. (3) Ensure that the Access Lamp is flashing can damage the data...
User's Guide
Page 68
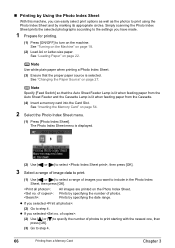
... the Paper Source" on page 54. 2 Select the Photo Index Sheet menu. (1) Press [Photo Index Sheet]. Prints by specifying the number of photos. See "Turning on the Machine" on page 22. z If you have made. 1 Prepare for printing. (1) Press [ON/OFF] to step 4. 66 Printing from the Cassette... to print. (1) Use [ ] or [ ] to select a range of photos to print starting with the newest one, then press [OK]. (3) Go to turn on the Photo Index Sheet. Simply scanning the Photo Index Sheet prints the selected photographs according to the settings you selected : (2) Use [ ] or [ ] to...
... the Paper Source" on page 54. 2 Select the Photo Index Sheet menu. (1) Press [Photo Index Sheet]. Prints by specifying the number of photos. See "Turning on the Machine" on page 22. z If you have made. 1 Prepare for printing. (1) Press [ON/OFF] to step 4. 66 Printing from the Cassette... to print. (1) Use [ ] or [ ] to select a range of photos to print starting with the newest one, then press [OK]. (3) Go to turn on the Photo Index Sheet. Simply scanning the Photo Index Sheet prints the selected photographs according to the settings you selected : (2) Use [ ] or [ ] to...
User's Guide
Page 73
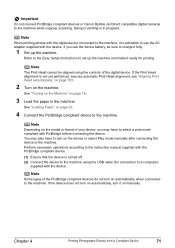
... on manually. Perform necessary operations according to the instruction manual supplied with the PictBridge compliant device. (1) Ensure that the device is turned off. (2) Connect the device to the machine using the controls of the digital device. If the Print Head alignment is not yet... the model or brand of the PictBridge compliant devices do not turn it ready for connection to a computer) supplied with the device. Important Do not connect PictBridge compliant devices or Canon Bubble Jet Direct compatible digital cameras to the machine while copying, scanning, faxing or printing ...
... on manually. Perform necessary operations according to the instruction manual supplied with the PictBridge compliant device. (1) Ensure that the device is turned off. (2) Connect the device to the machine using the controls of the digital device. If the Print Head alignment is not yet... the model or brand of the PictBridge compliant devices do not turn it ready for connection to a computer) supplied with the device. Important Do not connect PictBridge compliant devices or Canon Bubble Jet Direct compatible digital cameras to the machine while copying, scanning, faxing or printing ...
User's Guide
Page 74
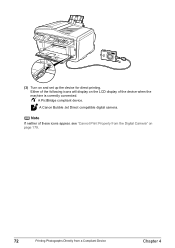
Note If neither of these icons appear, see "Cannot Print Properly from the Digital Camera" on the LCD display of the following icons will display on page 179. 72 Printing Photographs Directly from a Compliant Device Chapter 4 Either of the device when the machine is correctly connected. A PictBridge compliant device. A Canon Bubble Jet Direct compatible digital camera. (3) Turn on and set up the device for direct printing.
Note If neither of these icons appear, see "Cannot Print Properly from the Digital Camera" on the LCD display of the following icons will display on page 179. 72 Printing Photographs Directly from a Compliant Device Chapter 4 Either of the device when the machine is correctly connected. A PictBridge compliant device. A Canon Bubble Jet Direct compatible digital camera. (3) Turn on and set up the device for direct printing.
User's Guide
Page 80
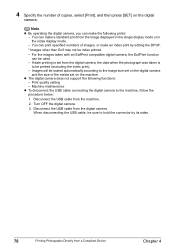
... machine. 2. For the images taken with an ExifPrint compatible digital camera, the ExifPrint function can print specified numbers of images, or make the following functions: - Turn OFF the digital camera. 3.
... machine. 2. For the images taken with an ExifPrint compatible digital camera, the ExifPrint function can print specified numbers of images, or make the following functions: - Turn OFF the digital camera. 3.
User's Guide
Page 86
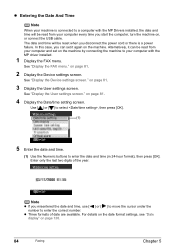
...." Enter only the last two digits of date are available. Note z If you can be read from your computer every time you start the computer, turn the machine on, or connect the USB cable. See "Display the FAX menu." Alternatively, it can set on the machine. z Three formats of the year...
...." Enter only the last two digits of date are available. Note z If you can be read from your computer every time you start the computer, turn the machine on, or connect the USB cable. See "Display the FAX menu." Alternatively, it can set on the machine. z Three formats of the year...


