PIXMA MP750/780 Quick Start Guide
Page 22
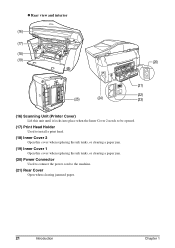
z Rear view and interior (16) (17) (18) (19) (20) (21) (22) (25) (24) (23) (16) Scanning Unit (Printer Cover) Lift this unit until it locks into place when the Inner Cover 2 needs to be opened. (17) Print Head Holder Used to install a print head. (18) Inner Cover 2 Open this cover when replacing the ink tanks, or clearing a paper jam. (19) Inner Cover 1 Open this cover when replacing the ink tanks, or clearing a paper jam. (20) Power Connector Used to connect the power cord to the machine. (21) Rear Cover Open when clearing jammed paper. 21 Introduction Chapter 1
z Rear view and interior (16) (17) (18) (19) (20) (21) (22) (25) (24) (23) (16) Scanning Unit (Printer Cover) Lift this unit until it locks into place when the Inner Cover 2 needs to be opened. (17) Print Head Holder Used to install a print head. (18) Inner Cover 2 Open this cover when replacing the ink tanks, or clearing a paper jam. (19) Inner Cover 1 Open this cover when replacing the ink tanks, or clearing a paper jam. (20) Power Connector Used to connect the power cord to the machine. (21) Rear Cover Open when clearing jammed paper. 21 Introduction Chapter 1
PIXMA MP750/780 Quick Start Guide
Page 46
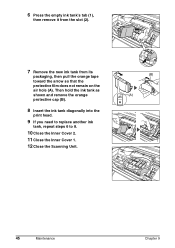
6 Press the empty ink tank's tab (1), then remove it from the slot (2). (2) 7 Remove the new ink tank from its packaging, then pull the orange tape toward the arrow so that the protective film does not remain on the air hole (A). Then hold the ink tank as shown and remove the orange protective cap (B). 8 Insert the ink tank diagonally into the print head. 9 If you need to replace another ink tank, repeat steps 6 to 8. 10 Close the Inner Cover 2. 11 Close the Inner Cover 1. 12 Close the Scanning Unit. (1) (B) (A) 45 Maintenance Chapter 9
6 Press the empty ink tank's tab (1), then remove it from the slot (2). (2) 7 Remove the new ink tank from its packaging, then pull the orange tape toward the arrow so that the protective film does not remain on the air hole (A). Then hold the ink tank as shown and remove the orange protective cap (B). 8 Insert the ink tank diagonally into the print head. 9 If you need to replace another ink tank, repeat steps 6 to 8. 10 Close the Inner Cover 2. 11 Close the Inner Cover 1. 12 Close the Scanning Unit. (1) (B) (A) 45 Maintenance Chapter 9


