MP520 series Quick Start Guide
Page 5
...the Best Printing Results 49 When Printing Becomes Faint or Colors Are Incorrect 50 Printing the Nozzle Check Pattern 51 Examining the Nozzle Check Pattern ...........52 Print Head Cleaning 54 Print Head Deep Cleaning 55 Aligning the Print Head 56 Cleaning Your Machine 59 Troubleshooting 67 An Error Message...But Ink Is Not Ejected......... 79 Paper Does Not Feed Properly 79 Paper Does Not Feed from the Paper Source Specified in the Printer Driver .......... 80 Paper Jams 81 Error Message Appears on the Computer Screen 83 Error Message Appears on a PictBridge Compliant Device 85 ...
...the Best Printing Results 49 When Printing Becomes Faint or Colors Are Incorrect 50 Printing the Nozzle Check Pattern 51 Examining the Nozzle Check Pattern ...........52 Print Head Cleaning 54 Print Head Deep Cleaning 55 Aligning the Print Head 56 Cleaning Your Machine 59 Troubleshooting 67 An Error Message...But Ink Is Not Ejected......... 79 Paper Does Not Feed Properly 79 Paper Does Not Feed from the Paper Source Specified in the Printer Driver .......... 80 Paper Jams 81 Error Message Appears on the Computer Screen 83 Error Message Appears on a PictBridge Compliant Device 85 ...
MP520 series Quick Start Guide
Page 48
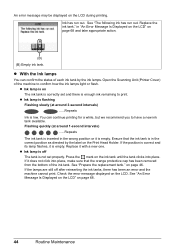
... have a new ink tank available. If the lamps are still off The tank is empty. Open the Scanning Unit (Printer Cover) of each ink tank by the label on the Print Head Holder. z Ink lamp is off after reinserting the ink tanks, there has been an error and the machine cannot print...
... have a new ink tank available. If the lamps are still off The tank is empty. Open the Scanning Unit (Printer Cover) of each ink tank by the label on the Print Head Holder. z Ink lamp is off after reinserting the ink tanks, there has been an error and the machine cannot print...
MP520 series Quick Start Guide
Page 49
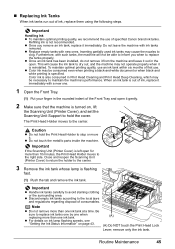
...your finger in the rounded indent of specified Canon brand ink tanks. z Do not touch the metallic parts inside the machine. Close and reopen the Scanning Unit (Printer Cover) to return the holder to stop ...Getting the Ink Status Information" on , lift the Scanning Unit (Printer Cover), and set the Scanning Unit Support to hold the Print Head Holder to the center. 3 Remove the ink tank whose lamp...tanks one by one when replacing more than 10 minutes, the Print Head Holder moves to replace the tanks properly. z Color ink may be able to the local laws and regulations regarding disposal...
...your finger in the rounded indent of specified Canon brand ink tanks. z Do not touch the metallic parts inside the machine. Close and reopen the Scanning Unit (Printer Cover) to return the holder to stop ...Getting the Ink Status Information" on , lift the Scanning Unit (Printer Cover), and set the Scanning Unit Support to hold the Print Head Holder to the center. 3 Remove the ink tank whose lamp...tanks one by one when replacing more than 10 minutes, the Print Head Holder moves to replace the tanks properly. z Color ink may be able to the local laws and regulations regarding disposal...
MP520 series Quick Start Guide
Page 51
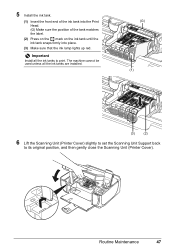
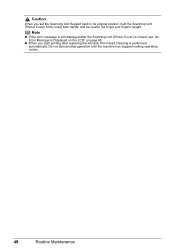
... unless all the ink tanks to its original position, and then gently close the Scanning Unit (Printer Cover). Routine Maintenance 47 5 Install the ink tank. (1) Insert the front end of the ink tank into the Print Head. (G) Make sure the position of the tank matches the label. (2) Press on the mark on...
... unless all the ink tanks to its original position, and then gently close the Scanning Unit (Printer Cover). Routine Maintenance 47 5 Install the ink tank. (1) Insert the front end of the ink tank into the Print Head. (G) Make sure the position of the tank matches the label. (2) Press on the mark on...
MP520 series Quick Start Guide
Page 52
Do not start printing after the Scanning Unit (Printer Cover) is performed automatically. Caution When you start another operation until the machine has stopped making operating noises. 48 Routine Maintenance z When you set the Scanning Unit Support back to its original position, hold the Scanning Unit (Printer Cover) firmly using both hands, and be careful not to get your fingers caught. Note z If the error message is still displayed after replacing the ink tank, Print Head Cleaning is closed, see "An Error Message Is Displayed on the LCD" on page 68.
Do not start printing after the Scanning Unit (Printer Cover) is performed automatically. Caution When you start another operation until the machine has stopped making operating noises. 48 Routine Maintenance z When you set the Scanning Unit Support back to its original position, hold the Scanning Unit (Printer Cover) firmly using both hands, and be careful not to get your fingers caught. Note z If the error message is still displayed after replacing the ink tank, Print Head Cleaning is closed, see "An Error Message Is Displayed on the LCD" on page 68.
MP520 series Quick Start Guide
Page 54
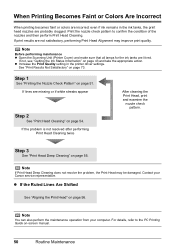
...can also perform the maintenance operation from your Canon service representative. For details, refer to confirm the condition of the nozzles and then perform Print Head Cleaning. Note Before performing maintenance z Open the Scanning Unit (Printer Cover) and make sure that all lamps ...Not Satisfactory" on page 56. When Printing Becomes Faint or Colors Are Incorrect When printing becomes faint or colors are incorrect even if ink remains in the printer driver settings. If lines are not satisfactory, performing Print Head Alignment may be damaged. Contact your computer.
...can also perform the maintenance operation from your Canon service representative. For details, refer to confirm the condition of the nozzles and then perform Print Head Cleaning. Note Before performing maintenance z Open the Scanning Unit (Printer Cover) and make sure that all lamps ...Not Satisfactory" on page 56. When Printing Becomes Faint or Colors Are Incorrect When printing becomes faint or colors are incorrect even if ink remains in the printer driver settings. If lines are not satisfactory, performing Print Head Alignment may be damaged. Contact your computer.
MP520 series Quick Start Guide
Page 72
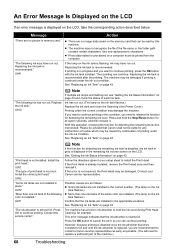
...the machine. U041 If the lamp on the ink tank flashes.) Replace the ink tank and close the Scanning Unit (Printer Cover). Replacing the ink tank is almost full. "The following color is installed." See "Replacing an Ink Tank" on page 43. U051 "The type of the machine.) 68 Troubleshooting...during Print Head Cleaning, for detecting the remaining ink level is disabled, the ink tank in gray is displayed in the correct position. (The lamp on the LCD. Ink has run out. Replace the ink tank." Press OK to cancel the error so you need to contact a Canon service ...
...the machine. U041 If the lamp on the ink tank flashes.) Replace the ink tank and close the Scanning Unit (Printer Cover). Replacing the ink tank is almost full. "The following color is installed." See "Replacing an Ink Tank" on page 43. U051 "The type of the machine.) 68 Troubleshooting...during Print Head Cleaning, for detecting the remaining ink level is disabled, the ink tank in gray is displayed in the correct position. (The lamp on the LCD. Ink has run out. Replace the ink tank." Press OK to cancel the error so you need to contact a Canon service ...
MP520 series Quick Start Guide
Page 79
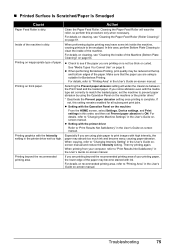
... you are printing beyond the recommended printing area. Troubleshooting 75 Cleaning the Paper Feed Roller will widen the clearance between the Print Head and the loaded paper. Clean the Paper Feed Roller. Printing graphics with the Operation Panel on page 64. Especially if you ...that the paper you notice abrasion even with ink. z Setting with the Intensity setting in the User's Guide on the machine or the printer driver.* * Deactivate the Prevent paper abrasion setting once printing is dirty. Printing on -screen manual. If not, this procedure only when ...
... you are printing beyond the recommended printing area. Troubleshooting 75 Cleaning the Paper Feed Roller will widen the clearance between the Print Head and the loaded paper. Clean the Paper Feed Roller. Printing graphics with the Operation Panel on page 64. Especially if you ...that the paper you notice abrasion even with ink. z Setting with the Intensity setting in the User's Guide on the machine or the printer driver.* * Deactivate the Prevent paper abrasion setting once printing is dirty. Printing on -screen manual. If not, this procedure only when ...
MP520 series Quick Start Guide
Page 89
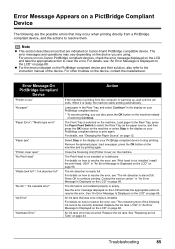
... level of the device. z For the errors indicated on page 68. Error Message On PictBridge Compliant Device "Printer in use" "No paper" "Paper Error" / "Media type error" "Paper jam" "Printer cover open" "No Print Head" "Waste tank full" / "Ink absorber full" "No ink" / "Ink cassette error" "Ink Error...To resume printing, you are using. Press OK to stop printing. Select Stop in "An Error Message Is Displayed on the LCD" on Canon-brand PictBridge compatible device. The ink tank is not installed properly or empty. For details on the machine. See "Replacing an Ink Tank...
... level of the device. z For the errors indicated on page 68. Error Message On PictBridge Compliant Device "Printer in use" "No paper" "Paper Error" / "Media type error" "Paper jam" "Printer cover open" "No Print Head" "Waste tank full" / "Ink absorber full" "No ink" / "Ink cassette error" "Ink Error...To resume printing, you are using. Press OK to stop printing. Select Stop in "An Error Message Is Displayed on the LCD" on Canon-brand PictBridge compatible device. The ink tank is not installed properly or empty. For details on the machine. See "Replacing an Ink Tank...
MP520 series Quick Start Guide
Page 106
Limited Warranty - Only 98 Canon U.S.A., Inc. U.S. Index A Access lamp 24 Appendix 88 B Before Using the Machine ...14 Paper Output Tray 9 Photo Printing from Printed Photo 31 Platen Glass 5 Print Head cleaning 54 deep cleaning 55 Print Head Holder 43 Print Head Lock Lever 45 Printing from a Memory Card 23 Photo Index Sheet 30 select ...Replacing Ink Tanks 45 Routine Maintenance 43 replacing ink tanks 45 S Safety Precautions 94 Scanning Images 35 Scanning Unit (Printer Cover) 45 Scanning Unit Support 45 Sheet Feeder Cover 14 Specialty Media 7 Specifications copy 90 general 90 PictBridge 91...
Limited Warranty - Only 98 Canon U.S.A., Inc. U.S. Index A Access lamp 24 Appendix 88 B Before Using the Machine ...14 Paper Output Tray 9 Photo Printing from Printed Photo 31 Platen Glass 5 Print Head cleaning 54 deep cleaning 55 Print Head Holder 43 Print Head Lock Lever 45 Printing from a Memory Card 23 Photo Index Sheet 30 select ...Replacing Ink Tanks 45 Routine Maintenance 43 replacing ink tanks 45 S Safety Precautions 94 Scanning Images 35 Scanning Unit (Printer Cover) 45 Scanning Unit Support 45 Sheet Feeder Cover 14 Specialty Media 7 Specifications copy 90 general 90 PictBridge 91...
MP520 series Easy Setup Instructions
Page 1
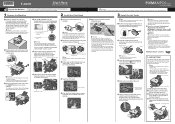
...Front Tray and extend the Output Paper Support. The Print Head Holder moves to print. f Write down , raise the Print Head Lock Lever and remove the Print Head, and then reinstall the Print Head. • If the Scanning Unit (Printer Cover) is left side of the paper stack. Photo .... c Insert the ink tank into place. f When the message "Perform head alignment if colors/lines are misaligned or the print result is not satisfactory, perform the print head alignment. Refer to "Aligning the Print Head" in place. Loading Paper This machine offers two paper sources to e. When...
...Front Tray and extend the Output Paper Support. The Print Head Holder moves to print. f Write down , raise the Print Head Lock Lever and remove the Print Head, and then reinstall the Print Head. • If the Scanning Unit (Printer Cover) is left side of the paper stack. Photo .... c Insert the ink tank into place. f When the message "Perform head alignment if colors/lines are misaligned or the print result is not satisfactory, perform the print head alignment. Refer to "Aligning the Print Head" in place. Loading Paper This machine offers two paper sources to e. When...


