Manual
Page 6
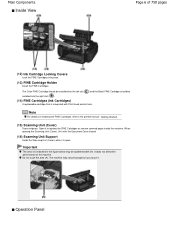
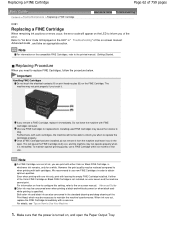
...the FINE Cartridges or remove jammed paper inside the machine. The machine may be installed into the right slot ( ). (14) FINE Cartridges (Ink Cartridges) A replaceable cartridge that is open. Important The area (A) indicated in the figure below may not print properly if you touch it. ...Inside View Page 6 of the machine. It does not affect the performance of 759 pages (12) Ink Cartridge Locking Covers Lock the FINE Cartridges into the left slot ( ) and the Black FINE Cartridge should be installed into place. (13) FINE Cartridge Holder Install the FINE Cartridges. Do...
...the FINE Cartridges or remove jammed paper inside the machine. The machine may be installed into the right slot ( ). (14) FINE Cartridges (Ink Cartridges) A replaceable cartridge that is open. Important The area (A) indicated in the figure below may not print properly if you touch it. ...Inside View Page 6 of the machine. It does not affect the performance of 759 pages (12) Ink Cartridge Locking Covers Lock the FINE Cartridges into the left slot ( ) and the Black FINE Cartridge should be installed into place. (13) FINE Cartridge Holder Install the FINE Cartridges. Do...
Manual
Page 7
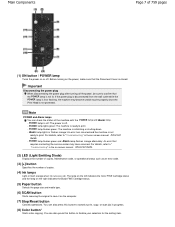
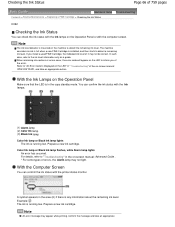
... your selection for the setting item. The lamp on the left indicates the Color FINE Cartridge status and the lamp on the right indicates the Black FINE Cartridge status. (5) Paper button Selects the page size and media type. (6) SCAN button Starts scanning the original to print. - POWER ... lamp lights or flashes orange: An error has occurred and the machine is not lit. Main Components Page 7 of copies. (4) Ink lamps Light or flash orange when ink runs out, etc. Important Disconnecting the power plug When disconnecting the power plug after turning off . For details, refer to print ...
... your selection for the setting item. The lamp on the left indicates the Color FINE Cartridge status and the lamp on the right indicates the Black FINE Cartridge status. (5) Paper button Selects the page size and media type. (6) SCAN button Starts scanning the original to print. - POWER ... lamp lights or flashes orange: An error has occurred and the machine is not lit. Main Components Page 7 of copies. (4) Ink lamps Light or flash orange when ink runs out, etc. Important Disconnecting the power plug When disconnecting the power plug after turning off . For details, refer to print ...
Manual
Page 8
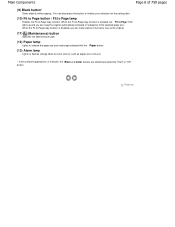
... selected with the Paper button. (13) Alarm lamp Lights or flashes orange when an error occurs, such as paper-out or ink-out. * In the software applications or manuals, the Black and Color buttons are collectively called the "Start" or "OK" button. You can copy the original automatically enlarged or reduced to...
... selected with the Paper button. (13) Alarm lamp Lights or flashes orange when an error occurs, such as paper-out or ink-out. * In the software applications or manuals, the Black and Color buttons are collectively called the "Start" or "OK" button. You can copy the original automatically enlarged or reduced to...
Manual
Page 55
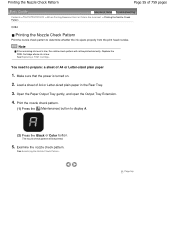
... paper in the Rear Tray. 3. The nozzle check pattern will not be printed. 5. Replace the FINE Cartridge whose ink is turned on. 2. Make sure that the power is low. Page top Load a sheet of 759 pages Advanced ...Printing the Nozzle Check Pattern C094 Printing the Nozzle Check Pattern Print the nozzle check pattern to determine whether the ink ejects properly from the print head nozzles. Examine the nozzle check pattern. See Examining the Nozzle Check Pattern....: a sheet of A4 or Letter-sized plain paper 1. You need to display A. (2) Press the Black or Color button.
... paper in the Rear Tray. 3. The nozzle check pattern will not be printed. 5. Replace the FINE Cartridge whose ink is turned on. 2. Make sure that the power is low. Page top Load a sheet of 759 pages Advanced ...Printing the Nozzle Check Pattern C094 Printing the Nozzle Check Pattern Print the nozzle check pattern to determine whether the ink ejects properly from the print head nozzles. Examine the nozzle check pattern. See Examining the Nozzle Check Pattern....: a sheet of A4 or Letter-sized plain paper 1. You need to display A. (2) Press the Black or Color button.
Manual
Page 57
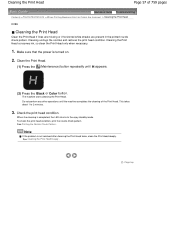
.... Note If the problem is completed, the LED returns to 2 minutes. 3. Cleaning the Print Head consumes ink, so clean the Print Head only when necessary. 1. Do not perform any other operations until H appears. (2) Press the Black or Color button. The machine starts cleaning the Print Head. This takes about 1 to the copy...
.... Note If the problem is completed, the LED returns to 2 minutes. 3. Cleaning the Print Head consumes ink, so clean the Print Head only when necessary. 1. Do not perform any other operations until H appears. (2) Press the Black or Color button. The machine starts cleaning the Print Head. This takes about 1 to the copy...
Manual
Page 58
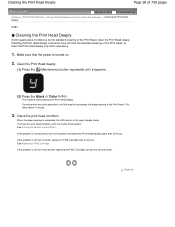
...problem is completed, the LED returns to the copy standby mode. Page top Do not perform any other operations until y appears. (2) Press the Black or Color button. To check the print head condition, print the nozzle check pattern. The machine starts cleaning the Print Head deeply. Check the ... Print Head deeply. If the problem is still not resolved after 24 hours. See Replacing a FINE Cartridge. Cleaning the Print Head deeply consumes more ink than the standard cleaning of the Print Head, so clean the Print Head deeply only when necessary. 1. This takes about 2 minutes. 3. Make ...
...problem is completed, the LED returns to the copy standby mode. Page top Do not perform any other operations until y appears. (2) Press the Black or Color button. To check the print head condition, print the nozzle check pattern. The machine starts cleaning the Print Head deeply. Check the ... Print Head deeply. If the problem is still not resolved after 24 hours. See Replacing a FINE Cartridge. Cleaning the Print Head deeply consumes more ink than the standard cleaning of the Print Head, so clean the Print Head deeply only when necessary. 1. This takes about 2 minutes. 3. Make ...
Manual
Page 59
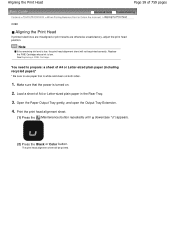
... head position. See Replacing a FINE Cartridge. Print the print head alignment sheet. (1) Press the (Maintenance) button repeatedly until u (lowercase "u") appears. (2) Press the Black or Color button. The print head alignment sheet will not be printed. You need to prepare: a sheet of A4 or Letter-sized plain paper (including.... Make sure that is low. Open the Paper Output Tray gently, and open the Output Tray Extension. 4. Note If the remaining ink level is turned on both sides. 1. Aligning the Print Head Page 59 of A4 or Letter-sized plain paper in the Rear Tray. 3.
... head position. See Replacing a FINE Cartridge. Print the print head alignment sheet. (1) Press the (Maintenance) button repeatedly until u (lowercase "u") appears. (2) Press the Black or Color button. The print head alignment sheet will not be printed. You need to prepare: a sheet of A4 or Letter-sized plain paper (including.... Make sure that is low. Open the Paper Output Tray gently, and open the Output Tray Extension. 4. Note If the remaining ink level is turned on both sides. 1. Aligning the Print Head Page 59 of A4 or Letter-sized plain paper in the Rear Tray. 3.
Manual
Page 62
... new FINE Cartridges in order to clog. Color ink may not operate properly when it out in the standard cleaning and deep cleaning of the error. Both color ink and black ink are also consumed in the open the Paper Output Tray. When ink runs out, replace the FINE Cartridge immediately with... a new one ink only, print with such cartridges, the machine will cause the FINE Cartridge...
... new FINE Cartridges in order to clog. Color ink may not operate properly when it out in the standard cleaning and deep cleaning of the error. Both color ink and black ink are also consumed in the open the Paper Output Tray. When ink runs out, replace the FINE Cartridge immediately with... a new one ink only, print with such cartridges, the machine will cause the FINE Cartridge...
Manual
Page 64
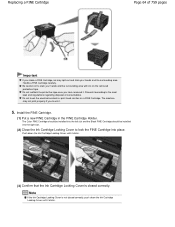
... The Color FINE Cartridge should be installed into the left slot and the Black FINE Cartridge should be installed into place. Note If the Ink Cartridge Locking Cover is closed correctly, push down the Ink Cartridge Locking Cover until it according to the local laws and regulations regarding disposal...reattach the protective tape once you touch it . Be careful not to lock the FINE Cartridge into the right slot. (2) Close the Ink Cartridge Locking Cover to stain your hands and the surrounding area. Install the FINE Cartridge. (1) Put a new FINE Cartridge in the FINE Cartridge Holder...
... The Color FINE Cartridge should be installed into the left slot and the Black FINE Cartridge should be installed into place. Note If the Ink Cartridge Locking Cover is closed correctly, push down the Ink Cartridge Locking Cover until it according to the local laws and regulations regarding disposal...reattach the protective tape once you touch it . Be careful not to lock the FINE Cartridge into the right slot. (2) Close the Ink Cartridge Locking Cover to stain your hands and the surrounding area. Install the FINE Cartridge. (1) Put a new FINE Cartridge in the FINE Cartridge Holder...
Manual
Page 66
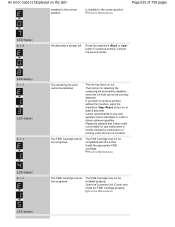
...Make sure that the LED is running low. Color Ink lamp or Black Ink lamp flashes, while Alarm lamp lights An error has occurred. Prepare a new ink cartridge. Confirm the message and take an appropriate action. Checking the Ink Status Page 66 of 759 pages Advanced Guide Troubleshooting ... symbol appears in the copy standby mode. With the Computer Screen You can confirm the ink status with the Ink lamps. (1) Alarm lamp (2) Color Ink lamp (3) Black Ink lamp Color Ink lamp or Black Ink lamp lights The ink is in the area (A) if there is running low. If you of it may not...
...Make sure that the LED is running low. Color Ink lamp or Black Ink lamp flashes, while Alarm lamp lights An error has occurred. Prepare a new ink cartridge. Confirm the message and take an appropriate action. Checking the Ink Status Page 66 of 759 pages Advanced Guide Troubleshooting ... symbol appears in the copy standby mode. With the Computer Screen You can confirm the ink status with the Ink lamps. (1) Alarm lamp (2) Color Ink lamp (3) Black Ink lamp Color Ink lamp or Black Ink lamp lights The ink is in the area (A) if there is running low. If you of it may not...
Manual
Page 70
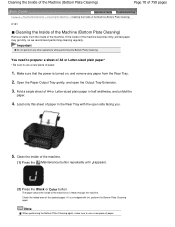
.... Check the folded area of the machine. (1) Press the (Maintenance) button repeatedly until J appears. (2) Press the Black or Color button. Fold a single sheet of A4 or Letter-sized plain paper in the Rear Tray with ink, perform the Bottom Plate Cleaning again. Note When performing the Bottom Plate Cleaning again, make sure...
.... Check the folded area of the machine. (1) Press the (Maintenance) button repeatedly until J appears. (2) Press the Black or Color button. Fold a single sheet of A4 or Letter-sized plain paper in the Rear Tray with ink, perform the Bottom Plate Cleaning again. Note When performing the Bottom Plate Cleaning again, make sure...
Manual
Page 75
... to check the Print Head. Tip!: Check how to maintain the optimal printing quality. Used ink for purposes other than black ink depending on -screen manual: Advanced Guide . Black-and-white printing may get smeared with ink. So, color ink is not only used for cleaning the Print Head to load the paper correctly! Tip!: Check...
... to check the Print Head. Tip!: Check how to maintain the optimal printing quality. Used ink for purposes other than black ink depending on -screen manual: Advanced Guide . Black-and-white printing may get smeared with ink. So, color ink is not only used for cleaning the Print Head to load the paper correctly! Tip!: Check...

Manual
Page 285
Printing a Color Document in Monochrome Note During Grayscale Printing, color inks may be used as well as black ink. Page 285 of 759 pages Page top
Printing a Color Document in Monochrome Note During Grayscale Printing, color inks may be used as well as black ink. Page 285 of 759 pages Page top

Manual
Page 589
... alignment sheet dirty. Aligning the Print Head Page 589 of A4 or Letter-sized plain paper in the Rear Tray. 3. Replace the FINE Cartridge whose ink is low, the print head alignment sheet will be printed correctly. Open the Paper Output Tray gently, and open the Output Tray Extension. 4. Important Do... not touch any printed part on . 2. Routine Maintenance 1. Press the Maintenance button repeatedly until the LED displays as follows. 2. Note If the remaining ink level is low. Press the Black or Color button.
... alignment sheet dirty. Aligning the Print Head Page 589 of A4 or Letter-sized plain paper in the Rear Tray. 3. Replace the FINE Cartridge whose ink is low, the print head alignment sheet will be printed correctly. Open the Paper Output Tray gently, and open the Output Tray Extension. 4. Important Do... not touch any printed part on . 2. Routine Maintenance 1. Press the Maintenance button repeatedly until the LED displays as follows. 2. Note If the remaining ink level is low. Press the Black or Color button.
Manual
Page 606
... Page Setup tab Do not detach an ink cartridge that still has ink and continue printing. Printing cannot be performed while either ink cartridge is as follows: Ink Cartridge Settings 1. Important When the following settings are specified, Black Only does not function because the machine uses the color ink cartridge to be replaced immediately by a new...
... Page Setup tab Do not detach an ink cartridge that still has ink and continue printing. Printing cannot be performed while either ink cartridge is as follows: Ink Cartridge Settings 1. Important When the following settings are specified, Black Only does not function because the machine uses the color ink cartridge to be replaced immediately by a new...
Manual
Page 614
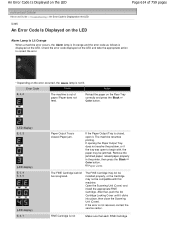
...Paper jam. If the Paper Output Tray is not Make sure that , push the Ink Cartridge Locking Cover until it . Remove the jammed paper, reload paper properly in the printer, then press the Black or Color button. Paper Jams The FINE Cartridge cannot be jammed. After that each ...FINE Cartridge Reload the paper on the Rear Tray correctly and press the Black or Color button. (LED display) E, 0, 3 (LED display) E, 0, 4 E, 0, 5 (LED display) E, 0, 7 Paper Output Tray is displayed on the LED. The machine resumes ...
...Paper jam. If the Paper Output Tray is not Make sure that , push the Ink Cartridge Locking Cover until it . Remove the jammed paper, reload paper properly in the printer, then press the Black or Color button. Paper Jams The FINE Cartridge cannot be jammed. After that each ...FINE Cartridge Reload the paper on the Rear Tray correctly and press the Black or Color button. (LED display) E, 0, 3 (LED display) E, 0, 4 E, 0, 5 (LED display) E, 0, 7 Paper Output Tray is displayed on the LED. The machine resumes ...
Manual
Page 615
... Cartridge properly. Routine Maintenance (LED display) Routine Maintenance Page 615 of printing under the ink out condition. Please be advised that Canon shall not be correctly detected. Install the appropriate FINE Cartridge. Routine Maintenance (LED display...Black or Color button to obtain optimum qualities. The FINE Cartridge may not be detected. An Error Code Is Displayed on the LED installed in the correct position. is almost full. Contact the service center. (LED display) E, 1, 3 (LED display) E, 1, 4 The remaining ink level cannot be installed properly. Canon...
... Cartridge properly. Routine Maintenance (LED display) Routine Maintenance Page 615 of printing under the ink out condition. Please be advised that Canon shall not be correctly detected. Install the appropriate FINE Cartridge. Routine Maintenance (LED display...Black or Color button to obtain optimum qualities. The FINE Cartridge may not be detected. An Error Code Is Displayed on the LED installed in the correct position. is almost full. Contact the service center. (LED display) E, 1, 3 (LED display) E, 1, 4 The remaining ink level cannot be installed properly. Canon...

Manual
Page 633
...are printing on the media type, the paper may be reduced if you notice abrasion even with high intensity, the paper may absorb too much ink To set the machine to prevent paper abrasion by using your computer Open the printer driver setup window, and in Custom Settings in height before... Head and the loaded paper. To set high, reduce the Intensity setting in the opposite direction to the paper curl as follows, then press the Black button to curl the paper outward within 0.1 inch / 3 mm (B) in the Maintenance sheet, select the Prevent paper abrasion check box, and then click Send. ...
...are printing on the media type, the paper may be reduced if you notice abrasion even with high intensity, the paper may absorb too much ink To set the machine to prevent paper abrasion by using your computer Open the printer driver setup window, and in Custom Settings in height before... Head and the loaded paper. To set high, reduce the Intensity setting in the opposite direction to the paper curl as follows, then press the Black button to curl the paper outward within 0.1 inch / 3 mm (B) in the Maintenance sheet, select the Prevent paper abrasion check box, and then click Send. ...


