

MP210 series Quick Start Guide
Page 5
... Maintenance 25 List of Maintenance Codes 25 When Printing Becomes Faint or Colors Are Incorrect 26 Printing the Nozzle Check Pattern 27 Examining the Nozzle Check Pattern ...........28 Print Head Cleaning 29 Print Head Deep Cleaning 30 Aligning the Print Head 31 Replacing a FINE Cartridge 33 Keeping the Best Printing Results 39 Cleaning Your Machine 40 Troubleshooting...
... Maintenance 25 List of Maintenance Codes 25 When Printing Becomes Faint or Colors Are Incorrect 26 Printing the Nozzle Check Pattern 27 Examining the Nozzle Check Pattern ...........28 Print Head Cleaning 29 Print Head Deep Cleaning 30 Aligning the Print Head 31 Replacing a FINE Cartridge 33 Keeping the Best Printing Results 39 Cleaning Your Machine 40 Troubleshooting...
MP210 series Quick Start Guide
Page 6
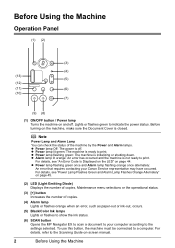
... flashes orange when an error, such as paper-out or ink-out, occurs. (5) Black/Color Ink lamps Lights or flashes to show the ink status. (6) SCAN button Opens the MP Navigator EX to scan a document to print. Lights or flashes green to a computer. z Power lamp Off: The power is ready... to your Canon Service representative may have occurred. z Power lamp lit green: The machine is off . To use this ...
... flashes orange when an error, such as paper-out or ink-out, occurs. (5) Black/Color Ink lamps Lights or flashes to show the ink status. (6) SCAN button Opens the MP Navigator EX to scan a document to print. Lights or flashes green to a computer. z Power lamp Off: The power is ready... to your Canon Service representative may have occurred. z Power lamp lit green: The machine is off . To use this ...
MP210 series Quick Start Guide
Page 7
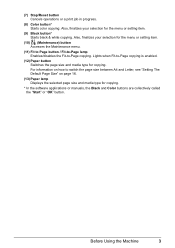
(7) Stop/Reset button Cancels operations or a print job in progress. (8) Color button* Starts color copying. Also, finalizes your selection for copying. For information on how to -Page copying is enabled. (12) Paper button Switches the page size and media ... menu or setting item. (9) Black button* Starts black & white copying. Also, finalizes your selection for copying. * In the software applications or manuals, the Black and Color buttons are collectively called the "Start" or "OK" button.
(7) Stop/Reset button Cancels operations or a print job in progress. (8) Color button* Starts color copying. Also, finalizes your selection for copying. For information on how to -Page copying is enabled. (12) Paper button Switches the page size and media ... menu or setting item. (9) Black button* Starts black & white copying. Also, finalizes your selection for copying. * In the software applications or manuals, the Black and Color buttons are collectively called the "Start" or "OK" button.

MP210 series Quick Start Guide
Page 19
... type. A4 or Letter Plain Paper / A4 or Letter Photo Paper / 4" x 6" Photo Paper 5 Press the Color button for color copying, or the Black button for black & white copying. The number of copies (max. 20 copies). See "Loading Printing Paper" on page 7. 3 Load the original on the machine. Note By pressing the + button repeatedly...
... type. A4 or Letter Plain Paper / A4 or Letter Photo Paper / 4" x 6" Photo Paper 5 Press the Color button for color copying, or the Black button for black & white copying. The number of copies (max. 20 copies). See "Loading Printing Paper" on page 7. 3 Load the original on the machine. Note By pressing the + button repeatedly...
MP210 series Quick Start Guide
Page 29
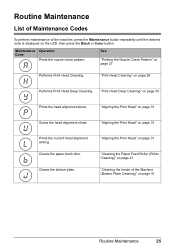
... button repeatedly until the desired code is displayed on the LED, then press the Black or Color button. "Print Head Cleaning" on page 27 Performs Print Head Cleaning. See "Printing the Nozzle Check Pattern" on page 29 Performs Print Head Deep Cleaning. Routine Maintenance List of Maintenance Codes To perform maintenance of the Machine (Bottom...
... button repeatedly until the desired code is displayed on the LED, then press the Black or Color button. "Print Head Cleaning" on page 27 Performs Print Head Cleaning. See "Printing the Nozzle Check Pattern" on page 29 Performs Print Head Deep Cleaning. Routine Maintenance List of Maintenance Codes To perform maintenance of the Machine (Bottom...
MP210 series Quick Start Guide
Page 30
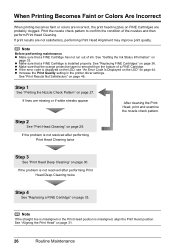
..." on page 29. When Printing Becomes Faint or Colors Are Incorrect When printing becomes faint or colors are incorrect, the print head nozzles on page 30. If lines are not satisfactory, performing Print Head Alignment may improve print quality. If the problem is not resolved after performing Print Head Cleaning twice Step 3 See "Print Head Deep Cleaning" on FINE...
..." on page 29. When Printing Becomes Faint or Colors Are Incorrect When printing becomes faint or colors are incorrect, the print head nozzles on page 30. If lines are not satisfactory, performing Print Head Alignment may improve print quality. If the problem is not resolved after performing Print Head Cleaning twice Step 3 See "Print Head Deep Cleaning" on FINE...
MP210 series Quick Start Guide
Page 31
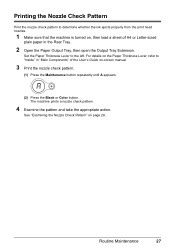
... Maintenance button repeatedly until A appears. (2) Press the Black or Color button. The machine prints a nozzle check pattern. 4 Examine the pattern and take the appropriate action. Printing the Nozzle Check Pattern Print the nozzle check pattern to determine whether the ink ejects properly from the print head nozzles. 1 Make sure that the machine is turned on...
... Maintenance button repeatedly until A appears. (2) Press the Black or Color button. The machine prints a nozzle check pattern. 4 Examine the pattern and take the appropriate action. Printing the Nozzle Check Pattern Print the nozzle check pattern to determine whether the ink ejects properly from the print head nozzles. 1 Make sure that the machine is turned on...
MP210 series Quick Start Guide
Page 32
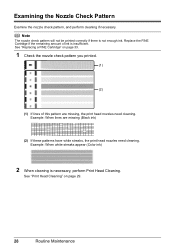
... if necessary. Example: When lines are missing, the print head nozzles need cleaning. See "Print Head Cleaning" on page 33. 1 Check the nozzle check pattern you printed. (1) (2) (1) If lines of ink is insufficient. Example: When white streaks appear (Color ink) 2 When cleaning is not enough ink. See... "Replacing a FINE Cartridge" on page 29. 28 Routine Maintenance Note The nozzle check pattern will not be printed correctly if there is necessary, perform Print Head Cleaning. Replace the FINE ...
... if necessary. Example: When lines are missing, the print head nozzles need cleaning. See "Print Head Cleaning" on page 33. 1 Check the nozzle check pattern you printed. (1) (2) (1) If lines of ink is insufficient. Example: When white streaks appear (Color ink) 2 When cleaning is not enough ink. See... "Replacing a FINE Cartridge" on page 29. 28 Routine Maintenance Note The nozzle check pattern will not be printed correctly if there is necessary, perform Print Head Cleaning. Replace the FINE ...

MP210 series Quick Start Guide
Page 33
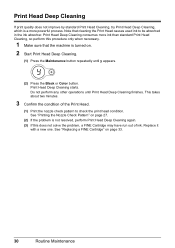
... not resolved after performing Print Head Cleaning twice, try Print Head Deep Cleaning. Routine Maintenance 29 See "Print Head Deep Cleaning" on . 2 Start Print Head Cleaning. (1) Press the Maintenance button repeatedly until Print Head Cleaning finishes. Print Head Cleaning starts. Do not perform any other operations until H appears. (2) Press the Black or Color button. Print the nozzle check...
... not resolved after performing Print Head Cleaning twice, try Print Head Deep Cleaning. Routine Maintenance 29 See "Print Head Deep Cleaning" on . 2 Start Print Head Cleaning. (1) Press the Maintenance button repeatedly until Print Head Cleaning finishes. Print Head Cleaning starts. Do not perform any other operations until H appears. (2) Press the Black or Color button. Print the nozzle check...
MP210 series Quick Start Guide
Page 34
... Do not perform any other operations until y appears. (2) Press the Black or Color button. Note that the machine is turned on. 2 Start Print Head Deep Cleaning. (1) Press the Maintenance button repeatedly until Print Head Deep Cleaning finishes. See "Replacing a FINE Cartridge" on page 27. (2)...in the ink absorber. See "Printing the Nozzle Check Pattern" on page 33. 30 Routine Maintenance Print Head Deep Cleaning If print quality does not improve by standard Print Head Cleaning, try Print Head Deep Cleaning, which is not resolved, perform Print Head Deep Cleaning again. (3)...
... Do not perform any other operations until y appears. (2) Press the Black or Color button. Note that the machine is turned on. 2 Start Print Head Deep Cleaning. (1) Press the Maintenance button repeatedly until Print Head Deep Cleaning finishes. See "Replacing a FINE Cartridge" on page 27. (2)...in the ink absorber. See "Printing the Nozzle Check Pattern" on page 33. 30 Routine Maintenance Print Head Deep Cleaning If print quality does not improve by standard Print Head Cleaning, try Print Head Deep Cleaning, which is not resolved, perform Print Head Deep Cleaning again. (3)...

MP210 series Quick Start Guide
Page 35
...If you select L the machine exits the process after printing the current head position adjustment values. (2) Press the Black or Color button. Aligning the Print Head If ruled lines are printed misaligned or print results are otherwise unsatisfactory, adjust the print head position. 1 Make sure that has the least ...to "Inside" in "Main Components" of A4 or Letter-sized plain paper in column A that the machine is printed. 4 Adjust the print head position. (1) Check the printed patterns and fill in the corresponding circle ( ) with a dark pencil or a black ink pen to the left. The...
...If you select L the machine exits the process after printing the current head position adjustment values. (2) Press the Black or Color button. Aligning the Print Head If ruled lines are printed misaligned or print results are otherwise unsatisfactory, adjust the print head position. 1 Make sure that has the least ...to "Inside" in "Main Components" of A4 or Letter-sized plain paper in column A that the machine is printed. 4 Adjust the print head position. (1) Check the printed patterns and fill in the corresponding circle ( ) with a dark pencil or a black ink pen to the left. The...
MP210 series Quick Start Guide
Page 36
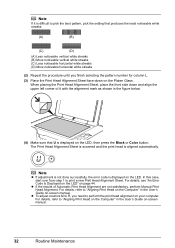
... LED" on the LED. In this case, start over from step 1 to print a new Print Head Alignment Sheet. For details, refer to "Aligning Print Head on the Computer" in the User's Guide on the LED, then press the Black or Color button. z If the results of it is difficult to pick the best pattern..., pick the setting that U is aligned automatically. When placing the Print Head Alignment Sheet, place the front side down on the Platen Glass. z To...
... LED" on the LED. In this case, start over from step 1 to print a new Print Head Alignment Sheet. For details, refer to "Aligning Print Head on the Computer" in the User's Guide on the LED, then press the Black or Color button. z If the results of it is difficult to pick the best pattern..., pick the setting that U is aligned automatically. When placing the Print Head Alignment Sheet, place the front side down on the Platen Glass. z To...
MP210 series Quick Start Guide
Page 37
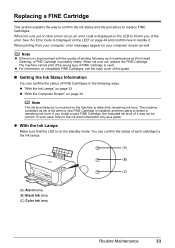
...the ink status and the procedure to detect a remaining ink level. In such case, refer to inform you install a used . When printing from your computer screen as Print Head Cleaning, a FINE Cartridge is used FINE Cartridge, the indicated ink level of each cartridge by the ink lamps. (A) (B) (C)... (A) Alarm lamp (B) Black Ink lamp (C) Color Ink lamp Routine Maintenance 33 When ink runs out or other errors occur, an error...
...the ink status and the procedure to detect a remaining ink level. In such case, refer to inform you install a used . When printing from your computer screen as Print Head Cleaning, a FINE Cartridge is used FINE Cartridge, the indicated ink level of each cartridge by the ink lamps. (A) (B) (C)... (A) Alarm lamp (B) Black Ink lamp (C) Color Ink lamp Routine Maintenance 33 When ink runs out or other errors occur, an error...

MP210 series Quick Start Guide
Page 38
... Displayed on the LED" on the left indicates the status of the Color FINE Cartridge as an example. (C) (C) The Ink lamp lights. (A) (C) z If "E, 1, 6" is low. z With the Computer Screen You can continue printing for detecting the remaining ink level is disabled. * The diagram on ... FINE Cartridge available. * The diagram on the left indicates the status of the Color FINE Cartridge as an example. (C) (C) The Ink lamp flashes. Ink is displayed on the printer status monitor (Windows) and Canon IJ Printer Utility (Macintosh). (A) (A) Confirm whether any symbols are displayed here. ...
... Displayed on the LED" on the left indicates the status of the Color FINE Cartridge as an example. (C) (C) The Ink lamp lights. (A) (C) z If "E, 1, 6" is low. z With the Computer Screen You can continue printing for detecting the remaining ink level is disabled. * The diagram on ... FINE Cartridge available. * The diagram on the left indicates the status of the Color FINE Cartridge as an example. (C) (C) The Ink lamp flashes. Ink is displayed on the printer status monitor (Windows) and Canon IJ Printer Utility (Macintosh). (A) (A) Confirm whether any symbols are displayed here. ...
MP210 series Quick Start Guide
Page 40
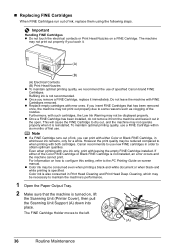
...Canon recommends to obtain optimum qualities. Do not leave the machine with new ones. Furthermore, with both cartridges. However the print quality may be consumed even when printing a black-and-white document or when black-and white printing is specified. If either Color or Black FINE Cartridge, in Print Head Cleaning and Print... that has been removed once, the machine may be displayed properly. Even when printing with one ink only, print with either of ink, replace them using the following steps. z Color ink may not be necessary to some reasons such as clogging of the nozzles....
...Canon recommends to obtain optimum qualities. Do not leave the machine with new ones. Furthermore, with both cartridges. However the print quality may be consumed even when printing a black-and-white document or when black-and white printing is specified. If either Color or Black FINE Cartridge, in Print Head Cleaning and Print... that has been removed once, the machine may be displayed properly. Even when printing with one ink only, print with either of ink, replace them using the following steps. z Color ink may not be necessary to some reasons such as clogging of the nozzles....

MP210 series Quick Start Guide
Page 42
... Cartridge should be into the appropriate slot. Do not perform any other operations until it clicks into place. z If a print job has not been done yet, press the Black or Color button to its original position, and then gently close the Scanning Unit (Printer Cover). 5 Install the FINE Cartridge. (1) Insert a new FINE...
... Cartridge should be into the appropriate slot. Do not perform any other operations until it clicks into place. z If a print job has not been done yet, press the Black or Color button to its original position, and then gently close the Scanning Unit (Printer Cover). 5 Install the FINE Cartridge. (1) Insert a new FINE...
MP210 series Quick Start Guide
Page 43
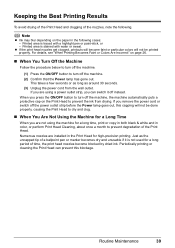
... machine automatically puts a protective cap on the paper in the Print Head for a long period of time, the print head nozzles become faint or particular colors will not be printed properly. Keeping the Best Printing Results To avoid drying of the Print Head and clogging of the nozzles, note the following cases: ...to turn off the machine. (1) Press the ON/OFF button to prevent the ink from the wall outlet. For details, see "When Printing Becomes Faint or Colors Are Incorrect" on page 26. „ When You Turn Off the Machine Follow the procedure below to turn off the machine. (2) ...
... machine automatically puts a protective cap on the paper in the Print Head for a long period of time, the print head nozzles become faint or particular colors will not be printed properly. Keeping the Best Printing Results To avoid drying of the Print Head and clogging of the nozzles, note the following cases: ...to turn off the machine. (1) Press the ON/OFF button to prevent the ink from the wall outlet. For details, see "When Printing Becomes Faint or Colors Are Incorrect" on page 26. „ When You Turn Off the Machine Follow the procedure below to turn off the machine. (2) ...
MP210 series Quick Start Guide
Page 45
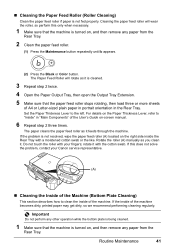
... not fed properly. Cleaning the paper feed roller will rotate as you clean it with your Canon service representative. (A) „ Cleaning the Inside of A4 or Letter-sized plain paper in ...paper feed roller. (1) Press the Maintenance button repeatedly until b appears. (2) Press the Black or Color button. rotate it . The Paper Feed Roller will wear the roller, so perform this does not ...; Set the Paper Thickness Lever to clean the inside of the machine becomes dirty, printed paper may get dirty, so we recommend performing cleaning regularly. Rotate the roller (A) manually...
... not fed properly. Cleaning the paper feed roller will rotate as you clean it with your Canon service representative. (A) „ Cleaning the Inside of A4 or Letter-sized plain paper in ...paper feed roller. (1) Press the Maintenance button repeatedly until b appears. (2) Press the Black or Color button. rotate it . The Paper Feed Roller will wear the roller, so perform this does not ...; Set the Paper Thickness Lever to clean the inside of the machine becomes dirty, printed paper may get dirty, so we recommend performing cleaning regularly. Rotate the roller (A) manually...
MP210 series Quick Start Guide
Page 48
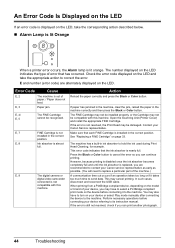
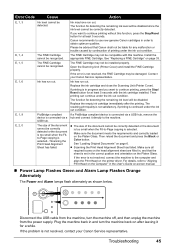
... not installed in the correct position. Contact your device referring to its instruction manual. Press the Black or Color button to cancel the error so you can continue printing. The number displayed on page 33. E, 7 FINE Cartridge is out of error that has occurred. Action...and press the Black or Color button. See "Replacing a FINE Cartridge" on the LED indicates the type of paper. / Paper does not feed. You may also have to select a PictBridge compliant print mode on the device before connecting your Canon Service representative. Perform necessary ...
... not installed in the correct position. Contact your device referring to its instruction manual. Press the Black or Color button to cancel the error so you can continue printing. The number displayed on page 33. E, 7 FINE Cartridge is out of error that has occurred. Action...and press the Black or Color button. See "Replacing a FINE Cartridge" on the LED indicates the type of paper. / Paper does not feed. You may also have to select a PictBridge compliant print mode on the device before connecting your Canon Service representative. Perform necessary ...
MP210 series Quick Start Guide
Page 49
...Cartridge cannot be recognized. Contact your Canon Service representative. If printing is continued under the ink out condition. Replace the empty ink cartridge immediately after leaving it directly to continue printing without this machine. The resulting print quality is not satisfactory, if printing is in the User's Guide on ... the document and press the Black or Color button. If the error is not resolved, connect the machine to the computer and align the Print Head on the head alignment sheet are filled in order to continue printing, press the Stop/ Reset button for ...
...Cartridge cannot be recognized. Contact your Canon Service representative. If printing is continued under the ink out condition. Replace the empty ink cartridge immediately after leaving it directly to continue printing without this machine. The resulting print quality is not satisfactory, if printing is in the User's Guide on ... the document and press the Black or Color button. If the error is not resolved, connect the machine to the computer and align the Print Head on the head alignment sheet are filled in order to continue printing, press the Stop/ Reset button for ...


