
User's Guide
Page 4
... Writing To A Memory Card (MP180 49 Setting Up The Card Slot As The Memory Card Drive Of The Computer...49 5 Printing From Your Computer 51 Printing With Windows 51 9 Routine Maintenance 67 Replacing A FINE Cartridge 67 When Printing Becomes Faint Or Color Is Incorrect 75 Printing The Nozzle Check Pattern 76 FINE Cartridge Cleaning 78 FINE Cartridge Deep Cleaning 78 Aligning The FINE Cartridge 79 Cleaning Your Machine 81 10 Troubleshooting 85 An Error Message Is Displayed On The...
... Writing To A Memory Card (MP180 49 Setting Up The Card Slot As The Memory Card Drive Of The Computer...49 5 Printing From Your Computer 51 Printing With Windows 51 9 Routine Maintenance 67 Replacing A FINE Cartridge 67 When Printing Becomes Faint Or Color Is Incorrect 75 Printing The Nozzle Check Pattern 76 FINE Cartridge Cleaning 78 FINE Cartridge Deep Cleaning 78 Aligning The FINE Cartridge 79 Cleaning Your Machine 81 10 Troubleshooting 85 An Error Message Is Displayed On The...
User's Guide
Page 6
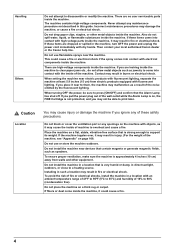
... machine. Do not use flammable sprays near electric products with fluorescent lighting. Do not place the machine on page 108. Handling Others Do not attempt to a heating source. Also do not allow metal objects such as speakers. When setting the machine near the machine. When turning OFF the power, be able to 90% (condensation free). Installing in such a location may result in this guide...
... machine. Do not use flammable sprays near electric products with fluorescent lighting. Do not place the machine on page 108. Handling Others Do not attempt to a heating source. Also do not allow metal objects such as speakers. When setting the machine near the machine. When turning OFF the power, be able to 90% (condensation free). Installing in such a location may result in this guide...

User's Guide
Page 14
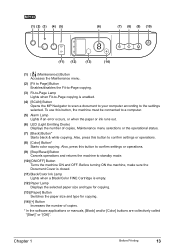
...the image file number. (13) [OK] Button Selects or confirms settings. Before turning ON the machine, make sure the Document Cover is closed. (10) Alarm Lamp Lights if an error occurs, or when the paper or ink runs out. (11) [Menu] Button Accesses the settings to the settings selected. Also, press this button, the machine must be connected to a computer. (4) [MEMORY CARD] Button Switches the machine to memory card mode. (5) LCD (Liquid Crystal Display) Displays messages, menu selections, and the operational status. (6) [Black] Button Starts black & white copying. (7) [Color] Button Starts...
...the image file number. (13) [OK] Button Selects or confirms settings. Before turning ON the machine, make sure the Document Cover is closed. (10) Alarm Lamp Lights if an error occurs, or when the paper or ink runs out. (11) [Menu] Button Accesses the settings to the settings selected. Also, press this button, the machine must be connected to a computer. (4) [MEMORY CARD] Button Switches the machine to memory card mode. (5) LCD (Liquid Crystal Display) Displays messages, menu selections, and the operational status. (6) [Black] Button Starts black & white copying. (7) [Color] Button Starts...
User's Guide
Page 15
...Before Printing 13 Before turning ON the machine, make sure the Document Cover is closed. (11) Black/Color Ink Lamp Lights when a Black/Color FINE Cartridge is enabled. (4) [SCAN] Button Opens the MP Navigator to scan a document to your computer according to the settings selected. (1) (2) (3) (4) (5) (6) (7) (8) (9) (10) (11) (12) (13) (14) (1) [ (Maintenance)] Button Accesses the Maintenance menu. (2) [Fit to Page] Button Enables/disables the Fit-to-Page copying. (3) Fit-to-Page Lamp Lights when Fit-to-Page copying is empty. (12) Paper Lamp Displays the selected paper size and type...
...Before Printing 13 Before turning ON the machine, make sure the Document Cover is closed. (11) Black/Color Ink Lamp Lights when a Black/Color FINE Cartridge is enabled. (4) [SCAN] Button Opens the MP Navigator to scan a document to your computer according to the settings selected. (1) (2) (3) (4) (5) (6) (7) (8) (9) (10) (11) (12) (13) (14) (1) [ (Maintenance)] Button Accesses the Maintenance menu. (2) [Fit to Page] Button Enables/disables the Fit-to-Page copying. (3) Fit-to-Page Lamp Lights when Fit-to-Page copying is empty. (12) Paper Lamp Displays the selected paper size and type...
User's Guide
Page 57
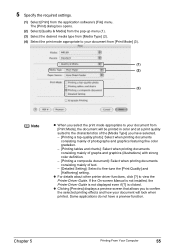
... the print mode appropriate to your document will look when printed. 5 Specify the required settings. (1) Select [Print] from [Print Mode], the document will be printed in color and at a print quality suited to the characteristics of text. - [Detailed Setting]: Select to confirm the selected printing effects and how your document from the application software's [File] menu. Chapter 5 Printing From Your Computer 55 z For details about other printer driver functions, click [?] to view the Printer Driver Guide.
... the print mode appropriate to your document will look when printed. 5 Specify the required settings. (1) Select [Print] from [Print Mode], the document will be printed in color and at a print quality suited to the characteristics of text. - [Detailed Setting]: Select to confirm the selected printing effects and how your document from the application software's [File] menu. Chapter 5 Printing From Your Computer 55 z For details about other printer driver functions, click [?] to view the Printer Driver Guide.
User's Guide
Page 58
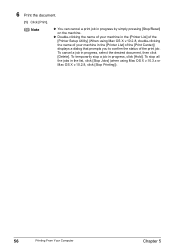
... [Stop Jobs] (when using Mac OS X v.10.2.8, double-clicking the name of your machine in the [Printer List] of the print job. Note z You can cancel a print job in the [Printer List] of the [Print Center]) displays a dialog that prompts you to confirm the status of the [Printer Setup Utility] (When using Mac OS X v.10.3.x or Mac OS X v.10.2.8, click [Stop Printing]). 56 Printing From Your Computer Chapter 5 To stop a job in progress, select the desired document, then click [Delete]. 6 Print the document. (1) Click [Print].
... [Stop Jobs] (when using Mac OS X v.10.2.8, double-clicking the name of your machine in the [Printer List] of the print job. Note z You can cancel a print job in the [Printer List] of the [Print Center]) displays a dialog that prompts you to confirm the status of the [Printer Setup Utility] (When using Mac OS X v.10.3.x or Mac OS X v.10.2.8, click [Stop Printing]). 56 Printing From Your Computer Chapter 5 To stop a job in progress, select the desired document, then click [Delete]. 6 Print the document. (1) Click [Print].
User's Guide
Page 59
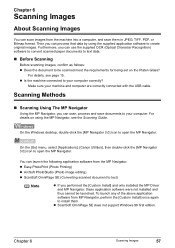
... the Scanning Guide. Make sure your computer correctly? On the Windows desktop, double-click the [MP Navigator 3.0] icon to open the MP Navigator. z Is the machine connected to your machine and computer are correctly connected with the USB cable. To launch any of the above application software from the MP Navigator. z ScanSoft OmniPage SE does not support Windows 98 first edition. Chapter 6 Scanning Images 57 Scanning Methods „ Scanning Using...
... the Scanning Guide. Make sure your computer correctly? On the Windows desktop, double-click the [MP Navigator 3.0] icon to open the MP Navigator. z Is the machine connected to your machine and computer are correctly connected with the USB cable. To launch any of the above application software from the MP Navigator. z ScanSoft OmniPage SE does not support Windows 98 first edition. Chapter 6 Scanning Images 57 Scanning Methods „ Scanning Using...
User's Guide
Page 60
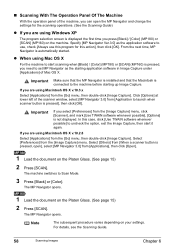
... to launch when scanner button is connected to use, check [Always use this case, click [Use TWAIN software whenever possible] to Scan Mode. 3 Press [Black] or [Color]. Note The subsequent procedure varies depending on the machine. If you are using Windows XP The program selection screen is displayed the first time you press [Black] / [Color] (MP180) or [SCAN] (MP160) on your settings. In this program for the scanning operations. (See the Scanning Guide) z If you are using Macintosh OS X v.10...
... to launch when scanner button is connected to use, check [Always use this case, click [Use TWAIN software whenever possible] to Scan Mode. 3 Press [Black] or [Color]. Note The subsequent procedure varies depending on the machine. If you are using Windows XP The program selection screen is displayed the first time you press [Black] / [Color] (MP180) or [SCAN] (MP160) on your settings. In this program for the scanning operations. (See the Scanning Guide) z If you are using Macintosh OS X v.10...
User's Guide
Page 63
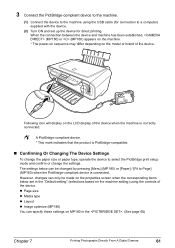
... connection between the device and machine has been established, (MP180) or (MP160) appears on the machine. * The power-on sequence may differ depending on the LCD display of the device. Following icon will display on the model or brand of the device when the machine is PictBridge-compatible. „ Confirming Or Changing The Device Settings To change the paper size or paper type, operate the device to select the PictBridge print setup mode and confirm or change the settings...
... connection between the device and machine has been established, (MP180) or (MP160) appears on the machine. * The power-on sequence may differ depending on the LCD display of the device. Following icon will display on the model or brand of the device when the machine is PictBridge-compatible. „ Confirming Or Changing The Device Settings To change the paper size or paper type, operate the device to select the PictBridge print setup mode and confirm or change the settings...
User's Guide
Page 87
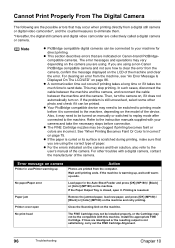
... page 92) Paper Jams (See page 94) Cannot Print Properly From A Photo Index Sheet (MP180) (See page 95) An Unintended Language is Displayed on the LCD (MP180) (See page 95) Cannot Print Properly From The Digital Camera (See page 96) Cannot Install The MP Driver (See page 98) Cannot Connect To PC Properly (See page 99) Problems With Scanning (See page 100) An Error Message Appears On The Screen (See page 103) For Windows Users (See page...
... page 92) Paper Jams (See page 94) Cannot Print Properly From A Photo Index Sheet (MP180) (See page 95) An Unintended Language is Displayed on the LCD (MP180) (See page 95) Cannot Print Properly From The Digital Camera (See page 96) Cannot Install The MP Driver (See page 98) Cannot Connect To PC Properly (See page 99) Problems With Scanning (See page 100) An Error Message Appears On The Screen (See page 103) For Windows Users (See page...
User's Guide
Page 88
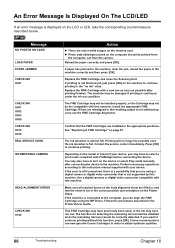
... out. Message NO PHOTOS ON CARD LOAD PAPER PAPER JAMMED CHECK INK U041 CHECK INK U051 U052 U053 U059 CHECK INK U075 U076 REQ. If printing is not satisfactory, carry out the FINE Cartridge Alignment. Canon recommends to use new genuine Canon Cartridges in order to continue printing in , and that you may be possible once the ink absorber is displayed on the device or select Play mode manually after connecting the device to the instruction manual supplied with a new one as...
... out. Message NO PHOTOS ON CARD LOAD PAPER PAPER JAMMED CHECK INK U041 CHECK INK U051 U052 U053 U059 CHECK INK U075 U076 REQ. If printing is not satisfactory, carry out the FINE Cartridge Alignment. Canon recommends to use new genuine Canon Cartridges in order to continue printing in , and that you may be possible once the ink absorber is displayed on the device or select Play mode manually after connecting the device to the instruction manual supplied with a new one as...
User's Guide
Page 89
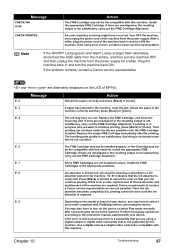
... the FINE Cartridge installed. If lines are alternately displayed on the model or brand of MP160. An error requiring servicing might have run out. E, 3 If paper has jammed in the machine, clear the jam, reload the paper in the appropriate positions. If printing is in and turn ON the machine. E, 8 Ink absorber is nearly full. Install the FINE Cartridges in the machine correctly and then press [Black] or [Color]. If the error is still...
... the FINE Cartridge installed. If lines are alternately displayed on the model or brand of MP160. An error requiring servicing might have run out. E, 3 If paper has jammed in the machine, clear the jam, reload the paper in the appropriate positions. If printing is in and turn ON the machine. E, 8 Ink absorber is nearly full. Install the FINE Cartridges in the machine correctly and then press [Black] or [Color]. If the error is still...
User's Guide
Page 92
Open the Paper Output Tray. Delete an undesired print job, if there is displayed, click [Yes]. Open the printer properties dialog box. 2. Click the [Maintenance] tab and then click [View Printer Status]. 3. When the confirmation message is any circumstances touch it matches the size of the paper loaded. 90 Troubleshooting Chapter 10 When using Mac OS X v.10.2.8, double-click the Print Center icon. 3. Click to have stopped. The print job is insufficient. Memory is deleted. To protect the FINE Cartridge, printing will...
Open the Paper Output Tray. Delete an undesired print job, if there is displayed, click [Yes]. Open the printer properties dialog box. 2. Click the [Maintenance] tab and then click [View Printer Status]. 3. When the confirmation message is any circumstances touch it matches the size of the paper loaded. 90 Troubleshooting Chapter 10 When using Mac OS X v.10.2.8, double-click the Print Center icon. 3. Click to have stopped. The print job is insufficient. Memory is deleted. To protect the FINE Cartridge, printing will...
User's Guide
Page 98
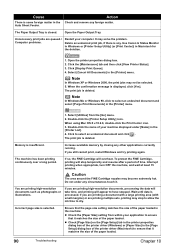
.... Error message on camera Printer in the Auto Sheet Feeder and press [OK] (MP180) / [Black] or [Color] (MP160) on the machine. If the Paper Output Tray is resumed. Printing is closed, open Close the Scanning Unit on the machine and retry printing. If lines are misaligned or the resulting output is warming up Action Photos are printed from the machine, see "An Error Message Is Displayed On The LCD/LED" on page 86. Printer cover open it takes too much time to printing mode...
.... Error message on camera Printer in the Auto Sheet Feeder and press [OK] (MP180) / [Black] or [Color] (MP160) on the machine. If the Paper Output Tray is resumed. Printing is closed, open Close the Scanning Unit on the machine and retry printing. If lines are misaligned or the resulting output is warming up Action Photos are printed from the machine, see "An Error Message Is Displayed On The LCD/LED" on page 86. Printer cover open it takes too much time to printing mode...
User's Guide
Page 100
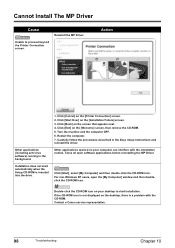
... Printer Connection screen. Turn the machine and the computer OFF. 6. Click [Start Over] on the desktop, there is a problem with the installation routine. Close all open the [My Computer] window and then doubleclick the CD-ROM icon. Click [Start], select [My Computer] and then double-click the CD-ROM icon. Contact a Canon service representative. 98 Troubleshooting Chapter 10 Cannot Install The MP Driver Cause Reinstall the MP Driver. Unable...
... Printer Connection screen. Turn the machine and the computer OFF. 6. Click [Start Over] on the desktop, there is a problem with the installation routine. Close all open the [My Computer] window and then doubleclick the CD-ROM icon. Click [Start], select [My Computer] and then double-click the CD-ROM icon. Contact a Canon service representative. 98 Troubleshooting Chapter 10 Cannot Install The MP Driver Cause Reinstall the MP Driver. Unable...

User's Guide
Page 105
... -screen manuals for each application program for the detailed procedures. „ Trouble scanning with the machine instead. Set the scale to the Scanning Guide. An Error Message Appears On The Screen „ Service Error 5100 is Displayed Cause Action Movement of the FINE Clear the paper jam or foreign object that are running, and try to adjust the printing size. The higher the resolution, the larger the resulting image will change the file name...
... -screen manuals for each application program for the detailed procedures. „ Trouble scanning with the machine instead. Set the scale to the Scanning Guide. An Error Message Appears On The Screen „ Service Error 5100 is Displayed Cause Action Movement of the FINE Clear the paper jam or foreign object that are running, and try to adjust the printing size. The higher the resolution, the larger the resulting image will change the file name...
User's Guide
Page 116
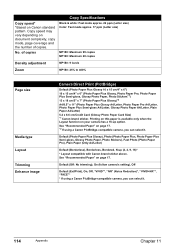
... document complexity, copy mode, page coverage and the number of copies Copy Specifications Black & white: Fast mode approx. 22 ppm (Letter size) Color: Fast mode approx. 17 ppm (Letter size) MP180: Maximum 99 copies MP160: Maximum 20 copies Density adjustment MP180: 9 levels Zoom MP180: 25% to 400% Page size Media type Layout Trimming Enhance image Camera Direct Print (PictBridge) Default (Photo Paper Plus Glossy 10 x 15 cm/4" x 6") 10 x 15 cm/4" x 6" (Photo Paper Plus Glossy, Photo Paper Pro, Photo Paper Plus Semi-gloss, Glossy Photo Paper, Photo...
... document complexity, copy mode, page coverage and the number of copies Copy Specifications Black & white: Fast mode approx. 22 ppm (Letter size) Color: Fast mode approx. 17 ppm (Letter size) MP180: Maximum 99 copies MP160: Maximum 20 copies Density adjustment MP180: 9 levels Zoom MP180: 25% to 400% Page size Media type Layout Trimming Enhance image Camera Direct Print (PictBridge) Default (Photo Paper Plus Glossy 10 x 15 cm/4" x 6") 10 x 15 cm/4" x 6" (Photo Paper Plus Glossy, Photo Paper Pro, Photo Paper Plus Semi-gloss, Glossy Photo Paper, Photo...
User's Guide
Page 124
... (Light Emitting Diode) 13 Loading Paper 23 Loading Envelopes 24 M Machine Parts 10 Maintenance Button 13 Memory Card 36 Inserting 37 Reading From/Writing To 49 Removing 38 Write Protection 49 MEMORY CARD Button 12 Menu Button 12 N Nozzle Check Pattern 76 Confirming 77 Printing 76 O OK Button 12 ON/OFF Button (MP160) 13 ON/OFF Button (MP180) 12 Operation panel (MP160) 13 Operation panel (MP180) 12 P Paper Button 13 Paper Guide 10 Paper Lamp 13 Paper Output Tray 10 Paper Support 10 Paper Support Extension 10 Paper Thickness Lever 11 Photo Index Sheet Button...
... (Light Emitting Diode) 13 Loading Paper 23 Loading Envelopes 24 M Machine Parts 10 Maintenance Button 13 Memory Card 36 Inserting 37 Reading From/Writing To 49 Removing 38 Write Protection 49 MEMORY CARD Button 12 Menu Button 12 N Nozzle Check Pattern 76 Confirming 77 Printing 76 O OK Button 12 ON/OFF Button (MP160) 13 ON/OFF Button (MP180) 12 Operation panel (MP160) 13 Operation panel (MP180) 12 P Paper Button 13 Paper Guide 10 Paper Lamp 13 Paper Output Tray 10 Paper Support 10 Paper Support Extension 10 Paper Thickness Lever 11 Photo Index Sheet Button...
Easy Setup Instructions
Page 1
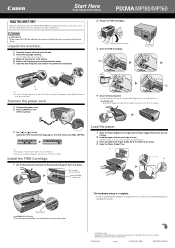
... use, see the reverse side for use, please follow these Easy Setup Instructions before referring to the User's Guide. 1 Lift the Scanning Unit and pull the Scanning Unit Support down the serial number. B Do not touch! (A) • Be sure to hold the machine by grasping the Paper Support Extension or the Operation Panel. 1 Connect the power cord. 2 Press [ON/OFF] to its original position. To prepare your machine for instructions on a flat surface. 4 Remove...
... use, see the reverse side for use, please follow these Easy Setup Instructions before referring to the User's Guide. 1 Lift the Scanning Unit and pull the Scanning Unit Support down the serial number. B Do not touch! (A) • Be sure to hold the machine by grasping the Paper Support Extension or the Operation Panel. 1 Connect the power cord. 2 Press [ON/OFF] to its original position. To prepare your machine for instructions on a flat surface. 4 Remove...
Easy Setup Instructions
Page 2
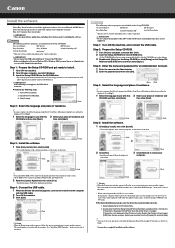
... displayed instructions. The serial number is located inside the machine. (See "3 Install the FINE Cartridge." z Perform the following software programs are included on the Setup CD-ROM: On-screen Manual MP Drivers MP Navigator Easy-PhotoPrint Easy-WebPrint ScanSoft OmniPage SE ArcSoft PhotoStudio My Printer* * This may not be detected. Double-click the [Printer Setup Utility] ([Print Center] when using Mac OS X v.10.2.8) icon. If the printer is not displayed in the [Printer List], click [Add] in Windows...
... displayed instructions. The serial number is located inside the machine. (See "3 Install the FINE Cartridge." z Perform the following software programs are included on the Setup CD-ROM: On-screen Manual MP Drivers MP Navigator Easy-PhotoPrint Easy-WebPrint ScanSoft OmniPage SE ArcSoft PhotoStudio My Printer* * This may not be detected. Double-click the [Printer Setup Utility] ([Print Center] when using Mac OS X v.10.2.8) icon. If the printer is not displayed in the [Printer List], click [Add] in Windows...


