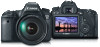

Instruction Manual
Page 3
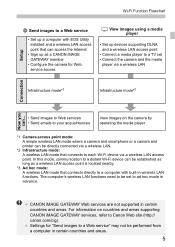
...) Upload your images to CANON iMAGE GATEWAY, an online photo service for Canon users (free registration required), to share them with built-in wireless LAN functions. (2) q Connect to a smartphone (p.31, 75) View saved images or operate the camera from your smartphone to use these functions. (3) l Print images using a Wi-Fi printer (p.45, 87) Connect the camera to a wireless LAN compatible printer supporting PictBridge (DPS over IP) to print images wirelessly. (4) D Operate the camera remotely using a media player supporting DLNA* via a wireless LAN. * Digital Living Network Alliance 3 What...
...) Upload your images to CANON iMAGE GATEWAY, an online photo service for Canon users (free registration required), to share them with built-in wireless LAN functions. (2) q Connect to a smartphone (p.31, 75) View saved images or operate the camera from your smartphone to use these functions. (3) l Print images using a Wi-Fi printer (p.45, 87) Connect the camera to a wireless LAN compatible printer supporting PictBridge (DPS over IP) to print images wirelessly. (4) D Operate the camera remotely using a media player supporting DLNA* via a wireless LAN. * Digital Living Network Alliance 3 What...
Instruction Manual
Page 5
... mode: A wireless LAN mode that connects directly to a computer with EOS Utility installed and a wireless LAN access point that can access the Internet • Sign up devices supporting DLNA and a wireless LAN access point • Connect a media player to a TV set to ad hoc mode in advance. For information on the camera by operating the media player *1 Camera access point mode: A simple wireless LAN mode where a camera and smartphone or a camera and printer can be established as long as a CANON iMAGE...
... mode: A wireless LAN mode that connects directly to a computer with EOS Utility installed and a wireless LAN access point that can access the Internet • Sign up devices supporting DLNA and a wireless LAN access point • Connect a media player to a TV set to ad hoc mode in advance. For information on the camera by operating the media player *1 Camera access point mode: A simple wireless LAN mode where a camera and smartphone or a camera and printer can be established as long as a CANON iMAGE...
Instruction Manual
Page 10
... Service 120 Reconnecting 126 Registering Multiple Connection Settings 127 10 Viewing Images Using a Media Player 131 Configuring Media Player Communication Settings 132 Displaying Images on a TV set 133 Reconnecting 135 Registering Multiple Connection Settings 136 11 Using Quick Control to Connect to a Wireless LAN 139 Connecting from Quick Control 140 Connecting from a Playback Screen 141 12 Managing Settings 145 Checking/Changing Settings 146 Clearing Wireless LAN Settings 149 13 Troubleshooting Guide 151 Responding to Error Messages 152 Troubleshooting Guide 163...
... Service 120 Reconnecting 126 Registering Multiple Connection Settings 127 10 Viewing Images Using a Media Player 131 Configuring Media Player Communication Settings 132 Displaying Images on a TV set 133 Reconnecting 135 Registering Multiple Connection Settings 136 11 Using Quick Control to Connect to a Wireless LAN 139 Connecting from Quick Control 140 Connecting from a Playback Screen 141 12 Managing Settings 145 Checking/Changing Settings 146 Clearing Wireless LAN Settings 149 13 Troubleshooting Guide 151 Responding to Error Messages 152 Troubleshooting Guide 163...
Instruction Manual
Page 36
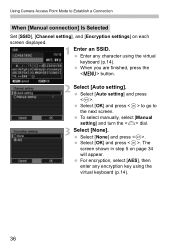
... go to Establish a Connection When [Manual connection] Is Selected Set [SSID], [Channel setting], and [Encryption settings] on page 34 will appear. To select manually, select [Manual setting] and turn the dial. 3 Select [None]. Select [Auto setting] and press . Select [OK] and press . Using Camera Access Point Mode to the next screen. The screen shown in step 5 on each screen displayed. 1 Enter an SSID. When you are finished, press the button. 2 Select [Auto setting]. Select [None...
... go to Establish a Connection When [Manual connection] Is Selected Set [SSID], [Channel setting], and [Encryption settings] on page 34 will appear. To select manually, select [Manual setting] and turn the dial. 3 Select [None]. Select [Auto setting] and press . Select [OK] and press . Using Camera Access Point Mode to the next screen. The screen shown in step 5 on each screen displayed. 1 Enter an SSID. When you are finished, press the button. 2 Select [Auto setting]. Select [None...

Instruction Manual
Page 37
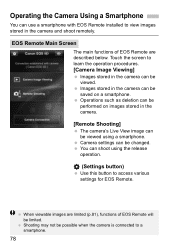
... the camera can use a smartphone with EOS Remote installed to learn the operation procedures. [Camera Image Viewing] Images stored in the camera can be changed. When viewable images are described below. EOS Remote Main Screen The main functions of EOS Remote are limited (p.40), functions of EOS Remote will be limited. You can be viewed using the release operation. (Settings button) Use this button to a smartphone. 37 Operating the Camera Using a Smartphone You can be saved on images stored in the camera. [Remote Shooting] The camera's Live View image can shoot using a smartphone...
... the camera can use a smartphone with EOS Remote installed to learn the operation procedures. [Camera Image Viewing] Images stored in the camera can be changed. When viewable images are described below. EOS Remote Main Screen The main functions of EOS Remote are limited (p.40), functions of EOS Remote will be limited. You can be viewed using the release operation. (Settings button) Use this button to a smartphone. 37 Operating the Camera Using a Smartphone You can be saved on images stored in the camera. [Remote Shooting] The camera's Live View image can shoot using a smartphone...
Instruction Manual
Page 49
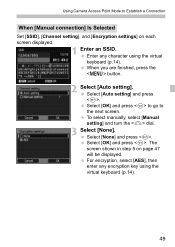
... . The screen shown in step 5 on each screen displayed. 1 Enter an SSID. Select [OK] and press to go to Establish a Connection When [Manual connection] Is Selected Set [SSID], [Channel setting], and [Encryption settings] on page 47 will be displayed. For encryption, select [AES], then enter any character using the virtual keyboard (p.14). 49 When you are finished, press the button. 2 Select [Auto setting]. Using Camera Access Point Mode to...
... . The screen shown in step 5 on each screen displayed. 1 Enter an SSID. Select [OK] and press to go to Establish a Connection When [Manual connection] Is Selected Set [SSID], [Channel setting], and [Encryption settings] on page 47 will be displayed. For encryption, select [AES], then enter any character using the virtual keyboard (p.14). 49 When you are finished, press the button. 2 Select [Auto setting]. Using Camera Access Point Mode to...
Instruction Manual
Page 78
... as deletion can be performed on a smartphone. EOS Remote Main Screen The main functions of EOS Remote will be limited. You can be viewed using the release operation. (Settings button) Use this button to access various settings for EOS Remote. Images stored in the camera. [Remote Shooting] The camera's Live View image can shoot using a smartphone. Camera settings can be saved on images stored in the camera can be changed. Shooting may not be possible when the camera is connected to view images stored in the camera can use a smartphone with EOS Remote installed...
... as deletion can be performed on a smartphone. EOS Remote Main Screen The main functions of EOS Remote will be limited. You can be viewed using the release operation. (Settings button) Use this button to access various settings for EOS Remote. Images stored in the camera. [Remote Shooting] The camera's Live View image can shoot using a smartphone. Camera settings can be saved on images stored in the camera can be changed. Shooting may not be possible when the camera is connected to view images stored in the camera can use a smartphone with EOS Remote installed...
Instruction Manual
Page 95
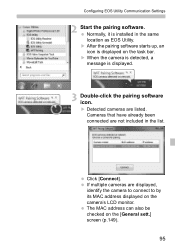
... location as EOS Utility. X When the camera is detected, a message is displayed on the task bar. Cameras that have already been connected are listed. Click [Connect]. Configuring EOS Utility Communication Settings 2 Start the pairing software. The MAC address can also be checked on the camera's LCD monitor. If multiple cameras are displayed, identify the camera to connect to by its MAC address displayed on the [General sett.] screen (p.149). 95 Normally, it is installed in...
... location as EOS Utility. X When the camera is detected, a message is displayed on the task bar. Cameras that have already been connected are listed. Click [Connect]. Configuring EOS Utility Communication Settings 2 Start the pairing software. The MAC address can also be checked on the camera's LCD monitor. If multiple cameras are displayed, identify the camera to connect to by its MAC address displayed on the [General sett.] screen (p.149). 95 Normally, it is installed in...
Instruction Manual
Page 104
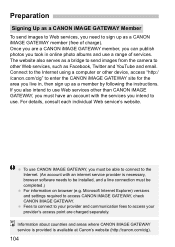
... online photo albums and use CANON iMAGE GATEWAY, you must be able to connect to the Internet. (An account with the services you intend to other device, access "http:/ /canon.com/cig" to be installed, and a line connection must be completed.) For information on browser (e.g. Preparation Signing Up as a CANON iMAGE GATEWAY Member To send images to Web services, you need to sign up as a CANON iMAGE GATEWAY member (free...
... online photo albums and use CANON iMAGE GATEWAY, you must be able to connect to the Internet. (An account with the services you intend to other device, access "http:/ /canon.com/cig" to be installed, and a line connection must be completed.) For information on browser (e.g. Preparation Signing Up as a CANON iMAGE GATEWAY Member To send images to Web services, you need to sign up as a CANON iMAGE GATEWAY member (free...

Instruction Manual
Page 105
... camera to install EOS Utility. 2 Access Canon website from the camera (p.106). 6 Send images to a Web service registered on the camera (p.120). For details, refer to the EOS Utility instruction manual (CD-ROM). 5 Connect to the wireless LAN access point from the computer and sign up as follows. 1 Prepare a computer on which EOS Utility has been installed. Before connection, set [Wi-Fi] to [Disable]. 4 Start EOS Utility on the computer, log in to CANON iMAGE GATEWAY, then configure the camera's settings to enable access...
... camera to install EOS Utility. 2 Access Canon website from the camera (p.106). 6 Send images to a Web service registered on the camera (p.120). For details, refer to the EOS Utility instruction manual (CD-ROM). 5 Connect to the wireless LAN access point from the computer and sign up as follows. 1 Prepare a computer on which EOS Utility has been installed. Before connection, set [Wi-Fi] to [Disable]. 4 Start EOS Utility on the computer, log in to CANON iMAGE GATEWAY, then configure the camera's settings to enable access...
Instruction Manual
Page 107
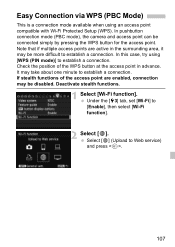
... may be more difficult to establish a connection. Deactivate stealth functions. 1 Select [Wi-Fi function]. Select [w] (Upload to establish a connection. In pushbutton connection mode (PBC mode), the camera and access point can be disabled. It may be connected simply by pressing the WPS button for the access point. Under the [53] tab, set [Wi-Fi] to establish a connection. Note that if multiple access points are enabled, connection may take about one minute to...
... may be more difficult to establish a connection. Deactivate stealth functions. 1 Select [Wi-Fi function]. Select [w] (Upload to establish a connection. In pushbutton connection mode (PBC mode), the camera and access point can be disabled. It may be connected simply by pressing the WPS button for the access point. Under the [53] tab, set [Wi-Fi] to establish a connection. Note that if multiple access points are enabled, connection may take about one minute to...
Instruction Manual
Page 133
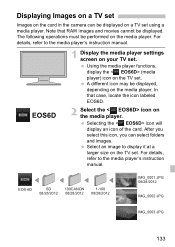
The following operations must be displayed, depending on the media player. A different icon may be performed on the media player. Select an image to display it at a larger size on the TV set . In that RAW images and movies cannot be displayed on a TV set using a media player. Note that case, locate the icon labeled EOS6D. 2 Select the < EOS6D> icon on the media player. EOS 6D SD 100CANON 1-100...
The following operations must be displayed, depending on the media player. A different icon may be performed on the media player. Select an image to display it at a larger size on the TV set . In that RAW images and movies cannot be displayed on a TV set using a media player. Note that case, locate the icon labeled EOS6D. 2 Select the < EOS6D> icon on the media player. EOS 6D SD 100CANON 1-100...
Instruction Manual
Page 134
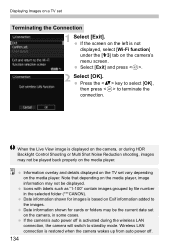
...]. Wireless LAN connection is activated during HDR Backlight Control Shooting or Multi Shot Noise Reduction shooting, images may not be played back properly on Exif information added to the images. Information overlay and details displayed on the TV set vary depending on a TV set on the camera's menu screen. Date information shown for images is displayed on the camera, or during the wireless LAN connection, the camera will switch to terminate the connection. If the camera's auto power...
...]. Wireless LAN connection is activated during HDR Backlight Control Shooting or Multi Shot Noise Reduction shooting, images may not be played back properly on Exif information added to the images. Information overlay and details displayed on the TV set vary depending on a TV set on the camera's menu screen. Date information shown for images is displayed on the camera, or during the wireless LAN connection, the camera will switch to terminate the connection. If the camera's auto power...
Instruction Manual
Page 140
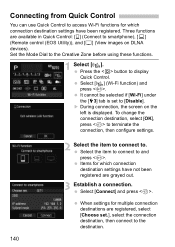
... use Quick Control to access Wi-Fi functions for which connection destination settings have been registered. Three functions are registered, select [Choose set to the destination. 140 It cannot be selected if [Wi-Fi] under the [53] tab is displayed. Items for multiple connection destinations are available in Quick Control: [q] (Connect to smartphone), [D] (Remote control (EOS Utility)), and [ ] (View images on the left is set .], select the connection destination, then connect to [Disable]. Press the button...
... use Quick Control to access Wi-Fi functions for which connection destination settings have been registered. Three functions are registered, select [Choose set to the destination. 140 It cannot be selected if [Wi-Fi] under the [53] tab is displayed. Items for multiple connection destinations are available in Quick Control: [q] (Connect to smartphone), [D] (Remote control (EOS Utility)), and [ ] (View images on the left is set .], select the connection destination, then connect to [Disable]. Press the button...
Instruction Manual
Page 153
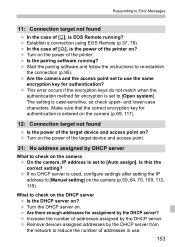
... server? X If no DHCP server is used, configure settings after setting the IP address to [Manual setting] on the camera On the camera, IP address is EOS Remote running ? X Remove devices assigned addresses by the DHCP server. Responding to Error Messages 11: Connection target not found Is the power of the target device and access point on ? X Turn on ? X This error occurs if the encryption keys do not...
... server? X If no DHCP server is used, configure settings after setting the IP address to [Manual setting] on the camera On the camera, IP address is EOS Remote running ? X Remove devices assigned addresses by the DHCP server. Responding to Error Messages 11: Connection target not found Is the power of the target device and access point on ? X Turn on ? X This error occurs if the encryption keys do not...
Instruction Manual
Page 154
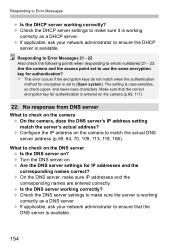
Responding to Error Messages Is the DHCP server working correctly? Responding to Error Messages 21 - 23 Also check the following points when responding to ensure the DHCP server is available. 154 and lower-case characters. X If applicable, ask your network ...are entered correctly. Are the camera and the access point set to check on the DNS server Is the DNS server on the camera On the camera, does the DNS server's IP address setting match the server's actual address? What to use the same encryption key for encryption is working correctly as a DHCP server....
Responding to Error Messages Is the DHCP server working correctly? Responding to Error Messages 21 - 23 Also check the following points when responding to ensure the DHCP server is available. 154 and lower-case characters. X If applicable, ask your network ...are entered correctly. Are the camera and the access point set to check on the DNS server Is the DNS server on the camera On the camera, does the DNS server's IP address setting match the server's actual address? What to use the same encryption key for encryption is working correctly as a DHCP server....
Instruction Manual
Page 159
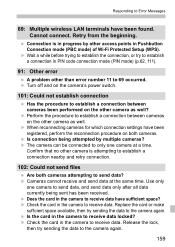
.... X Turn off and on the camera's power switch. 101: Could not establish connection Has the procedure to establish a connection between cameras on the other than error number 11 to 69 occurred. Retry from the beginning. X Wait a while before trying to establish the connection, or try to establish a connection in the camera to receive data locked? Is the card in PIN code connection mode (PIN mode) (p.62, 111). 91: Other error A problem...
.... X Turn off and on the camera's power switch. 101: Could not establish connection Has the procedure to establish a connection between cameras on the other than error number 11 to 69 occurred. Retry from the beginning. X Wait a while before trying to establish the connection, or try to establish a connection in the camera to receive data locked? Is the card in PIN code connection mode (PIN mode) (p.62, 111). 91: Other error A problem...
Instruction Manual
Page 161
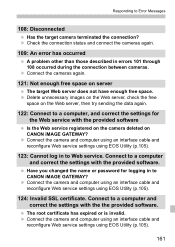
... connection between cameras. X Connect the camera and computer using an interface cable and reconfigure Web service settings using EOS Utility (p.105). 124: Invalid SSL certificate. The root certificate has expired or is invalid. Responding to CANON iMAGE GATEWAY? X Check the connection status and connect the cameras again. 109: An error has occurred A problem other than those described in to Error Messages 108: Disconnected Has the target camera terminated the connection? X Connect the cameras...
... connection between cameras. X Connect the camera and computer using an interface cable and reconfigure Web service settings using EOS Utility (p.105). 124: Invalid SSL certificate. The root certificate has expired or is invalid. Responding to CANON iMAGE GATEWAY? X Check the connection status and connect the cameras again. 109: An error has occurred A problem other than those described in to Error Messages 108: Disconnected Has the target camera terminated the connection? X Connect the cameras...
Instruction Manual
Page 170
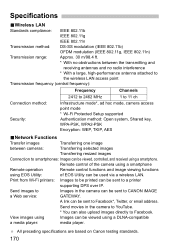
... service: GATEWAY. A link can be sent to a printer supporting DPS over IP. Send images to Images in the camera to YouTube. * You can also upload images directly to smartphones: Images can be viewed, controlled, and received using a smartphone. Print from Wi-Fi printers: Images to be printed can be sent to Facebook*, Twitter, or email address. View images using Images can be viewed using EOS Utility: of the camera using a smartphone Remote operation Remote control functions...
... service: GATEWAY. A link can be sent to a printer supporting DPS over IP. Send images to Images in the camera to YouTube. * You can also upload images directly to smartphones: Images can be viewed, controlled, and received using a smartphone. Print from Wi-Fi printers: Images to be printed can be sent to Facebook*, Twitter, or email address. View images using Images can be viewed using EOS Utility: of the camera using a smartphone Remote operation Remote control functions...

Instruction Manual
Page 171
... ..........68, 117 Android 32, 55 Auto power off 15 C Cable 17 Camera access point mode ......33, 46 CANON iMAGE GATEWAY ..........104 Changing setting names .........28, 148 Changing settings 148 Checking settings 146 Clearing settings (Wireless LAN) ..149 Connecting to a smartphone.....31, 75 D DLNA 131 DNS address 59, 64, 70, 109, 113, 118 E Email 125 EOS Remote 32, 37, 55, 78 EOS Utility 93 Eye-Fi card 17 G Gateway......59, 64, 70, 109...
... ..........68, 117 Android 32, 55 Auto power off 15 C Cable 17 Camera access point mode ......33, 46 CANON iMAGE GATEWAY ..........104 Changing setting names .........28, 148 Changing settings 148 Checking settings 146 Clearing settings (Wireless LAN) ..149 Connecting to a smartphone.....31, 75 D DLNA 131 DNS address 59, 64, 70, 109, 113, 118 E Email 125 EOS Remote 32, 37, 55, 78 EOS Utility 93 Eye-Fi card 17 G Gateway......59, 64, 70, 109...


