Instruction Manual
Page 2
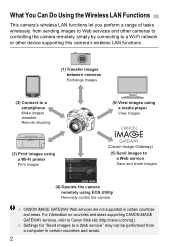
...refer to a Web service Save and share images (4) Operate the camera remotely using a Wi-Fi printer Print images (Canon Image Gateway) (5) Send images to Canon Web site (http://canon.com/cig). Settings for "Send images to a Web service" may not be performed from sending images to Web services ...between cameras Exchange images (2) Connect to a smartphone Make images viewable Remote shooting (6) View images using a media player View images (3) Print images using EOS Utility Remotely control the camera CANON iMAGE GATEWAY Web services are not supported in certain countries and areas. 2
...refer to a Web service Save and share images (4) Operate the camera remotely using a Wi-Fi printer Print images (Canon Image Gateway) (5) Send images to Canon Web site (http://canon.com/cig). Settings for "Send images to a Web service" may not be performed from sending images to Web services ...between cameras Exchange images (2) Connect to a smartphone Make images viewable Remote shooting (6) View images using a media player View images (3) Print images using EOS Utility Remotely control the camera CANON iMAGE GATEWAY Web services are not supported in certain countries and areas. 2

Instruction Manual
Page 3
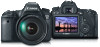
You must install the dedicated application "EOS Remote" on your TV set, by using EOS Utility (p.93) Use EOS Utility via a wireless LAN instead of an interface cable, and operate your camera from your images to CANON iMAGE GATEWAY, an online photo service for Canon users (free registration required), to... 3 What You Can Do Using the Wireless LAN Functions (1) z Transfer images between cameras (p.19) Transfer images between this camera and other Canon cameras with family and friends. (6) View images using a media player (p.131) Display images on the camera's memory card on your smartphone to...
You must install the dedicated application "EOS Remote" on your TV set, by using EOS Utility (p.93) Use EOS Utility via a wireless LAN instead of an interface cable, and operate your camera from your images to CANON iMAGE GATEWAY, an online photo service for Canon users (free registration required), to... 3 What You Can Do Using the Wireless LAN Functions (1) z Transfer images between cameras (p.19) Transfer images between this camera and other Canon cameras with family and friends. (6) View images using a media player (p.131) Display images on the camera's memory card on your smartphone to...
Instruction Manual
Page 4
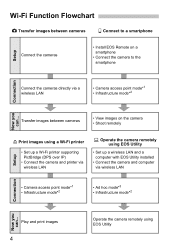
Play and print images 4 Operate the camera remotely using EOS Utility • Set up a wireless LAN and a computer with EOS Utility installed • Connect the camera and computer via wireless LAN • Camera access point mode*1 • Infrastructure mode*2 • Ad... point mode*1 • Infrastructure mode*2 Now you can ... Transfer images between cameras q Connect to a smartphone Setup Connect the cameras • Install EOS Remote on the camera • Shoot remotely Setup l Print images using a Wi-Fi printer • Set up a Wi-Fi printer supporting PictBridge ...
Play and print images 4 Operate the camera remotely using EOS Utility • Set up a wireless LAN and a computer with EOS Utility installed • Connect the camera and computer via wireless LAN • Camera access point mode*1 • Infrastructure mode*2 • Ad... point mode*1 • Infrastructure mode*2 Now you can ... Transfer images between cameras q Connect to a smartphone Setup Connect the cameras • Install EOS Remote on the camera • Shoot remotely Setup l Print images using a Wi-Fi printer • Set up a Wi-Fi printer supporting PictBridge ...
Instruction Manual
Page 5
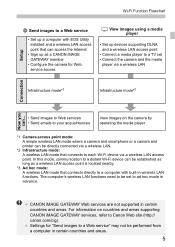
...smartphone or a camera and printer can ... • Send images to Web services • Send emails to Canon Web site (http:// canon.com/cig). CANON iMAGE GATEWAY Web services are not supported in certain countries and areas. 5 Settings for Web service access View... images using a media player • Set up as a wireless LAN access point is located nearby. *3 Ad hoc mode: A wireless LAN mode that connects directly to a computer with EOS Utility...
...smartphone or a camera and printer can ... • Send images to Web services • Send emails to Canon Web site (http:// canon.com/cig). CANON iMAGE GATEWAY Web services are not supported in certain countries and areas. 5 Settings for Web service access View... images using a media player • Set up as a wireless LAN access point is located nearby. *3 Ad hoc mode: A wireless LAN mode that connects directly to a computer with EOS Utility...
Instruction Manual
Page 7
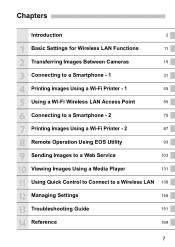
...-Fi Printer - 1 45 5 Using a Wi-Fi Wireless LAN Access Point 55 6 Connecting to a Smartphone - 2 75 7 Printing Images Using a Wi-Fi Printer - 2 87 8 Remote Operation Using EOS Utility 93 9 Sending Images to a Web Service 103 10 Viewing Images Using a Media Player 131 11 Using Quick Control to Connect to a Wireless LAN 139 12...
...-Fi Printer - 1 45 5 Using a Wi-Fi Wireless LAN Access Point 55 6 Connecting to a Smartphone - 2 75 7 Printing Images Using a Wi-Fi Printer - 2 87 8 Remote Operation Using EOS Utility 93 9 Sending Images to a Web Service 103 10 Viewing Images Using a Media Player 131 11 Using Quick Control to Connect to a Wireless LAN 139 12...
Instruction Manual
Page 9
...-Fi Printer - 2 87 Using Infrastructure Mode to Establish a Connection 88 Printing 90 Reconnecting 91 Registering Multiple Connection Settings 92 8 Remote Operation Using EOS Utility 93 Configuring EOS Utility Communication Settings 94 Using EOS Utility 98 Reconnecting 99 Registering Multiple Connection Settings 100 9 Sending Images to a Web Service 103 Preparation 104 Checking the Type of Access Point...
...-Fi Printer - 2 87 Using Infrastructure Mode to Establish a Connection 88 Printing 90 Reconnecting 91 Registering Multiple Connection Settings 92 8 Remote Operation Using EOS Utility 93 Configuring EOS Utility Communication Settings 94 Using EOS Utility 98 Reconnecting 99 Registering Multiple Connection Settings 100 9 Sending Images to a Web Service 103 Preparation 104 Checking the Type of Access Point...
Instruction Manual
Page 21
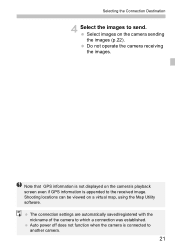
Shooting locations can be viewed on the camera sending the images (p.22). Select images on a virtual map, using the Map Utility software. The connection settings are automatically saved/registered with the nickname of the camera to another camera. 21 Auto power off does not function when ...
Shooting locations can be viewed on the camera sending the images (p.22). Select images on a virtual map, using the Map Utility software. The connection settings are automatically saved/registered with the nickname of the camera to another camera. 21 Auto power off does not function when ...
Instruction Manual
Page 55
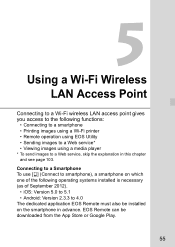
... point gives you access to the following functions: • Connecting to a smartphone • Printing images using a Wi-Fi printer • Remote operation using EOS Utility • Sending images to a Web service* • Viewing images using a media player * To send images to 4.0 The dedicated application... EOS Remote must also be downloaded from the App Store or Google Play. 55 Connecting to a Smartphone To use [q] (Connect to smartphone), a smartphone on ...
... point gives you access to the following functions: • Connecting to a smartphone • Printing images using a Wi-Fi printer • Remote operation using EOS Utility • Sending images to a Web service* • Viewing images using a media player * To send images to 4.0 The dedicated application... EOS Remote must also be downloaded from the App Store or Google Play. 55 Connecting to a Smartphone To use [q] (Connect to smartphone), a smartphone on ...
Instruction Manual
Page 60
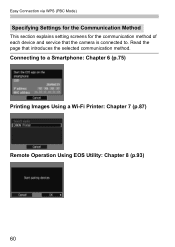
Read the page that the camera is connected to a Smartphone: Chapter 6 (p.75) Printing Images Using a Wi-Fi Printer: Chapter 7 (p.87) Remote Operation Using EOS Utility: Chapter 8 (p.93) 60 Easy Connection via WPS (PBC Mode) Specifying Settings for the Communication Method This section explains setting screens for the communication method of each device and service that introduces the selected communication method. Connecting to .
Read the page that the camera is connected to a Smartphone: Chapter 6 (p.75) Printing Images Using a Wi-Fi Printer: Chapter 7 (p.87) Remote Operation Using EOS Utility: Chapter 8 (p.93) 60 Easy Connection via WPS (PBC Mode) Specifying Settings for the Communication Method This section explains setting screens for the communication method of each device and service that introduces the selected communication method. Connecting to .
Instruction Manual
Page 61
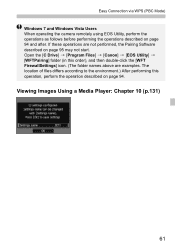
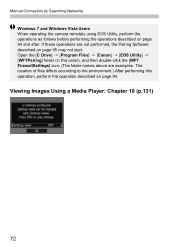
Open the [C Drive] 9 [Program Files] 9 [Canon] 9 [EOS Utility] 9 [WFTPairing] folder (in this operation, perform the operation described on page 95 may not start. If these operations are examples. Viewing Images Using a Media Player: ... performed, the Pairing Software described on page 94. Easy Connection via WPS (PBC Mode) Windows 7 and Windows Vista Users When operating the camera remotely using EOS Utility, perform the operations as follows before performing the operations described on page 94 and after.
Open the [C Drive] 9 [Program Files] 9 [Canon] 9 [EOS Utility] 9 [WFTPairing] folder (in this operation, perform the operation described on page 95 may not start. If these operations are examples. Viewing Images Using a Media Player: ... performed, the Pairing Software described on page 94. Easy Connection via WPS (PBC Mode) Windows 7 and Windows Vista Users When operating the camera remotely using EOS Utility, perform the operations as follows before performing the operations described on page 94 and after.
Instruction Manual
Page 65
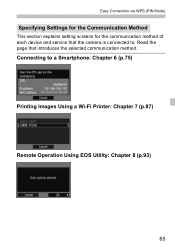
Connecting to . Easy Connection via WPS (PIN Mode) Specifying Settings for the Communication Method This section explains setting screens for the communication method of each device and service that introduces the selected communication method. Read the page that the camera is connected to a Smartphone: Chapter 6 (p.75) Printing Images Using a Wi-Fi Printer: Chapter 7 (p.87) Remote Operation Using EOS Utility: Chapter 8 (p.93) 65
Connecting to . Easy Connection via WPS (PIN Mode) Specifying Settings for the Communication Method This section explains setting screens for the communication method of each device and service that introduces the selected communication method. Read the page that the camera is connected to a Smartphone: Chapter 6 (p.75) Printing Images Using a Wi-Fi Printer: Chapter 7 (p.87) Remote Operation Using EOS Utility: Chapter 8 (p.93) 65

Instruction Manual
Page 66
If these operations are examples. Open the [C Drive] 9 [Program Files] 9 [Canon] 9 [EOS Utility] 9 [WFTPairing] folder (in this operation, perform the operation described on page 95 may not start. Viewing Images Using a Media Player: Chapter 10 (p.131) 66 The ... performed, the Pairing Software described on page 94. Easy Connection via WPS (PIN Mode) Windows 7 and Windows Vista Users When operating the camera remotely using EOS Utility, perform the operations as follows before performing the operations described on page 94 and after.
If these operations are examples. Open the [C Drive] 9 [Program Files] 9 [Canon] 9 [EOS Utility] 9 [WFTPairing] folder (in this operation, perform the operation described on page 95 may not start. Viewing Images Using a Media Player: Chapter 10 (p.131) 66 The ... performed, the Pairing Software described on page 94. Easy Connection via WPS (PIN Mode) Windows 7 and Windows Vista Users When operating the camera remotely using EOS Utility, perform the operations as follows before performing the operations described on page 94 and after.
Instruction Manual
Page 71
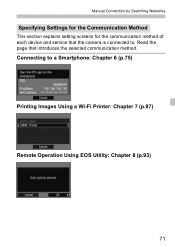
Read the page that the camera is connected to a Smartphone: Chapter 6 (p.75) Printing Images Using a Wi-Fi Printer: Chapter 7 (p.87) Remote Operation Using EOS Utility: Chapter 8 (p.93) 71 Connecting to . Manual Connection by Searching Networks Specifying Settings for the Communication Method This section explains setting screens for the communication method of each device and service that introduces the selected communication method.
Read the page that the camera is connected to a Smartphone: Chapter 6 (p.75) Printing Images Using a Wi-Fi Printer: Chapter 7 (p.87) Remote Operation Using EOS Utility: Chapter 8 (p.93) 71 Connecting to . Manual Connection by Searching Networks Specifying Settings for the Communication Method This section explains setting screens for the communication method of each device and service that introduces the selected communication method.
Instruction Manual
Page 72
Viewing Images Using a Media Player: Chapter 10 (p.131) 72 Open the [C Drive] 9 [Program Files] 9 [Canon] 9 [EOS Utility] 9 [WFTPairing] folder (in this operation, perform the operation described on page 94 and after. The location of files differs according to the environment.) After ... Software described on page 95 may not start. Manual Connection by Searching Networks Windows 7 and Windows Vista Users When operating the camera remotely using EOS Utility, perform the operations as follows before performing the operations described on page 94. If these operations are examples.
Viewing Images Using a Media Player: Chapter 10 (p.131) 72 Open the [C Drive] 9 [Program Files] 9 [Canon] 9 [EOS Utility] 9 [WFTPairing] folder (in this operation, perform the operation described on page 94 and after. The location of files differs according to the environment.) After ... Software described on page 95 may not start. Manual Connection by Searching Networks Windows 7 and Windows Vista Users When operating the camera remotely using EOS Utility, perform the operations as follows before performing the operations described on page 94. If these operations are examples.
Instruction Manual
Page 93
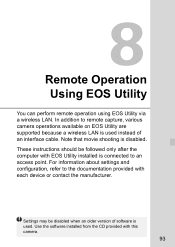
... this camera. 93 Settings may be followed only after the computer with EOS Utility installed is connected to remote capture, various camera operations available on EOS Utility are supported because a wireless LAN is used . Remote Operation Using EOS Utility You can perform remote operation using EOS Utility via a wireless LAN. In addition to an access point. These instructions...
... this camera. 93 Settings may be followed only after the computer with EOS Utility installed is connected to remote capture, various camera operations available on EOS Utility are supported because a wireless LAN is used . Remote Operation Using EOS Utility You can perform remote operation using EOS Utility via a wireless LAN. In addition to an access point. These instructions...
Instruction Manual
Page 94
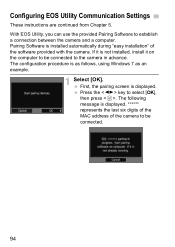
...OK]. Pairing Software is installed automatically during "easy installation" of the camera to the camera in advance. The following message is displayed. With EOS Utility, you can use the provided Pairing Software to select [OK], then press . First, the pairing screen is displayed. ****** represents the ...last six digits of the MAC address of the software provided with the camera. Configuring EOS Utility Communication Settings These instructions are continued from Chapter 5. Press the key to establish a connection between the camera and a computer.
...OK]. Pairing Software is installed automatically during "easy installation" of the camera to the camera in advance. The following message is displayed. With EOS Utility, you can use the provided Pairing Software to select [OK], then press . First, the pairing screen is displayed. ****** represents the ...last six digits of the MAC address of the software provided with the camera. Configuring EOS Utility Communication Settings These instructions are continued from Chapter 5. Press the key to establish a connection between the camera and a computer.
Instruction Manual
Page 95
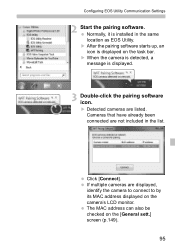
... the pairing software starts up, an icon is displayed. 3 Double-click the pairing software icon. X Detected cameras are not included in the same location as EOS Utility. The MAC address can also be checked on the task bar. Cameras that have already been connected are listed. If multiple cameras are displayed, identify...
... the pairing software starts up, an icon is displayed. 3 Double-click the pairing software icon. X Detected cameras are not included in the same location as EOS Utility. The MAC address can also be checked on the task bar. Cameras that have already been connected are listed. If multiple cameras are displayed, identify...
Instruction Manual
Page 96
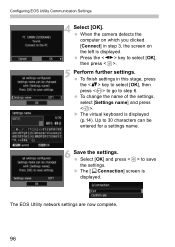
.... Press the key to 30 characters can be entered for a settings name. 6 Save the settings. Up to select [OK], then press . 5 Perform further settings. The EOS Utility network settings are now complete. 96 Select [OK] and press to step 6. X The [DConnection] screen is displayed (p.14). To change the name of the settings... 3, the screen on which you clicked [Connect] in this stage, press the key to select [OK], then press to go to save the settings. Configuring EOS Utility Communication Settings 4 Select [OK].
.... Press the key to 30 characters can be entered for a settings name. 6 Save the settings. Up to select [OK], then press . 5 Perform further settings. The EOS Utility network settings are now complete. 96 Select [OK] and press to step 6. X The [DConnection] screen is displayed (p.14). To change the name of the settings... 3, the screen on which you clicked [Connect] in this stage, press the key to select [OK], then press to go to save the settings. Configuring EOS Utility Communication Settings 4 Select [OK].
Instruction Manual
Page 97
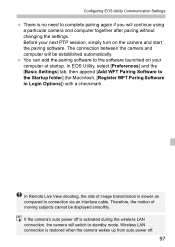
Configuring EOS Utility Communication Settings There is activated during the wireless LAN connection, the camera will switch to standby mode. If the camera's auto power off . 97 The ... restored when the camera wakes up from auto power off is no need to connection via an interface cable. Before your computer at startup. In EOS Utility, select [Preferences] and the [Basic Settings] tab, then append [Add WFT Pairing Software to the software launched on your next PTP session, simply turn on...
Configuring EOS Utility Communication Settings There is activated during the wireless LAN connection, the camera will switch to standby mode. If the camera's auto power off . 97 The ... restored when the camera wakes up from auto power off is no need to connection via an interface cable. Before your computer at startup. In EOS Utility, select [Preferences] and the [Basic Settings] tab, then append [Add WFT Pairing Software to the software launched on your next PTP session, simply turn on...

Instruction Manual
Page 98
Select [Exit] and press . 2 Select [OK]. You can use functions of EOS Utility just as when the camera and computer are connected via an interface cable. Press the key to select [OK], then press to the EOS Utility instruction manual (CD-ROM). Using EOS Utility For EOS Utility instructions, refer to terminate the connection. 98 Terminating the Connection 1 Select [Exit]. If the screen on the left is not displayed, select [Wi-Fi function] under the [53] tab on the camera's menu screen.
Select [Exit] and press . 2 Select [OK]. You can use functions of EOS Utility just as when the camera and computer are connected via an interface cable. Press the key to select [OK], then press to the EOS Utility instruction manual (CD-ROM). Using EOS Utility For EOS Utility instructions, refer to terminate the connection. 98 Terminating the Connection 1 Select [Exit]. If the screen on the left is not displayed, select [Wi-Fi function] under the [53] tab on the camera's menu screen.
