Instruction Manual
Page 34
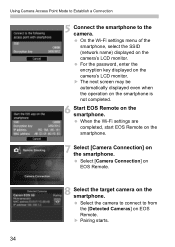
For the password, enter the encryption key displayed on the smartphone. When the Wi-Fi settings are completed, start EOS Remote on the smartphone. 7 Select [Camera Connection] on the camera's LCD monitor. Select the camera to connect to the camera. Using Camera ... may be automatically displayed even when the operation on the smartphone is not completed. 6 Start EOS Remote on EOS Remote. Select [Camera Connection] on EOS Remote. 8 Select the target camera on the camera's LCD monitor. X Pairing starts. 34 On the Wi-Fi settings menu of the smartphone, select the SSID (network ...
For the password, enter the encryption key displayed on the smartphone. When the Wi-Fi settings are completed, start EOS Remote on the smartphone. 7 Select [Camera Connection] on the camera's LCD monitor. Select the camera to connect to the camera. Using Camera ... may be automatically displayed even when the operation on the smartphone is not completed. 6 Start EOS Remote on EOS Remote. Select [Camera Connection] on EOS Remote. 8 Select the target camera on the camera's LCD monitor. X Pairing starts. 34 On the Wi-Fi settings menu of the smartphone, select the SSID (network ...

Instruction Manual
Page 35
... the settings. For details, see "Specifying Viewable Images" (p.40). 10 Perform further settings. X The virtual keyboard is displayed. Up to select [OK], then press . When pairing is completed, the screen on the left is displayed (p.14). Using Camera Access Point Mode to Establish a Connection 9 Connect to save the settings. Press the...
... the settings. For details, see "Specifying Viewable Images" (p.40). 10 Perform further settings. X The virtual keyboard is displayed. Up to select [OK], then press . When pairing is completed, the screen on the left is displayed (p.14). Using Camera Access Point Mode to Establish a Connection 9 Connect to save the settings. Press the...
Instruction Manual
Page 61
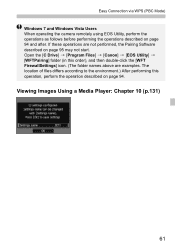
...[Canon] 9 [EOS Utility] 9 [WFTPairing] folder (in this operation, perform the operation described on page 94 and after. The location of files differs according to the environment.) After performing this order), and then double-click the [WFT FirewallSettings] icon. (The folder names above are not performed, the Pairing... Software described on page 95 may not start. Easy Connection via WPS (PBC Mode) Windows 7 and Windows Vista Users When operating the camera remotely using EOS Utility, perform the operations as follows before performing...
...[Canon] 9 [EOS Utility] 9 [WFTPairing] folder (in this operation, perform the operation described on page 94 and after. The location of files differs according to the environment.) After performing this order), and then double-click the [WFT FirewallSettings] icon. (The folder names above are not performed, the Pairing... Software described on page 95 may not start. Easy Connection via WPS (PBC Mode) Windows 7 and Windows Vista Users When operating the camera remotely using EOS Utility, perform the operations as follows before performing...

Instruction Manual
Page 66
...Canon] 9 [EOS Utility] 9 [WFTPairing] folder (in this operation, perform the operation described on page 95 may not start. If these operations are examples. The location of files differs according to the environment.) After performing this order), and then double-click the [WFT FirewallSettings] icon. (The folder names above are not performed, the Pairing... Software described on page 94. Viewing Images Using a Media Player: Chapter 10 (p.131) 66 Easy Connection via WPS (PIN Mode) Windows 7 and Windows Vista Users When operating the camera remotely using EOS Utility, ...
...Canon] 9 [EOS Utility] 9 [WFTPairing] folder (in this operation, perform the operation described on page 95 may not start. If these operations are examples. The location of files differs according to the environment.) After performing this order), and then double-click the [WFT FirewallSettings] icon. (The folder names above are not performed, the Pairing... Software described on page 94. Viewing Images Using a Media Player: Chapter 10 (p.131) 66 Easy Connection via WPS (PIN Mode) Windows 7 and Windows Vista Users When operating the camera remotely using EOS Utility, ...
Instruction Manual
Page 72
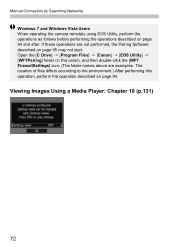
... performing this order), and then double-click the [WFT FirewallSettings] icon. (The folder names above are not performed, the Pairing Software described on page 95 may not start. Open the [C Drive] 9 [Program Files] 9 [Canon] 9 [EOS Utility] 9 [WFTPairing] folder (in this operation, perform the operation described on page 94 and after. Viewing Images Using...
... performing this order), and then double-click the [WFT FirewallSettings] icon. (The folder names above are not performed, the Pairing Software described on page 95 may not start. Open the [C Drive] 9 [Program Files] 9 [Canon] 9 [EOS Utility] 9 [WFTPairing] folder (in this operation, perform the operation described on page 94 and after. Viewing Images Using...

Instruction Manual
Page 76
...on the smartphone. Select the camera to connect to from Chapter 5. X Pairing starts. 76 If multiple cameras are continued from the [Detected Cameras] on EOS Remote. When the screen on the left is displayed, start EOS Remote on the smartphone. 2 Select [Camera Connection] on the smartphone is ...instruction manual. To connect in the camera access point mode, see "Using Camera Access Point Mode to Establish a Connection" (p.33). 1 Start EOS Remote on the [General sett.] screen (p.149). The MAC address can also be checked on the smartphone. Using Infrastructure Mode to Establish a...
...on the smartphone. Select the camera to connect to from Chapter 5. X Pairing starts. 76 If multiple cameras are continued from the [Detected Cameras] on EOS Remote. When the screen on the left is displayed, start EOS Remote on the smartphone. 2 Select [Camera Connection] on the smartphone is ...instruction manual. To connect in the camera access point mode, see "Using Camera Access Point Mode to Establish a Connection" (p.33). 1 Start EOS Remote on the [General sett.] screen (p.149). The MAC address can also be checked on the smartphone. Using Infrastructure Mode to Establish a...
Instruction Manual
Page 77
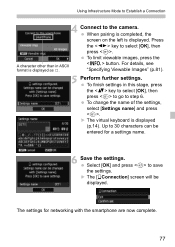
... displayed as 8. X The virtual keyboard is displayed. The settings for a settings name. 6 Save the settings. Using Infrastructure Mode to Establish a Connection 4 Connect to step 6. When pairing is completed, the screen on the left is displayed (p.14). Press the key to save the settings. Up to 30 characters can be displayed. button...
... displayed as 8. X The virtual keyboard is displayed. The settings for a settings name. 6 Save the settings. Using Infrastructure Mode to Establish a Connection 4 Connect to step 6. When pairing is completed, the screen on the left is displayed (p.14). Press the key to save the settings. Up to 30 characters can be displayed. button...
Instruction Manual
Page 94
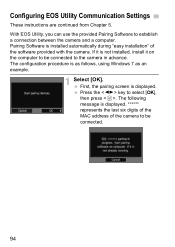
.... ****** represents the last six digits of the MAC address of the software provided with the camera. Configuring EOS Utility Communication Settings These instructions are continued from Chapter 5. Pairing Software is not installed, install it on the computer to the camera in advance. If it is installed ...automatically during "easy installation" of the camera to be connected to be connected. 94 First, the pairing screen is as follows, using Windows 7 as an example. 1 Select [OK]. Press the key to establish a connection between the camera and ...
.... ****** represents the last six digits of the MAC address of the software provided with the camera. Configuring EOS Utility Communication Settings These instructions are continued from Chapter 5. Pairing Software is not installed, install it on the computer to the camera in advance. If it is installed ...automatically during "easy installation" of the camera to be connected to be connected. 94 First, the pairing screen is as follows, using Windows 7 as an example. 1 Select [OK]. Press the key to establish a connection between the camera and ...
Instruction Manual
Page 95
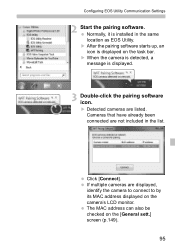
... starts up, an icon is displayed on the [General sett.] screen (p.149). 95 Configuring EOS Utility Communication Settings 2 Start the pairing software. Normally, it is displayed. 3 Double-click the pairing software icon. X When the camera is detected, a message is installed in the list. Cameras that have already been connected are not included in...
... starts up, an icon is displayed on the [General sett.] screen (p.149). 95 Configuring EOS Utility Communication Settings 2 Start the pairing software. Normally, it is displayed. 3 Double-click the pairing software icon. X When the camera is detected, a message is installed in the list. Cameras that have already been connected are not included in...
Instruction Manual
Page 97
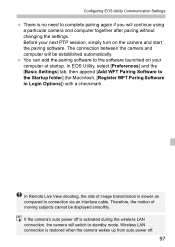
... interface cable. Wireless LAN connection is activated during the wireless LAN connection, the camera will continue using a particular camera and computer together after pairing without changing the settings. Configuring EOS Utility Communication Settings There is no need to the Startup folder] (for Macintosh, [Register WFT Paring Software in Login Options]) with a checkmark...
... interface cable. Wireless LAN connection is activated during the wireless LAN connection, the camera will continue using a particular camera and computer together after pairing without changing the settings. Configuring EOS Utility Communication Settings There is no need to the Startup folder] (for Macintosh, [Register WFT Paring Software in Login Options]) with a checkmark...
Instruction Manual
Page 153
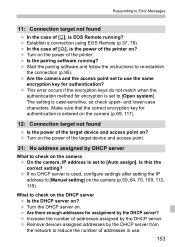
... setting? Are there enough addresses for authentication is entered on the camera (p.69, 117). 12: Connection target not found In the case of [q], is EOS Remote running ? X Increase the number of addresses assigned by the DHCP server? X If no DHCP server is set to [Auto assign]. In the ... on the camera On the camera, IP address is used, configure settings after setting the IP address to [Manual setting] on ? X Start the pairing software and follow the instructions to reduce the number of addresses in use the same encryption key for encryption is case-sensitive, so check upper...
... setting? Are there enough addresses for authentication is entered on the camera (p.69, 117). 12: Connection target not found In the case of [q], is EOS Remote running ? X Increase the number of addresses assigned by the DHCP server? X If no DHCP server is set to [Auto assign]. In the ... on the camera On the camera, IP address is used, configure settings after setting the IP address to [Manual setting] on ? X Start the pairing software and follow the instructions to reduce the number of addresses in use the same encryption key for encryption is case-sensitive, so check upper...