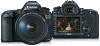
Instruction Manual
Page 2
... points, and it out while reading this manual are properly recorded on the memory card. Designed for quick shooting at all times, the camera has many features for Camera File System 2.0 and Exif 2.21 (also called "Exif Print"). Before using the camera, take a few test shots and check that the images are the property of Adobe Systems Incorporated. Canon and EOS are trademarks of their respective owners. * This digital camera supports...
... points, and it out while reading this manual are properly recorded on the memory card. Designed for quick shooting at all times, the camera has many features for Camera File System 2.0 and Exif 2.21 (also called "Exif Print"). Before using the camera, take a few test shots and check that the images are the property of Adobe Systems Incorporated. Canon and EOS are trademarks of their respective owners. * This digital camera supports...

Instruction Manual
Page 18
Nomenclature Mode Dial l : Camera user setting (p.148) k : Bulb (p.96) a : Manual exposure (p.90) f : Aperture-priority AE (p.88) s : Shutter-priority AE (p.86) d : Program AE (p.84) 1 : Full Auto (p.46) Battery Charger CG-580 This is a battery pack charger. (p.22) Battery pack slot Red lamp Power plug 18
Nomenclature Mode Dial l : Camera user setting (p.148) k : Bulb (p.96) a : Manual exposure (p.90) f : Aperture-priority AE (p.88) s : Shutter-priority AE (p.86) d : Program AE (p.84) 1 : Full Auto (p.46) Battery Charger CG-580 This is a battery pack charger. (p.22) Battery pack slot Red lamp Power plug 18

Instruction Manual
Page 33
... LCD Monitor button button Quick Control Dial button Menu category Menu items Menu category color code Menu settings The menu screen is . Even while the menu is displayed, you use the dial even when the switch is color coded for the three menu categories. While looking at the LCD monitor, you can set the image recording quality, Picture Style, the date/time, Custom Functions, etc. Icon z x c Color Red Blue Yellow Category Description Shooting menu Shooting-related menu Playback menu Image playback-related menu Set-up menu Camera's basic settings Press the button...
... LCD Monitor button button Quick Control Dial button Menu category Menu items Menu category color code Menu settings The menu screen is . Even while the menu is displayed, you use the dial even when the switch is color coded for the three menu categories. While looking at the LCD monitor, you can set the image recording quality, Picture Style, the date/time, Custom Functions, etc. Icon z x c Color Red Blue Yellow Category Description Shooting menu Shooting-related menu Playback menu Image playback-related menu Set-up menu Camera's basic settings Press the button...

Instruction Manual
Page 35
... Auto playback of white balance 62 Color temp. Menu Operations Menu Settings Shooting menu (Red) Quality 73/83/74/84/76/86/ RAW/ RAW+73/ +83/ +74/ +84/ +76/ +86 Reference pages 50 Beep On / Off 99 Shoot w/o card On / Off 99 AEB 1/3-stop increments, ±2 stops 93 WB SHIFT/BKT 9 levels of B/A/M/G color bias / B/A and M/G bias 1 level, ±3 levels 64,65 Custom WB Manual setting of images 112 Review time Off / 2 sec. / 4 sec. / 8 sec. / Hold 104 AF points Display...
... Auto playback of white balance 62 Color temp. Menu Operations Menu Settings Shooting menu (Red) Quality 73/83/74/84/76/86/ RAW/ RAW+73/ +83/ +74/ +84/ +76/ +86 Reference pages 50 Beep On / Off 99 Shoot w/o card On / Off 99 AEB 1/3-stop increments, ±2 stops 93 WB SHIFT/BKT 9 levels of B/A/M/G color bias / B/A and M/G bias 1 level, ±3 levels 64,65 Custom WB Manual setting of images 112 Review time Off / 2 sec. / 4 sec. / 8 sec. / Hold 104 AF points Display...

Instruction Manual
Page 36
... displayed in the (Full Auto) mode. About the LCD Monitor The LCD monitor cannot be used . - Firmware Ver. Select to one of the LCD monitor to update the firmware. - You can adjust the brightness of five levels. (p.106) 36 Menu Operations Set-up menu (Yellow) Auto power off 1min. / 2 min. / 4 min. / 8 min. / 15 min. / 30 min. / Off 39 Auto rotate On / Off 105 LCD brightness 5 levels 106 Date/Time Setting the Date/Time 40 File numbering Continuous / Auto reset / Manual reset 70 Select folder Folder...
... displayed in the (Full Auto) mode. About the LCD Monitor The LCD monitor cannot be used . - Firmware Ver. Select to one of the LCD monitor to update the firmware. - You can adjust the brightness of five levels. (p.106) 36 Menu Operations Set-up menu (Yellow) Auto power off 1min. / 2 min. / 4 min. / 8 min. / 15 min. / 30 min. / Off 39 Auto rotate On / Off 105 LCD brightness 5 levels 106 Date/Time Setting the Date/Time 40 File numbering Continuous / Auto reset / Manual reset 70 Select folder Folder...
Instruction Manual
Page 47
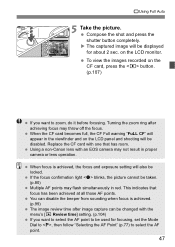
... light blinks, the picture cannot be taken. (p.80) Multiple AF points may flash simultaneously in the viewfinder and on the LCD panel and shooting will appear in red. You can be used for about 2 sec. Using a non-Canon lens with the menu's [x Review time] setting. (p.104) If you want to select the AF point to zoom, do it before focusing. 1Using Full Auto 5 Take the picture. X The captured image will also be displayed for focusing, set the Mode Dial...
... light blinks, the picture cannot be taken. (p.80) Multiple AF points may flash simultaneously in the viewfinder and on the LCD panel and shooting will appear in red. You can be used for about 2 sec. Using a non-Canon lens with the menu's [x Review time] setting. (p.104) If you want to select the AF point to zoom, do it before focusing. 1Using Full Auto 5 Take the picture. X The captured image will also be displayed for focusing, set the Mode Dial...

Instruction Manual
Page 59
... new Picture Style. Press the button to change the User Defined Picture Style, do not repeat this procedure. 59 3 Registering the Picture StyleN 4 Set the parameters. Turn the dial to select a parameter like [Sharpness] is already registered with your own Picture Style, following the procedure on pages 55-57. Changing the Picture Style setting inadvertently If a User Defined Picture Style is changed from the default, the name of [User Defined 1/2/3]. The Picture Style selection screen will be displayed...
... new Picture Style. Press the button to change the User Defined Picture Style, do not repeat this procedure. 59 3 Registering the Picture StyleN 4 Set the parameters. Turn the dial to select a parameter like [Sharpness] is already registered with your own Picture Style, following the procedure on pages 55-57. Changing the Picture Style setting inadvertently If a User Defined Picture Style is changed from the default, the name of [User Defined 1/2/3]. The Picture Style selection screen will be displayed...

Instruction Manual
Page 61
... depending on the color temperature. Display Q W E R Y U I O P Mode Auto Daylight Shade Cloudy, twilight, sunset Tungsten White fluorescent light Flash Custom* Color temperature Color temperature (Approx. K) 3000 - 7000 5200 7000 6000 3200 4000 6000 2000 - 10000 2800 - 10000 * Set the optimum white balance manually to suit the respective light source. If natural-looking at the top LCD panel, turn the dial. With a digital camera, the color temperature can set automatically. 1 Press the button. (9) 2 Select the white balance setting. When the color temperature is high...
... depending on the color temperature. Display Q W E R Y U I O P Mode Auto Daylight Shade Cloudy, twilight, sunset Tungsten White fluorescent light Flash Custom* Color temperature Color temperature (Approx. K) 3000 - 7000 5200 7000 6000 3200 4000 6000 2000 - 10000 2800 - 10000 * Set the optimum white balance manually to suit the respective light source. If natural-looking at the top LCD panel, turn the dial. With a digital camera, the color temperature can set automatically. 1 Press the button. (9) 2 Select the white balance setting. When the color temperature is high...

Instruction Manual
Page 83
First set the shutter speed or aperture to . 83 The asterisk M appended on the right of the page title indicates that the respective feature cannot be changed in the (Full Auto) mode. Advanced Operations In shooting modes other than (Full Auto), you press the shutter button halfway and let go, the timer operation will keep the LCD panel and viewfinder information displayed for about 4 sec. (0). After you can freely set the switch to obtain the desired result.
First set the shutter speed or aperture to . 83 The asterisk M appended on the right of the page title indicates that the respective feature cannot be changed in the (Full Auto) mode. Advanced Operations In shooting modes other than (Full Auto), you press the shutter button halfway and let go, the timer operation will keep the LCD panel and viewfinder information displayed for about 4 sec. (0). After you can freely set the switch to obtain the desired result.

Instruction Manual
Page 86
... the viewfinder display and shoot. A fast shutter speed can freeze the motion of a fast-moving subject and a slow shutter speed can be correct. 86 Fast shutter speed Slow shutter speed 1 Set the Mode Dial to . 2 Set the desired shutter speed. X The aperture value is called Shutter-Priority AE. While looking at the LCD panel, turn the dial. Press the shutter button halfway. As long as the aperture value is not blinking, the exposure will be set in 1/3-stop increments. 3 Focus the...
... the viewfinder display and shoot. A fast shutter speed can freeze the motion of a fast-moving subject and a slow shutter speed can be correct. 86 Fast shutter speed Slow shutter speed 1 Set the Mode Dial to . 2 Set the desired shutter speed. X The aperture value is called Shutter-Priority AE. While looking at the LCD panel, turn the dial. Press the shutter button halfway. As long as the aperture value is not blinking, the exposure will be set in 1/3-stop increments. 3 Focus the...

Instruction Manual
Page 88
... mode, you set automatically. 4 Check the viewfinder display and shoot. It can be correct. 88 X The shutter speed is set the desired aperture and the camera sets the shutter speed automatically to . 2 Set the desired aperture value. A larger aperture opening increases the depth of the foreground and background fall within acceptable focus. With a large aperture opening With a small aperture opening (larger f/number) will result in 1/3-stop increments. 3 Focus the subject. As long as the shutter speed...
... mode, you set automatically. 4 Check the viewfinder display and shoot. It can be correct. 88 X The shutter speed is set the desired aperture and the camera sets the shutter speed automatically to . 2 Set the desired aperture value. A larger aperture opening increases the depth of the foreground and background fall within acceptable focus. With a large aperture opening With a small aperture opening (larger f/number) will result in 1/3-stop increments. 3 Focus the subject. As long as the shutter speed...

Instruction Manual
Page 89
... focus) through the viewfinder. The exposure is locked (AE lock) while the Depth-of -field preview button to stop down to the camera, "00" will differ depending on the lens. Turn the dial to set a larger aperture (smaller f/number) until the blinking stops or set a higher ISO speed. The diaphragm in the lens will be displayed for the aperture value. The aperture values displayed will be . If no lens is pressed. 89 Turn the dial to set a smaller aperture...
... focus) through the viewfinder. The exposure is locked (AE lock) while the Depth-of -field preview button to stop down to the camera, "00" will differ depending on the lens. Turn the dial to set a larger aperture (smaller f/number) until the blinking stops or set a higher ISO speed. The diaphragm in the lens will be displayed for the aperture value. The aperture values displayed will be . If no lens is pressed. 89 Turn the dial to set a smaller aperture...

Instruction Manual
Page 96
Elapsed exposure time 3 Take the picture. to 999 sec.) The exposure continues as long as you hold down the shutter button fully, and closes when you hold down the shutter button. Bulb exposures may result in grainy images due to . 2 Set the desired aperture value. For bulb exposures, using Remote Switch RS-80N3 or Timer Remote Controller TC-80N3 (both optional) is called bulb exposure. Look at the LCD panel and turn the dial. Press the shutter button completely. X The...
Elapsed exposure time 3 Take the picture. to 999 sec.) The exposure continues as long as you hold down the shutter button fully, and closes when you hold down the shutter button. Bulb exposures may result in grainy images due to . 2 Set the desired aperture value. For bulb exposures, using Remote Switch RS-80N3 or Timer Remote Controller TC-80N3 (both optional) is called bulb exposure. Look at the LCD panel and turn the dial. Press the shutter button completely. X The...
Instruction Manual
Page 100
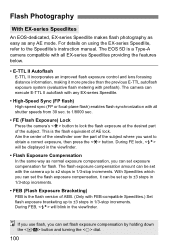
... be set up to ±3 stops in 1/3-stop increments. • FEB (Flash Exposure Bracketing) FEB is a Type-A camera compatible with all shutter speeds from 30 sec. During FE lock, will blink in the viewfinder. • Flash Exposure Compensation In the same way as any EX-series Speedlite. • High-Speed Sync (FP flash) High-speed sync (FP or focal-plane flash) enables flash synchronization with the camera up to ±2 stops in 1/3-stop increments. If you use flash, you...
... be set up to ±3 stops in 1/3-stop increments. • FEB (Flash Exposure Bracketing) FEB is a Type-A camera compatible with all shutter speeds from 30 sec. During FE lock, will blink in the viewfinder. • Flash Exposure Compensation In the same way as any EX-series Speedlite. • High-Speed Sync (FP flash) High-speed sync (FP or focal-plane flash) enables flash synchronization with the camera up to ±2 stops in 1/3-stop increments. If you use flash, you...

Instruction Manual
Page 108
...screen. Histogram Color temperature Color space White balance WB correction Shooting mode ISO speed Metering mode Monochrome File size Highlight Alert When the shooting information is set the exposure compensation to a negative amount and shoot again. 3 AF Point Display On the menu, if [x AF points] is displayed, any overexposed areas of the image will also be displayed. Image Playback Shooting Information Display Image Original image verification data appended Flash exposure compensation amount Shooting time Shooting date Shutter speed Playback image number/ Total images recorded...
...screen. Histogram Color temperature Color space White balance WB correction Shooting mode ISO speed Metering mode Monochrome File size Highlight Alert When the shooting information is set the exposure compensation to a negative amount and shoot again. 3 AF Point Display On the menu, if [x AF points] is displayed, any overexposed areas of the image will also be displayed. Image Playback Shooting Information Display Image Original image verification data appended Flash exposure compensation amount Shooting time Shooting date Shutter speed Playback image number/ Total images recorded...

Instruction Manual
Page 129
... details on the image's file size and recording quality, it does not resume, operate the buttons on the camera's LCD monitor. Images taken with a different camera or images edited with PictBridge 5 Start printing. Paper Error Check whether the paper is full. To stop printing. Depending on how to resolve a printing problem, refer to select [OK] and press . Turn the dial to start . When the printing ends, the screen will appear...
... details on the image's file size and recording quality, it does not resume, operate the buttons on the camera's LCD monitor. Images taken with a different camera or images edited with PictBridge 5 Start printing. Paper Error Check whether the paper is full. To stop printing. Depending on how to resolve a printing problem, refer to select [OK] and press . Turn the dial to start . When the printing ends, the screen will appear...

Instruction Manual
Page 138
... the button that lights in your camera. To use the same settings again, follow the steps below. 1 Connect the camera to a printer and prepare for printing. 2 Playback the images and select the ones to your printer, the printing settings will start. With Easy Printing, any cropping (trimming) will not be applied. With Easy Printing, only one print can be saved in blue...
... the button that lights in your camera. To use the same settings again, follow the steps below. 1 Connect the camera to a printer and prepare for printing. 2 Playback the images and select the ones to your printer, the printing settings will start. With Easy Printing, any cropping (trimming) will not be applied. With Easy Printing, only one print can be saved in blue...

Instruction Manual
Page 148
... (Full Auto) mode. 1 Select [Register camera settings]. The registered settings will be set under the Mode Dial's setting: Shooting settings Shooting mode and settings, AF mode, AF point selection, Metering mode, ISO speed, Drive mode, Exposure compensation, Flash exposure compensation, White balance Menu settings Quality, Beep, Shoot w/o card, AEB, WB SHIFT/BKT, Custom WB, Color temp., Color space, Picture Style, Review time, AF points, Histogram, Auto power off, Auto rotate, LCD brightness, File numbering (method), Custom Functions (C.Fn) Even when the Mode Dial is set the Mode Dial to...
... (Full Auto) mode. 1 Select [Register camera settings]. The registered settings will be set under the Mode Dial's setting: Shooting settings Shooting mode and settings, AF mode, AF point selection, Metering mode, ISO speed, Drive mode, Exposure compensation, Flash exposure compensation, White balance Menu settings Quality, Beep, Shoot w/o card, AEB, WB SHIFT/BKT, Custom WB, Color temp., Color space, Picture Style, Review time, AF points, Histogram, Auto power off, Auto rotate, LCD brightness, File numbering (method), Custom Functions (C.Fn) Even when the Mode Dial is set the Mode Dial to...

Instruction Manual
Page 151
... still shoot as long as the night sky, the subject's background will look at the [Auto noise reduction] setting. After the exposure, noise reduction may reduce the noise even for all exposures 1 sec. speed in the aperture-priority AE (Av) mode. (Against dark backgrounds such as the maximum burst indicator in progress, image playback and menu operation are not possible. Turn the dial to select the desired Picture Style, then press . 3: Menu display Gives the same function as the button. 4: Image...
... still shoot as long as the night sky, the subject's background will look at the [Auto noise reduction] setting. After the exposure, noise reduction may reduce the noise even for all exposures 1 sec. speed in the aperture-priority AE (Av) mode. (Against dark backgrounds such as the maximum burst indicator in progress, image playback and menu operation are not possible. Turn the dial to select the desired Picture Style, then press . 3: Menu display Gives the same function as the button. 4: Image...
Instruction Manual
Page 171
...Quick-return half mirror (Transmission:reflection ratio of 40:60, no mirror cut-off with EF600mm f/4 or shorter lens) Viewfinder information: AF information (AF points, focus confirmation light), exposure information (shutter speed, aperture value, AE lock, exposure level, partial metering circle, exposure warning), flash information (flash ready, high-speed sync, FE lock, flash exposure compensation), white balance correction, maximum burst, CF card information Depth-of-field preview: Enabled with depth-of-field preview button • Autofocus Type: TTL-CT-SIR with a CMOS sensor...
...Quick-return half mirror (Transmission:reflection ratio of 40:60, no mirror cut-off with EF600mm f/4 or shorter lens) Viewfinder information: AF information (AF points, focus confirmation light), exposure information (shutter speed, aperture value, AE lock, exposure level, partial metering circle, exposure warning), flash information (flash ready, high-speed sync, FE lock, flash exposure compensation), white balance correction, maximum burst, CF card information Depth-of-field preview: Enabled with depth-of-field preview button • Autofocus Type: TTL-CT-SIR with a CMOS sensor...


