Digital Video Software (Windows) Ver.20 Instruction Manual
Page 2
...Checking Supplied Accessories 5 System Requirements 6 What is Digital Video Software 7 Windows ...8 CameraWindow ...8 [Acquire Images] Tab 8 [Print] Tab ...9 [Set to Camera] Tab 10 Camera Browser Window 11 Main Window ...12 [Image Viewer]... Window 17 [Red Eye Correction] Window 18 [Auto Adjustment] Window 19 [Color/Brightness Adjustment] Window 19 [Sharpness] Window 20 [Trim Image] Window 20 [Insert Text] Window 21 Installing the Digital Video Software 22 Before Downloading Images 26 Connecting the Camcorder...
...Checking Supplied Accessories 5 System Requirements 6 What is Digital Video Software 7 Windows ...8 CameraWindow ...8 [Acquire Images] Tab 8 [Print] Tab ...9 [Set to Camera] Tab 10 Camera Browser Window 11 Main Window ...12 [Image Viewer]... Window 17 [Red Eye Correction] Window 18 [Auto Adjustment] Window 19 [Color/Brightness Adjustment] Window 19 [Sharpness] Window 20 [Trim Image] Window 20 [Insert Text] Window 21 Installing the Digital Video Software 22 Before Downloading Images 26 Connecting the Camcorder...
Digital Video Software (Windows) Ver.20 Instruction Manual
Page 22
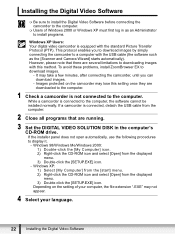
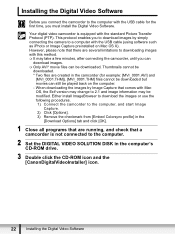
... running. 3 Set the DIGITAL VIDEO SOLUTION DISK in as the [Scanner and Camera Wizard] starts automatically). To avoid these problems, install ZoomBrowser EX to display it. - Depending on the camcorder may lose this method. Installing the Digital Video Software Be sure to install the Digital Video Software before connecting the camcorder to the computer. ...
... running. 3 Set the DIGITAL VIDEO SOLUTION DISK in as the [Scanner and Camera Wizard] starts automatically). To avoid these problems, install ZoomBrowser EX to display it. - Depending on the camcorder may lose this method. Installing the Digital Video Software Be sure to install the Digital Video Software before connecting the camcorder to the computer. ...
Digital Video Software (Windows) Ver.20 Instruction Manual
Page 26
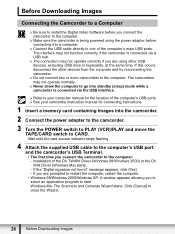
... one of the computer's main USB ports. Windows Me: The Scanners and Cameras Wizard starts. If the "Digital signature not found" message appears, click [Yes]. - The interface may not function correctly if the camcorder is connected via the USB interface. Refer to your computer manual for... the other USB devices, excluding USB mice or keyboards, at the same time. Before Downloading Images Connecting the Camcorder to a Computer Be sure to install the Digital Video Software before connecting it to a computer. Connect the USB cable directly to close the Wizard. 26...
... one of the computer's main USB ports. Windows Me: The Scanners and Cameras Wizard starts. If the "Digital signature not found" message appears, click [Yes]. - The interface may not function correctly if the camcorder is connected via the USB interface. Refer to your computer manual for... the other USB devices, excluding USB mice or keyboards, at the same time. Before Downloading Images Connecting the Camcorder to a Computer Be sure to install the Digital Video Software before connecting it to a computer. Connect the USB cable directly to close the Wizard. 26...
Digital Video Software (Windows) Ver.20 Instruction Manual
Page 80
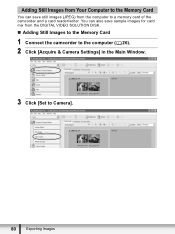
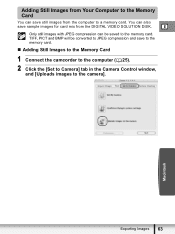
You can save sample images for card mix from the computer to Camera]. 80 Exporting Images Adding Still Images from Your Computer to the Memory Card You can also save still images (JPEG) from the DIGITAL VIDEO SOLUTION DISK. „ Adding Still Images to the Memory Card 1 Connect the camcorder to the computer ( 26). 2 Click [Acquire & Camera Settings] in the Main Window. 3 Click [Set to a memory card of the camcorder and a card reader/writer.
You can save sample images for card mix from the computer to Camera]. 80 Exporting Images Adding Still Images from Your Computer to the Memory Card You can also save still images (JPEG) from the DIGITAL VIDEO SOLUTION DISK. „ Adding Still Images to the Memory Card 1 Connect the camcorder to the computer ( 26). 2 Click [Acquire & Camera Settings] in the Main Window. 3 Click [Set to a memory card of the camcorder and a card reader/writer.
Digital Video Software (Windows) Ver.20 Instruction Manual
Page 82
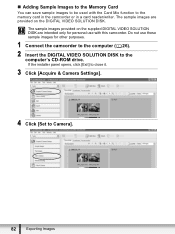
...-ROM drive. The sample images provided on the supplied DIGITAL VIDEO SOLUTION DISK are provided on the DIGITAL VIDEO SOLUTION DISK. If the installer panel opens, click [Exit] to close it. 3 Click [Acquire & Camera Settings]. 4 Click [Set to the memory card in the camcorder or in a card reader/writer. „ Adding Sample Images to...
...-ROM drive. The sample images provided on the supplied DIGITAL VIDEO SOLUTION DISK are provided on the DIGITAL VIDEO SOLUTION DISK. If the installer panel opens, click [Exit] to close it. 3 Click [Acquire & Camera Settings]. 4 Click [Set to the memory card in the camcorder or in a card reader/writer. „ Adding Sample Images to...
Digital Video Software (Windows) Ver.20 Instruction Manual
Page 96
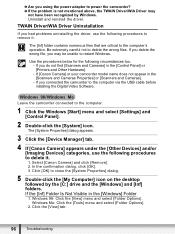
...computer's operation. If [Canon Camera] or your camcorder model name does not appear in the [Windows] Folder 1. The [Inf] folder contains numerous files that are critical to delete the wrong files. If you delete the wrong file, you do not find [Scanners and Cameras] in the [Control ... the driver. If you connected the camcorder to the computer. 1 Click the Windows [Start] menu and select [Settings] and [Control Panel]. 2 Double-click the [System] icon. Leave the camcorder connected to the computer via the USB cable before installing the Digital Video Software. Click the [View] tab....
...computer's operation. If [Canon Camera] or your camcorder model name does not appear in the [Windows] Folder 1. The [Inf] folder contains numerous files that are critical to delete the wrong files. If you delete the wrong file, you do not find [Scanners and Cameras] in the [Control ... the driver. If you connected the camcorder to the computer. 1 Click the Windows [Start] menu and select [Settings] and [Control Panel]. 2 Double-click the [System] icon. Leave the camcorder connected to the computer via the USB cable before installing the Digital Video Software. Click the [View] tab....

Digital Video Software (Macintosh) Ver.20 Instruction Manual
Page 2
Contents Read This First ...4 Checking Supplied Accessories 5 System Requirements 6 What is Digital Video Software 7 Windows ...8 CameraWindow ...8 [Acquire Images] Tab 8 [Print] Tab ...9 [Set to Camera] Tab 10 Camera Browser Window 11 Browser Window 12 [Image Viewer] Window 17 [Trim Image] Window... Curve Adjustment] Window 20 [Sharpness] Window 21 [Auto Adjustment] Window 21 Installing the Digital Video Software 22 Before Downloading Images 25 Connecting the Camcorder to a Computer 25 CameraWindow Automatic Launch Setting 26 Downloading Images (ImageBrowser 27 Using the Computer...
Contents Read This First ...4 Checking Supplied Accessories 5 System Requirements 6 What is Digital Video Software 7 Windows ...8 CameraWindow ...8 [Acquire Images] Tab 8 [Print] Tab ...9 [Set to Camera] Tab 10 Camera Browser Window 11 Browser Window 12 [Image Viewer] Window 17 [Trim Image] Window... Curve Adjustment] Window 20 [Sharpness] Window 21 [Auto Adjustment] Window 21 Installing the Digital Video Software 22 Before Downloading Images 25 Connecting the Camcorder to a Computer 25 CameraWindow Automatic Launch Setting 26 Downloading Images (ImageBrowser 27 Using the Computer...
Digital Video Software (Macintosh) Ver.20 Instruction Manual
Page 22
... change to 2.1 and image information may take a few minutes, after connecting the camcorder, until you must install the Digital Video Software. When downloading the images by simply connecting the camera to a computer with the USB cable (using software such as iPhoto or Image Capture...-ROM drive. 3 Double click the CD-ROM icon and the [CanonDigitalVideoInstaller] icon. 22 Installing the Digital Video Software Installing the Digital Video Software Before you connect the camcorder to the computer with the USB cable for example: [MVI_0001.AVI] and [MVI_0001.THM]). [MVI_0001.THM]...
... change to 2.1 and image information may take a few minutes, after connecting the camcorder, until you must install the Digital Video Software. When downloading the images by simply connecting the camera to a computer with the USB cable (using software such as iPhoto or Image Capture...-ROM drive. 3 Double click the CD-ROM icon and the [CanonDigitalVideoInstaller] icon. 22 Installing the Digital Video Software Installing the Digital Video Software Before you connect the camcorder to the computer with the USB cable for example: [MVI_0001.AVI] and [MVI_0001.THM]). [MVI_0001.THM]...
Digital Video Software (Macintosh) Ver.20 Instruction Manual
Page 63
...memory card. „ Adding Still Images to the Memory Card 1 Connect the camcorder to the computer ( 25). 2 Click the [Set to Camera] tab in the Camera Control window, and [Uploads images to the camera]. TIFF, PICT and BMP will be saved to a memory card. Macintosh ...Exporting Images 63 E Only still images with JPEG compression can save sample images for card mix from the computer to the memory card. You can also save still images from the DIGITAL VIDEO...
...memory card. „ Adding Still Images to the Memory Card 1 Connect the camcorder to the computer ( 25). 2 Click the [Set to Camera] tab in the Camera Control window, and [Uploads images to the camera]. TIFF, PICT and BMP will be saved to a memory card. Macintosh ...Exporting Images 63 E Only still images with JPEG compression can save sample images for card mix from the computer to the memory card. You can also save still images from the DIGITAL VIDEO...
ELURA100 Instruction Manual
Page 3
...Canon Digital Video Camcorder Power Adapter should be followed. Do not use electrician to fit, contact your obsolete outlet. If an sources of power source indicated on an proper grounding of the mast and unstable cart, stand, tripod, bracket or supporting structure, grounding of the should be operated only E ELURA 100... serious damage to the antenna discharge unit, connection to . 4. Unplug this manual. 12. Do not use the camera close to TV transmitters, particular attention to insert the plug fully into the power outlet only one blade wider than the...
...Canon Digital Video Camcorder Power Adapter should be followed. Do not use electrician to fit, contact your obsolete outlet. If an sources of power source indicated on an proper grounding of the mast and unstable cart, stand, tripod, bracket or supporting structure, grounding of the should be operated only E ELURA 100... serious damage to the antenna discharge unit, connection to . 4. Unplug this manual. 12. Do not use the camera close to TV transmitters, particular attention to insert the plug fully into the power outlet only one blade wider than the...
ELURA100 Instruction Manual
Page 8
... the Image 71 Displaying the Data Code 72 End Search...73 Returning to a Pre-marked Position 74 Date Search 75 Digital Camera Functions Selecting the Image Quality/Size 76 Simultaneous Recording on the Tape and Memory Card 78 Changing the Focusing Method 79 Selecting ... 94 Recording from the Tape on a Memory Card 96 Printing Printing Still Images 97 Selecting the Print Settings 100 Printing with Print Order Settings 102 Connecting to a PC Transferring Video Recordings to a Computer 104 Transferring Memory Card Images to a Computer 106 Selecting Images for Transfer (Transfer Order...
... the Image 71 Displaying the Data Code 72 End Search...73 Returning to a Pre-marked Position 74 Date Search 75 Digital Camera Functions Selecting the Image Quality/Size 76 Simultaneous Recording on the Tape and Memory Card 78 Changing the Focusing Method 79 Selecting ... 94 Recording from the Tape on a Memory Card 96 Printing Printing Still Images 97 Selecting the Print Settings 100 Printing with Print Order Settings 102 Connecting to a PC Transferring Video Recordings to a Computer 104 Transferring Memory Card Images to a Computer 106 Selecting Images for Transfer (Transfer Order...

ELURA100 Instruction Manual
Page 28
... without producing any noise or blank sections between the recordings even if you turn the camcorder off. Bright light may be recorded not in record pause mode ( ) to protect the tape and video heads. Close the LCD panel. Wait until the tape counter stops completely... Finished Recording 1. Close the lens cover (move the lens cover switch down , set the switch to CAMERA. 2. Basic Functions Recording Recording Movies on the switch pressed down to ). 4. If necessary, clean the video heads ( 120). 1. Press the start/stop button to start /stop button again to . 3. In...
... without producing any noise or blank sections between the recordings even if you turn the camcorder off. Bright light may be recorded not in record pause mode ( ) to protect the tape and video heads. Close the LCD panel. Wait until the tape counter stops completely... Finished Recording 1. Close the lens cover (move the lens cover switch down , set the switch to CAMERA. 2. Basic Functions Recording Recording Movies on the switch pressed down to ). 4. If necessary, clean the video heads ( 120). 1. Press the start/stop button to start /stop button again to . 3. In...
ELURA100 Instruction Manual
Page 111
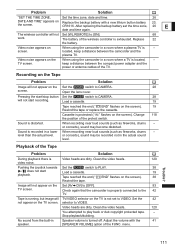
... will TV/VIDEO selector on the Set [AV DV] to CAMERA. 28 screen. Load a cassette. 19 Tape reached the end (" END" flashes on Replace the backup battery with the 41 speaker. [SPEAKER VOLUME] option of the TV. Set the 42 not appear on the When using the camcorder in the actual sound level...
... will TV/VIDEO selector on the Set [AV DV] to CAMERA. 28 screen. Load a cassette. 19 Tape reached the end (" END" flashes on Replace the backup battery with the 41 speaker. [SPEAKER VOLUME] option of the TV. Set the 42 not appear on the When using the camcorder in the actual sound level...
ELURA100 Instruction Manual
Page 125
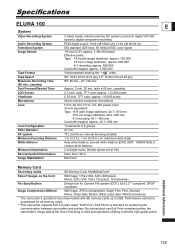
... Memory Card, MultiMediaCard* Size of shooting is a standard for enhancing the communication between camcorders and printers. Additional Information 125 Specifications ELURA 100 E System Video Recording System 2 rotary heads, helical scanning DV system (consumer digital VCR SD system),.... Performance cannot be guaranteed for Camera File system (DCF), Exif 2.2** compliant, DPOF compliant Image Compression Method Still image: JPEG (compression: Super Fine, Fine, Normal) Movie: Video data: Motion JPEG, audio data: WAVE (monaural) * The camcorder's operations have been tested with ...
... Memory Card, MultiMediaCard* Size of shooting is a standard for enhancing the communication between camcorders and printers. Additional Information 125 Specifications ELURA 100 E System Video Recording System 2 rotary heads, helical scanning DV system (consumer digital VCR SD system),.... Performance cannot be guaranteed for Camera File system (DCF), Exif 2.2** compliant, DPOF compliant Image Compression Method Still image: JPEG (compression: Super Fine, Fine, Normal) Movie: Video data: Motion JPEG, audio data: WAVE (monaural) * The camcorder's operations have been tested with ...


