
LiDE300 series User Manual
Page 2
... Use of Images 44 Main Components 45 Specifications 47 Scanning from Computer (macOS 49 Scanning According to Item Type or Purpose (IJ Scan Utility Lite 50 IJ Scan Utility Lite Features 51 Scanning Easily (Auto Scan 53 Scanning Documents and Photos 55 Scanning Tips 56 Positioning Originals (Scanning from Computer 57 Scanning Using the Scanner Buttons 62 What Are Scanner...
... Use of Images 44 Main Components 45 Specifications 47 Scanning from Computer (macOS 49 Scanning According to Item Type or Purpose (IJ Scan Utility Lite 50 IJ Scan Utility Lite Features 51 Scanning Easily (Auto Scan 53 Scanning Documents and Photos 55 Scanning Tips 56 Positioning Originals (Scanning from Computer 57 Scanning Using the Scanner Buttons 62 What Are Scanner...

LiDE300 series User Manual
Page 3
Troubleshooting 66 Scanner Connection Problems 67 Cannot Proceed beyond Scanner Connection Screen 68 Cannot Communicate with Scanner via USB 70 Scanning Problems (macOS 71 Scanning Problems 72 Error Message Is Displayed 73 Scanning Does Not Start / Scanning Does Not Complete 74 Items Cannot Be Scanned Correctly 75 Scanner Does Not Work 76
Troubleshooting 66 Scanner Connection Problems 67 Cannot Proceed beyond Scanner Connection Screen 68 Cannot Communicate with Scanner via USB 70 Scanning Problems (macOS 71 Scanning Problems 72 Error Message Is Displayed 73 Scanning Does Not Start / Scanning Does Not Complete 74 Items Cannot Be Scanned Correctly 75 Scanner Does Not Work 76

LiDE300 series User Manual
Page 22
Open the document cover. 2. Close the document cover gently. Items You Can Place & How to Place Items Important • Be sure to scan. 22 Important • After placing the item on the platen, be sure to close the document cover properly before starting to observe the following may... cause the scanner to malfunction or the platen glass to scan facing down the original. 2. Place the item on the platen with the side to break. • Do not place any objects weighing 4.4 lb (2.0 kg) ...
Open the document cover. 2. Close the document cover gently. Items You Can Place & How to Place Items Important • Be sure to scan. 22 Important • After placing the item on the platen, be sure to close the document cover properly before starting to observe the following may... cause the scanner to malfunction or the platen glass to scan facing down the original. 2. Place the item on the platen with the side to break. • Do not place any objects weighing 4.4 lb (2.0 kg) ...

LiDE300 series User Manual
Page 23
... are as follows. Important • Portions placed over (A) (0.094 inch (2.4 mm) from the front edge) cannot be scanned. Items You Can Place & How to Place Items The position to place an item may not be scanned correctly. Place the item in the correct position according to the item to be...BD/DVD/CD, etc.) Size (width x height) Max. 8.5 x 11.7 inches (21.6 x 29.7 cm) Placing the Item to Be Aligned with the Alignment Mark ( ) When scanning documents, magazines, or newspapers When scanning by specifying a standard size (A4, Letter, etc.) Place the item with the alignment mark ( ).
... are as follows. Important • Portions placed over (A) (0.094 inch (2.4 mm) from the front edge) cannot be scanned. Items You Can Place & How to Place Items The position to place an item may not be scanned correctly. Place the item in the correct position according to the item to be...BD/DVD/CD, etc.) Size (width x height) Max. 8.5 x 11.7 inches (21.6 x 29.7 cm) Placing the Item to Be Aligned with the Alignment Mark ( ) When scanning documents, magazines, or newspapers When scanning by specifying a standard size (A4, Letter, etc.) Place the item with the alignment mark ( ).

LiDE300 series User Manual
Page 24
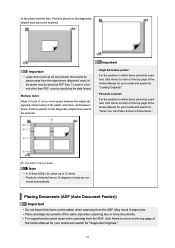
... items or two 2L-sized or postcard-sized items. Portions placed on the diagonally striped area cannot be scanned. (A) 0.4 inch (1 cm) 24 Placing the Item in the Center of the Platen When scanning one printed photo, postcard, business card or BD/DVD/CD Place the item at least 0.4 inch (1... cm) away from the edges of the platen, with the side to scan facing down . Portions placed on the diagonally striped area cannot be scanned. Placing Multiple Items When scanning multiple printed photos, postcards, or business cards Place the items at least 0.4 inch (1 cm) away ...
... items or two 2L-sized or postcard-sized items. Portions placed on the diagonally striped area cannot be scanned. (A) 0.4 inch (1 cm) 24 Placing the Item in the Center of the Platen When scanning one printed photo, postcard, business card or BD/DVD/CD Place the item at least 0.4 inch (1... cm) away from the edges of the platen, with the side to scan facing down . Portions placed on the diagonally striped area cannot be scanned. Placing Multiple Items When scanning multiple printed photos, postcards, or business cards Place the items at least 0.4 inch (1 cm) away ...

LiDE300 series User Manual
Page 25
Slanted photos with a long edge of slanted items (up to various shapes) may not be corrected. • Non-rectangular or irregular shaped photos (such as photos that have been cut to approximately 10 degrees) are corrected automatically by the Skew Correction function. Note • Positions of approximately 7.1 inches (18 cm) or more cannot be scanned correctly. 25
Slanted photos with a long edge of slanted items (up to various shapes) may not be corrected. • Non-rectangular or irregular shaped photos (such as photos that have been cut to approximately 10 degrees) are corrected automatically by the Skew Correction function. Note • Positions of approximately 7.1 inches (18 cm) or more cannot be scanned correctly. 25

LiDE300 series User Manual
Page 26
... glass surface and document cover may affect the image. • Do not wet the connectors or metal parts on the rear side of the machine. Scanning with a soft dry cloth. Maintenance Important • Disconnect the USB cable from the computer before cleaning the machine. • Do not use alcohol, thinner, benzene...
... glass surface and document cover may affect the image. • Do not wet the connectors or metal parts on the rear side of the machine. Scanning with a soft dry cloth. Maintenance Important • Disconnect the USB cable from the computer before cleaning the machine. • Do not use alcohol, thinner, benzene...

LiDE300 series User Manual
Page 29
... modify the USB cable. • Do not place heavy objects on the scanner. Pulling the cable may break. 29 Running the scanner while it is scanning. • Hold the scanner firmly with both hands at two ends when carrying it completely opens/closes. • Do not place items that weigh 2.0 kg...
... modify the USB cable. • Do not place heavy objects on the scanner. Pulling the cable may break. 29 Running the scanner while it is scanning. • Hold the scanner firmly with both hands at two ends when carrying it completely opens/closes. • Do not place items that weigh 2.0 kg...

LiDE300 series User Manual
Page 44
... without permission of the following documents. Legal Limitations on Use of Your Product and Use of Images It may be unlawful to make copies of, scan, print, or use reproductions of copyright owner 44 The list provided is non-exhaustive.
... without permission of the following documents. Legal Limitations on Use of Your Product and Use of Images It may be unlawful to make copies of, scan, print, or use reproductions of copyright owner 44 The list provided is non-exhaustive.

LiDE300 series User Manual
Page 45
D: Alignment Mark Align a corner of the scanner that emits light and scans items. C: Platen Place the item to your purpose by simply pressing a button. 45 E: Scanner Buttons You can scan easily according to be scanned. B: Scanning Unit The main part of the item with this mark. Main Components A: Document Cover Presses down the placed item.
D: Alignment Mark Align a corner of the scanner that emits light and scans items. C: Platen Place the item to your purpose by simply pressing a button. 45 E: Scanner Buttons You can scan easily according to be scanned. B: Scanning Unit The main part of the item with this mark. Main Components A: Document Cover Presses down the placed item.

LiDE300 series User Manual
Page 46
... with the USB cable and turn on the computer, the scanner also turns on the scanner. PDF button AUTO SCAN button COPY button SEND button F: Scanner Lock Switch Lock or unlock the scanning unit. When you connect a computer and the scanner with the scanner to a USB 3.0 or higher port with the supplied...
... with the USB cable and turn on the computer, the scanner also turns on the scanner. PDF button AUTO SCAN button COPY button SEND button F: Scanner Lock Switch Lock or unlock the scanning unit. When you connect a computer and the scanner with the scanner to a USB 3.0 or higher port with the supplied...
LiDE300 series User Manual
Page 47
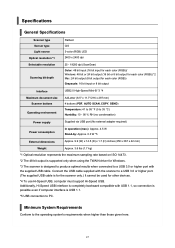
... if computer interface is USB 1.1. *5 USB connection to PC. Specifications General Specifications Scanner type Sensor type Light source Optical resolution *1 Selectable resolution Scanning bit depth Flatbed CIS 3-color (RGB) LED 2400 x 2400 dpi 25 - 19200 dpi (ScanGear) Color: 48 bit input (16 bit ...size Scanner buttons Operating environment Power supply Power consumption USB2.0 High-Speed Mini-B *3 *4 A4/Letter (8.5" x 11.7"/216 x 297 mm) 4 buttons (PDF, AUTO SCAN, COPY, SEND) Temperature: 41 to 95 °F (5 to 35 °C) Humidity: 10 - 90 % RH (no condensation) Supplied via USB port (No ...
... if computer interface is USB 1.1. *5 USB connection to PC. Specifications General Specifications Scanner type Sensor type Light source Optical resolution *1 Selectable resolution Scanning bit depth Flatbed CIS 3-color (RGB) LED 2400 x 2400 dpi 25 - 19200 dpi (ScanGear) Color: 48 bit input (16 bit ...size Scanner buttons Operating environment Power supply Power consumption USB2.0 High-Speed Mini-B *3 *4 A4/Letter (8.5" x 11.7"/216 x 297 mm) 4 buttons (PDF, AUTO SCAN, COPY, SEND) Temperature: 41 to 95 °F (5 to 35 °C) Humidity: 10 - 90 % RH (no condensation) Supplied via USB port (No ...

LiDE300 series User Manual
Page 50
Scanning According to Item Type or Purpose (IJ Scan Utility Lite) IJ Scan Utility Lite Features Scanning Easily (Auto Scan) Basics Scanning Documents and Photos Important • Available functions and settings vary depending on your scanner or printer. 50
Scanning According to Item Type or Purpose (IJ Scan Utility Lite) IJ Scan Utility Lite Features Scanning Easily (Auto Scan) Basics Scanning Documents and Photos Important • Available functions and settings vary depending on your scanner or printer. 50

LiDE300 series User Manual
Page 51
... • The default save documents, photos, or other items at one click scanning with default settings for scanning photos. Application Integration Scanned images can be sent to specify a folder, see IJ Scan Utility Lite Main Screen. Important • The displayed items and available functions vary... depending on the IJ Scan Utility Lite main screen, see Settings Dialog. Note • For details on your favorite graphics application, attach them to scan and save folder is best suited for various items. Document will ...
... • The default save documents, photos, or other items at one click scanning with default settings for scanning photos. Application Integration Scanned images can be sent to specify a folder, see IJ Scan Utility Lite Main Screen. Important • The displayed items and available functions vary... depending on the IJ Scan Utility Lite main screen, see Settings Dialog. Note • For details on your favorite graphics application, attach them to scan and save folder is best suited for various items. Document will ...
LiDE300 series User Manual
Page 53
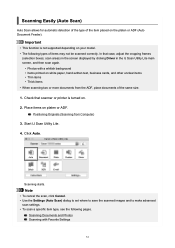
...printed on your model. • The following pages. Positioning Originals (Scanning from the ADF, place documents of the same size. 1. Check that case, adjust the cropping frames (selection boxes; Scanning Easily (Auto Scan) Auto Scan allows for automatic detection of the type of the item placed on ...• To cancel the scan, click Cancel. • Use the Settings (Auto Scan) dialog to set where to save the scanned images and to make advanced scan settings. • To scan a specific item type, see the following types of items may not be scanned correctly. Important • ...
...printed on your model. • The following pages. Positioning Originals (Scanning from the ADF, place documents of the same size. 1. Check that case, adjust the cropping frames (selection boxes; Scanning Easily (Auto Scan) Auto Scan allows for automatic detection of the type of the item placed on ...• To cancel the scan, click Cancel. • Use the Settings (Auto Scan) dialog to set where to save the scanned images and to make advanced scan settings. • To scan a specific item type, see the following types of items may not be scanned correctly. Important • ...

LiDE300 series User Manual
Page 54
Scanning Multiple Documents at One Time from the ADF (Auto Document Feeder) 54
Scanning Multiple Documents at One Time from the ADF (Auto Document Feeder) 54

LiDE300 series User Manual
Page 55
...specify the paper size, resolution, PDF settings, etc., click Settings..., and then set where to save the scanned images, and more, as needed. Note • To cancel the scan, click Cancel. 55 Positioning Originals (Scanning from the next time. • In the Settings dialog, specify image processing settings such as JPEG and... TIFF. 1. Start IJ Scan Utility Lite. 3. When setting is completed, click OK. 4. Click Document or Photo. Save documents in formats such as PDF and JPEG, and photos ...
...specify the paper size, resolution, PDF settings, etc., click Settings..., and then set where to save the scanned images, and more, as needed. Note • To cancel the scan, click Cancel. 55 Positioning Originals (Scanning from the next time. • In the Settings dialog, specify image processing settings such as JPEG and... TIFF. 1. Start IJ Scan Utility Lite. 3. When setting is completed, click OK. 4. Click Document or Photo. Save documents in formats such as PDF and JPEG, and photos ...
LiDE300 series User Manual
Page 57
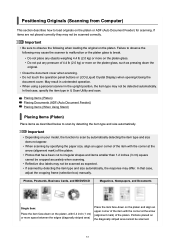
...in the upright position, the item type may differ. May result in unintended operation. • When using a personal scanner in IJ Scan Utility and scan. Placing Items (Platen) Placing Documents (ADF (Auto Document Feeder)) Placing Items (When Using Stand) Placing Items (Platen) Place items as... size automatically. Failure to observe the following when loading the original on the platen or ADF (Auto Document Feeder) for scanning. Positioning Originals (Scanning from Computer) This section describes how to load originals on the platen. Important • Depending on the platen glass. ...
...in the upright position, the item type may differ. May result in unintended operation. • When using a personal scanner in IJ Scan Utility and scan. Placing Items (Platen) Placing Documents (ADF (Auto Document Feeder)) Placing Items (When Using Stand) Placing Items (Platen) Place items as... size automatically. Failure to observe the following when loading the original on the platen or ADF (Auto Document Feeder) for scanning. Positioning Originals (Scanning from Computer) This section describes how to load originals on the platen. Important • Depending on the platen glass. ...
LiDE300 series User Manual
Page 58
... top page of the Online Manual for your model and search for "Loading Originals." • Personal scanner: For the portions in which items cannot be scanned, click Home to return to the top page of the Online Manual for your model and search for "Items You Can Place & How to Place... Items." : 0.4 inch (1 cm) or more documents. • For supported document sizes when scanning from the ADF, click Home to return to 12 items. • Positions of the Online Manual for your model and search for "Supported Originals." 58...
... top page of the Online Manual for your model and search for "Loading Originals." • Personal scanner: For the portions in which items cannot be scanned, click Home to return to the top page of the Online Manual for your model and search for "Items You Can Place & How to Place... Items." : 0.4 inch (1 cm) or more documents. • For supported document sizes when scanning from the ADF, click Home to return to 12 items. • Positions of the Online Manual for your model and search for "Supported Originals." 58...

LiDE300 series User Manual
Page 59
... if placed the other way around. Note • When scanning duplex documents, place the front sides facing up in document tray. Do not slide the document guide too hard against the document. Open the document ... Items (When Using Stand) 1. Load document with side to match width of document. Slide the paper guides (B) all the way out. 4. Adjust document guide (B) to scan facing up . They will not be fed properly. Make sure any original has been removed from platen. 2. Open document tray (A). 3. 1. Place item on platen. 1.
... if placed the other way around. Note • When scanning duplex documents, place the front sides facing up in document tray. Do not slide the document guide too hard against the document. Open the document ... Items (When Using Stand) 1. Load document with side to match width of document. Slide the paper guides (B) all the way out. 4. Adjust document guide (B) to scan facing up . They will not be fed properly. Make sure any original has been removed from platen. 2. Open document tray (A). 3. 1. Place item on platen. 1.


