User Manual
Page 1
Quick Start Guide Table of Contents Preface 1 Shipping Materials 1 Introduction 1 Setting Up 2 Preparing the Printer 2 Connecting the Printer to the Computer 2 Installing the Print Head 4 Loading Paper 7 Installing the Printer Driver 8 Aligning the Print Head 12 Basic Operations 15 Printing with Windows 15 Printing with Macintosh 18 Print Head Maintenance 20 Appendix 21 Printing Photographs Directly from a Digital Camera 21 Notes on Handling the USB Interface (for Windows Users) 25 For Further Details... 25 BE QA7-3441-V01
Quick Start Guide Table of Contents Preface 1 Shipping Materials 1 Introduction 1 Setting Up 2 Preparing the Printer 2 Connecting the Printer to the Computer 2 Installing the Print Head 4 Loading Paper 7 Installing the Printer Driver 8 Aligning the Print Head 12 Basic Operations 15 Printing with Windows 15 Printing with Macintosh 18 Print Head Maintenance 20 Appendix 21 Printing Photographs Directly from a Digital Camera 21 Notes on Handling the USB Interface (for Windows Users) 25 For Further Details... 25 BE QA7-3441-V01

User Manual
Page 3
... following symbols to your Canon Service Representative. ‰ Printer ‰ Setup Software & User's Guide CD-ROM ‰ Quick Start Guide ‰ Print Head ‰ 5 Ink Tanks * A USB cable should be observed for purchasing a Canon Bubble Jet Printer. and other trademarks and registered trademarks appearing in personal injury or material damage caused by incorrect operation of the equipment. Preface Shipping Materials Thank you for safe operation. Check that , if ignored...
... following symbols to your Canon Service Representative. ‰ Printer ‰ Setup Software & User's Guide CD-ROM ‰ Quick Start Guide ‰ Print Head ‰ 5 Ink Tanks * A USB cable should be observed for purchasing a Canon Bubble Jet Printer. and other trademarks and registered trademarks appearing in personal injury or material damage caused by incorrect operation of the equipment. Preface Shipping Materials Thank you for safe operation. Check that , if ignored...

User Manual
Page 9
... the User's Guide. • You can select the paper source also from the printer driver. Paper Output Tray print side 2 Load the paper and align it with your hand when opening the tray. If not, press the Paper Feed Switch. For details, refer to load paper in the Sheet Feeder. „ Loading A4 (Letter) Size Plain Paper in the Cassette. Support the Front Cover with the right side of plain paper (64 gsm). For information on loading the print media in the Sheet Feeder...
... the User's Guide. • You can select the paper source also from the printer driver. Paper Output Tray print side 2 Load the paper and align it with your hand when opening the tray. If not, press the Paper Feed Switch. For details, refer to load paper in the Sheet Feeder. „ Loading A4 (Letter) Size Plain Paper in the Cassette. Support the Front Cover with the right side of plain paper (64 gsm). For information on loading the print media in the Sheet Feeder...

User Manual
Page 11
.... 4 Follow the instructions displayed on page 25. 8 Click OK. 3 Place the Setup Software & User's Guide CD-ROM in the CD-ROM drive. • If the installer in the CD-ROM are installed automatically. When the screen shown on the left appears, turn the printer on the left is recognized, the printer driver will be automatically installed. To select particular items to install, click Custom Install and follow...
.... 4 Follow the instructions displayed on page 25. 8 Click OK. 3 Place the Setup Software & User's Guide CD-ROM in the CD-ROM drive. • If the installer in the CD-ROM are installed automatically. When the screen shown on the left appears, turn the printer on the left is recognized, the printer driver will be automatically installed. To select particular items to install, click Custom Install and follow...

User Manual
Page 12
... out print head alignment. See page 13 for restarting your system, you can restart the system instead of A4/ Letter-sized plain paper is completed, click Next. 12 When the screen shown on the Mac. 2 Place the Setup Software & User's Guide CD-ROM in the computer or printer not operating normally. • Before installing the driver, disable all anti-virus programs and automatically loading programs or remove them...
... out print head alignment. See page 13 for restarting your system, you can restart the system instead of A4/ Letter-sized plain paper is completed, click Next. 12 When the screen shown on the Mac. 2 Place the Setup Software & User's Guide CD-ROM in the computer or printer not operating normally. • Before installing the driver, disable all anti-virus programs and automatically loading programs or remove them...

User Manual
Page 13
... the instructions in this step. 7 Select a destination to install the printer driver, and click Continue. 8 Click Install. 9 Enter an administrator name and a password, then click OK. When using the printer, you want to where you must carry out the print head alignment on the screen. Software installation will start. 11 Software installation is complete. Before using Mac OS X v.10.2, enter an administrator name and a password, then click OK in Mac Help. 10 A message...
... the instructions in this step. 7 Select a destination to install the printer driver, and click Continue. 8 Click Install. 9 Enter an administrator name and a password, then click OK. When using the printer, you want to where you must carry out the print head alignment on the screen. Software installation will start. 11 Software installation is complete. Before using Mac OS X v.10.2, enter an administrator name and a password, then click OK in Mac Help. 10 A message...

User Manual
Page 14
... your printer. 3 Open the File menu and select: • Windows XP/Windows 2000 → Printing Preferences • Windows Me/Windows 98 → Properties to open the setting screen. 4 Click the Maintenance tab, and click Print Head Alignment. 12 Hold the RESUME/CANCEL button until the POWER lamp flashes four times. • You need to load a sheet of A4 (Letter) size plain paper in the Sheet Feeder. With the printer on, load a sheet of A4 (Letter) size plain paper in the color registration...
... your printer. 3 Open the File menu and select: • Windows XP/Windows 2000 → Printing Preferences • Windows Me/Windows 98 → Properties to open the setting screen. 4 Click the Maintenance tab, and click Print Head Alignment. 12 Hold the RESUME/CANCEL button until the POWER lamp flashes four times. • You need to load a sheet of A4 (Letter) size plain paper in the Sheet Feeder. With the printer on, load a sheet of A4 (Letter) size plain paper in the color registration...
User Manual
Page 15
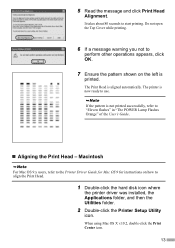
... instructions on the left is now ready to align the Print Head. 1 Double-click the hard disk icon where the printer driver was installed, the Applications folder, and then the Utilities folder. 2 Double-click the Printer Setup Utility icon. 5 Read the message and click Print Head Alignment. If the pattern is aligned automatically. When using Mac OS X v.10.2, double-click the Print Center icon. 13 Do not open the Top Cover while printing. 6 If a message...
... instructions on the left is now ready to align the Print Head. 1 Double-click the hard disk icon where the printer driver was installed, the Applications folder, and then the Utilities folder. 2 Double-click the Printer Setup Utility icon. 5 Read the message and click Print Head Alignment. If the pattern is aligned automatically. When using Mac OS X v.10.2, double-click the Print Center icon. 13 Do not open the Top Cover while printing. 6 If a message...

User Manual
Page 17
... noises around the printer, immediately switch the printer off and always unplug the printer. For details about the other than plain paper, refer to "Basic Printing Settings" on the User's Guide. 15 Check the application's users manual for the actual procedures. 2 Ensure that you use anything other settings for specifying the paper source, refer to your printer is printing. From the File menu, click Print. Contact your local Canon service representative. •...
... noises around the printer, immediately switch the printer off and always unplug the printer. For details about the other than plain paper, refer to "Basic Printing Settings" on the User's Guide. 15 Check the application's users manual for the actual procedures. 2 Ensure that you use anything other settings for specifying the paper source, refer to your printer is printing. From the File menu, click Print. Contact your local Canon service representative. •...
User Manual
Page 19
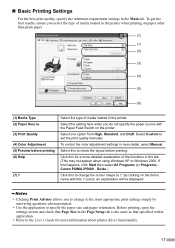
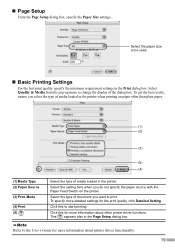
... media loaded in the printer when printing on the item's name with the Paper Feed Switch on the printer. Select this to set the print quality manually. By clicking on paper other than plain paper. (7) (1) (2) (3) (4) (5) (6) (1) Media Type (2) Paper Source (3) Print Quality (4) Color Adjustment (5) Preview before printing. To control the color adjustment settings in more detailed explanation of media loaded in the Main tab. Click this ? Guide.) Click this happens, click Start then select All Programs (or Programs) Canon PIXMA...
... media loaded in the printer when printing on the item's name with the Paper Feed Switch on the printer. Select this to set the print quality manually. By clicking on paper other than plain paper. (7) (1) (2) (3) (4) (5) (6) (1) Media Type (2) Paper Source (3) Print Quality (4) Color Adjustment (5) Preview before printing. To control the color adjustment settings in more detailed explanation of media loaded in the Main tab. Click this ? Guide.) Click this happens, click Start then select All Programs (or Programs) Canon PIXMA...

User Manual
Page 20
... application to print the document. From the File menu, click Page Setup. For details, refer to your requirements. Check the application's users manual for the actual procedures. 2 Specify the page setup, then click OK. Printing will start in a few moments. 18 Check the application's users manual for the actual procedures. 4 Specify the printing settings according to "Basic Printing Settings" on the printer. Sheet Feeder Lamp If not, press the Paper Feed Switch on page 19. 5 Ensure...
... application to print the document. From the File menu, click Page Setup. For details, refer to your requirements. Check the application's users manual for the actual procedures. 2 Specify the page setup, then click OK. Printing will start in a few moments. 18 Check the application's users manual for the actual procedures. 4 Specify the printing settings according to "Basic Printing Settings" on the printer. Sheet Feeder Lamp If not, press the Paper Feed Switch on page 19. 5 Ensure...
User Manual
Page 21
... Paper Feed Switch on paper other printer driver functions. To specify more detailed settings for more information about printer driver functionality. 19 Select Quality & Media from the pop-up menu to be used. „ Basic Printing Settings For the best print quality, specify the minimum requirement settings in the printer. To get the best results, ensure you select the type of media loaded in the Page Setup dialog box. „ Page Setup From the Page Setup...
... Paper Feed Switch on paper other printer driver functions. To specify more detailed settings for more information about printer driver functionality. 19 Select Quality & Media from the pop-up menu to be used. „ Basic Printing Settings For the best print quality, specify the minimum requirement settings in the printer. To get the best results, ensure you select the type of media loaded in the Page Setup dialog box. „ Page Setup From the Page Setup...
User Manual
Page 22
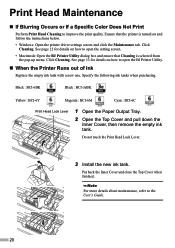
... Print Head Lock Lever 1 Open the Paper Output Tray. 2 Open the Top Cover and pull down the Inner Cover, then remove the empty ink tank. See page 12 for details on how to open the BJ Printer Utility. „ When the Printer Runs out of Ink Replace the empty ink tank with a new one. See page 13 for details on and follow the instructions below. • Windows: Open the printer driver settings screen and click the Maintenance...
... Print Head Lock Lever 1 Open the Paper Output Tray. 2 Open the Top Cover and pull down the Inner Cover, then remove the empty ink tank. See page 12 for details on how to open the BJ Printer Utility. „ When the Printer Runs out of Ink Replace the empty ink tank with a new one. See page 13 for details on and follow the instructions below. • Windows: Open the printer driver settings screen and click the Maintenance...
User Manual
Page 23
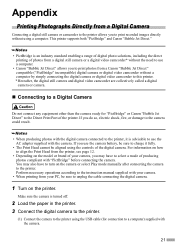
... printer, see page 12. • Depending on the model or brand of producing photos compliant with the camera. 21 This printer supports both "PictBridge" and Canon "Bubble Jet Direct." • PictBridge is turned off. 2 Load the paper in the printer. 3 Connect the digital camera to the printer. (1) Connect the camera to the instruction manual supplied with the camera. For information on how to align the Print Head from a Canon "Bubble Jet Direct" compatible...
... printer, see page 12. • Depending on the model or brand of producing photos compliant with the camera. 21 This printer supports both "PictBridge" and Canon "Bubble Jet Direct." • PictBridge is turned off. 2 Load the paper in the printer. 3 Connect the digital camera to the printer. (1) Connect the camera to the instruction manual supplied with the camera. For information on how to align the Print Head from a Canon "Bubble Jet Direct" compatible...

User Manual
Page 24
... "Photo" for direct printing. Paper size 10 x 15 cm / 4" x 6" - Date print Off (No printing) About the Settings Explained Below The settings explained on the following default settings: - Image optimize On (ExifPrint) - When the connection between the camera and printer has been established, the POWER lamp on the printer flashes once. * The power-on sequence may be displayed on your camera's instruction manual. Layout Borderless - For details, refer to select the PictBridge print setup mode...
... "Photo" for direct printing. Paper size 10 x 15 cm / 4" x 6" - Date print Off (No printing) About the Settings Explained Below The settings explained on the following default settings: - Image optimize On (ExifPrint) - When the connection between the camera and printer has been established, the POWER lamp on the printer flashes once. * The power-on sequence may be displayed on your camera's instruction manual. Layout Borderless - For details, refer to select the PictBridge print setup mode...

User Manual
Page 25
... printing. • When disconnecting the USB cable between the digital camera and printer, follow the instructions given in the lower-right corner of each photo. • This printer can handle only Exif/JPEG image data to the User's Guide. 23 About "Image optimize" If you use a Canon PictBridge-compliant camera, you can be available in the printer by selecting options from Paper size and Paper type. "Paper size" setting 10 x 15 cm / 4" x 6" (Default...
... printing. • When disconnecting the USB cable between the digital camera and printer, follow the instructions given in the lower-right corner of each photo. • This printer can handle only Exif/JPEG image data to the User's Guide. 23 About "Image optimize" If you use a Canon PictBridge-compliant camera, you can be available in the printer by selecting options from Paper size and Paper type. "Paper size" setting 10 x 15 cm / 4" x 6" (Default...
User Manual
Page 26
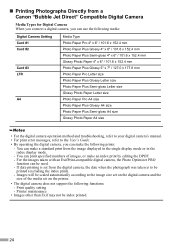
... Photo Paper A4 size • For the digital camera operation method and troubleshooting, refer to your digital camera's manual. • For print error messages, refer to the User's Guide. • By operating the digital camera, you can make a standard print from the digital camera, the date when the photograph was taken is set on the printer. • The digital camera does not support the following prints: - You can make...
... Photo Paper A4 size • For the digital camera operation method and troubleshooting, refer to your digital camera's manual. • For print error messages, refer to the User's Guide. • By operating the digital camera, you can make a standard print from the digital camera, the date when the photograph was taken is set on the printer. • The digital camera does not support the following prints: - You can make...
User Manual
Page 27
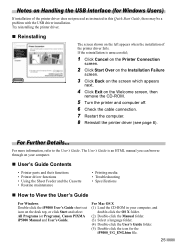
.... (2) Double-click the Manual folder. (3) Select a language folder. (4) Double-click the User's Guide folder. (5) Double-click the icon for Windows Users) If installation of the printer driver fails. For Mac OS X (1) Load the CD-ROM in your computer. „ User's Guide Contents • Printer parts and their functions • Printer driver functions • Using the Sheet Feeder and the Cassette • Routine maintenance • Printing media • Troubleshooting • Specifications „ How to the User's Guide. Notes on Handling the USB...
.... (2) Double-click the Manual folder. (3) Select a language folder. (4) Double-click the User's Guide folder. (5) Double-click the icon for Windows Users) If installation of the printer driver fails. For Mac OS X (1) Load the CD-ROM in your computer. „ User's Guide Contents • Printer parts and their functions • Printer driver functions • Using the Sheet Feeder and the Cassette • Routine maintenance • Printing media • Troubleshooting • Specifications „ How to the User's Guide. Notes on Handling the USB...
User Manual
Page 28
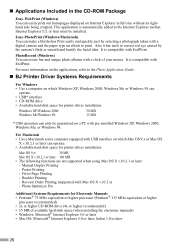
... camera's flash or smooth and beatify the facial skin. Manual Duplex Printing - For more information on the applications, refer to the Photo Application Guide. „ BJ Printer Driver Systems Requirements For Windows • Use a computer on a PC with pre-installed Windows XP, Windows 2000, Windows Me, or Windows 98. Reverse Order Printing (supported with a digital camera and the paper type on Internet Explorer in full size without its righthand side being...
... camera's flash or smooth and beatify the facial skin. Manual Duplex Printing - For more information on the applications, refer to the Photo Application Guide. „ BJ Printer Driver Systems Requirements For Windows • Use a computer on a PC with pre-installed Windows XP, Windows 2000, Windows Me, or Windows 98. Reverse Order Printing (supported with a digital camera and the paper type on Internet Explorer in full size without its righthand side being...

User Manual
Page 29
... in which case the user will not occur in accordance with the instruction manual, may cause undesired operation. These limits are designed to the following two conditions: (1) This device may not cause harmful interference, and (2) this equipment in Subpart B of Part 15 of the FCC Rules. For 110-120V, 50/60Hz model Color Printer Model: K10244 This device complies...
... in which case the user will not occur in accordance with the instruction manual, may cause undesired operation. These limits are designed to the following two conditions: (1) This device may not cause harmful interference, and (2) this equipment in Subpart B of Part 15 of the FCC Rules. For 110-120V, 50/60Hz model Color Printer Model: K10244 This device complies...


