
elan7n_instructions.pdf
Page 3
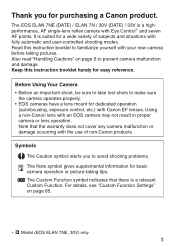
... booklet to familiarize yourself with Canon EF lenses. Using a non-Canon lens with Eye Control∗ and seven AF points. Thank you to avoid shooting problems. The Note symbol gives supplemental information for basic camera operation or picture-taking pictures. Also read "Handling Cautions" on page 85. ∗ m Model (EOS ELAN 7NE, 30V) only 3 Note that...
... booklet to familiarize yourself with Canon EF lenses. Using a non-Canon lens with Eye Control∗ and seven AF points. Thank you to avoid shooting problems. The Note symbol gives supplemental information for basic camera operation or picture-taking pictures. Also read "Handling Cautions" on page 85. ∗ m Model (EOS ELAN 7NE, 30V) only 3 Note that...
elan7n_instructions.pdf
Page 4
............21 5Loading and Unloading Film........22 Loading Film 22 Checking the Film Speed 23 Unloading Film 24 6Midroll Rewind 24 Dioptric Adjustment 25 Holding the Camera 26 2 Fully Automatic Shooting .........27 YFull Auto Mode 28 AF-Assist beam with the Built-in Flash...29 Programmed Image Control Modes...30 U Portrait 30...
............21 5Loading and Unloading Film........22 Loading Film 22 Checking the Film Speed 23 Unloading Film 24 6Midroll Rewind 24 Dioptric Adjustment 25 Holding the Camera 26 2 Fully Automatic Shooting .........27 YFull Auto Mode 28 AF-Assist beam with the Built-in Flash...29 Programmed Image Control Modes...30 U Portrait 30...
elan7n_instructions.pdf
Page 6
.... Be careful not to release the shutter a few times. • Avoid storing the camera in a laboratory, cabinet, etc., where corrosive chemicals are present. • If you have the camera checked by your nearest Canon dealer. • The shutter curtains are working properly. 6 Use only a blower to ... on the shutter curtains. Do not drop it or subject it to physical shock. • The camera is a precision instrument. Do not clean the camera body or lens with your nearest Canon dealer as soon as in a car on the lens, eyepiece, mirror, focusing screen, film compartment,...
.... Be careful not to release the shutter a few times. • Avoid storing the camera in a laboratory, cabinet, etc., where corrosive chemicals are present. • If you have the camera checked by your nearest Canon dealer. • The shutter curtains are working properly. 6 Use only a blower to ... on the shutter curtains. Do not drop it or subject it to physical shock. • The camera is a precision instrument. Do not clean the camera body or lens with your nearest Canon dealer as soon as in a car on the lens, eyepiece, mirror, focusing screen, film compartment,...
elan7n_instructions.pdf
Page 7
... replaced with the rear end up to normal at high temperatures. Lens Electrical Contacts After detaching the lens from the camera, put on the LCD panel. How Low Battery Levels Affect Camera Operation On the LCD panel, if the icon blinks or it is to remove any fingerprints and smudges. However, when...
... replaced with the rear end up to normal at high temperatures. Lens Electrical Contacts After detaching the lens from the camera, put on the LCD panel. How Low Battery Levels Affect Camera Operation On the LCD panel, if the icon blinks or it is to remove any fingerprints and smudges. However, when...

elan7n_instructions.pdf
Page 8
... halfway to autofocus. (p.21) • Under low-light or backlit conditions, the built-in flash will advance to the battery orientation diagram on the camera and close the camera back until it snaps shut. (p.22) • The film will pop-up and fire automatically. (p.78) Aim the AF points on the lens... and camera and turn the lens as shown. (p.18) 2 Attach a lens. Align the edge of the film leader with the orange mark on the battery chamber cover, ...
... halfway to autofocus. (p.21) • Under low-light or backlit conditions, the built-in flash will advance to the battery orientation diagram on the camera and close the camera back until it snaps shut. (p.22) • The film will pop-up and fire automatically. (p.78) Aim the AF points on the lens... and camera and turn the lens as shown. (p.18) 2 Attach a lens. Align the edge of the film leader with the orange mark on the battery chamber cover, ...
elan7n_instructions.pdf
Page 9
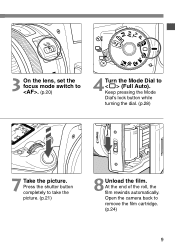
Open the camera back to (Full Auto). At the end of the roll, the film rewinds automatically. 3 On the lens, set the focus mode switch to . (p.20) 4Turn the Mode Dial to remove the film cartridge. (p.24) 9 Keep pressing the Mode Dial's lock button while turning the dial. (p.28) 7 Take the picture. Press the shutter button completely to take the picture. (p.21) 8Unload the film.
Open the camera back to (Full Auto). At the end of the roll, the film rewinds automatically. 3 On the lens, set the focus mode switch to . (p.20) 4Turn the Mode Dial to remove the film cartridge. (p.24) 9 Keep pressing the Mode Dial's lock button while turning the dial. (p.28) 7 Take the picture. Press the shutter button completely to take the picture. (p.21) 8Unload the film.
elan7n_instructions.pdf
Page 10
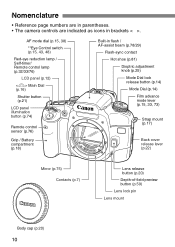
... panel illumination button (p.74) Remote control sensor (p.76) Grip / Battery compartment (p.18) Built-in brackets < >. Nomenclature • Reference page numbers are in parentheses. • The camera controls are indicated as icons in flash / AF-assist beam (p.78/29) Flash-sync contact Hot shoe (p.81) Dioptric adjustment knob (p.25) Mode Dial lock...
... panel illumination button (p.74) Remote control sensor (p.76) Grip / Battery compartment (p.18) Built-in brackets < >. Nomenclature • Reference page numbers are in parentheses. • The camera controls are indicated as icons in flash / AF-assist beam (p.78/29) Flash-sync contact Hot shoe (p.81) Dioptric adjustment knob (p.25) Mode Dial lock...
elan7n_instructions.pdf
Page 14
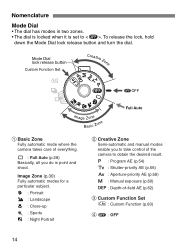
Mode Dial lock release button Custom Function Set Creative Zone 2OFF Image Zone Basic Zone Full Auto 1 Basic Zone Fully automatic mode where the camera takes care of -field AE (p.62) 3 Custom Function Set G : Custom Function (p.83) 4 2 : OFF 14 S : Program AE (p.54) R : Shutter-priority AE (p.56) E ...: Aperture-priority AE (p.58) W : Manual exposure (p.60) Q : Depth-of everything. Y : Full Auto (p.28) Basically, all you to take control of the camera to . Nomenclature Mode Dial • The dial has modes in two zones. • The dial is locked when it is point and shoot. Image Zone...
Mode Dial lock release button Custom Function Set Creative Zone 2OFF Image Zone Basic Zone Full Auto 1 Basic Zone Fully automatic mode where the camera takes care of -field AE (p.62) 3 Custom Function Set G : Custom Function (p.83) 4 2 : OFF 14 S : Program AE (p.54) R : Shutter-priority AE (p.56) E ...: Aperture-priority AE (p.58) W : Manual exposure (p.60) Q : Depth-of everything. Y : Full Auto (p.28) Basically, all you to take control of the camera to . Nomenclature Mode Dial • The dial has modes in two zones. • The dial is locked when it is point and shoot. Image Zone...
elan7n_instructions.pdf
Page 16
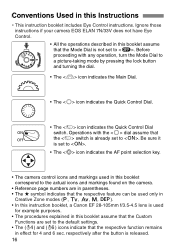
Ignore those instructions if your camera EOS ELAN 7N/33V does not have Eye Control. • All the operations described in effect for example purposes. • The procedures explained in this booklet assume ... booklet correspond to the actual icons and markings found on the camera. • Reference page numbers are in parentheses. • The ★ symbol indicates that the respective feature can be used only in Creative Zone modes (S, R, E, W, Q). • In this instruction booklet, a Canon EF 28-105mm f/3.5-4.5 lens is used for 4 and 6 sec. Before...
Ignore those instructions if your camera EOS ELAN 7N/33V does not have Eye Control. • All the operations described in effect for example purposes. • The procedures explained in this booklet assume ... booklet correspond to the actual icons and markings found on the camera. • Reference page numbers are in parentheses. • The ★ symbol indicates that the respective feature can be used only in Creative Zone modes (S, R, E, W, Q). • In this instruction booklet, a Canon EF 28-105mm f/3.5-4.5 lens is used for 4 and 6 sec. Before...
elan7n_instructions.pdf
Page 17
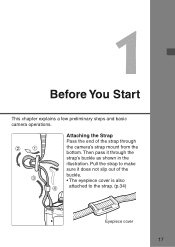
1 Before You Start This chapter explains a few preliminary steps and basic camera operations. 2 1 3 Attaching the Strap Pass the end of the buckle. • The eyepiece cover is also 4 attached to make sure it through the camera's strap mount from the bottom. Then pass it does not slip out of the strap through the strap's buckle as shown in the illustration. Pull the strap to the strap. (p.34) Eyepiece cover 17
1 Before You Start This chapter explains a few preliminary steps and basic camera operations. 2 1 3 Attaching the Strap Pass the end of the buckle. • The eyepiece cover is also 4 attached to make sure it through the camera's strap mount from the bottom. Then pass it does not slip out of the strap through the strap's buckle as shown in the illustration. Pull the strap to the strap. (p.34) Eyepiece cover 17
elan7n_instructions.pdf
Page 18
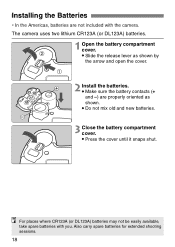
... battery contacts (+ and -) are not included with you. For places where CR123A (or DL123A) batteries may not be easily available, take spare batteries with the camera. The camera uses two lithium CR123A (or DL123A) batteries. 2 1 Open the battery compartment cover. • Slide the release lever as shown. • Do not mix old...
... battery contacts (+ and -) are not included with you. For places where CR123A (or DL123A) batteries may not be easily available, take spare batteries with the camera. The camera uses two lithium CR123A (or DL123A) batteries. 2 1 Open the battery compartment cover. • Slide the release lever as shown. • Do not mix old...
elan7n_instructions.pdf
Page 19
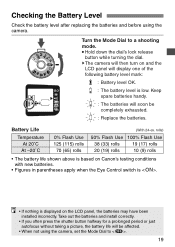
... LCD panel, the batteries may have been installed incorrectly. Checking the Battery Level Check the battery level after replacing the batteries and before using the camera, set the Mode Dial to a shooting mode. • Hold down the dial's lock release button while turning the dial. Battery Life (With ... 100% Flash Use 38 (33) rolls 19 (17) rolls 20 (19) rolls 10 (9) rolls • The battery life shown above is based on Canon's testing conditions with new batteries. • Figures in parentheses apply when the Eye Control switch is . • If nothing is low. Turn the Mode ...
... LCD panel, the batteries may have been installed incorrectly. Checking the Battery Level Check the battery level after replacing the batteries and before using the camera, set the Mode Dial to a shooting mode. • Hold down the dial's lock release button while turning the dial. Battery Life (With ... 100% Flash Use 38 (33) rolls 19 (17) rolls 20 (19) rolls 10 (9) rolls • The battery life shown above is based on Canon's testing conditions with new batteries. • Figures in parentheses apply when the Eye Control switch is . • If nothing is low. Turn the Mode ...

elan7n_instructions.pdf
Page 20
Mounting and Detaching a Lens Mounting a Lens Red dots 1 2 1 Remove the caps. • Remove the rear lens cap and the camera body cap. 2 Mount the lens. • Align the red dots on the lens and camera and turn the lens as shown by the arrow until it snaps in place. 3 On the lens, set... where you will not lose them. • stands for "Auto Focus," and stands for "Manual Focus." • An EF-S lens cannot be attached to the camera. 20
Mounting and Detaching a Lens Mounting a Lens Red dots 1 2 1 Remove the caps. • Remove the rear lens cap and the camera body cap. 2 Mount the lens. • Align the red dots on the lens and camera and turn the lens as shown by the arrow until it snaps in place. 3 On the lens, set... where you will not lose them. • stands for "Auto Focus," and stands for "Manual Focus." • An EF-S lens cannot be attached to the camera. 20

elan7n_instructions.pdf
Page 21
... not operate. • After pressing the shutter button halfway, wait a moment before pressing it will take a moment before the picture is taken. • Camera movement during the moment of exposure is released to take the picture and the film advances by one stroke or right after pressing it halfway..., it completely to take the picture. To prevent blurred pictures due to camera shake: · Hold the camera steady. · Use your finger tip to touch the shutter button, grasp the camera with your entire right hand, then press the shutter button gently. • If the ...
... not operate. • After pressing the shutter button halfway, wait a moment before pressing it will take a moment before the picture is taken. • Camera movement during the moment of exposure is released to take the picture and the film advances by one stroke or right after pressing it halfway..., it completely to take the picture. To prevent blurred pictures due to camera shake: · Hold the camera steady. · Use your finger tip to touch the shutter button, grasp the camera with your entire right hand, then press the shutter button gently. • If the ...
elan7n_instructions.pdf
Page 22
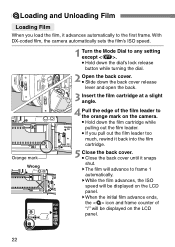
... and frame counter of the film leader to the first frame. sThe film will be displayed on the LCD panel. With DX-coded film, the camera automatically sets the film's ISO speed. 5Loading and Unloading Film Loading Film When you load the film, it advances automatically to the orange mark on... the camera. • Hold down the film cartridge while pulling out the film leader. • If you pull out the film leader too much, rewind it back...
... and frame counter of the film leader to the first frame. sThe film will be displayed on the LCD panel. With DX-coded film, the camera automatically sets the film's ISO speed. 5Loading and Unloading Film Loading Film When you load the film, it advances automatically to the orange mark on... the camera. • Hold down the film cartridge while pulling out the film leader. • If you pull out the film leader too much, rewind it back...
elan7n_instructions.pdf
Page 23
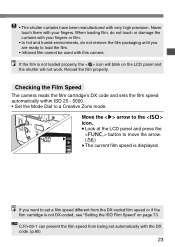
Checking the Film Speed The camera reads the film cartridge's DX code and sets the film speed automatically within ISO 25 - 5000. • Set the Mode Dial to set a film speed ... is not DX-coded, see "Setting the ISO Film Speed" on the LCD panel and the shutter will not work. Never touch them with this camera. Reload the film properly. If you are ready to move the arrow. (1) sThe current film speed is not loaded properly, the icon will blink on...
Checking the Film Speed The camera reads the film cartridge's DX code and sets the film speed automatically within ISO 25 - 5000. • Set the Mode Dial to set a film speed ... is not DX-coded, see "Setting the ISO Film Speed" on the LCD panel and the shutter will not work. Never touch them with this camera. Reload the film properly. If you are ready to move the arrow. (1) sThe current film speed is not loaded properly, the icon will blink on...
elan7n_instructions.pdf
Page 24
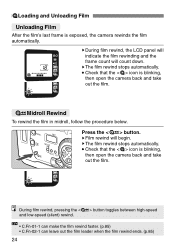
... film leader when the film rewind ends. (p.85) 24 Press the button. sThe film rewind stops automatically. • Check that the icon is exposed, the camera rewinds the film automatically. sDuring film rewind, the LCD panel will indicate the film rewinding and the frame count will begin. sFilm rewind will count... down. 5Loading and Unloading Film Unloading Film After the film's last frame is blinking, then open the camera back and take out the film. 6Midroll Rewind To rewind the film in midroll, follow the procedure below.
... film leader when the film rewind ends. (p.85) 24 Press the button. sThe film rewind stops automatically. • Check that the icon is exposed, the camera rewinds the film automatically. sDuring film rewind, the LCD panel will indicate the film rewinding and the frame count will begin. sFilm rewind will count... down. 5Loading and Unloading Film Unloading Film After the film's last frame is blinking, then open the camera back and take out the film. 6Midroll Rewind To rewind the film in midroll, follow the procedure below.
elan7n_instructions.pdf
Page 25
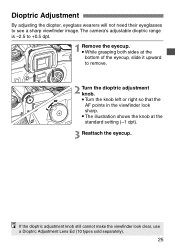
... the viewfinder look sharp. • The illustration shows the knob at the bottom of the eyecup, slide it upward to see a sharp viewfinder image. The camera's adjustable dioptric range is -2.5 to +0.5 dpt. 1 Remove the eyecup. • While grasping both sides at the standard setting (-1 dpt). 3 Reattach the eyecup...
... the viewfinder look sharp. • The illustration shows the knob at the bottom of the eyecup, slide it upward to see a sharp viewfinder image. The camera's adjustable dioptric range is -2.5 to +0.5 dpt. 1 Remove the eyecup. • While grasping both sides at the standard setting (-1 dpt). 3 Reattach the eyecup...
elan7n_instructions.pdf
Page 26
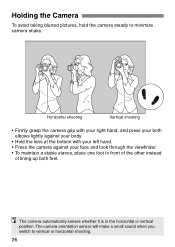
... senses whether it is in front of the other instead of lining up both feet. Horizontal shooting Vertical shooting • Firmly grasp the camera grip with your right hand, and press your both elbows lightly against your body. • Hold the lens at the bottom with your left hand. &#...8226; Press the camera against your face and look through the viewfinder. • To maintain a stable stance, place one foot in the horizontal or vertical position. Holding the...
... senses whether it is in front of the other instead of lining up both feet. Horizontal shooting Vertical shooting • Firmly grasp the camera grip with your right hand, and press your both elbows lightly against your body. • Hold the lens at the bottom with your left hand. &#...8226; Press the camera against your face and look through the viewfinder. • To maintain a stable stance, place one foot in the horizontal or vertical position. Holding the...
elan7n_instructions.pdf
Page 27
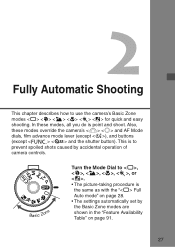
Basic Zone Turn the Mode Dial to , , , , , or . • The picture-taking procedure is to use the camera's Basic Zone modes for quick and easy shooting. 2 Fully Automatic Shooting This chapter describes how to prevent spoiled shots caused by the Basic Zone modes ...are shown in the "Feature Availability Table" on page 28. • The settings automatically set by accidental operation of camera controls. Also, these modes, all you do is point and shoot. This is the same as with the " Full Auto mode" on page 91. 27...
Basic Zone Turn the Mode Dial to , , , , , or . • The picture-taking procedure is to use the camera's Basic Zone modes for quick and easy shooting. 2 Fully Automatic Shooting This chapter describes how to prevent spoiled shots caused by the Basic Zone modes ...are shown in the "Feature Availability Table" on page 28. • The settings automatically set by accidental operation of camera controls. Also, these modes, all you do is point and shoot. This is the same as with the " Full Auto mode" on page 91. 27...


