
iPF6300 User Manual ver.1.20
Page 13
... Colors (Mac OS X 805 Printer Parts 808 Printer parts 809 Front ...809 Back ...810 Top Cover (Inside) ...811 Paper Feed Slots ...812 Inside the Roll Feed Unit Cover ...813 Carriage ...814 Ink Tank Cover (Inside) ...814 Vents ...816 Control Panel 817 Control Panel ...817 Turning the Printer On and Off ...819 Control Panel Display ...821 How to View Instructions with Navigate ...825 Printer Menu Operations ...827 Menu Operations ...828 Menu Structure ...830 Menu Settings ...838 Menu Settings (During Printing) ...847 Adj 767 Troubleshooting Paper Abrasion and Blurry Images (Head...
... Colors (Mac OS X 805 Printer Parts 808 Printer parts 809 Front ...809 Back ...810 Top Cover (Inside) ...811 Paper Feed Slots ...812 Inside the Roll Feed Unit Cover ...813 Carriage ...814 Ink Tank Cover (Inside) ...814 Vents ...816 Control Panel 817 Control Panel ...817 Turning the Printer On and Off ...819 Control Panel Display ...821 How to View Instructions with Navigate ...825 Printer Menu Operations ...827 Menu Operations ...828 Menu Structure ...830 Menu Settings ...838 Menu Settings (During Printing) ...847 Adj 767 Troubleshooting Paper Abrasion and Blurry Images (Head...

iPF6300 User Manual ver.1.20
Page 17
... Ink Tank Cover ...990 Not much ink is L, R, or not displayed) ...996 Execute printhead cleaning...996 Messages regarding printing or adjustment 992 Cannot execute this manual 1003 About This User Manual ...1003 Viewing Videos of Explanations ...1004 Searching Topics ...1004 HTML Version of the Manual for parts replacement...1000 Parts replacement time has passed...1000 Unknown file...1000 Calibration There is low ...997 No Maintenance Cartridge capacity...997 Maintenance cartridge full...997 Maintenance cartridge problem...998 Other Messages...
... Ink Tank Cover ...990 Not much ink is L, R, or not displayed) ...996 Execute printhead cleaning...996 Messages regarding printing or adjustment 992 Cannot execute this manual 1003 About This User Manual ...1003 Viewing Videos of Explanations ...1004 Searching Topics ...1004 HTML Version of the Manual for parts replacement...1000 Parts replacement time has passed...1000 Unknown file...1000 Calibration There is low ...997 No Maintenance Cartridge capacity...997 Maintenance cartridge full...997 Maintenance cartridge problem...998 Other Messages...

iPF6300 User Manual ver.1.20
Page 457
... Types Display Show/Hide 452 Changing the Display Order of Media Types 453 Updating Media Types ...455 Using Paper Other Than Genuine Paper/Feed Confirmed Paper 457 Compatible Paper ...458 Add Custom Paper ...459 4 Delete Custom Paper ...468 Edit Custom Paper ...469 Export Custom Media Information ...470 Import Custom Media Information ...471 Warnings ...474 The Features of Media Configuration Tool The Media Configuration Tool offers the following features. • Enables information about additional media (types of paper) supported by the printer administrator. • Canon...
... Types Display Show/Hide 452 Changing the Display Order of Media Types 453 Updating Media Types ...455 Using Paper Other Than Genuine Paper/Feed Confirmed Paper 457 Compatible Paper ...458 Add Custom Paper ...459 4 Delete Custom Paper ...468 Edit Custom Paper ...469 Export Custom Media Information ...470 Import Custom Media Information ...471 Warnings ...474 The Features of Media Configuration Tool The Media Configuration Tool offers the following features. • Enables information about additional media (types of paper) supported by the printer administrator. • Canon...

iPF6300 User Manual ver.1.20
Page 687
... Media Configuration Tool The Media Configuration Tool offers the following features. • Enables information about additional media (types of paper) supported by the printer administrator. 669 • Canon offers absolutely no guarantees regarding the print quality or paper feed properties of customer paper (paper that is not Canon genuine paper or Canon feed confirmed paper) to the printer driver, through the use of relevant media information files. • You can add custom paper (paper that is not Canon genuine paper or Canon output confirmed paper...
... Media Configuration Tool The Media Configuration Tool offers the following features. • Enables information about additional media (types of paper) supported by the printer administrator. 669 • Canon offers absolutely no guarantees regarding the print quality or paper feed properties of customer paper (paper that is not Canon genuine paper or Canon feed confirmed paper) to the printer driver, through the use of relevant media information files. • You can add custom paper (paper that is not Canon genuine paper or Canon output confirmed paper...

iPF6300 User Manual ver.1.20
Page 850
... printer driver from information about the latest three print jobs.) Third Level Document Name User Name Page Count Job Status Print Start Time Print End Time Print Time Print Size Media Type Interface Ink Consumed Print settings Head Height Fourth Level Fifth Level OK CANCELED yyyy/mm/dd hh:mm:ss yyyy/mm/dd hh:mm:ss xxxsec. Ink Menu First Level 8 Rep. xxxxxxxxsq.mm USB Network (The total amount of paper the printer supports, see "Paper Sizes." →P.715 *3: Available only if ManageRemainRoll is On. Printer Parts > Control Panel > First Level Paper...
... printer driver from information about the latest three print jobs.) Third Level Document Name User Name Page Count Job Status Print Start Time Print End Time Print Time Print Size Media Type Interface Ink Consumed Print settings Head Height Fourth Level Fifth Level OK CANCELED yyyy/mm/dd hh:mm:ss yyyy/mm/dd hh:mm:ss xxxsec. Ink Menu First Level 8 Rep. xxxxxxxxsq.mm USB Network (The total amount of paper the printer supports, see "Paper Sizes." →P.715 *3: Available only if ManageRemainRoll is On. Printer Parts > Control Panel > First Level Paper...

iPF6300 User Manual ver.1.20
Page 857
... paper to use when printing on sheets. Printer Parts > Control Panel > Paper Details Setting Item (The type of paper is displayed here.) (*1 →P.839 ) VacuumStrngth Scan Wait Time Description, Instructions Specify the level of suction that holds paper against the Platen. (See "Adjusting the Vacuum Strength (VacuumStrngth).") →P.780 Specify the time to wait for the ink to dry between each sheet. When printing on heavyweight paper such as specified in the printer driver and related software...
... paper to use when printing on sheets. Printer Parts > Control Panel > Paper Details Setting Item (The type of paper is displayed here.) (*1 →P.839 ) VacuumStrngth Scan Wait Time Description, Instructions Specify the level of suction that holds paper against the Platen. (See "Adjusting the Vacuum Strength (VacuumStrngth).") →P.780 Specify the time to wait for the ink to dry between each sheet. When printing on heavyweight paper such as specified in the printer driver and related software...

iPF6300 User Manual ver.1.20
Page 864
... configuration by administrators only IPv4 Settings Change Password Init.Admin.Pswd • Viewing and configuration by administrators, and only viewing by other users Interface Setup settings (except IPv4 Settings ) Date & Time Date Format Time Zone Use RemoteUI Reset PaprSetngs Choose OK to another location. Select this option when transferring the printer to restore the Admin. Enter a number in Job Menu > Job Log. Indicates information about the printhead. Choose 1 page to the default values. Select Warning > On to display...
... configuration by administrators only IPv4 Settings Change Password Init.Admin.Pswd • Viewing and configuration by administrators, and only viewing by other users Interface Setup settings (except IPv4 Settings ) Date & Time Date Format Time Zone Use RemoteUI Reset PaprSetngs Choose OK to another location. Select this option when transferring the printer to restore the Admin. Enter a number in Job Menu > Job Log. Indicates information about the printhead. Choose 1 page to the default values. Select Warning > On to display...

iPF6300 User Manual ver.1.20
Page 865
... ink consumed when cleaning printheads by forceful ejection of these estimates. Follow the instructions displayed to five). Print End Time Indicates when the print job was started. Printer Parts > Control Panel > Printer Info Setting Item System Info Description, Instructions Indicates the firmware version, serial number, and interface information. Calculation of ink. For instructions on selecting menu items, see "Menu Structure." →P.830 Ink Menu Setting Item Rep. Page Count Indicates the number of use. Job Status Indicates the printing results. Print...
... ink consumed when cleaning printheads by forceful ejection of these estimates. Follow the instructions displayed to five). Print End Time Indicates when the print job was started. Printer Parts > Control Panel > Printer Info Setting Item System Info Description, Instructions Indicates the firmware version, serial number, and interface information. Calculation of ink. For instructions on selecting menu items, see "Menu Structure." →P.830 Ink Menu Setting Item Rep. Page Count Indicates the number of use. Job Status Indicates the printing results. Print...

iPF6300 User Manual ver.1.20
Page 878
... USB -compatible model • Operating system: Windows 7/Windows Vista/Windows Server 2008/Windows Server 2003/Windows XP/Windows 2000 or Mac OS X ver. 10.3.9 or later • USB 2.0 driver: Microsoft USB 2.0 driver (available from the Front Paper Feed Slot, leave 1,300 mm (51.2 in) of unobstructed space in front of the printer, 300 mm (11.8 in ) above the printer. Only when printing from Windows Update or the Service Pack.) • USB cable: Certified USB 2.0 cable Ink Ink Tank 860 PC Ink Tank ( Photo...
... USB -compatible model • Operating system: Windows 7/Windows Vista/Windows Server 2008/Windows Server 2003/Windows XP/Windows 2000 or Mac OS X ver. 10.3.9 or later • USB 2.0 driver: Microsoft USB 2.0 driver (available from the Front Paper Feed Slot, leave 1,300 mm (51.2 in) of unobstructed space in front of the printer, 300 mm (11.8 in ) above the printer. Only when printing from Windows Update or the Service Pack.) • USB cable: Certified USB 2.0 cable Ink Ink Tank 860 PC Ink Tank ( Photo...

iPF6300 User Manual ver.1.20
Page 890
... also configure IPv6 StlessAddrs and DHCPv6 from the printer Control Panel. Press the OK button. Press ▲ or ▼ to select IPv6 Support, and then press the OK button. 7. Use RemoteUI to change the status of the Control Panel, press ◀ or ▶ to display the RemoteUI page. Menu is not displayed, press the Menu button. 2. Using RemoteUI Enter the printer's IP address in the Location (or Address ) box to select the Settings/Adj...
... also configure IPv6 StlessAddrs and DHCPv6 from the printer Control Panel. Press the OK button. Press ▲ or ▼ to select IPv6 Support, and then press the OK button. 7. Use RemoteUI to change the status of the Control Panel, press ◀ or ▶ to display the RemoteUI page. Menu is not displayed, press the Menu button. 2. Using RemoteUI Enter the printer's IP address in the Location (or Address ) box to select the Settings/Adj...

iPF6300/iPF6350 Basic Guide No.3
Page 9
Compatible operating systems Windows 7, Windows Vista, Windows Server 2008, Windows Server 2003, Windows XP, and Windows 2000 Supported connection methods The printer driver works over USB or network (TCP/IP) connections. Follow these steps to your network hub port. 2 Insert the provided User Software CD-ROM for installing the printer driver are as follows. Installing the Printer Driver (Windows) The basic instructions for the appropriate operating system in the CD-ROM drive. 9 The driver installation procedure varies depending on . If you accidentally connect the USB cable ...
Compatible operating systems Windows 7, Windows Vista, Windows Server 2008, Windows Server 2003, Windows XP, and Windows 2000 Supported connection methods The printer driver works over USB or network (TCP/IP) connections. Follow these steps to your network hub port. 2 Insert the provided User Software CD-ROM for installing the printer driver are as follows. Installing the Printer Driver (Windows) The basic instructions for the appropriate operating system in the CD-ROM drive. 9 The driver installation procedure varies depending on . If you accidentally connect the USB cable ...

iPF6300/iPF6350 Basic Guide No.2
Page 35
... OK button to clear the error. 2. Either change the printer driver Paper Source setting or replace the paper with color calibration. (→"Types of Paper," User Manual) The test pattern was printed too faintly. Cannot calibrate. However, note that is not used when causing the sensor to ensure the printer is compatible with color calibration. However, the roll paper may run out during the print job and you have loaded colored paper. Press the OK button to clear the error. Adjustment...
... OK button to clear the error. 2. Either change the printer driver Paper Source setting or replace the paper with color calibration. (→"Types of Paper," User Manual) The test pattern was printed too faintly. Cannot calibrate. However, note that is not used when causing the sensor to ensure the printer is compatible with color calibration. However, the roll paper may run out during the print job and you have loaded colored paper. Press the OK button to clear the error. Adjustment...

iPF6300/iPF6350 Basic Guide No.2
Page 46
... Holder) (→ , Loading Rolls in the Control Panel menu is set to stop printing. Press ▲ or ▼ to select Stop Printing, and then press the OK button to Pause or Warning, the width of the roll loaded in the Printer) 4. Replace the paper with paper compatible for borderless printing. (→ , Loading Rolls on the Display Screen, press the OK button. Remove the paper. (→ , If Roll Paper Jams) (→ , If a Sheet Jams) 3. Press the OK...
... Holder) (→ , Loading Rolls in the Control Panel menu is set to stop printing. Press ▲ or ▼ to select Stop Printing, and then press the OK button to Pause or Warning, the width of the roll loaded in the Printer) 4. Replace the paper with paper compatible for borderless printing. (→ , Loading Rolls on the Display Screen, press the OK button. Remove the paper. (→ , If Roll Paper Jams) (→ , If a Sheet Jams) 3. Press the OK...

iPF6300/iPF6350 Basic Guide No.2
Page 48
... Settings of the same type and size. 1. Cause Corrective Action A print job for Printing," User Manual) 48 Load a new roll. (→ , Loading Rolls in the control panel menu and a barcode is not printed on the roll, specify the type of paper. (→"Changing the Type of Paper," User Manual) 4. Load the new roll. (→ , Loading Rolls on the Display Screen, press the OK button. Finish printing remaining jobs? Choose a higher level of Print Quality in the Printer) 3. Press ▲ or ▼ to stop printing...
... Settings of the same type and size. 1. Cause Corrective Action A print job for Printing," User Manual) 48 Load a new roll. (→ , Loading Rolls in the control panel menu and a barcode is not printed on the roll, specify the type of paper. (→"Changing the Type of Paper," User Manual) 4. Load the new roll. (→ , Loading Rolls on the Display Screen, press the OK button. Finish printing remaining jobs? Choose a higher level of Print Quality in the Printer) 3. Press ▲ or ▼ to stop printing...
iPF6300/iPF6350 Basic Guide No.1
Page 8
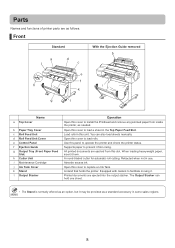
...Name a Top Cover b Paper Tray Cover c Roll Feed Unit d Roll Feed Unit Cover e Control Panel f Ejection Guide g Output Tray (Front Paper Feed Slot) h Cutter Unit i Maintenance Cartridge j Ink Tank Cover k Stand l Output Stacker Operation Open this cover to prevent it may be provided as needed. Open this cover to operate the printer and check the printer status. Use this panel to install the Printhead and remove any jammed paper from rising. A round-bladed cutter for automatic roll cutting. Retracted when not in some sales regions. 8 The Output Stacker can also load sheets manually.
...Name a Top Cover b Paper Tray Cover c Roll Feed Unit d Roll Feed Unit Cover e Control Panel f Ejection Guide g Output Tray (Front Paper Feed Slot) h Cutter Unit i Maintenance Cartridge j Ink Tank Cover k Stand l Output Stacker Operation Open this cover to prevent it may be provided as needed. Open this cover to operate the printer and check the printer status. Use this panel to install the Printhead and remove any jammed paper from rising. A round-bladed cutter for automatic roll cutting. Retracted when not in some sales regions. 8 The Output Stacker can also load sheets manually.
Setup Guide
Page 1
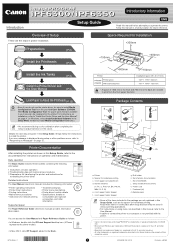
... can access the User Manual and Paper Reference Guide as shown in a handy location for network printing • Troubleshooting tips • Printer menu descriptions • Printer driver function details • Specifications, details on page 12. Load Paper to Adjust the Printheads (P.12) • Even if you do not use the printer driver, be registered to the documentation for instructions on using items not described in this manual in this Setup Guide, refer to the printer. Daily operation The Basic Guide includes...
... can access the User Manual and Paper Reference Guide as shown in a handy location for network printing • Troubleshooting tips • Printer menu descriptions • Printer driver function details • Specifications, details on page 12. Load Paper to Adjust the Printheads (P.12) • Even if you do not use the printer driver, be registered to the documentation for instructions on using items not described in this manual in this Setup Guide, refer to the printer. Daily operation The Basic Guide includes...

Setup Guide
Page 5
.... This completes printer driver installation. Insert the provided User Software CD-ROM for your operating system in the CD-ROM drive. 2 In the Setup Menu window, click Install Printer Driver. • To choose a different language, click MEMO Language. 3 Confirm that conforms to the Hi-Speed USB specification. • Connect the USB cable to the printer according to the on-screen instructions during installation of the software. 6 In the Printer Selection window, select The printer is connected directly to a computer...
.... This completes printer driver installation. Insert the provided User Software CD-ROM for your operating system in the CD-ROM drive. 2 In the Setup Menu window, click Install Printer Driver. • To choose a different language, click MEMO Language. 3 Confirm that conforms to the Hi-Speed USB specification. • Connect the USB cable to the printer according to the on-screen instructions during installation of the software. 6 In the Printer Selection window, select The printer is connected directly to a computer...

Setup Guide
Page 6
.../IP (network) connections When you have finished setting up the printer and installing the printer driver and User Manual, we recommend performing color calibration. The LED on the top lights orange. 2 Make sure the printer is on . The installation process begins. 16 After installation is compatible with this process. tab) and select Adjust Printer - Color MEMO calibration compensates for your operating system in the CD-ROM drive. 3 In the Setup Menu window, click Install Printer Driver. 4 Confirm...
.../IP (network) connections When you have finished setting up the printer and installing the printer driver and User Manual, we recommend performing color calibration. The LED on the top lights orange. 2 Make sure the printer is on . The installation process begins. 16 After installation is compatible with this process. tab) and select Adjust Printer - Color MEMO calibration compensates for your operating system in the CD-ROM drive. 3 In the Setup Menu window, click Install Printer Driver. 4 Confirm...

Setup Guide
Page 7
... to select Interface Setup and press OK. 3 Use the ▲ and ▼ keys to select (settings/adj. Follow steps 8-11 on page 7 to finish installing the printer driver. 7 Select a printer from the list on either set on the printer. This is set DNS Dync update to select a field for the first time, do not operate the printer until printhead adjustment is turned off and on the control panel. 1.Select IPv4 and...
... to select Interface Setup and press OK. 3 Use the ▲ and ▼ keys to select (settings/adj. Follow steps 8-11 on page 7 to finish installing the printer driver. 7 Select a printer from the list on either set on the printer. This is set DNS Dync update to select a field for the first time, do not operate the printer until printhead adjustment is turned off and on the control panel. 1.Select IPv4 and...

Setup Guide
Page 12
... feed unit cover. xxxxxxxx-xxxx (x represents a letter or number) Cause The loaded paper is now complete. Corrective Action Adjust the paper. (see steps 2-7 on page 12) Turn off the printer and wait at "Install the Printer Driver and the User Manual". Write down the error code and message, turn off the printer, and contact your Canon dealer for selecting the paper type is finished, Ready appears on the display screen. a b 4 Slide the holder stopper for printhead adjustment...
... feed unit cover. xxxxxxxx-xxxx (x represents a letter or number) Cause The loaded paper is now complete. Corrective Action Adjust the paper. (see steps 2-7 on page 12) Turn off the printer and wait at "Install the Printer Driver and the User Manual". Write down the error code and message, turn off the printer, and contact your Canon dealer for selecting the paper type is finished, Ready appears on the display screen. a b 4 Slide the holder stopper for printhead adjustment...


