
Reference Guide FAXPHONE L90
Page 26
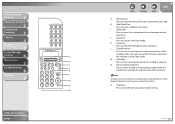
... key Press to adjust the density for copy or documents you disconnect the power cord of the machine. Any data stored in the memory, including received fax documents, will be deleted if you send. L [Stop/Reset] key Press to stop a current job or to return the machine to tone dialing. 1-7 N Processing/Data indicator Flashes while sending or receiving faxes. I [Menu] key Press to access the setting menu for sending or copying. J [Copy] key Press to switch to access additional fax modes. Mode] key Press to the Copy mode. M [Start] key Press to clear entered alphanumeric...
... key Press to adjust the density for copy or documents you disconnect the power cord of the machine. Any data stored in the memory, including received fax documents, will be deleted if you send. L [Stop/Reset] key Press to stop a current job or to return the machine to tone dialing. 1-7 N Processing/Data indicator Flashes while sending or receiving faxes. I [Menu] key Press to access the setting menu for sending or copying. J [Copy] key Press to switch to access additional fax modes. Mode] key Press to the Copy mode. M [Start] key Press to clear entered alphanumeric...
Reference Guide FAXPHONE L90
Page 46
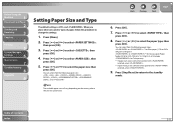
... Using the Machine 1 Document and Paper 2 Sending and Receiving 3 Copying 4 Printing 5 System Manager Settings 6 Maintenance 7 Troubleshooting 8 Appendix 9 Setting Paper Size and Type The default setting is not sufficient when printed with selected, select . 9. Press [ ] or [ ] to select the paper size, then press [OK]. Press [ ] or [ ] to select , then press [OK]. 4. Press [ ] or [ ] to select , then press [OK]. 5. Table of paper, follow this procedure to change the settings. 1. When you place other sizes and/or types...
... Using the Machine 1 Document and Paper 2 Sending and Receiving 3 Copying 4 Printing 5 System Manager Settings 6 Maintenance 7 Troubleshooting 8 Appendix 9 Setting Paper Size and Type The default setting is not sufficient when printed with selected, select . 9. Press [ ] or [ ] to select the paper size, then press [OK]. Press [ ] or [ ] to select , then press [OK]. 4. Press [ ] or [ ] to select , then press [OK]. 5. Table of paper, follow this procedure to change the settings. 1. When you place other sizes and/or types...

Reference Guide FAXPHONE L90
Page 69
... receives a fax, the machine does not ring and switches to the standby mode. Press [Stop/Reset] to return to the receive mode automatically. You can set the fax receive mode to suit your needs, set how the received documents are printed. ˙ FAX/TEL: Optional Settings If required, change the optional settings as follows: 1. Before Using the Machine 1 Document and Paper 2 Sending and Receiving 3 Copying 4 Printing 5 System Manager Settings 6 Maintenance 7 Troubleshooting 8 Appendix 9 Receiving Features You can also set the machine to receive fax documents into memory...
... receives a fax, the machine does not ring and switches to the standby mode. Press [Stop/Reset] to return to the receive mode automatically. You can set the fax receive mode to suit your needs, set how the received documents are printed. ˙ FAX/TEL: Optional Settings If required, change the optional settings as follows: 1. Before Using the Machine 1 Document and Paper 2 Sending and Receiving 3 Copying 4 Printing 5 System Manager Settings 6 Maintenance 7 Troubleshooting 8 Appendix 9 Receiving Features You can also set the machine to receive fax documents into memory...

Reference Guide FAXPHONE L90
Page 73
Press [ ] or [ ] to the standby mode. Press [Stop/Reset] to return to select , then press [OK]. 4. Press [ ] or [ ] to receive faxes manually. If the machine is being used by someone else. Table of 25. 1. Before Using the Machine 1 Document and Paper 2 Sending and Receiving 3 Copying 4 Printing 5 System Manager Settings 6 Maintenance 7 Troubleshooting 8 Appendix 9 ˙ Remote Reception Remote reception enables you to use an external telephone connected to the machine to select , then press [OK]. 5. This...
Press [ ] or [ ] to the standby mode. Press [Stop/Reset] to return to select , then press [OK]. 4. Press [ ] or [ ] to receive faxes manually. If the machine is being used by someone else. Table of 25. 1. Before Using the Machine 1 Document and Paper 2 Sending and Receiving 3 Copying 4 Printing 5 System Manager Settings 6 Maintenance 7 Troubleshooting 8 Appendix 9 ˙ Remote Reception Remote reception enables you to use an external telephone connected to the machine to select , then press [OK]. 5. This...
Reference Guide FAXPHONE L90
Page 88
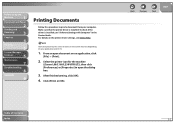
... the machine ([Canon L90/L160/L230 UFRII LT]), then click [Preferences] or [Properties] to display the print screen or items on the screen may vary depending on the printer driver settings, see "Software Settings with Computer" in the Starter Guide. How to open document on an application, click [File] → [Print]. 2. Click [Print] or [OK]. Make sure that the printer driver is installed, see Online Help. To check if the driver is installed. From an open the...
... the machine ([Canon L90/L160/L230 UFRII LT]), then click [Preferences] or [Properties] to display the print screen or items on the screen may vary depending on the printer driver settings, see "Software Settings with Computer" in the Starter Guide. How to open document on an application, click [File] → [Print]. 2. Click [Print] or [OK]. Make sure that the printer driver is installed, see Online Help. To check if the driver is installed. From an open the...
Reference Guide FAXPHONE L90
Page 146
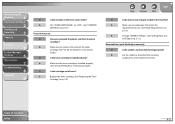
... mode? A Replace the toner cartridge. (See "Replacing the Toner Cartridge," on p. 9-6.) Faxes do not print. Before Using the Machine 1 Document and Paper 2 Sending and Receiving 3 Copying 4 Printing 5 System Manager Settings 6 Maintenance 7 Troubleshooting 8 Appendix 9 Q Is the machine in the Starter Guide.) Q Is the cartridge out of toner? A Set to check that meets the requirements for use. (See "Paper Requirements," on p. 2-5.) A Change . (See "Setting Paper Size and Type," on p. 2-11.) Received faxes print blotched or unevenly. A Make sure you removed...
... mode? A Replace the toner cartridge. (See "Replacing the Toner Cartridge," on p. 9-6.) Faxes do not print. Before Using the Machine 1 Document and Paper 2 Sending and Receiving 3 Copying 4 Printing 5 System Manager Settings 6 Maintenance 7 Troubleshooting 8 Appendix 9 Q Is the machine in the Starter Guide.) Q Is the cartridge out of toner? A Set to check that meets the requirements for use. (See "Paper Requirements," on p. 2-5.) A Change . (See "Setting Paper Size and Type," on p. 2-11.) Received faxes print blotched or unevenly. A Make sure you removed...
Reference Guide FAXPHONE L90
Page 149
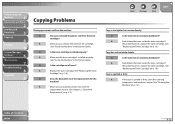
... A Make sure you removed the plastic seal from the machine. A If the copy is spotted or dirty, clean the scanning components and machine's interior (See "Cleaning the Machine," on p. 2-2.) Back Previous Next TOP Copy is too light or has uneven density. If the problem persists, replace the toner cartridge. (See "Replacing the Toner Cartridge," on p. 7-8.) Copy is installed properly. (See "Set Up the Machine," in the Starter Guide.) Q Is the toner cartridge installed properly? Q Have you load documents...
... A Make sure you removed the plastic seal from the machine. A If the copy is spotted or dirty, clean the scanning components and machine's interior (See "Cleaning the Machine," on p. 2-2.) Back Previous Next TOP Copy is too light or has uneven density. If the problem persists, replace the toner cartridge. (See "Replacing the Toner Cartridge," on p. 7-8.) Copy is installed properly. (See "Set Up the Machine," in the Starter Guide.) Q Is the toner cartridge installed properly? Q Have you load documents...
Reference Guide FAXPHONE L90
Page 151
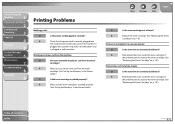
... light or has uneven density. A Check that the power cord is securely plugged into the machine and into a power strip, make sure the power strip is plugged in and turned on p. 7-8.) Printout is installed properly. (See "Set Up the Machine," in securely? A Replace the toner cartridge. (See "Replacing the Toner Cartridge," on . A Redistribute the toner inside the toner cartridge. Before Using the Machine 1 Document and Paper 2 Sending and Receiving 3 Copying 4 Printing 5 System Manager Settings 6 Maintenance 7 Troubleshooting 8 Appendix 9 Printing Problems...
... light or has uneven density. A Check that the power cord is securely plugged into the machine and into a power strip, make sure the power strip is plugged in and turned on p. 7-8.) Printout is installed properly. (See "Set Up the Machine," in securely? A Replace the toner cartridge. (See "Replacing the Toner Cartridge," on . A Redistribute the toner inside the toner cartridge. Before Using the Machine 1 Document and Paper 2 Sending and Receiving 3 Copying 4 Printing 5 System Manager Settings 6 Maintenance 7 Troubleshooting 8 Appendix 9 Printing Problems...
Reference Guide FAXPHONE L90
Page 153
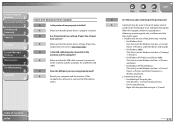
... installed? A Make sure that the USB cable is properly installed. Q Does the USB port you installed. - For Windows 2000: Click [Start] on the Windows task bar → [Control Panel] → [Printers and Other Hardware] → [Printers and Faxes]. 2. For the specified job: Right-click the specified print job → [Cancel] Table of the printer you are correct. (See Online Help.) Q Is the USB cable properly connected to the machine and the computer? A Make sure that the printer driver settings (Paper Size, Output Size) are using properly work...
... installed? A Make sure that the USB cable is properly installed. Q Does the USB port you installed. - For Windows 2000: Click [Start] on the Windows task bar → [Control Panel] → [Printers and Other Hardware] → [Printers and Faxes]. 2. For the specified job: Right-click the specified print job → [Cancel] Table of the printer you are correct. (See Online Help.) Q Is the USB cable properly connected to the machine and the computer? A Make sure that the printer driver settings (Paper Size, Output Size) are using properly work...
Reference Guide FAXPHONE L90
Page 158
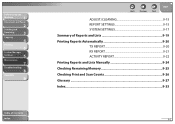
Before Using the Machine 1 Document and Paper 2 Sending and Receiving 3 Copying 4 Printing 5 System Manager Settings 6 Maintenance 7 Troubleshooting 8 Appendix 9 Table of Contents Index Back Previous Next TOP ADJUST./CLEANING 9-15 REPORT SETTINGS 9-15 SYSTEM SETTINGS 9-17 Summary of Reports and Lists 9-19 Printing Reports Automatically 9-20 TX REPORT 9-20 RX REPORT 9-21 ACTIVITY REPORT 9-22 Printing Reports and Lists Manually 9-24 Checking Remaining Memory 9-25 Checking Print and Scan Counts 9-26 Glossary ...9-27 Index ...9-33 9-2
Before Using the Machine 1 Document and Paper 2 Sending and Receiving 3 Copying 4 Printing 5 System Manager Settings 6 Maintenance 7 Troubleshooting 8 Appendix 9 Table of Contents Index Back Previous Next TOP ADJUST./CLEANING 9-15 REPORT SETTINGS 9-15 SYSTEM SETTINGS 9-17 Summary of Reports and Lists 9-19 Printing Reports Automatically 9-20 TX REPORT 9-20 RX REPORT 9-21 ACTIVITY REPORT 9-22 Printing Reports and Lists Manually 9-24 Checking Remaining Memory 9-25 Checking Print and Scan Counts 9-26 Glossary ...9-27 Index ...9-33 9-2
Reference Guide FAXPHONE L90
Page 159
... mode. Printing starts, and the screen automatically returns to select , then press [OK]. 4. Press [Menu]. 2. Press [ ] or [ ] to access, then press [OK]. Back Previous Next TOP ˙ Accessing the Setting Menu 1. Table of the current settings, print out USER DATA LIST. ˙ Printing USER DATA LIST 1. To see the list of Contents Index 9-3 Press [ ] or [ ] to select the menu you want to select , then press [OK]. 3. Before Using the Machine 1 Document and Paper 2 Sending and Receiving 3 Copying 4 Printing...
... mode. Printing starts, and the screen automatically returns to select , then press [OK]. 4. Press [Menu]. 2. Press [ ] or [ ] to access, then press [OK]. Back Previous Next TOP ˙ Accessing the Setting Menu 1. Table of the current settings, print out USER DATA LIST. ˙ Printing USER DATA LIST 1. To see the list of Contents Index 9-3 Press [ ] or [ ] to select the menu you want to select , then press [OK]. 3. Before Using the Machine 1 Document and Paper 2 Sending and Receiving 3 Copying 4 Printing...
Reference Guide FAXPHONE L90
Page 166
... the Receive Mode for Printing," on p. 3-28.) All receptions are received. Sets whether to insert the machine's fax number and the sender information on the size of the image. Print each page as it is cut and not recorded. 9-10 Sets whether to reduce or truncate the image when a faxed page is received. The image that sends the TSI signal. Before Using the Machine 1 Document and Paper 2 Sending and Receiving 3 Copying 4 Printing 5 System Manager Settings 6 Maintenance 7 Troubleshooting 8 Appendix 9 FAX SETTINGS 5. RX PRINT MEMORY RX PRINT...
... the Receive Mode for Printing," on p. 3-28.) All receptions are received. Sets whether to insert the machine's fax number and the sender information on the size of the image. Print each page as it is cut and not recorded. 9-10 Sets whether to reduce or truncate the image when a faxed page is received. The image that sends the TSI signal. Before Using the Machine 1 Document and Paper 2 Sending and Receiving 3 Copying 4 Printing 5 System Manager Settings 6 Maintenance 7 Troubleshooting 8 Appendix 9 FAX SETTINGS 5. RX PRINT MEMORY RX PRINT...

Reference Guide FAXPHONE L90
Page 177
... of error codes, See "Error Codes," on p. 8-16. Press [Menu]. 2. STOP: Transmission manually canceled before completion - Before Using the Machine 1 Document and Paper 2 Sending and Receiving 3 Copying 4 Printing 5 System Manager Settings 6 Maintenance 7 Troubleshooting 8 Appendix 9 Report Items The following items are displayed in the Transmission Report: ˔ JOB NO.: Job number ˔ MODE: Mode of transaction (G3 or ECM) ˔ NO.: Sequence number ˔ DESTINATION TEL/ID: Name and number of recipient ˔ START TIME: Date and time of transaction ˔ PAGE...
... of error codes, See "Error Codes," on p. 8-16. Press [Menu]. 2. STOP: Transmission manually canceled before completion - Before Using the Machine 1 Document and Paper 2 Sending and Receiving 3 Copying 4 Printing 5 System Manager Settings 6 Maintenance 7 Troubleshooting 8 Appendix 9 Report Items The following items are displayed in the Transmission Report: ˔ JOB NO.: Job number ˔ MODE: Mode of transaction (G3 or ECM) ˔ NO.: Sequence number ˔ DESTINATION TEL/ID: Name and number of recipient ˔ START TIME: Date and time of transaction ˔ PAGE...
Reference Guide FAXPHONE L90
Page 184
.... D Document The sheet of Contents Index 9-28 With this feature, one telephone line can be shared by both the telephone and the fax. DRPD This receive mode allows the machine to distinguish fax and voice calls depending on subsequent visits. If the call is used to enable a user to automatically sign on the line. Before Using the Machine 1 Document and Paper 2 Sending and Receiving 3 Copying 4 Printing 5 System Manager Settings 6 Maintenance 7 Troubleshooting 8 Appendix 9 Coded Speed Dialing Codes A method...
.... D Document The sheet of Contents Index 9-28 With this feature, one telephone line can be shared by both the telephone and the fax. DRPD This receive mode allows the machine to distinguish fax and voice calls depending on subsequent visits. If the call is used to enable a user to automatically sign on the line. Before Using the Machine 1 Document and Paper 2 Sending and Receiving 3 Copying 4 Printing 5 System Manager Settings 6 Maintenance 7 Troubleshooting 8 Appendix 9 Coded Speed Dialing Codes A method...

Reference Guide FAXPHONE L90
Page 185
... transmission time. Back Previous Next TOP I Interface The connection between a printer and a computer. LPD Line Printer Daemon. A daemon is supported by CCITT/ITU-T. Images in Address Book as a means of specifying recipients that allows computer applications to this port. Interface cable The cable used to a printer. L Log in Entering a password as a group. Before Using the Machine 1 Document and Paper 2 Sending and Receiving 3 Copying 4 Printing 5 System Manager Settings 6 Maintenance 7 Troubleshooting 8 Appendix 9 G G3, Group 3 fax machine Defined...
... transmission time. Back Previous Next TOP I Interface The connection between a printer and a computer. LPD Line Printer Daemon. A daemon is supported by CCITT/ITU-T. Images in Address Book as a means of specifying recipients that allows computer applications to this port. Interface cable The cable used to a printer. L Log in Entering a password as a group. Before Using the Machine 1 Document and Paper 2 Sending and Receiving 3 Copying 4 Printing 5 System Manager Settings 6 Maintenance 7 Troubleshooting 8 Appendix 9 G G3, Group 3 fax machine Defined...
Reference Guide FAXPHONE L90
Page 189
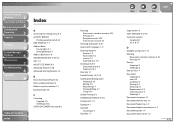
... Checking dialing line 3-20 Clean Earth Campaign 7-17 Cleaning machine Exterior 7-2 Fuser roller 7-6 Interior 7-2 Scanning area 7-6 Clearing jams 8-3 Document jams 8-3 Paper jams 8-5 Clear key 1-7 Coded Dial key 1-8, 3-14 Coded speed dialing codes Deleting 3-10 Editing 3-9 Registering 3-7 Storing/Editing 3-7 Using 3-14 Collate Printing 5-3 COMMON SETTINGS 9-3, 9-6 Components 1-3 Copying 4-1 Copy job Canceling 4-5 Copy key 1-7 Copy mode 1-9 COPY SETTINGS 9-3, 9-6 Customer support Canada 8-37 U.S.A. 8-37 D Daylight saving time 1-15 Deleting Documents stored in memory 3-35 Print job 5-4 Density...
... Checking dialing line 3-20 Clean Earth Campaign 7-17 Cleaning machine Exterior 7-2 Fuser roller 7-6 Interior 7-2 Scanning area 7-6 Clearing jams 8-3 Document jams 8-3 Paper jams 8-5 Clear key 1-7 Coded Dial key 1-8, 3-14 Coded speed dialing codes Deleting 3-10 Editing 3-9 Registering 3-7 Storing/Editing 3-7 Using 3-14 Collate Printing 5-3 COMMON SETTINGS 9-3, 9-6 Components 1-3 Copying 4-1 Copy job Canceling 4-5 Copy key 1-7 Copy mode 1-9 COPY SETTINGS 9-3, 9-6 Customer support Canada 8-37 U.S.A. 8-37 D Daylight saving time 1-15 Deleting Documents stored in memory 3-35 Print job 5-4 Density...

Reference Guide FAXPHONE L90
Page 191
... ID 3-27 Replacing the toner cartridge 7-8 Reports and lists 9-19 REPORT SETTINGS 9-3, 9-15 Restricting access to destinations Confirm entered fax numbers 6-3 RX REPORT Printing automatically 9-21 S Scanning area 2-3 Scan settings Copying 4-3 Sending 3-6 Sending and receiving 3-1 Sending documents Address Book 3-7 Advanced features 3-30 Basic sending method 3-5 Fax dialing features 3-18 Manual sending 3-17 Scan settings 3-6 Specifying recipients 3-14 Setting menu ADDRESS BOOK SET. 9-12 COMMON SETTINGS 9-6 COPY SETTINGS 9-6 PAPER SETTINGS 9-5 PRINTER SETTINGS 9-13 REPORT SETTINGS 9-15 SYSTEM...
... ID 3-27 Replacing the toner cartridge 7-8 Reports and lists 9-19 REPORT SETTINGS 9-3, 9-15 Restricting access to destinations Confirm entered fax numbers 6-3 RX REPORT Printing automatically 9-21 S Scanning area 2-3 Scan settings Copying 4-3 Sending 3-6 Sending and receiving 3-1 Sending documents Address Book 3-7 Advanced features 3-30 Basic sending method 3-5 Fax dialing features 3-18 Manual sending 3-17 Scan settings 3-6 Specifying recipients 3-14 Setting menu ADDRESS BOOK SET. 9-12 COMMON SETTINGS 9-6 COPY SETTINGS 9-6 PAPER SETTINGS 9-5 PRINTER SETTINGS 9-13 REPORT SETTINGS 9-15 SYSTEM...

FAXPHONE L90 Basic Operation Guide
Page 7
Printer Feature Print a document from a PC Printing → p. 6-2 Sort printouts by page order Collate Printing → p. 6-4 System Manager Settings Restrict the use of the machine with This Machine? What Can I Do with a password System Manager Settings → Reference Guide vi
Printer Feature Print a document from a PC Printing → p. 6-2 Sort printouts by page order Collate Printing → p. 6-4 System Manager Settings Restrict the use of the machine with This Machine? What Can I Do with a password System Manager Settings → Reference Guide vi
FAXPHONE L90 Basic Operation Guide
Page 15
...) to light. - Never lift the machine by any objects into the machine. - To avoid spillage in or around the machine, do not attempt to remove the toner cartridge from operating properly. For all warnings and instructions marked on the machine since they may be sure to service the machine yourself. To avoid paper jams, never unplug the power cord, open the scanning platform, or add or remove paper in fire...
...) to light. - Never lift the machine by any objects into the machine. - To avoid spillage in or around the machine, do not attempt to remove the toner cartridge from operating properly. For all warnings and instructions marked on the machine since they may be sure to service the machine yourself. To avoid paper jams, never unplug the power cord, open the scanning platform, or add or remove paper in fire...
FAXPHONE L90 Basic Operation Guide
Page 178
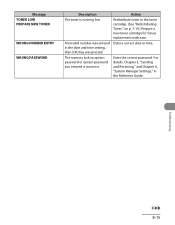
in the Reference Guide. The memory lock reception password or system password you entered is running low. For details, Chapter 3, "Sending and Receiving," and Chapter 6, "System Manager Settings," in the date and time setting, then [OK] key was entered Enter a correct date or time. Troubleshooting 8-15 An invalid number was pressed. Redistribute toner in the toner cartridge. (See "Redistributing Toner," on p. 7-10.) Prepare a new toner cartridge for future replacement with ease. Enter the correct password. Message TONER LOW PREPARE NEW TONER WRONG NUMBER ENTRY WRONG ...
in the Reference Guide. The memory lock reception password or system password you entered is running low. For details, Chapter 3, "Sending and Receiving," and Chapter 6, "System Manager Settings," in the date and time setting, then [OK] key was entered Enter a correct date or time. Troubleshooting 8-15 An invalid number was pressed. Redistribute toner in the toner cartridge. (See "Redistributing Toner," on p. 7-10.) Prepare a new toner cartridge for future replacement with ease. Enter the correct password. Message TONER LOW PREPARE NEW TONER WRONG NUMBER ENTRY WRONG ...


