

Quick Start Guide
Page 1
Quick Start Guide Table of Contents Introduction 1 How to Use the Documentation Provided 3 Preparing the Machine 5 Installing the MP Drivers 7 Reading the On-screen Manuals 9 Loading Paper in the Cassette 10 How to Navigate Menus on the LCD 11 Copying 14 Printing from a Memory Card 15 Photo Printing from Printed Photo or Film 19 Printing from Your Computer 24 Scanning Images 26 Printing Photographs Directly from a PictBridge Compliant Device 28 Replacing an Ink Tank 34 Specifications 36
Quick Start Guide Table of Contents Introduction 1 How to Use the Documentation Provided 3 Preparing the Machine 5 Installing the MP Drivers 7 Reading the On-screen Manuals 9 Loading Paper in the Cassette 10 How to Navigate Menus on the LCD 11 Copying 14 Printing from a Memory Card 15 Photo Printing from Printed Photo or Film 19 Printing from Your Computer 24 Scanning Images 26 Printing Photographs Directly from a PictBridge Compliant Device 28 Replacing an Ink Tank 34 Specifications 36

Quick Start Guide
Page 5
... instructions for: z copying z printing from a memory card z printing from the Setup CD-ROM. PC Photo Printing Guide (Windows® only) Refer to this guide when starting to use the machine. Scanning Guide Refer to this guide after reading the front side of your setup sheet when using the various application software included on troubleshooting them. Bluetooth Guide Refer to this sheet first. How to Use the Documentation Provided 3 This sheet includes instructions for setting up your machine to be used over network. If the Quick Start Guide...
... instructions for: z copying z printing from a memory card z printing from the Setup CD-ROM. PC Photo Printing Guide (Windows® only) Refer to this guide when starting to use the machine. Scanning Guide Refer to this guide after reading the front side of your setup sheet when using the various application software included on troubleshooting them. Bluetooth Guide Refer to this sheet first. How to Use the Documentation Provided 3 This sheet includes instructions for setting up your machine to be used over network. If the Quick Start Guide...

Quick Start Guide
Page 7
... Scanning Unit (Printer Cover) to return the holder to get ink on print quality. Important A USB cable is left open for about 2 minutes, until the machine has stopped making operating noises, before you turn on the inside of the bag the print head comes in step 3 of all the ink tanks are installed. Important z If you have removed it again properly. The machine cannot be some transparent or light blue ink...
... Scanning Unit (Printer Cover) to return the holder to get ink on print quality. Important A USB cable is left open for about 2 minutes, until the machine has stopped making operating noises, before you turn on the inside of the bag the print head comes in step 3 of all the ink tanks are installed. Important z If you have removed it again properly. The machine cannot be some transparent or light blue ink...

Quick Start Guide
Page 8
z When loading paper in the User's Guide on-screen manual. Notes on the LCD" in the Rear Tray, make sure that the Rear Tray lamp is lit. Do not open the Scanning Unit (Printer Cover) while printing. If the Bluetooth unit is not printed successfully and some error messages appear on the LCD, press the OK button to clear the error, go ahead to the next procedure to install the MP Drivers and on-screen manuals, then...
z When loading paper in the User's Guide on-screen manual. Notes on the LCD" in the Rear Tray, make sure that the Rear Tray lamp is lit. Do not open the Scanning Unit (Printer Cover) while printing. If the Bluetooth unit is not printed successfully and some error messages appear on the LCD, press the OK button to clear the error, go ahead to the next procedure to install the MP Drivers and on-screen manuals, then...
Quick Start Guide
Page 9
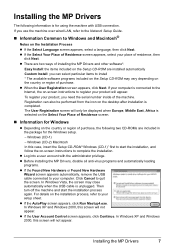
... on-screen instructions to your setup sheet. z If the AutoPlay screen appears, click Run Msetup4.exe. If your computer is connected to the Internet, the on-screen instructions to register your place of the machine. z If the User Account Control screen appears, click Continue. Installing the MP Drivers The following information is selected on the Select Your Place of Residence screen. „ Information for Windows z Depending...
... on-screen instructions to your setup sheet. z If the AutoPlay screen appears, click Run Msetup4.exe. If your computer is connected to the Internet, the on-screen instructions to register your place of the machine. z If the User Account Control screen appears, click Continue. Installing the MP Drivers The following information is selected on the Select Your Place of Residence screen. „ Information for Windows z Depending...

Quick Start Guide
Page 10
... supported, do not remove the Setup CD-ROM. While restarting, do not connect the machine to the machine may appear during the installation process. When using the Operation Panel on the machine to save scanned originals to be installed only on -screen instructions. Users in the PIXMA Extended Survey Program regarding the use of Canon printers. For details, refer to "Scanning Images" in the User's Guide on -screen manual in a language other than the installed one, double-click the Manual folder...
... supported, do not remove the Setup CD-ROM. While restarting, do not connect the machine to the machine may appear during the installation process. When using the Operation Panel on the machine to save scanned originals to be installed only on -screen instructions. Users in the PIXMA Extended Survey Program regarding the use of Canon printers. For details, refer to "Scanning Images" in the User's Guide on -screen manual in a language other than the installed one, double-click the Manual folder...

Quick Start Guide
Page 14
... a connected computer using the Photo Index Sheet. See "Printing by Using the Photo Index Sheet" on page 19. You can perform the maintenance or change the various settings of the LCD. Print the photo data saved on the 35 mm film strips and slides and then print them. z Display the Print Instruction Using the Navigation Menu When you do not know how to use the print function for the selected mode functions are displayed. You can scan the image data on a memory card...
... a connected computer using the Photo Index Sheet. See "Printing by Using the Photo Index Sheet" on page 19. You can perform the maintenance or change the various settings of the LCD. Print the photo data saved on the 35 mm film strips and slides and then print them. z Display the Print Instruction Using the Navigation Menu When you do not know how to use the print function for the selected mode functions are displayed. You can scan the image data on a memory card...

Quick Start Guide
Page 16
... number (1) of copies. (2) 6 Press the Color button for color copying, or the Black button for black & white copying. Reduced/Enlarged copy Two-sided copy Borderless copy 2-on-1 copy 4-on -screen manual. For details, refer to "Using Useful Copy Functions" in the User's Guide on-screen manual. 1 Turn on the machine. 2 Make sure that Copy is selected on the HOME screen, then press the OK button. 3 Load paper. 4 Load the original document on the Platen Glass. 5 Specify copy settings. (1) Confirm the paper source, page size, media type, and other settings. Using Useful Copy...
... number (1) of copies. (2) 6 Press the Color button for color copying, or the Black button for black & white copying. Reduced/Enlarged copy Two-sided copy Borderless copy 2-on-1 copy 4-on -screen manual. For details, refer to "Using Useful Copy Functions" in the User's Guide on-screen manual. 1 Turn on the machine. 2 Make sure that Copy is selected on the HOME screen, then press the OK button. 3 Load paper. 4 Load the original document on the Platen Glass. 5 Specify copy settings. (1) Confirm the paper source, page size, media type, and other settings. Using Useful Copy...

Quick Start Guide
Page 18
... the OK button. (2) Confirm the paper source, page size, media type, and other settings. See "Inserting the Memory Card" on the memory card. Do not remove the memory card while the Access lamp is reading or writing data from a Memory Card If you may damage the data saved on page 15. 3 Select the print menu. (1) Make sure that the memory card is lit, then remove the memory card. 3 Close the Card Slot Cover. Removing the memory card or turning off the machine while the Access lamp is...
... the OK button. (2) Confirm the paper source, page size, media type, and other settings. See "Inserting the Memory Card" on the memory card. Do not remove the memory card while the Access lamp is reading or writing data from a Memory Card If you may damage the data saved on page 15. 3 Select the print menu. (1) Make sure that the memory card is lit, then remove the memory card. 3 Close the Card Slot Cover. Removing the memory card or turning off the machine while the Access lamp is...

Quick Start Guide
Page 19
... photos saved on -screen manual. (3) Press the Color button. Trimming Edits images displayed on Canon Photo Stickers. To change the settings, select the item and press the OK button. (2) Confirm the total number of Photo index print or selected individual photos. Printing from a Memory Card 17 Photo index print Prints an index of dates. Using Useful Printing Functions Layout print Prints photos you have specified them . Captured info print Prints information on photographs at the time of its shooting (Exif info) in the margin of copies...
... photos saved on -screen manual. (3) Press the Color button. Trimming Edits images displayed on Canon Photo Stickers. To change the settings, select the item and press the OK button. (2) Confirm the total number of Photo index print or selected individual photos. Printing from a Memory Card 17 Photo index print Prints an index of dates. Using Useful Printing Functions Layout print Prints photos you have specified them . Captured info print Prints information on photographs at the time of its shooting (Exif info) in the margin of copies...

Quick Start Guide
Page 24
... number of the Film Holder inward lightly and close the Document Cover and press the Color button. See "Scanning a Photo" on page 19 or "Scanning a Film" on page 19. (2) Load paper. 2 Select the print menu. (1) Make sure that all the protrusions on the outer edges of the Film Holder fit into the Film Guide. (2) Squeeze the edges of copies for each photo. (4) Press the OK button. 22 Photo Printing from Printed Photo or Film Printing Scanned...
... number of the Film Holder inward lightly and close the Document Cover and press the Color button. See "Scanning a Photo" on page 19 or "Scanning a Film" on page 19. (2) Load paper. 2 Select the print menu. (1) Make sure that all the protrusions on the outer edges of the Film Holder fit into the Film Guide. (2) Squeeze the edges of copies for each photo. (4) Press the OK button. 22 Photo Printing from Printed Photo or Film Printing Scanned...

Quick Start Guide
Page 26
.... Printing with the printer driver as well as the Operation Panel on -screen manual. You can change the paper source to be used with Windows 1 Turn on the machine and load the paper in the machine. 2 Create a document or open a file to view the online help or the PC Printing Guide on the machine. Printing from Your Computer Note For details on other printer driver functions, click Help or Instructions to print using an appropriate application software. 3 Select Print on the application software's File menu. 4 Make sure that Canon...
.... Printing with the printer driver as well as the Operation Panel on -screen manual. You can change the paper source to be used with Windows 1 Turn on the machine and load the paper in the machine. 2 Create a document or open a file to view the online help or the PC Printing Guide on the machine. Printing from Your Computer Note For details on other printer driver functions, click Help or Instructions to print using an appropriate application software. 3 Select Print on the application software's File menu. 4 Make sure that Canon...

Quick Start Guide
Page 28
.... Scanning Images You can scan images from the machine to edit the scanned images, such as the resolution. If you are scanning printed text, you to a computer without printing them and save them in the User's Guide on-screen manual. 2 Turn on the machine. 3 Load the original document on -screen manual. „ Scanning Using the Operation Panel of the Machine" on the HOME screen, then press the OK button. 5 Select USB or a LAN-connected computer, then press the OK button. 26 Scanning Images
.... Scanning Images You can scan images from the machine to edit the scanned images, such as the resolution. If you are scanning printed text, you to a computer without printing them and save them in the User's Guide on-screen manual. 2 Turn on the machine. 3 Load the original document on -screen manual. „ Scanning Using the Operation Panel of the Machine" on the HOME screen, then press the OK button. 5 Select USB or a LAN-connected computer, then press the OK button. 26 Scanning Images

Quick Start Guide
Page 31
... as paper type and layout. Note Depending on the PictBridge compliant device before connecting the device. You may have to select a print mode compliant with PictBridge before connecting it on page 32. 4 Start printing from your device, you loaded in the device's instruction manual. (1) Make sure that you may also have setting menu, change the setting from a PictBridge Compliant Device 29 If your PictBridge compliant device does not have to turn it to this machine...
... as paper type and layout. Note Depending on the PictBridge compliant device before connecting the device. You may have to select a print mode compliant with PictBridge before connecting it on page 32. 4 Start printing from your device, you loaded in the device's instruction manual. (1) Make sure that you may also have setting menu, change the setting from a PictBridge Compliant Device 29 If your PictBridge compliant device does not have to turn it to this machine...

Quick Start Guide
Page 32
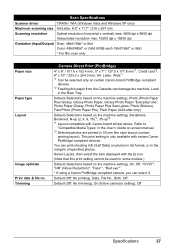
... following sizes and types of printing paper can be different depending on the machine are applied. For details, visit our website. *1 Can be available on some Canon genuine papers depending on the country or region of setting items are given according to Default on your PictBridge compliant device, you may not be sure to your PictBridge compliant device (For users in the instruction manual...
... following sizes and types of printing paper can be different depending on the machine are applied. For details, visit our website. *1 Can be available on some Canon genuine papers depending on the country or region of setting items are given according to Default on your PictBridge compliant device, you may not be sure to your PictBridge compliant device (For users in the instruction manual...

Quick Start Guide
Page 33
... by the device's function. z Depending on sticker paper, select 10 x 15 cm/ 4" x 6" for Paper size and Photo for each photo is selected. When printing on the paper size and layout, the date will only be printed even when Both is made using a Canon-brand PictBridge compliant device, the following additional options may be printed over the date printed by flash photography. The following two options are using the Auto image fix function of paper. z Bordered/Borderless...
... by the device's function. z Depending on sticker paper, select 10 x 15 cm/ 4" x 6" for Paper size and Photo for each photo is selected. When printing on the paper size and layout, the date will only be printed even when Both is made using a Canon-brand PictBridge compliant device, the following additional options may be printed over the date printed by flash photography. The following two options are using the Auto image fix function of paper. z Bordered/Borderless...

Quick Start Guide
Page 36
... Document Cover closed. Replacing an Ink Tank When ink tanks run out of ink, replace them using the following steps. 1 Open the Paper Output Tray. 2 Make sure that the protective film does not remain on , and lift the Scanning Unit (Printer Cover) until it stops. z Do not touch the metallic parts inside the machine. 3 Push the tab (A) of the arrow to open the Scanning Unit (Printer Cover). Then remove the film (D) completely. Caution z If the Document Cover is turned...
... Document Cover closed. Replacing an Ink Tank When ink tanks run out of ink, replace them using the following steps. 1 Open the Paper Output Tray. 2 Make sure that the protective film does not remain on , and lift the Scanning Unit (Printer Cover) until it stops. z Do not touch the metallic parts inside the machine. 3 Push the tab (A) of the arrow to open the Scanning Unit (Printer Cover). Then remove the film (D) completely. Caution z If the Document Cover is turned...

Quick Start Guide
Page 38
... with USB Full-Speed (USB 1.1), it can be used at minimum. Total 3,584 nozzles (C/M/Y/PC/PM/PgBK/Dye BK: each 512 nozzles) Multiple copy Intensity adjustment Zoom Copy Specifications 1 - 99 pages 9 positions, Auto intensity (AE copy) 25% - 400% (1% unit) 36 Specifications Approx. 11.9 kg (Approx. 26.3 lb.) * With the Print Head and ink tanks installed. Specifications Printing resolution (dpi) Interface Print width Acoustic noise level Operating environment Storage environment Power supply Power consumption...
... with USB Full-Speed (USB 1.1), it can be used at minimum. Total 3,584 nozzles (C/M/Y/PC/PM/PgBK/Dye BK: each 512 nozzles) Multiple copy Intensity adjustment Zoom Copy Specifications 1 - 99 pages 9 positions, Auto intensity (AE copy) 25% - 400% (1% unit) 36 Specifications Approx. 11.9 kg (Approx. 26.3 lb.) * With the Print Head and ink tanks installed. Specifications Printing resolution (dpi) Interface Print width Acoustic noise level Operating environment Storage environment Power supply Power consumption...
Quick Start Guide
Page 39
... (contact printing layout). You can print shooting Info (Exif Data) on -screen manual. *2 Selected photos are printed in the margins of specified photos. Select Layout, then select the item displayed with certain Canon PictBridge compliant devices. This print setting is only available with the [i] icon. (Note that this paper from the Cassette can select it. Scan Specifications Scanner driver TWAIN / WIA (Windows Vista and Windows XP only) Maximum scanning size A4/Letter...
... (contact printing layout). You can print shooting Info (Exif Data) on -screen manual. *2 Selected photos are printed in the margins of specified photos. Select Layout, then select the item displayed with certain Canon PictBridge compliant devices. This print setting is only available with the [i] icon. (Note that this paper from the Cassette can select it. Scan Specifications Scanner driver TWAIN / WIA (Windows Vista and Windows XP only) Maximum scanning size A4/Letter...

Quick Start Guide
Page 41
... on-screen manual may not be displayed properly depending on your operating system. We recommend that you keep your system up to date with Windows Update. Additional System Requirements for On-Screen Manuals Browser: Windows HTML Help Viewer Note: Microsoft Internet Explorer 5.0 or later must be displayed properly depending on your operating system or Internet Explorer version. The on-screen manual may not be installed. Specifications are...
... on-screen manual may not be displayed properly depending on your operating system. We recommend that you keep your system up to date with Windows Update. Additional System Requirements for On-Screen Manuals Browser: Windows HTML Help Viewer Note: Microsoft Internet Explorer 5.0 or later must be displayed properly depending on your operating system or Internet Explorer version. The on-screen manual may not be installed. Specifications are...


