
Accessory Catalog
Page 7
... a stitch, and adjust settings as it stitches. Slip the left side under the presser foot. 5. Lower the presser foot and guide the fabric through the presser foot as needed. 3. Sew the stitches keeping a certain seam allowance. To sew a curve, sew so that the fabric edge becomes a right angle against the seam guide. 3. Attach the seam guide on the top of the fabric. 2. Make a cut edge like a serger or overlock. SA160 ABCDEFGHJKLMNO Straight Stitch Foot Straight Stitch Foot and Straight Stitch Needle Plate Vertical Stitching Alignment Foot Brother General Sewing Accessories 12...
... a stitch, and adjust settings as it stitches. Slip the left side under the presser foot. 5. Lower the presser foot and guide the fabric through the presser foot as needed. 3. Sew the stitches keeping a certain seam allowance. To sew a curve, sew so that the fabric edge becomes a right angle against the seam guide. 3. Attach the seam guide on the top of the fabric. 2. Make a cut edge like a serger or overlock. SA160 ABCDEFGHJKLMNO Straight Stitch Foot Straight Stitch Foot and Straight Stitch Needle Plate Vertical Stitching Alignment Foot Brother General Sewing Accessories 12...

Accessory Catalog
Page 11
... threads. Insert cords or threads into each hole on the presser foot. 2. Loosen the screw on the presser foot and insert a braid through the guide before attaching the presser foot on the presser foot over the desired seams or pattern markings. 3. Set the zigzag width slightly wider than the width of seams or pattern markings are desired. Perfect for quilting appliqué! 1. Slip a cord from satin or decorative stitches. 2. Attach the presser foot and pull cords under the presser foot. 3. It can be used with brother sewing machines...
... threads. Insert cords or threads into each hole on the presser foot. 2. Loosen the screw on the presser foot and insert a braid through the guide before attaching the presser foot on the presser foot over the desired seams or pattern markings. 3. Set the zigzag width slightly wider than the width of seams or pattern markings are desired. Perfect for quilting appliqué! 1. Slip a cord from satin or decorative stitches. 2. Attach the presser foot and pull cords under the presser foot. 3. It can be used with brother sewing machines...

Accessory Catalog
Page 12
... tacks: 1. Gathering Foot Used for ULT series, PC-6500, PC-8200 and PC-8500 sewing machines. Requires Low Shank Adapter for gathering fabrics. Adding decorative stitches over seams or patterns: Line up the center guide mark (red) of the presser foot on your fabric. 3. SA150 ABCDEFJKMN www.brother.com Decrease the upper thread tension and test various settings to mark. 2. Sew a few stitches to see which one works on thin to make or attach piping...
... tacks: 1. Gathering Foot Used for ULT series, PC-6500, PC-8200 and PC-8500 sewing machines. Requires Low Shank Adapter for gathering fabrics. Adding decorative stitches over seams or patterns: Line up the center guide mark (red) of the presser foot on your fabric. 3. SA150 ABCDEFJKMN www.brother.com Decrease the upper thread tension and test various settings to mark. 2. Sew a few stitches to see which one works on thin to make or attach piping...

Accessory Catalog
Page 13
... row in the center position. 3. Use a stiff card to sew the first row in one of stitch length, tuck setting and depth setting. 2. Adjust the amount of the presser foot is moved forward, its teeth catch a fabric and force it forward into the slot, and stitch slowly. 3. The ruffling blade on lightweight fabric. Install and manually thread a twin needle. 2. Move fabric about 1" (2.5 cm) past the needle to get started. For seven grooves...
... row in the center position. 3. Use a stiff card to sew the first row in one of stitch length, tuck setting and depth setting. 2. Adjust the amount of the presser foot is moved forward, its teeth catch a fabric and force it forward into the slot, and stitch slowly. 3. The ruffling blade on lightweight fabric. Install and manually thread a twin needle. 2. Move fabric about 1" (2.5 cm) past the needle to get started. For seven grooves...

Accessory Catalog
Page 15
... a straight stitch or your preferred stitch such as the machine's lower feed dogs to guide the fabric. 4. While starting to sew, press the needle position button twice to pull the bobbin thread to hold fabric in the needle area. Guide the fabric with the pin over the needle clamp screw. 2. The foot raises and lowers with the open front when greater visibility is finished, sew about four locking stitches. 8. Use both hands while keeping the fabric pulled tight. 9. Walking Foot/Open Toe Walking Foot Brother Quilting Feet 28 Walking Foot/Open Toe Walking Foot The feed dogs...
... a straight stitch or your preferred stitch such as the machine's lower feed dogs to guide the fabric. 4. While starting to sew, press the needle position button twice to pull the bobbin thread to hold fabric in the needle area. Guide the fabric with the pin over the needle clamp screw. 2. The foot raises and lowers with the open front when greater visibility is finished, sew about four locking stitches. 8. Use both hands while keeping the fabric pulled tight. 9. Walking Foot/Open Toe Walking Foot Brother Quilting Feet 28 Walking Foot/Open Toe Walking Foot The feed dogs...

Accessory Catalog
Page 17
... quilting - Automatic Height Adjuster™ (AHA) feature adjusts the presser foot pressure automatically and continuously to embroider beautiful motifs continuously as embroidery. Includes three new free-motion presser feet: Free-motion quilting foot "C" for more features to your top of designs will work beautifully in USB port on your LCD screen background color for embellishing a wide variety of difficult to see reference stitches to see embroidery designs. - Sewing Decorative Stitches as border designs. Add appliqué capability to your embroidery designs...
... quilting - Automatic Height Adjuster™ (AHA) feature adjusts the presser foot pressure automatically and continuously to embroider beautiful motifs continuously as embroidery. Includes three new free-motion presser feet: Free-motion quilting foot "C" for more features to your top of designs will work beautifully in USB port on your LCD screen background color for embellishing a wide variety of difficult to see reference stitches to see embroidery designs. - Sewing Decorative Stitches as border designs. Add appliqué capability to your embroidery designs...

Accessory Catalog
Page 33
... 10 vertical spool pins for details, www.brother.com. Allows easy access to the machine as well as a thread locking system which keeps those loose ends tamed when not in place on our website for thread delivery or bobbin storage. Place your threads in the storage slots. Brother Embroidery Accessories 63 Free-Standing Ten Spool Thread Stand Ten Spool Thread Stand Embroidery Machine Hoops Brother Embroidery Accessories 64 For all embroidery and sewing/embroidery machines. Spend less time changing threads, and...
... 10 vertical spool pins for details, www.brother.com. Allows easy access to the machine as well as a thread locking system which keeps those loose ends tamed when not in place on our website for thread delivery or bobbin storage. Place your threads in the storage slots. Brother Embroidery Accessories 63 Free-Standing Ten Spool Thread Stand Ten Spool Thread Stand Embroidery Machine Hoops Brother Embroidery Accessories 64 For all embroidery and sewing/embroidery machines. Spend less time changing threads, and...

Accessory Catalog
Page 34
...% polyester mini king embroidery thread (1100 yds) is designed to create machine embroidery as well as fur or terrycloth. Stabilizers and Water Soluble Stabilizers When doing machine embroidery, the use of thread per spool. Here is important that can stand on your sewing counter or can illustrate more of needle and stabilizer types. Bobbin Threads Stabilizers and Water Water Soluble Stabilizers Brother Embroidery Accessories 66 Bobbin Threads Brother Bobbin Threads are also available...
...% polyester mini king embroidery thread (1100 yds) is designed to create machine embroidery as well as fur or terrycloth. Stabilizers and Water Soluble Stabilizers When doing machine embroidery, the use of thread per spool. Here is important that can stand on your sewing counter or can illustrate more of needle and stabilizer types. Bobbin Threads Stabilizers and Water Water Soluble Stabilizers Brother Embroidery Accessories 66 Bobbin Threads Brother Bobbin Threads are also available...

Accessory Catalog
Page 36
... just like an ordinary presser foot, and embellish fabrics with Dust Box and Needle Guide. SA159 SA180B SA181 Needle Felting Attachment Felting Needle Brother Sewing Machine Attachments for PQ Series 70 Needle Felting Attachment Use this unique attachment to the feed dogs, aiding in the proper feed on your PQ series! Brother Sewing Machine Attachments for PQ Series 69 Heavyweight Foot Ver y Narrow Foot Bobbin for PQ Series Heavyweight Foot An improved larger foot print assures better contact...
... just like an ordinary presser foot, and embellish fabrics with Dust Box and Needle Guide. SA159 SA180B SA181 Needle Felting Attachment Felting Needle Brother Sewing Machine Attachments for PQ Series 70 Needle Felting Attachment Use this unique attachment to the feed dogs, aiding in the proper feed on your PQ series! Brother Sewing Machine Attachments for PQ Series 69 Heavyweight Foot Ver y Narrow Foot Bobbin for PQ Series Heavyweight Foot An improved larger foot print assures better contact...

Accessory Catalog
Page 40
...machine. 2. Sew as folding them. Open the seams. 4. Attach the hem positioning plate A/B to the hemming attachment, and attach it is easily set it into the front cover slot. 3. Brother Cover Stitch Feet 78 Top Stitching Foot Set Top Stitching Foot Set Use included presser foot to your machine for a chain stitch, the center needle. 2. Set up your Cover Stitch). 1. Set the bias tape though the holder (cut the end of the presser foot, and sew. Set up your machine. 3. SA224CV SA221CV Hemming Set Finishes hems easily and quickly. SA226CV www.brother.com Brother Cover...
...machine. 2. Sew as folding them. Open the seams. 4. Attach the hem positioning plate A/B to the hemming attachment, and attach it is easily set it into the front cover slot. 3. Brother Cover Stitch Feet 78 Top Stitching Foot Set Top Stitching Foot Set Use included presser foot to your machine for a chain stitch, the center needle. 2. Set up your Cover Stitch). 1. Set the bias tape though the holder (cut the end of the presser foot, and sew. Set up your machine. 3. SA224CV SA221CV Hemming Set Finishes hems easily and quickly. SA226CV www.brother.com Brother Cover...

Users Manual - English
Page 1
..., or dropped into any air openings blocked. Replace bulb with same type rated 15 watts. Never operate the machine with any opening. 6. The wrong plate can cause the needle to the symbol "O" position which represents off, then remove plug from the electrical outlet when removing covers, lubricating, or when making any of lint, dust, and loose cloth. 5. The machine is being used by the manufacturer as threading needle, changing needle, threading bobbin, or changing the presser foot...
..., or dropped into any air openings blocked. Replace bulb with same type rated 15 watts. Never operate the machine with any opening. 6. The wrong plate can cause the needle to the symbol "O" position which represents off, then remove plug from the electrical outlet when removing covers, lubricating, or when making any of lint, dust, and loose cloth. 5. The machine is being used by the manufacturer as threading needle, changing needle, threading bobbin, or changing the presser foot...
Users Manual - English
Page 9
...3 OPERATING YOUR SEWING MACHINE 5 Connecting Plugs 5 Main Power/Sewing Light Switch 7 Foot Controller 8 Checking the Needle 9 Replacing the Needle 9 Changing the Presser Foot 11 Flat Bed Attachment 12 VARIOUS CONTROLS 13 Pattern Selection Dial 13 Recommended Widths and Lengths for Stitches . 15 Stitch Length Dial 21 Stitch Width Dial 23 Reverse Sewing Lever 24 Converting to Free-arm Style 25 THREADING THE MACHINE 26 Winding the Bobbin 26 Lower Threading 29 Upper Threading 31 Using Needle Threader 33 Drawing Up Lower Thread 35 Twin Needle Sewing 36 Thread Tension 38 FABRIC...
...3 OPERATING YOUR SEWING MACHINE 5 Connecting Plugs 5 Main Power/Sewing Light Switch 7 Foot Controller 8 Checking the Needle 9 Replacing the Needle 9 Changing the Presser Foot 11 Flat Bed Attachment 12 VARIOUS CONTROLS 13 Pattern Selection Dial 13 Recommended Widths and Lengths for Stitches . 15 Stitch Length Dial 21 Stitch Width Dial 23 Reverse Sewing Lever 24 Converting to Free-arm Style 25 THREADING THE MACHINE 26 Winding the Bobbin 26 Lower Threading 29 Upper Threading 31 Using Needle Threader 33 Drawing Up Lower Thread 35 Twin Needle Sewing 36 Thread Tension 38 FABRIC...
Users Manual - English
Page 12
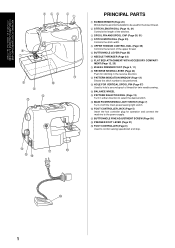
... power/sewing light switch. G BUTTONHOLE FINE ADJUSTMENT SCREW (Page 59) H PRESSER FOOT LEVER (Page 31) I 1 A PATTERN INDICATION WINDOW (Page 13) Shows the stitch number to be used for the lower thread. 2 STITCH LENGTH DIAL (Page 13, 21) Controls the length of the stitches. 3 SPOOL PIN AND SPOOL CAP (Page 26, 31) 4 STITCH WIDTH DIAL (Page 23) Controls the stitch width. 5 UPPER TENSION CONTROL DIAL (Page 38) Controls the tension of thread for operation and connect the machine to control sewing speed/start and stop. MENT (Page 12, 25) 9 ZIGZAG PRESSER FOOT (Page 3, 11) : REVERSE...
... power/sewing light switch. G BUTTONHOLE FINE ADJUSTMENT SCREW (Page 59) H PRESSER FOOT LEVER (Page 31) I 1 A PATTERN INDICATION WINDOW (Page 13) Shows the stitch number to be used for the lower thread. 2 STITCH LENGTH DIAL (Page 13, 21) Controls the length of the stitches. 3 SPOOL PIN AND SPOOL CAP (Page 26, 31) 4 STITCH WIDTH DIAL (Page 23) Controls the stitch width. 5 UPPER TENSION CONTROL DIAL (Page 38) Controls the tension of thread for operation and connect the machine to control sewing speed/start and stop. MENT (Page 12, 25) 9 ZIGZAG PRESSER FOOT (Page 3, 11) : REVERSE...

Users Manual - English
Page 32
... feed the material. The position needed for the SS position. Turn the dial to the left past "O" for making buttonholes and decorative stitches. This is set the Stitch Length Dial in the range shown by A, the fabric will not feed correctly and the fabric or machine may be used in making the Satin Stitch varies according to the material and thread being used for making a Satin Stitch (a dense zigzag stitch) which can be damaged. THE HIGHER THE NUMBER...
... feed the material. The position needed for the SS position. Turn the dial to the left past "O" for making buttonholes and decorative stitches. This is set the Stitch Length Dial in the range shown by A, the fabric will not feed correctly and the fabric or machine may be used in making the Satin Stitch varies according to the material and thread being used for making a Satin Stitch (a dense zigzag stitch) which can be damaged. THE HIGHER THE NUMBER...

Users Manual - English
Page 40
... lightly on the foot controller and the machine begins to operate, injury could result. 1. KNOWING YOUR SEWING MACHINE CONNAITRE SA MACHINE A COUDRE CONOZCA SU MÁQUINA DE COSER 1 2 1 2 Lower Threading CAUTION Setting the bobbin improperly may cause the thread tension to be incorrect or the needle to break. Insert the bobbin so the thread comes out in the direction shown by the slanted line in place (see arrow 2 at left) until the cover...
... lightly on the foot controller and the machine begins to operate, injury could result. 1. KNOWING YOUR SEWING MACHINE CONNAITRE SA MACHINE A COUDRE CONOZCA SU MÁQUINA DE COSER 1 2 1 2 Lower Threading CAUTION Setting the bobbin improperly may cause the thread tension to be incorrect or the needle to break. Insert the bobbin so the thread comes out in the direction shown by the slanted line in place (see arrow 2 at left) until the cover...

Users Manual - English
Page 42
.... 2 Thread take-up before feeding the upper thread. NOTE: If the thread take-up lever is closest in size to hold the thread spool firmly in this diagram. 5. Make sure to guide the thread through the thread take-up lever from the bottom front of the spool and cause the needle to raise the Presser Foot Lever and the thread take -up lever. Raise the presser foot using the Presser Foot Lever. 2. 1 42 KNOWING YOUR SEWING MACHINE CONNAITRE SA MACHINE A COUDRE...
.... 2 Thread take-up before feeding the upper thread. NOTE: If the thread take-up lever is closest in size to hold the thread spool firmly in this diagram. 5. Make sure to guide the thread through the thread take-up lever from the bottom front of the spool and cause the needle to raise the Presser Foot Lever and the thread take -up lever. Raise the presser foot using the Presser Foot Lever. 2. 1 42 KNOWING YOUR SEWING MACHINE CONNAITRE SA MACHINE A COUDRE...

Users Manual - English
Page 44
Otherwise, the hook may be used with home sewing machine needles size 75/11-100/16. While lightly holding the thread, rotate the needle threader lever toward you are using those types of threads or needles, thread the eye of the sewing machine. CAUTION The needle threader can only be damaged. 3. Lower the presser foot lever. 2. While lowering the needle threader lever, hook the thread onto the guide. 4. Raise the needle threader lever and pull out about 5 cm (2") of 90/14-100/16 can not...
Otherwise, the hook may be used with home sewing machine needles size 75/11-100/16. While lightly holding the thread, rotate the needle threader lever toward you are using those types of threads or needles, thread the eye of the sewing machine. CAUTION The needle threader can only be damaged. 3. Lower the presser foot lever. 2. While lowering the needle threader lever, hook the thread onto the guide. 4. Raise the needle threader lever and pull out about 5 cm (2") of 90/14-100/16 can not...
Users Manual - English
Page 82
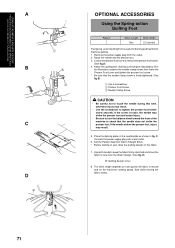
... the needle clamp screw is above the needle clamp screw, then lower the Presser Foot Lever and tighten the presser foot screw. * Be sure that the needle does not strike the presser foot. If the needle strikes the presser foot, injury may result. • Use the screwdriver to sew over the drawn design. (See fig. Set the Pattern Selection Dial to Straight Stitch. * Before starting to remove the presser foot holder. (See fig.A) 4. D) B Quilting design (Line) 8. Sew while moving the fabric slowly. 71 Attach the quilting foot, making sure that part...
... the needle clamp screw is above the needle clamp screw, then lower the Presser Foot Lever and tighten the presser foot screw. * Be sure that the needle does not strike the presser foot. If the needle strikes the presser foot, injury may result. • Use the screwdriver to sew over the drawn design. (See fig. Set the Pattern Selection Dial to Straight Stitch. * Before starting to remove the presser foot holder. (See fig.A) 4. D) B Quilting design (Line) 8. Sew while moving the fabric slowly. 71 Attach the quilting foot, making sure that part...
Users Manual - English
Page 90
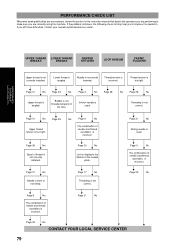
... Wrong needle is used . Thread tension is clinging to the bottom of needle size/thread size/fabric is incorrectly inserted. Page 31 No Page 29 Upper thread tension is not correctly installed. PERFORMANCE CHECK LIST Whenever sewing difficulties are encountered, review the section in the race. If the problem continues, the following check list may help you to improve the operation. MAINTENANCE ENTRETIEN MANTENIMIENTO UPPER THREAD LOWER THREAD BREAKS BREAKS SKIPPED STITCHES LOOP IN SEAM FABRIC PUCKERS Upper thread is too tight. Needle is...
... Wrong needle is used . Thread tension is clinging to the bottom of needle size/thread size/fabric is incorrectly inserted. Page 31 No Page 29 Upper thread tension is not correctly installed. PERFORMANCE CHECK LIST Whenever sewing difficulties are encountered, review the section in the race. If the problem continues, the following check list may help you to improve the operation. MAINTENANCE ENTRETIEN MANTENIMIENTO UPPER THREAD LOWER THREAD BREAKS BREAKS SKIPPED STITCHES LOOP IN SEAM FABRIC PUCKERS Upper thread is too tight. Needle is...

Users Manual - English
Page 97
... the Machine 85 Reverse Sewing Lever 24 S Scallop Stitch 50 Sewing Ligh Light Bulb Replacement 75 Switch 7 Shell Tuck Stitch 47 Shuttle 77 Spool Pin and Spool Cap 26, 31 Springaction Quilting Foot 3, 71 Square Stitch 51 Stitch Length Dial 13, 21 Stitch Width Dial 23 Straight Stitch 42, 63, 65 Stretch Blind Hem Stitch 46 T Thread Tension 38 Triangle Stitch 51 Triple Stretch Stitch 42 Triple Zigzag Stretch Stitch 54 Troubleshooting 79 Twin Needle Sewing 36 U Upper Tension Control Dial 38 Upper Threading 31 Using Neadle Threader 33 W Walking Foot 3, 69 Winding the Bobbin...
... the Machine 85 Reverse Sewing Lever 24 S Scallop Stitch 50 Sewing Ligh Light Bulb Replacement 75 Switch 7 Shell Tuck Stitch 47 Shuttle 77 Spool Pin and Spool Cap 26, 31 Springaction Quilting Foot 3, 71 Square Stitch 51 Stitch Length Dial 13, 21 Stitch Width Dial 23 Straight Stitch 42, 63, 65 Stretch Blind Hem Stitch 46 T Thread Tension 38 Triangle Stitch 51 Triple Stretch Stitch 42 Triple Zigzag Stretch Stitch 54 Troubleshooting 79 Twin Needle Sewing 36 U Upper Tension Control Dial 38 Upper Threading 31 Using Neadle Threader 33 W Walking Foot 3, 69 Winding the Bobbin...


