
Accessory Catalog
Page 4
...parts of the presser foot and slide the presser foot so that the needle fits on the opening on the presser foot. 4. Check the needle does not hit the presser foot, and then tighten the clamp screw with just right pressure. 1. Brother General Sewing Accessories 05 Sew... as you like. Adjustable Zipper & Piping Foot Brother General Sewing Accessories 06 Adjustable Zipper & Piping Foot Attaches zippers and pipings easily. Screw on either left ). 2. SA161 All Brother home-use sewing machines www.brother.com Use these utility...
...parts of the presser foot and slide the presser foot so that the needle fits on the opening on the presser foot. 4. Check the needle does not hit the presser foot, and then tighten the clamp screw with just right pressure. 1. Brother General Sewing Accessories 05 Sew... as you like. Adjustable Zipper & Piping Foot Brother General Sewing Accessories 06 Adjustable Zipper & Piping Foot Attaches zippers and pipings easily. Screw on either left ). 2. SA161 All Brother home-use sewing machines www.brother.com Use these utility...

Accessory Catalog
Page 6
Hold the fabric from the edge and sew 2-3 stitches. 4. Overlock Foot For vertical bobbin machines only. Sew along the guide. Raise the needle and the presser foot. 5. SA164 ABCDEFJKMN SA149 GHILOP SA114 ABCDEFGHJKLMNO SA122 IP Travel Jewelr y Portfolio Innov-...Project Book (See page 53 for details.) www.brother.com Lower the needle into the fabric approximately 1/8" from the back and front and roll it into the fabric approximately 1/8" from fraying. 1. Lower the needle into the curled part of the foot. 8. Slowly sew 2-3 stitches, making sure the fabric is rolling ...
Hold the fabric from the edge and sew 2-3 stitches. 4. Overlock Foot For vertical bobbin machines only. Sew along the guide. Raise the needle and the presser foot. 5. SA164 ABCDEFJKMN SA149 GHILOP SA114 ABCDEFGHJKLMNO SA122 IP Travel Jewelr y Portfolio Innov-...Project Book (See page 53 for details.) www.brother.com Lower the needle into the fabric approximately 1/8" from the back and front and roll it into the fabric approximately 1/8" from fraying. 1. Lower the needle into the curled part of the foot. 8. Slowly sew 2-3 stitches, making sure the fabric is rolling ...

Users Manual - English
Page 6
... not store anything on the needle while sewing. If the problem persists, please consult your eye on the foot controller. 4. Always consult the operation manual when replacing or installing any other parts • A power failure occurs during use or store the machine near a space heater, iron, halogen... not use extension cords. Use only neutral soaps or detergents to inspect and adjust the machine yourself. Do not touch the balance wheel, thread take-up, needle, or other parts to keep your local authorized dealer. For repair or adjustment In the event a malfunction occurs...
... not store anything on the needle while sewing. If the problem persists, please consult your eye on the foot controller. 4. Always consult the operation manual when replacing or installing any other parts • A power failure occurs during use or store the machine near a space heater, iron, halogen... not use extension cords. Use only neutral soaps or detergents to inspect and adjust the machine yourself. Do not touch the balance wheel, thread take-up, needle, or other parts to keep your local authorized dealer. For repair or adjustment In the event a malfunction occurs...
Users Manual - English
Page 9
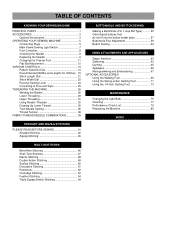
TABLE OF CONTENTS KNOWING YOUR SEWING MACHINE PRINCIPAL PARTS 1 ACCESSORIES 3 Optional Accessories 3 OPERATING YOUR SEWING MACHINE 5 Connecting Plugs 5 Main Power/Sewing Light Switch 7 Foot Controller 8 Checking the Needle 9 Replacing the Needle 9 Changing the Presser Foot 11 Flat Bed ...Quilting Foot 73 MAINTENANCE Changing the Light Bulb 75 Cleaning 77 Performance Check List 79 Repacking the Machine 85 INDEX STRAIGHT AND ZIGZAG STITCHING PLEASE READ BEFORE SEWING 41 Straight Stitching 42 Zigzag Stitching 45 BUILT-IN STITCHES Blind Hem Stitching 46 Shell Tuck Stitching...
TABLE OF CONTENTS KNOWING YOUR SEWING MACHINE PRINCIPAL PARTS 1 ACCESSORIES 3 Optional Accessories 3 OPERATING YOUR SEWING MACHINE 5 Connecting Plugs 5 Main Power/Sewing Light Switch 7 Foot Controller 8 Checking the Needle 9 Replacing the Needle 9 Changing the Presser Foot 11 Flat Bed ...Quilting Foot 73 MAINTENANCE Changing the Light Bulb 75 Cleaning 77 Performance Check List 79 Repacking the Machine 85 INDEX STRAIGHT AND ZIGZAG STITCHING PLEASE READ BEFORE SEWING 41 Straight Stitching 42 Zigzag Stitching 45 BUILT-IN STITCHES Blind Hem Stitching 46 Shell Tuck Stitching...
Users Manual - English
Page 12
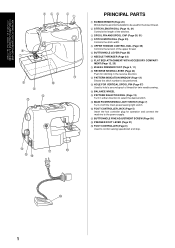
...(Page 37) Used to select the desired stitch. F FOOT CONTROLLER JACK (Page 5) Insert the foot controller plug for operation and connect the machine to control sewing speed/start and stop. G BUTTONHOLE FINE ADJUSTMENT SCREW (Page 59) H PRESSER FOOT LEVER (Page 31) I 1 D G H EF ... LEVER (Page 55) 7 NEEDLE THREADER (Page 33) 8 FLAT BED ATTACHMENT WITH ACCESSORY COMPART- KNOWING YOUR SEWING MACHINE CONNAITRE SA MACHINE A COUDRE CONOZCA SU MÁQUINA DE COSER 5 43 2 1 6 7 A 8 : 9 B C PRINCIPAL PARTS 1 BOBBIN WINDER (Page 26) Winds the thread onto the bobbin to be performed.
...(Page 37) Used to select the desired stitch. F FOOT CONTROLLER JACK (Page 5) Insert the foot controller plug for operation and connect the machine to control sewing speed/start and stop. G BUTTONHOLE FINE ADJUSTMENT SCREW (Page 59) H PRESSER FOOT LEVER (Page 31) I 1 D G H EF ... LEVER (Page 55) 7 NEEDLE THREADER (Page 33) 8 FLAT BED ATTACHMENT WITH ACCESSORY COMPART- KNOWING YOUR SEWING MACHINE CONNAITRE SA MACHINE A COUDRE CONOZCA SU MÁQUINA DE COSER 5 43 2 1 6 7 A 8 : 9 B C PRINCIPAL PARTS 1 BOBBIN WINDER (Page 26) Winds the thread onto the bobbin to be performed.
Users Manual - English
Page 14
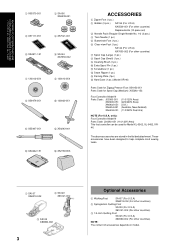
...153 Foot Controller: Model N Parts Code: J00360-051 XA6400-051 XA6402-051 XA6404-051 XA6434-051 (110/120V Area) (220/240V Area) (U.K.) (Australia, New Zealand) (110/220V Dual Ara) NOTE (For U.S.A. The above accessories are stored in the flat bed attachment. KNOWING YOUR SEWING MACHINE CONNAITRE SA MACHINE A COUDRE CONOZCA SU MÁ... (Small) (1 pc.) 9 Cleaning Brush (1 pc.) 0 Extra Spool Pin (1 pc.) A Screwdriver (1 pc.) B Seam Ripper (1 pc.) C Darning Plate (1pc.) D Hard Case (1 pc.) (Model XR-46) Parts Code for Zigzag Presser Foot: X51953-051 Parts Code for Model XL-6562, XL-6452, XR46.
...153 Foot Controller: Model N Parts Code: J00360-051 XA6400-051 XA6402-051 XA6404-051 XA6434-051 (110/120V Area) (220/240V Area) (U.K.) (Australia, New Zealand) (110/220V Dual Ara) NOTE (For U.S.A. The above accessories are stored in the flat bed attachment. KNOWING YOUR SEWING MACHINE CONNAITRE SA MACHINE A COUDRE CONOZCA SU MÁ... (Small) (1 pc.) 9 Cleaning Brush (1 pc.) 0 Extra Spool Pin (1 pc.) A Screwdriver (1 pc.) B Seam Ripper (1 pc.) C Darning Plate (1pc.) D Hard Case (1 pc.) (Model XR-46) Parts Code for Zigzag Presser Foot: X51953-051 Parts Code for Model XL-6562, XL-6452, XR46.
Users Manual - English
Page 80
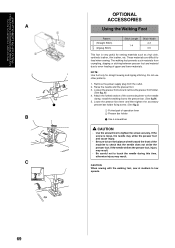
...the presser foot. Raise the needle and the presser foot. 3. If the screw is very useful for straight sewing and zigzag stitching. A) 4. USING ATTACHMENTS AND APPLICATIONS UTILISATION DES ACCESSOIRES ET LEURS APPLICATIONS USO DE ACCESORIOS Y...cause injury. • Be sure to turn the balance wheel toward the front of the machine to the presser bar. (See fig B) 5. Remove the power supply plug from crumpling,... tighten the accessory presser bar holder fixing screw. (See fig.C) 1 Forked part of operation lever 2 Presser bar holder 1 Use a screwdriver CAUTION • Use the screwdriver to ...
...the presser foot. Raise the needle and the presser foot. 3. If the screw is very useful for straight sewing and zigzag stitching. A) 4. USING ATTACHMENTS AND APPLICATIONS UTILISATION DES ACCESSOIRES ET LEURS APPLICATIONS USO DE ACCESORIOS Y...cause injury. • Be sure to turn the balance wheel toward the front of the machine to the presser bar. (See fig B) 5. Remove the power supply plug from crumpling,... tighten the accessory presser bar holder fixing screw. (See fig.C) 1 Forked part of operation lever 2 Presser bar holder 1 Use a screwdriver CAUTION • Use the screwdriver to ...
Users Manual - English
Page 82
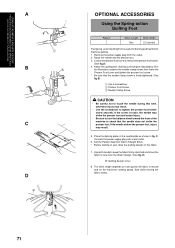
...supply plug from the outlet. 2. Attach the quilting foot, making sure that part indicated by A in fig. Place the darning plate on the needle plate ... Stitch. * Before starting to touch the needle during this time, otherwise injury may result. 5. Sew while moving the fabric slowly. 71 The stitch length depends on how quickly the fabric is above ...Needle Clamp Screw CAUTION • Be careful not to sew, draw the quilting design on the machine's sewing speed. Raise the needle and the presser foot. 3. Loosen the presser foot screw to sew over the drawn design. (See fig. If the...
...supply plug from the outlet. 2. Attach the quilting foot, making sure that part indicated by A in fig. Place the darning plate on the needle plate ... Stitch. * Before starting to touch the needle during this time, otherwise injury may result. 5. Sew while moving the fabric slowly. 71 The stitch length depends on how quickly the fabric is above ...Needle Clamp Screw CAUTION • Be careful not to sew, draw the quilting design on the machine's sewing speed. Raise the needle and the presser foot. 3. Loosen the presser foot screw to sew over the drawn design. (See fig. If the...

Users Manual - English
Page 97
...arm Style 25 G Gathering 63 H Hole for Vertical Spool Pin 37 L Lightning Stitch 51 Link Stitch 52 Lower Threading 29 M Main Power/Sewing Light Switch 7 Monogramming 67 Page N Needle Inspection 9 Replacement 9 Needle Threader 33 O Overedge Stitching 53 P Parallelogram Stitch 51 Patchwork 52 ...13 Pattern Selection Dial 13 Performance Check List 79 Presser Foot Lever 31 Principal parts 1 R Race 77 Rampart Stitch 49 Repacking the Machine 85 Reverse Sewing Lever 24 S Scallop Stitch 50 Sewing Ligh Light Bulb Replacement 75 Switch 7 Shell Tuck Stitch 47 Shuttle 77 Spool...
...arm Style 25 G Gathering 63 H Hole for Vertical Spool Pin 37 L Lightning Stitch 51 Link Stitch 52 Lower Threading 29 M Main Power/Sewing Light Switch 7 Monogramming 67 Page N Needle Inspection 9 Replacement 9 Needle Threader 33 O Overedge Stitching 53 P Parallelogram Stitch 51 Patchwork 52 ...13 Pattern Selection Dial 13 Performance Check List 79 Presser Foot Lever 31 Principal parts 1 R Race 77 Rampart Stitch 49 Repacking the Machine 85 Reverse Sewing Lever 24 S Scallop Stitch 50 Sewing Ligh Light Bulb Replacement 75 Switch 7 Shell Tuck Stitch 47 Shuttle 77 Spool...


