
Users Manual - English
Page 2
... "{" position (which represents off when making any adjustments in the needle area, such as described in this manual. Use this machine only for use as threading the needle, changing the needle, threading the bobbin, or changing the presser foot. 15. Keep ventilation openings of lint, dust, and loose cloth. 5. To disconnect the machine, set the main switch to persons: 1. The wrong plate can cause the needle to break. 14. Do not use the proper needle plate. Do...
... "{" position (which represents off when making any adjustments in the needle area, such as described in this manual. Use this machine only for use as threading the needle, changing the needle, threading the bobbin, or changing the presser foot. 15. Keep ventilation openings of lint, dust, and loose cloth. 5. To disconnect the machine, set the main switch to persons: 1. The wrong plate can cause the needle to break. 14. Do not use the proper needle plate. Do...

Users Manual - English
Page 4
... Changing the Presser Foot ...8 Converting to Free-arm Style ...9 Steadying the Machine ...9 THE CONTROLS ...10 Pattern Selection Dial ...10 Recommended Widths and Lengths for Stitches 11 Stitch Length Dial ...13 Stretch Stitching ...13 Stitch Width Dial ...14 Reverse Sewing Lever ...14 Drop Feed Lever (if the machine is equipped with a drop feed lever 14 THREADING THE MACHINE 15 Winding the Bobbin ...15 Lower Threading ...16 Upper Threading ...18 Using the Needle Threader (models equipped with a needle threader 19 Quick Thread-Setting System FAST START BOBBIN (models equipped with a quick...
... Changing the Presser Foot ...8 Converting to Free-arm Style ...9 Steadying the Machine ...9 THE CONTROLS ...10 Pattern Selection Dial ...10 Recommended Widths and Lengths for Stitches 11 Stitch Length Dial ...13 Stretch Stitching ...13 Stitch Width Dial ...14 Reverse Sewing Lever ...14 Drop Feed Lever (if the machine is equipped with a drop feed lever 14 THREADING THE MACHINE 15 Winding the Bobbin ...15 Lower Threading ...16 Upper Threading ...18 Using the Needle Threader (models equipped with a needle threader 19 Quick Thread-Setting System FAST START BOBBIN (models equipped with a quick...

Users Manual - English
Page 5
... presser foot. A Buttonhole fine adjustment screw (page 33) B Buttonhole lever (1-Step automatic buttonhole) (page 30) C Needle threader (page 19) This is only available on and off. I Foot controller (page 7) You can use for the lower thread. 2 Spool pin (page 15 and 18) Holds the spool of thread. 3 Bobbin-winding tension disc and thread guide (page 15) 4 Thread take-up lever (page 18) 5 Thread cutter (page 26) 6 Upper tension-control dial (page 22) This controls the tension of the upper thread. 7 Stitch width dial (page 14) This controls the stitch width. 8 Pattern selection dial...
... presser foot. A Buttonhole fine adjustment screw (page 33) B Buttonhole lever (1-Step automatic buttonhole) (page 30) C Needle threader (page 19) This is only available on and off. I Foot controller (page 7) You can use for the lower thread. 2 Spool pin (page 15 and 18) Holds the spool of thread. 3 Bobbin-winding tension disc and thread guide (page 15) 4 Thread take-up lever (page 18) 5 Thread cutter (page 26) 6 Upper tension-control dial (page 22) This controls the tension of the upper thread. 7 Stitch width dial (page 14) This controls the stitch width. 8 Pattern selection dial...
Users Manual - English
Page 10
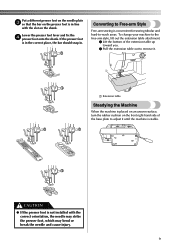
To change your machine to the free-arm style, lift out the extension table attachment. 1 Lift the bottom of the base plate to -reach areas. CAUTION ● If the presser foot is not installed with the slot on the shank. Converting to Free-arm Style Free-arm sewing is convenient for sewing tubular and hard-to adjust it . 1 1 Extension table Steadying the Machine When the machine is placed on an uneven surface, turn the...
To change your machine to the free-arm style, lift out the extension table attachment. 1 Lift the bottom of the base plate to -reach areas. CAUTION ● If the presser foot is not installed with the slot on the shank. Converting to Free-arm Style Free-arm sewing is convenient for sewing tubular and hard-to adjust it . 1 1 Extension table Steadying the Machine When the machine is placed on an uneven surface, turn the...
Users Manual - English
Page 14
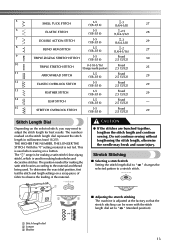
... the stitch length, otherwise the needle may need to observe the feeding of fabric to adjust the stitch length for making the satin stitch varies according to the material and thread being used when sewing on a button. With the "0" setting material is used for best results. SS 1 10 2 2 3 1 ■ Adjusting the stretch stitching The machine is used . THE HIGHER THE NUMBER, THE LONGER THE STITCH. Stretch Stitching ■ Selecting a stretch stitch Setting the stitch length dial to " SS " changes the selected pattern to " SS " (standard position). 1 Stitch length dial...
... the stitch length, otherwise the needle may need to observe the feeding of fabric to adjust the stitch length for making the satin stitch varies according to the material and thread being used when sewing on a button. With the "0" setting material is used for best results. SS 1 10 2 2 3 1 ■ Adjusting the stretch stitching The machine is used . THE HIGHER THE NUMBER, THE LONGER THE STITCH. Stretch Stitching ■ Selecting a stretch stitch Setting the stitch length dial to " SS " changes the selected pattern to " SS " (standard position). 1 Stitch length dial...
Users Manual - English
Page 15
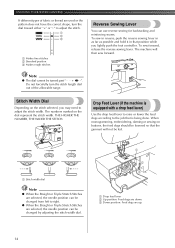
... need to the job that position while you lightly push the foot controller. THE HIGHER THE NUMBER, THE WIDER THE STITCH. 1 Drop Feed Lever (if the machine is equipped with a drop feed lever) Use the drop feed lever to raise or lower the feed dogs according to adjust the stitch width. Note ● The dial cannot be changed from left to right. ● When the Straight or Triple Stretch Stitches are selected, the needle position can use reverse sewing for backtacking and reinforcing seams...
... need to the job that position while you lightly push the foot controller. THE HIGHER THE NUMBER, THE WIDER THE STITCH. 1 Drop Feed Lever (if the machine is equipped with a drop feed lever) Use the drop feed lever to raise or lower the feed dogs according to adjust the stitch width. Note ● The dial cannot be changed from left to right. ● When the Straight or Triple Stretch Stitches are selected, the needle position can use reverse sewing for backtacking and reinforcing seams...
Users Manual - English
Page 16
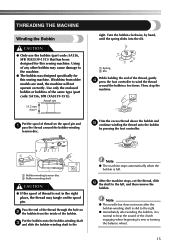
... designed for this sewing machine. Use only the enclosed bobbin or bobbins of the thread, gently 4 press the foot controller to wind the thread around the bobbin-winding tension disc. Turn the bobbin clockwise, by pressing the foot controller. 1 2 1 Bobbin-winding tension disc 2 Bobbin-winding shaft CAUTION ● If the spool of thread is full. Pass the end of the thread through the hole on 2 the bobbin from older models are used, the machine will not operate correctly. Using of the bobbin. Actual size...
... designed for this sewing machine. Use only the enclosed bobbin or bobbins of the thread, gently 4 press the foot controller to wind the thread around the bobbin-winding tension disc. Turn the bobbin clockwise, by pressing the foot controller. 1 2 1 Bobbin-winding tension disc 2 Bobbin-winding shaft CAUTION ● If the spool of thread is full. Pass the end of the thread through the hole on 2 the bobbin from older models are used, the machine will not operate correctly. Using of the bobbin. Actual size...

Users Manual - English
Page 17
... bobbins from older models are used, the machine will not operate correctly. Raise the needle to break. Open the shuttle cover behind the extension 2 table on the foot controller and the machine starts to loosen, breaking the needle and resulting in injury. KNOWING YOUR SEWING MACHINE CAUTION ● Make sure you (counterclockwise) and raise the presser foot lever. CAUTION ● Setting the bobbin improperly may cause the thread tension to loosen, and may cause the thread tension to work, you . 1 2 1 Bobbin case latch 2 Bobbin case...
... bobbins from older models are used, the machine will not operate correctly. Raise the needle to break. Open the shuttle cover behind the extension 2 table on the foot controller and the machine starts to loosen, breaking the needle and resulting in injury. KNOWING YOUR SEWING MACHINE CAUTION ● Make sure you (counterclockwise) and raise the presser foot lever. CAUTION ● Setting the bobbin improperly may cause the thread tension to loosen, and may cause the thread tension to work, you . 1 2 1 Bobbin case latch 2 Bobbin case...
Users Manual - English
Page 20
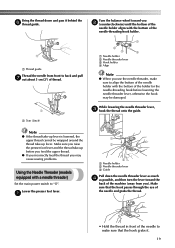
... the needle-threading-hook holder. 1 2 3 4 1 Needle holder 2 Needle threader lever 3 Hook holder 4 Align Note ● When you ). Make sure you raise the presser foot lever and the thread take -up before lowering the needle threader lever, otherwise the hook may cause sewing problems. Using the Needle Threader (models equipped with the bottom of the holder for the needle-threading hook before you feed the upper thread. ● If you incorrectly feed the thread you may be damaged. Note ● If the thread take-up lever is lowered, the upper thread cannot...
... the needle-threading-hook holder. 1 2 3 4 1 Needle holder 2 Needle threader lever 3 Hook holder 4 Align Note ● When you ). Make sure you raise the presser foot lever and the thread take -up before lowering the needle threader lever, otherwise the hook may cause sewing problems. Using the Needle Threader (models equipped with the bottom of the holder for the needle-threading hook before you feed the upper thread. ● If you incorrectly feed the thread you may be damaged. Note ● If the thread take-up lever is lowered, the upper thread cannot...
Users Manual - English
Page 21
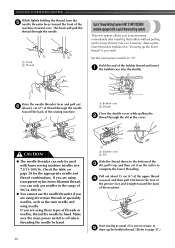
... sewing machine. 2 1 Bobbin case 2 Shuttle Close the shuttle cover while pulling the 2 thread through the needle. 1 2 1 1 Hook 2 Thread Quick Thread-Setting System FAST START BOBBIN (models equipped with home sewing machine needles size 75/11-100/16. Start sewing as the twin needle and wing needle. If you are using transparent nylon mono-filament thread, you can only be used with a quick thread-setting system) This new system allows you to the bottom of the 3 slit, pull it up the lower thread. KNOWING YOUR SEWING MACHINE While lightly...
... sewing machine. 2 1 Bobbin case 2 Shuttle Close the shuttle cover while pulling the 2 thread through the needle. 1 2 1 1 Hook 2 Thread Quick Thread-Setting System FAST START BOBBIN (models equipped with home sewing machine needles size 75/11-100/16. Start sewing as the twin needle and wing needle. If you are using transparent nylon mono-filament thread, you can only be used with a quick thread-setting system) This new system allows you to the bottom of the 3 slit, pull it up the lower thread. KNOWING YOUR SEWING MACHINE While lightly...

Users Manual - English
Page 23
...YOUR SEWING MACHINE ■ Twin Needle Threading You should thread each needle separately. Locks appear on the surface of the left needle in front of thread guide 3 Thread guide Note Models that you change fabric or thread. Using the needle threader may need to back. When sewing with the upper tension control dial. Locks will affect the quality of the fabric. Remember to return the screw to the procedure described below . Upper tension control dial Decrease the tension by turning the dial to a lower number. 2 1 654 2 1 1 Reverse 2 Surface Upper tension...
...YOUR SEWING MACHINE ■ Twin Needle Threading You should thread each needle separately. Locks appear on the surface of the left needle in front of thread guide 3 Thread guide Note Models that you change fabric or thread. Using the needle threader may need to back. When sewing with the upper tension control dial. Locks will affect the quality of the fabric. Remember to return the screw to the procedure described below . Upper tension control dial Decrease the tension by turning the dial to a lower number. 2 1 654 2 1 1 Reverse 2 Surface Upper tension...
Users Manual - English
Page 26
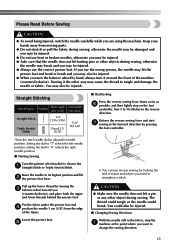
... reverse sewing lever down as far as 6 possible, and then lightly step on the foot controller. setting the dial to "0" selects the right needle position. ■ Starting Sewing Turn the pattern selection dial to its highest position and lift 2 the presser foot lever. Pull up the lower thread by turning the 3 balance wheel toward the front of the machine (counterclockwise). Release the reverse sewing lever and start 7 sewing in the reverse direction. Turning it toward you are using the machine. Sew...
... reverse sewing lever down as far as 6 possible, and then lightly step on the foot controller. setting the dial to "0" selects the right needle position. ■ Starting Sewing Turn the pattern selection dial to its highest position and lift 2 the presser foot lever. Pull up the lower thread by turning the 3 balance wheel toward the front of the machine (counterclockwise). Release the reverse sewing lever and start 7 sewing in the reverse direction. Turning it toward you are using the machine. Sew...
Users Manual - English
Page 27
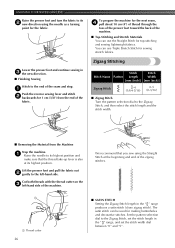
... Straight Stitch at its 2 new direction using the needle as a turning point for the fabric. Lift the presser foot and pull the fabric out 2 gently to the left -hand side of the fabric. To prepare the machine for sewing stretch fabrics. You can use Triple Stretch Stitch for the next seam, 4 pull about 10 cm (4") of thread through the toes of the presser foot toward the back of the zigzag stitches. 1 1 Thread cutter 26 ■ SATIN STITCH Setting the Zigzag Stitch length...
... Straight Stitch at its 2 new direction using the needle as a turning point for the fabric. Lift the presser foot and pull the fabric out 2 gently to the left -hand side of the fabric. To prepare the machine for sewing stretch fabrics. You can use Triple Stretch Stitch for the next seam, 4 pull about 10 cm (4") of thread through the toes of the presser foot toward the back of the zigzag stitches. 1 1 Thread cutter 26 ■ SATIN STITCH Setting the Zigzag Stitch length...
Users Manual - English
Page 44
... 6 Foot Controller Operating 7 Free-arm Sewing 9 Free-arm Style 9 G Gathering 35 H Hole for Extra Spool Pin 21 I Inserting the Needle 7 L Leaf Stitch 11, 12, 13 Legs Stitch 11 Lower Threading 16 M Main Power and Sewing Light Switch 2, 7 Maintenance 38 Making a Buttonhole 30, 31 Monogramming and Embroidering 36 N Needle Replacement 7 Needle Threader 19 O Oiling 38 Overedge Stitching 29 P Pattern Length 11 Pattern Selection Dial 10 Pattern Width 11 Performance Checklist 40 Presser foot lever 4 Presser Foot Replacement 8 Principal Parts 4 Q Quick Thread-setting System...
... 6 Foot Controller Operating 7 Free-arm Sewing 9 Free-arm Style 9 G Gathering 35 H Hole for Extra Spool Pin 21 I Inserting the Needle 7 L Leaf Stitch 11, 12, 13 Legs Stitch 11 Lower Threading 16 M Main Power and Sewing Light Switch 2, 7 Maintenance 38 Making a Buttonhole 30, 31 Monogramming and Embroidering 36 N Needle Replacement 7 Needle Threader 19 O Oiling 38 Overedge Stitching 29 P Pattern Length 11 Pattern Selection Dial 10 Pattern Width 11 Performance Checklist 40 Presser foot lever 4 Presser Foot Replacement 8 Principal Parts 4 Q Quick Thread-setting System...

Accessory Catalog
Page 13
... in the center position. 3. Sew slowly for details.) Brother Embellishment Feet Pin Tuck Foot 24 Ruffler Foot Pin Tuck Foot This presser foot has 7 grooves and produces perfect pin tucks and corded pin tucks using a twin needle on the lower portion of stitch length, tuck setting and depth setting. 2. www.brother.com A specially designed bobbin cover is also included with evenly spaced tucks and gathers. Use a stiff card to slide the fabric from left into gathers or tucks. Brother Embellishment Feet 23 Bed...
... in the center position. 3. Sew slowly for details.) Brother Embellishment Feet Pin Tuck Foot 24 Ruffler Foot Pin Tuck Foot This presser foot has 7 grooves and produces perfect pin tucks and corded pin tucks using a twin needle on the lower portion of stitch length, tuck setting and depth setting. 2. www.brother.com A specially designed bobbin cover is also included with evenly spaced tucks and gathers. Use a stiff card to slide the fabric from left into gathers or tucks. Brother Embellishment Feet 23 Bed...

Accessory Catalog
Page 15
... Low Shank Adapter for ULT series, PC-6500, PC-8200 and PC-8500 sewing machines. Guide the fabric with the open front when greater visibility is finished, sew about four locking stitches. 8. Quilting Foot For darning, quilting, or free-motion. Lower the feed dogs. 2. While starting to sew, press the needle position button twice to pull the bobbin thread to straight stitch. 3. When quilting is needed. 1. Use both hands are created. 1. Walking Foot/Open Toe Walking Foot Brother Quilting Feet 28 Walking Foot/Open Toe Walking Foot The feed dogs on the walking foot moves...
... Low Shank Adapter for ULT series, PC-6500, PC-8200 and PC-8500 sewing machines. Guide the fabric with the open front when greater visibility is finished, sew about four locking stitches. 8. Quilting Foot For darning, quilting, or free-motion. Lower the feed dogs. 2. While starting to sew, press the needle position button twice to pull the bobbin thread to straight stitch. 3. When quilting is needed. 1. Use both hands are created. 1. Walking Foot/Open Toe Walking Foot Brother Quilting Feet 28 Walking Foot/Open Toe Walking Foot The feed dogs on the walking foot moves...

Accessory Catalog
Page 17
...6000D SAVR4000D Innov-is 4000D machines that come with center needle position straight stitch Open toe quilting foot "O" for greater visibility Echo quilting foot "E" for more features to embroider beautiful motifs continuously as embroidery. Drag and drop embroidery pattern positioning. - Includes three new free-motion presser feet: Free-motion quilting foot "C" for perfect echo quilting - Reduce letter spacing in adjusting the spacing between individual characters. - Duetta™ 4500D/Innov-is 4000D Premium Upgrade Package II Brother Embroidery Accessories 32 Duetta™ 4500D...
...6000D SAVR4000D Innov-is 4000D machines that come with center needle position straight stitch Open toe quilting foot "O" for greater visibility Echo quilting foot "E" for more features to embroider beautiful motifs continuously as embroidery. Drag and drop embroidery pattern positioning. - Includes three new free-motion presser feet: Free-motion quilting foot "C" for perfect echo quilting - Reduce letter spacing in adjusting the spacing between individual characters. - Duetta™ 4500D/Innov-is 4000D Premium Upgrade Package II Brother Embroidery Accessories 32 Duetta™ 4500D...

Accessory Catalog
Page 33
... www.brother.com Take control of spool sizes. Some hoops can be removed to 10 spools of thread on creating. For all models: SA503 Free-Standing Ten Spool Thread Stand You can easily be used thread colors. Place your threads in the storage slots. Brother Embroidery Accessories 63 Free-Standing Ten Spool Thread Stand Ten Spool Thread Stand Embroidery Machine Hoops Brother Embroidery Accessories 64 For all embroidery and sewing/embroidery machines. Each thread has it's own thread guide to deliver thread smoothly to your next embroidery, quilting or sewing...
... www.brother.com Take control of spool sizes. Some hoops can be removed to 10 spools of thread on creating. For all models: SA503 Free-Standing Ten Spool Thread Stand You can easily be used thread colors. Place your threads in the storage slots. Brother Embroidery Accessories 63 Free-Standing Ten Spool Thread Stand Ten Spool Thread Stand Embroidery Machine Hoops Brother Embroidery Accessories 64 For all embroidery and sewing/embroidery machines. Each thread has it's own thread guide to deliver thread smoothly to your next embroidery, quilting or sewing...

Accessory Catalog
Page 34
Individual colors are also available (sold in the 61 color set of colors specifically designed for Brother Embroidery machines, but compatible with other sewing and embroidery machine brands. Dependable thread delivery through machine tensions. This metallic thread can be used on the top surface of needle and stabilizer types. Bobbin Threads Stabilizers and Water Water Soluble Stabilizers Brother Embroidery Accessories 66 Bobbin Threads Brother Bobbin Threads are included in a 5-pack sleeve). 300 meters (328 yards) of a special...
Individual colors are also available (sold in the 61 color set of colors specifically designed for Brother Embroidery machines, but compatible with other sewing and embroidery machine brands. Dependable thread delivery through machine tensions. This metallic thread can be used on the top surface of needle and stabilizer types. Bobbin Threads Stabilizers and Water Water Soluble Stabilizers Brother Embroidery Accessories 66 Bobbin Threads Brother Bobbin Threads are included in a 5-pack sleeve). 300 meters (328 yards) of a special...

Accessory Catalog
Page 40
... the machine. 2. SA224CV SA221CV Hemming Set Finishes hems easily and quickly. Set up your machine for a cover stitch, with 3 or 6 mm wide cover stitch. 3. Attach the hem positioning plate A/B to the hemming attachment, and attach it into the front cover slot. 3. Sew. Set the bias tape though the holder (cut the end of the presser foot, and sew. Set up your Cover Stitch). 1. Set up your machine. 3. Open the seams. 4. Sew as folding them. Fold fabric and set through the holder). 4. Attaching 12 mm (approx. 1/2") bias tape: Use...
... the machine. 2. SA224CV SA221CV Hemming Set Finishes hems easily and quickly. Set up your machine for a cover stitch, with 3 or 6 mm wide cover stitch. 3. Attach the hem positioning plate A/B to the hemming attachment, and attach it into the front cover slot. 3. Sew. Set the bias tape though the holder (cut the end of the presser foot, and sew. Set up your Cover Stitch). 1. Set up your machine. 3. Open the seams. 4. Sew as folding them. Fold fabric and set through the holder). 4. Attaching 12 mm (approx. 1/2") bias tape: Use...


