
Users Manual - English
Page 17
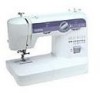
...bobbins from older models are used, the machine will not operate correctly. KNOWING YOUR SEWING MACHINE CAUTION ● Make sure you turn the power off while threading the machine. If you accidentally step on the front of the machine and pull the bobbin case out of the same type (part code...the needle. 1 2 1 Wound evenly 2 Wound poorly 1 2 1 Wound evenly 2 Wound poorly ● The bobbin was designed specifically for this sewing machine. Raise the needle to loosen, and may tangle around the bobbin and cause the needle to break. Actual size 11.5 mm (7/16") CAUTION ●...
...bobbins from older models are used, the machine will not operate correctly. KNOWING YOUR SEWING MACHINE CAUTION ● Make sure you turn the power off while threading the machine. If you accidentally step on the front of the machine and pull the bobbin case out of the same type (part code...the needle. 1 2 1 Wound evenly 2 Wound poorly 1 2 1 Wound evenly 2 Wound poorly ● The bobbin was designed specifically for this sewing machine. Raise the needle to loosen, and may tangle around the bobbin and cause the needle to break. Actual size 11.5 mm (7/16") CAUTION ●...
Users Manual - English
Page 18
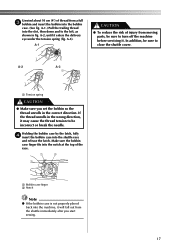
... into the shuttle race and release the latch. Make sure the bobbin case finger fits into the notch at the top of the race. 1 2 1 Bobbin case finger 2 Notch Note ● If the bobbin case is not properly placed back into the machine, it may cause the thread tension to close the shuttle cover. Unwind... reduce the risk of injury from moving parts, be sure to be incorrect or break the needle. A-3). A-2 A-3 1 1 Tension spring CAUTION ● Make sure you start sewing. 17
... into the shuttle race and release the latch. Make sure the bobbin case finger fits into the notch at the top of the race. 1 2 1 Bobbin case finger 2 Notch Note ● If the bobbin case is not properly placed back into the machine, it may cause the thread tension to close the shuttle cover. Unwind... reduce the risk of injury from moving parts, be sure to be incorrect or break the needle. A-3). A-2 A-3 1 1 Tension spring CAUTION ● Make sure you start sewing. 17
Users Manual - English
Page 21
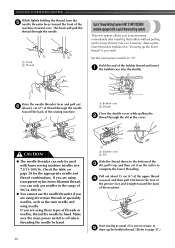
...will pull the thread through the needle. 1 2 1 1 Hook 2 Thread Quick Thread-Setting System FAST START BOBBIN (models equipped with home sewing machine needles size 75/11-100/16. Check the table on the cutter to page 21.) CAUTION ● The needle threader can only be used... ● You cannot use the needle threader if you ). KNOWING YOUR SEWING MACHINE While lightly holding the thread, turn the 5 needle threader lever toward the front of the machine (toward the back of the sewing machine. 2 1 Bobbin case 2 Shuttle Close the shuttle cover while pulling the 2 thread through the ...
...will pull the thread through the needle. 1 2 1 1 Hook 2 Thread Quick Thread-Setting System FAST START BOBBIN (models equipped with home sewing machine needles size 75/11-100/16. Check the table on the cutter to page 21.) CAUTION ● The needle threader can only be used... ● You cannot use the needle threader if you ). KNOWING YOUR SEWING MACHINE While lightly holding the thread, turn the 5 needle threader lever toward the front of the machine (toward the back of the sewing machine. 2 1 Bobbin case 2 Shuttle Close the shuttle cover while pulling the 2 thread through the ...
Users Manual - English
Page 34
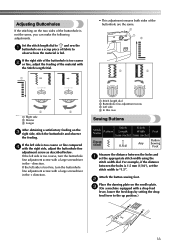
... with the right side, adjust the buttonhole fine adjustment screw as described below. Attach the button sewing foot. 2 Place the darning plate on the needle plate. 3 (On a machine equipped with the Stitch Length Dial. 1 • This adjustment ensures both sides of the buttonhole are the same. ...screwdriver in the + direction. 1 Stitch length dial 2 Buttonhole fine adjustment screw 3 Left side 4 In this case Sewing Buttons Stitch Stitch Stitch Name Pattern Length Width Foot [mm (inch)] [mm (inch)] Zigzag Stitch (1/64) Button Any Sewing Foot Measure the distance between the...
... with the right side, adjust the buttonhole fine adjustment screw as described below. Attach the button sewing foot. 2 Place the darning plate on the needle plate. 3 (On a machine equipped with the Stitch Length Dial. 1 • This adjustment ensures both sides of the buttonhole are the same. ...screwdriver in the + direction. 1 Stitch length dial 2 Buttonhole fine adjustment screw 3 Left side 4 In this case Sewing Buttons Stitch Stitch Stitch Name Pattern Length Width Foot [mm (inch)] [mm (inch)] Zigzag Stitch (1/64) Button Any Sewing Foot Measure the distance between the...

Users Manual - English
Page 40
...1 Retaining ring 2 Latch lever Remove the hook by grasping its highest position and 1 unplug the machine. Note ● When the needle is lowered, the shuttle hook cannot be removed. 39 Take the bobbin case out of the free arm. Clean the shuttle hook as described in step 2. 3 When reinstalling the...from the shuttle race using a cloth 2 dampened with a brush. Clean the upper part of the feed dogs and 2 shuttle race body with machine oil. Cleaning ■ Removing the Shuttle Hook Raise the needle to their original positions. ■ Cleaning the Feed Dogs Remove the needle plate...
...1 Retaining ring 2 Latch lever Remove the hook by grasping its highest position and 1 unplug the machine. Note ● When the needle is lowered, the shuttle hook cannot be removed. 39 Take the bobbin case out of the free arm. Clean the shuttle hook as described in step 2. 3 When reinstalling the...from the shuttle race using a cloth 2 dampened with a brush. Clean the upper part of the feed dogs and 2 shuttle race body with machine oil. Cleaning ■ Removing the Shuttle Hook Raise the needle to their original positions. ■ Cleaning the Feed Dogs Remove the needle plate...


