
Users Manual - English
Page 2
...not use bent needles. 13. Special care is not intended for its intended use by or near children. 2. This sewing machine is required around the machine needle. 11. Return the machine to break. 12. To unplug, grasp the plug, not the cord. 10. The wrong plate can cause the ...all instructions before you change the light bulb. Do not allow this machine to be left unattended while plugged in the needle area, such as a toy. Never operate the machine with the same type and rated 15 watts. Do not pull or push fabric while stitching. DANGER - The machine ...
...not use bent needles. 13. Special care is not intended for its intended use by or near children. 2. This sewing machine is required around the machine needle. 11. Return the machine to break. 12. To unplug, grasp the plug, not the cord. 10. The wrong plate can cause the ...all instructions before you change the light bulb. Do not allow this machine to be left unattended while plugged in the needle area, such as a toy. Never operate the machine with the same type and rated 15 watts. Do not pull or push fabric while stitching. DANGER - The machine ...

Users Manual - English
Page 4
... INSTRUCTIONS 1 CONNECTING PLUGS AND MAIN POWER/SEWING LIGHT SWITCH 2 CONTENTS ...3 PRINCIPAL PARTS ...4 ACCESSORIES ...5 USING YOUR SEWING MACHINE 6 Connecting Plugs ...6 Main Power/Sewing Light Switch ...7 Foot Controller ...7 Inserting the Needle ...7 Checking the Needle ...8 Changing the Presser Foot ...8 Converting to Free-arm Style ...9 Steadying the Machine ...9 THE CONTROLS ...10 Pattern Selection Dial ...10 Recommended Widths and Lengths for Stitches...
... INSTRUCTIONS 1 CONNECTING PLUGS AND MAIN POWER/SEWING LIGHT SWITCH 2 CONTENTS ...3 PRINCIPAL PARTS ...4 ACCESSORIES ...5 USING YOUR SEWING MACHINE 6 Connecting Plugs ...6 Main Power/Sewing Light Switch ...7 Foot Controller ...7 Inserting the Needle ...7 Checking the Needle ...8 Changing the Presser Foot ...8 Converting to Free-arm Style ...9 Steadying the Machine ...9 THE CONTROLS ...10 Pattern Selection Dial ...10 Recommended Widths and Lengths for Stitches...
Users Manual - English
Page 13
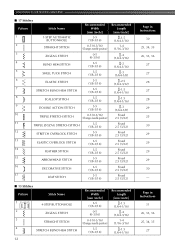
KNOWING YOUR SEWING MACHINE ■ 17 Stitches Pattern 1 Stitch Name 1-STEP AUTOMATIC BUTTONHOLE Recommended Width [mm (inch)] 3-5 (1/8-3/16) 2 STRAIGHT STITCH 0-5 (0-3/16) (Changes needle position) 3 ZIGZAG STITCH 0-5 (0-3/16) 4 BLIND HEM STITCH 3-5 (1/8-3/16) 5 SHELL TUCK STITCH 3-5 (1/8-3/16) 6 ELASTIC STITCH 3-5 (1/8-3/16) 7 STRETCH BLIND HEM STITCH 3-5 (1/8-3/16) 8 SCALLOP STITCH 3-5 (1/8-3/16) 9 DOUBLE ACTION STITCH 3-5 (1/8-3/16) 10 TRIPLE STRETCH STITCH 0-5 (0-3/16) (Changes needle position) 11 TRIPLE ZIGZAG STRETCH STITCH 3-5 (1/8-3/16) 12...
KNOWING YOUR SEWING MACHINE ■ 17 Stitches Pattern 1 Stitch Name 1-STEP AUTOMATIC BUTTONHOLE Recommended Width [mm (inch)] 3-5 (1/8-3/16) 2 STRAIGHT STITCH 0-5 (0-3/16) (Changes needle position) 3 ZIGZAG STITCH 0-5 (0-3/16) 4 BLIND HEM STITCH 3-5 (1/8-3/16) 5 SHELL TUCK STITCH 3-5 (1/8-3/16) 6 ELASTIC STITCH 3-5 (1/8-3/16) 7 STRETCH BLIND HEM STITCH 3-5 (1/8-3/16) 8 SCALLOP STITCH 3-5 (1/8-3/16) 9 DOUBLE ACTION STITCH 3-5 (1/8-3/16) 10 TRIPLE STRETCH STITCH 0-5 (0-3/16) (Changes needle position) 11 TRIPLE ZIGZAG STRETCH STITCH 3-5 (1/8-3/16) 12...

Users Manual - English
Page 17
... in injury. Actual size 11.5 mm (7/16") CAUTION ● Make sure you follow the instructions carefully. Open the shuttle cover behind the extension 2 table on the foot controller and the machine starts to its highest position by pulling the latch toward you do not cut the thread completely,...low it may break the needle. 1 2 1 Wound evenly 2 Wound poorly 1 2 1 Wound evenly 2 Wound poorly ● The bobbin was designed specifically for this sewing machine. Lower Threading CAUTION ● Setting the bobbin improperly may cause the thread tension to break. KNOWING YOUR...
... in injury. Actual size 11.5 mm (7/16") CAUTION ● Make sure you follow the instructions carefully. Open the shuttle cover behind the extension 2 table on the foot controller and the machine starts to its highest position by pulling the latch toward you do not cut the thread completely,...low it may break the needle. 1 2 1 Wound evenly 2 Wound poorly 1 2 1 Wound evenly 2 Wound poorly ● The bobbin was designed specifically for this sewing machine. Lower Threading CAUTION ● Setting the bobbin improperly may cause the thread tension to break. KNOWING YOUR...

Users Manual - English
Page 23
... thread tension as explained below . Threading the Right Needle 1 Follow the same instructions for general use the needle threader to adjust it through the eye of the fabric... 1 Right needle thread passes through the thread guide above the needle before starting your stitches. Remember to return the screw to a lower number. Upper tension control dial Increase the...sewing on the reverse side of the thread will appear on the extra spool pin, but do not turn . You may damage the machine. Tension of the Thread The tension of the fabric. KNOWING YOUR SEWING MACHINE...
... thread tension as explained below . Threading the Right Needle 1 Follow the same instructions for general use the needle threader to adjust it through the eye of the fabric... 1 Right needle thread passes through the thread guide above the needle before starting your stitches. Remember to return the screw to a lower number. Upper tension control dial Increase the...sewing on the reverse side of the thread will appear on the extra spool pin, but do not turn . You may damage the machine. Tension of the Thread The tension of the fabric. KNOWING YOUR SEWING MACHINE...


