Users Manual - English
Page 5
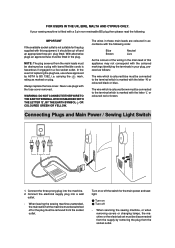
...THE EARTH SYMBOL OR COLOURED GREEN OR YELLOW. When leaving the sewing machine unattended, the main switch of the machine must be switched off - When servicing the sewing machine, or when removing covers or changing lamps, the machine or the electrical set must be disconnected from the supply by ASTA to the terminal... for the plug supplied with this appliance may not correspond with the coloured markings identifying the terminals in your sewing machine is coloured brown must be fitted in a live socket outlet. Turn on or off and an appropriate three pin plug fitted.
...THE EARTH SYMBOL OR COLOURED GREEN OR YELLOW. When leaving the sewing machine unattended, the main switch of the machine must be switched off - When servicing the sewing machine, or when removing covers or changing lamps, the machine or the electrical set must be disconnected from the supply by ASTA to the terminal... for the plug supplied with this appliance may not correspond with the coloured markings identifying the terminals in your sewing machine is coloured brown must be fitted in a live socket outlet. Turn on or off and an appropriate three pin plug fitted.

Users Manual - English
Page 6
... STITCHES KNOWING YOUR SEWING MACHINE PRINCIPAL PARTS 1 ACCESSORIES 3 OPERATING YOUR SEWING MACHINE 5 Connecting Plugs 5 Main Power and Sewing Light Switches 6 Foot Controller 6 Inserting the Needle 7 Checking the Needle 7 Changing the Presser Foot 8 Converting to Free-Arm Style 9 Steadying the Machine 9 VARIOUS CONTROLS ...the machine is equipped with a needle threader) .. 22 Quick Thread-setting System FAST START BOBBIN (when the machine is equipped with a quick thread-setting system 24 Drawing Up Lower Thread 25 Twin-Needle Sewing 26 Thread Tension 27 CHART OF SEWING FABRICS,...
... STITCHES KNOWING YOUR SEWING MACHINE PRINCIPAL PARTS 1 ACCESSORIES 3 OPERATING YOUR SEWING MACHINE 5 Connecting Plugs 5 Main Power and Sewing Light Switches 6 Foot Controller 6 Inserting the Needle 7 Checking the Needle 7 Changing the Presser Foot 8 Converting to Free-Arm Style 9 Steadying the Machine 9 VARIOUS CONTROLS ...the machine is equipped with a needle threader) .. 22 Quick Thread-setting System FAST START BOBBIN (when the machine is equipped with a quick thread-setting system 24 Drawing Up Lower Thread 25 Twin-Needle Sewing 26 Thread Tension 27 CHART OF SEWING FABRICS,...

Users Manual - English
Page 35
...below. CONTENTS KNOWING YOUR SEWING MACHINE STRAIGHT AND ZIGZAG STITCHING BUILT-IN STITCHES A 2 1 2 1 B 2 1 2 1 A-1 654 B-1 654 C 2 1 2 1 Thread Tension Thread tension will weaken your seams or cause puckers in C-1. It may need to be adjusted according to its original setting before sewing on the reverse side ...of the fabric. B Upper tension is too tight. The basic thread tension setting is too loose. A-1 Upper tension control dial Decrease the tension by...
...below. CONTENTS KNOWING YOUR SEWING MACHINE STRAIGHT AND ZIGZAG STITCHING BUILT-IN STITCHES A 2 1 2 1 B 2 1 2 1 A-1 654 B-1 654 C 2 1 2 1 Thread Tension Thread tension will weaken your seams or cause puckers in C-1. It may need to be adjusted according to its original setting before sewing on the reverse side ...of the fabric. B Upper tension is too tight. The basic thread tension setting is too loose. A-1 Upper tension control dial Decrease the tension by...
Users Manual - English
Page 42
... droits à chaque extrémité d'une couture en points zigzag. Then, select the stitch length and the stitch width. Set the pattern selection dial to sew using the Straight Stitch at the beginning and end of the Zigzag Stitch. Número de puntada (Point zigzag) Longueur de point Largeur... de la largeur de point zigzag souhaitée. POINT DE BOURDON Lorsque la longueur du point zigzag est définie dans la plage " ", la machine effectue un point de bourdon (point zigzag très serré) qui peut servir à faire des boutonnières ou comme point fantaisie d&#...
... droits à chaque extrémité d'une couture en points zigzag. Then, select the stitch length and the stitch width. Set the pattern selection dial to sew using the Straight Stitch at the beginning and end of the Zigzag Stitch. Número de puntada (Point zigzag) Longueur de point Largeur... de la largeur de point zigzag souhaitée. POINT DE BOURDON Lorsque la longueur du point zigzag est définie dans la plage " ", la machine effectue un point de bourdon (point zigzag très serré) qui peut servir à faire des boutonnières ou comme point fantaisie d&#...
Users Manual - English
Page 43
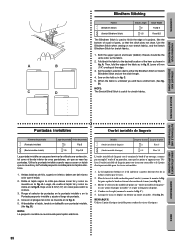
.... D.) NOTE: The Stretch Blind Stitch is unfolded you will have a blind hem. (See fig. BUTTONHOLE AND BUTTON SEWING USING ATTACHMENTS AND APPLICATIONS Puntadas invisibles Ourlet invisible de lingerie Número de puntada (Puntada invisible) (Basta invisible stretch) ... YOUR SEWING MACHINE STRAIGHT AND ZIGZAG STITCHING BUILT-IN STITCHES A B C D Blindhem Stitching Pattern (Blindhem Stitch) (Stretch Blindhem Stitch) Stitch Length -2 -1.5 Stitch Width Fixed 5 Fixed 3.5 The Blindhem Stitch is used to either the Blindhem Stitch or Stretch Blindhem Stitch and set the ...
.... D.) NOTE: The Stretch Blind Stitch is unfolded you will have a blind hem. (See fig. BUTTONHOLE AND BUTTON SEWING USING ATTACHMENTS AND APPLICATIONS Puntadas invisibles Ourlet invisible de lingerie Número de puntada (Puntada invisible) (Basta invisible stretch) ... YOUR SEWING MACHINE STRAIGHT AND ZIGZAG STITCHING BUILT-IN STITCHES A B C D Blindhem Stitching Pattern (Blindhem Stitch) (Stretch Blindhem Stitch) Stitch Length -2 -1.5 Stitch Width Fixed 5 Fixed 3.5 The Blindhem Stitch is used to either the Blindhem Stitch or Stretch Blindhem Stitch and set the ...

Users Manual - English
Page 50
... as in fig. Attach the buttonhole foot and set the pattern selection dial to match the diameter of fabric before attempting it back slightly as shown in fig. B.) 5. Lower the presser foot and start the machine. 7. Once sewing is a simple process that provides reliable results..... 3. While gently holding the upper thread, start sewing. * Set the stitch width to " ". 2. Open the button plate and insert the button. (See fig. C. 6. Stop the machine when the buttonhole is done in the order shown in fig. E) When sewing buttonholes on the fabric. 2. A. (The front ...
... as in fig. Attach the buttonhole foot and set the pattern selection dial to match the diameter of fabric before attempting it back slightly as shown in fig. B.) 5. Lower the presser foot and start the machine. 7. Once sewing is a simple process that provides reliable results..... 3. While gently holding the upper thread, start sewing. * Set the stitch width to " ". 2. Open the button plate and insert the button. (See fig. C. 6. Stop the machine when the buttonhole is done in the order shown in fig. E) When sewing buttonholes on the fabric. 2. A. (The front ...
Users Manual - English
Page 55
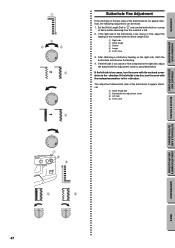
... fine adjustment screw as described below. SS 10 7 6 8 Buttonhole Fine Adjustment If the stitching on the right side, stitch the buttonhole and observe the feeding. 4. Set the Stitch Length Dial to appear identical. 6 Stitch length dial 7 Buttonhole fine adjustment screw 8 Left side 9 In this case 3. SS 10 5 432 - If the left... two sides of fabric while observing how the material is too coarse, turn the screw with the enclosed screwdriver in the + direction. CONTENTS KNOWING YOUR SEWING MACHINE STRAIGHT AND ZIGZAG STITCHING BUILT-IN STITCHES 1 2 4 3 10 432 -
... fine adjustment screw as described below. SS 10 7 6 8 Buttonhole Fine Adjustment If the stitching on the right side, stitch the buttonhole and observe the feeding. 4. Set the Stitch Length Dial to appear identical. 6 Stitch length dial 7 Buttonhole fine adjustment screw 8 Left side 9 In this case 3. SS 10 5 432 - If the left... two sides of fabric while observing how the material is too coarse, turn the screw with the enclosed screwdriver in the + direction. CONTENTS KNOWING YOUR SEWING MACHINE STRAIGHT AND ZIGZAG STITCHING BUILT-IN STITCHES 1 2 4 3 10 432 -

Users Manual - English
Page 57
... on the needle plate. (When the machine is 1.5 mm (1/16"), set the appropriate stitch width with a drop feed lever, lower the feed dogs by setting the drop feed lever to "1.5". 2. If it hits, see step 1. 5. BUTTONHOLE AND BUTTON SEWING USING ATTACHMENTS AND APPLICATIONS MAINTENANCE INDEX 49 ...the holes and set the stitch width to the up position.) 4. Measure the distance between the foot and the fabric and make sure that the needle enters the holes without hitting the button. Remove the material from the machine. CONTENTS KNOWING YOUR SEWING MACHINE STRAIGHT AND ...
... on the needle plate. (When the machine is 1.5 mm (1/16"), set the appropriate stitch width with a drop feed lever, lower the feed dogs by setting the drop feed lever to "1.5". 2. If it hits, see step 1. 5. BUTTONHOLE AND BUTTON SEWING USING ATTACHMENTS AND APPLICATIONS MAINTENANCE INDEX 49 ...the holes and set the stitch width to the up position.) 4. Measure the distance between the foot and the fabric and make sure that the needle enters the holes without hitting the button. Remove the material from the machine. CONTENTS KNOWING YOUR SEWING MACHINE STRAIGHT AND ...

Users Manual - English
Page 59
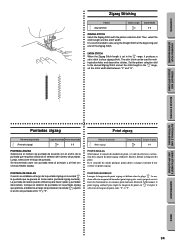
... side of zippers and can cause the needle to adjust the needle position. The zipper foot is used to sew various types of the zipper Check for correct needle setting. CONTENTS KNOWING YOUR SEWING MACHINE STRAIGHT AND ZIGZAG STITCHING BUILT-IN STITCHES A 1 2 3 B Zipper Inserting Pattern (Straight Stitch) Stitch Length 2-3 Stitch Width 2.5 (Center needle position...
... side of zippers and can cause the needle to adjust the needle position. The zipper foot is used to sew various types of the zipper Check for correct needle setting. CONTENTS KNOWING YOUR SEWING MACHINE STRAIGHT AND ZIGZAG STITCHING BUILT-IN STITCHES A 1 2 3 B Zipper Inserting Pattern (Straight Stitch) Stitch Length 2-3 Stitch Width 2.5 (Center needle position...
Users Manual - English
Page 69
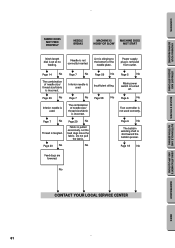
... AND APPLICATIONS MAINTENANCE INDEX 61 w Page 29 No w Fabric is turned off. Let the feed dogs move the fabric. CONTENTS KNOWING YOUR SEWING MACHINE STRAIGHT AND ZIGZAG STITCHING BUILT-IN STITCHES FABRIC DOES NOT FEED PROPERLY NEEDLE BREAKS MACHINE IS NOISY OR SLOW MACHINE DOES NOT START Stitch length dial is set at no feeding.
... AND APPLICATIONS MAINTENANCE INDEX 61 w Page 29 No w Fabric is turned off. Let the feed dogs move the fabric. CONTENTS KNOWING YOUR SEWING MACHINE STRAIGHT AND ZIGZAG STITCHING BUILT-IN STITCHES FABRIC DOES NOT FEED PROPERLY NEEDLE BREAKS MACHINE IS NOISY OR SLOW MACHINE DOES NOT START Stitch length dial is set at no feeding.

Users Manual - English
Page 75
...F Feed Dog Cleaning 59 Lever 17 Finishing a Seam 32-33 Foot Controller Connecting 5 Operating 6 Free-Arm Sewing 9 G Gathering 51 L Legs Stitch 11 Light Bulb Replacement 57 Lower Threading 19 M Main Power... 8 Principal Parts 1 Q Quick Thread-setting System 24 R Repacking 66 Reverse Sewing Lever 17 S Scallop Stitching 38 Sewing Direction 32 Sewing Light Bulb Replacement 57 Switch 6 Shell ... 57 Spool Installing 20 Steadying the Machine 9 Stitch Length Dial 14 Straight Stitching 31 Stretch Blindhem Stitching 35 Stretch Material Sewing 33 Stretch Overlock 39 Stretch Stitching...
...F Feed Dog Cleaning 59 Lever 17 Finishing a Seam 32-33 Foot Controller Connecting 5 Operating 6 Free-Arm Sewing 9 G Gathering 51 L Legs Stitch 11 Light Bulb Replacement 57 Lower Threading 19 M Main Power... 8 Principal Parts 1 Q Quick Thread-setting System 24 R Repacking 66 Reverse Sewing Lever 17 S Scallop Stitching 38 Sewing Direction 32 Sewing Light Bulb Replacement 57 Switch 6 Shell ... 57 Spool Installing 20 Steadying the Machine 9 Stitch Length Dial 14 Straight Stitching 31 Stretch Blindhem Stitching 35 Stretch Material Sewing 33 Stretch Overlock 39 Stretch Stitching...


