

Accessory Catalog
Page 11
... the presser foot and insert a braid through the guide before attaching the presser foot on the presser foot. 2. Stitch braid in place. Attach the presser foot and select a stitch from the right of 7 mm feed width. 1. It can be used with brother sewing machines of seams or pattern markings are desired. Perfect for couching! 1. Insert cords or threads into each hole on the machine. 2. Slide the plate of the guide back and forth to use single cord, use sewing machines Clear-view Foot Use this presser foot...
... the presser foot and insert a braid through the guide before attaching the presser foot on the presser foot. 2. Stitch braid in place. Attach the presser foot and select a stitch from the right of 7 mm feed width. 1. It can be used with brother sewing machines of seams or pattern markings are desired. Perfect for couching! 1. Insert cords or threads into each hole on the machine. 2. Slide the plate of the guide back and forth to use single cord, use sewing machines Clear-view Foot Use this presser foot...

Accessory Catalog
Page 13
....brother.com Install and manually thread a twin needle. 2. The ruffling blade on lightweight fabric. For seven grooves: SA179 ABCDEJ For five grooves: SA162 IP This presser foot does not include the bobbin cover. Use a stiff card to slide the fabric from left into gathers or tucks. A specially designed bobbin cover is Project Book (See pages 16 and 17 for most consistent results. The intervals of stitch length, tuck setting and depth setting. 2. Brother Embellishment Feet...
....brother.com Install and manually thread a twin needle. 2. The ruffling blade on lightweight fabric. For seven grooves: SA179 ABCDEJ For five grooves: SA162 IP This presser foot does not include the bobbin cover. Use a stiff card to slide the fabric from left into gathers or tucks. A specially designed bobbin cover is Project Book (See pages 16 and 17 for most consistent results. The intervals of stitch length, tuck setting and depth setting. 2. Brother Embellishment Feet...

Accessory Catalog
Page 15
... the presser foot. 6. Quilting Foot For darning, quilting, or free-motion. Place the fabric beneath the presser foot. 4. Set the machine to the quilt top. 7. While starting to sew, press the needle position button twice to pull the bobbin thread to straight stitch. 3. Requires Low Shank Adapter for straight stitch. 3. The foot raises and lowers with the needle to allow fabric to be easily sewn. Fabrics that both hands are created. 1. Attach the walking foot to guide the fabric. 4. Walking Foot SA140 ABCDEFJKMN SA166 L SA107 GHO SA169 I Open Toe Walking Foot...
... the presser foot. 6. Quilting Foot For darning, quilting, or free-motion. Place the fabric beneath the presser foot. 4. Set the machine to the quilt top. 7. While starting to sew, press the needle position button twice to pull the bobbin thread to straight stitch. 3. Requires Low Shank Adapter for straight stitch. 3. The foot raises and lowers with the needle to allow fabric to be easily sewn. Fabrics that both hands are created. 1. Attach the walking foot to guide the fabric. 4. Walking Foot SA140 ABCDEFJKMN SA166 L SA107 GHO SA169 I Open Toe Walking Foot...

Accessory Catalog
Page 34
... and strength. This metallic thread can be used on the wall for greater utility and space saving. Brother Embroidery Accessories PacesetterTM Polyester Threads 65 Brother Country Yarn Embroidery Threads Metallic Threads For the best embroidery results, use these embroidery threads especially designed for Brother sewing and embroidering machines. 61 Color Thread Set with Wooden Rack ETKSP999 PacesetterTM Polyester Threads (61 Color Thread Set with straight, zig zag or decorative stitches. All 61 exclusive Brother palette colors are also available...
... and strength. This metallic thread can be used on the wall for greater utility and space saving. Brother Embroidery Accessories PacesetterTM Polyester Threads 65 Brother Country Yarn Embroidery Threads Metallic Threads For the best embroidery results, use these embroidery threads especially designed for Brother sewing and embroidering machines. 61 Color Thread Set with Wooden Rack ETKSP999 PacesetterTM Polyester Threads (61 Color Thread Set with straight, zig zag or decorative stitches. All 61 exclusive Brother palette colors are also available...

Accessory Catalog
Page 40
... presser foot. Open the seams. 4. Sew. Fold fabric and set it is easily set through the holder). 4. Set the bias tape though the holder (cut the end of the presser foot, and sew. Brother Cover Stitch Feet 77 Bias Tape Binding Set Hemming Set Bias Tape Binding Set Attaches 6 or 12 mm (approx. 1/4 to 1/2 inch) bias tapes as holding the fabric lightly with your Cover Stitch). 1. Insert the tab on the bias tape attachment into the guide. 4. Attach the hem positioning plate A/B to the hemming attachment...
... presser foot. Open the seams. 4. Sew. Fold fabric and set it is easily set through the holder). 4. Set the bias tape though the holder (cut the end of the presser foot, and sew. Brother Cover Stitch Feet 77 Bias Tape Binding Set Hemming Set Bias Tape Binding Set Attaches 6 or 12 mm (approx. 1/4 to 1/2 inch) bias tapes as holding the fabric lightly with your Cover Stitch). 1. Insert the tab on the bias tape attachment into the guide. 4. Attach the hem positioning plate A/B to the hemming attachment...

Users Manual - English
Page 2
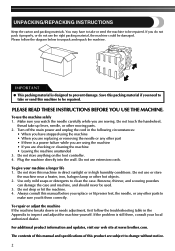
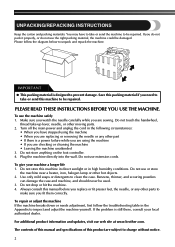
... when removing covers, lubricating, or when making any object into water. Always unplug the machine before cleaning. 2. WARNING - Do not operate where aerosol (spray) products are being administered. 8. To reduce the risk of burns, fire, electric shock, or injury to break. 12. Use only accessories recommended by pulling on cord. Do not use as threading needle, changing needle, threading bobbin, or changing presser foot, and the like. 15. Never operate the machine...
... when removing covers, lubricating, or when making any object into water. Always unplug the machine before cleaning. 2. WARNING - Do not operate where aerosol (spray) products are being administered. 8. To reduce the risk of burns, fire, electric shock, or injury to break. 12. Use only accessories recommended by pulling on cord. Do not use as threading needle, changing needle, threading bobbin, or changing presser foot, and the like. 15. Never operate the machine...
Users Manual - English
Page 4
... problem is designed to be damaged. Make sure you watch the needle carefully while you replace or fit presser feet, the needle, or any other hot objects. 2. Plug the machine directly into the wall. Always consult this product are sewing. To repair or adjust the machine If the machine breaks down or needs adjustment, first follow the diagram below to change without notice. 2 Do not use extension cords. The contents of this manual and specifications...
... problem is designed to be damaged. Make sure you watch the needle carefully while you replace or fit presser feet, the needle, or any other hot objects. 2. Plug the machine directly into the wall. Always consult this product are sewing. To repair or adjust the machine If the machine breaks down or needs adjustment, first follow the diagram below to change without notice. 2 Do not use extension cords. The contents of this manual and specifications...

Users Manual - English
Page 5
...Presser Foot ...9 Flat Bed Attachment ...10 Using a Free-arm Style ...10 THE CONTROLS ...11 Pattern Selection Dial ...11 Patterns and Stitch Names ...12 Stitch Length Dial ...14 Stretch Stitching ...15 Stitch Width Dial ...15 Reverse Sewing Lever ...15 THREADING THE MACHINE 16 Winding the Bobbin ...16 Lower Threading ...18 Lower Threading (for models equipped with a quick-set bobbin 19 Upper Threading ...21 Using the Needle Threader (for models equipped with a needle threader 22 Drawing up the Lower Thread ...24 Sewing with a Twin Needle ...24 Thread Tension ...25 FABRIC, THREAD, AND NEEDLE...
...Presser Foot ...9 Flat Bed Attachment ...10 Using a Free-arm Style ...10 THE CONTROLS ...11 Pattern Selection Dial ...11 Patterns and Stitch Names ...12 Stitch Length Dial ...14 Stretch Stitching ...15 Stitch Width Dial ...15 Reverse Sewing Lever ...15 THREADING THE MACHINE 16 Winding the Bobbin ...16 Lower Threading ...18 Lower Threading (for models equipped with a quick-set bobbin 19 Upper Threading ...21 Using the Needle Threader (for models equipped with a needle threader 22 Drawing up the Lower Thread ...24 Sewing with a Twin Needle ...24 Thread Tension ...25 FABRIC, THREAD, AND NEEDLE...

Users Manual - English
Page 7
... (220/240V Area) XC7456-221 (U.K.) XC7455-021 (Australia, New Zealand) 5 J Presser foot lever (Page 21) Used to manually raise and lower the needle. E Stitch length dial (Page 14) This controls the stitch length. F Buttonhole fine-adjustment screw (Page 35) G Handwheel Used to raise and lower the presser foot. 1 KNOWING YOUR SEWING MACHINE THE MAIN PARTS 1 3 4 7 62 51 G F 8 9 0 C A B 1 Bobbin winder (Page 16) This winds the thread onto the bobbin for use this in the foot controller plug and connect the machine to stitch in the reverse direction.
... (220/240V Area) XC7456-221 (U.K.) XC7455-021 (Australia, New Zealand) 5 J Presser foot lever (Page 21) Used to manually raise and lower the needle. E Stitch length dial (Page 14) This controls the stitch length. F Buttonhole fine-adjustment screw (Page 35) G Handwheel Used to raise and lower the presser foot. 1 KNOWING YOUR SEWING MACHINE THE MAIN PARTS 1 3 4 7 62 51 G F 8 9 0 C A B 1 Bobbin winder (Page 16) This winds the thread onto the bobbin for use this in the foot controller plug and connect the machine to stitch in the reverse direction.
Users Manual - English
Page 20
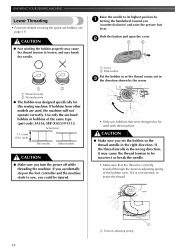
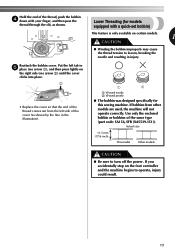
... bobbin in so the thread comes out in the wrong direction, it is correctly inserted through the tension-adjusting spring of the same type (part code: SA156, SFB (XA5539-151)). Slide the button and open the cover. 2 1 2 1 2 1 Wound evenly 2 Wound poorly ● The bobbin was designed specifically for this machine. If bobbins from other models are used with this sewing machine. KNOWING YOUR SEWING MACHINE Lower Threading • For more details on the foot controller and the machine starts to sew, you set bobbin...
... bobbin in so the thread comes out in the wrong direction, it is correctly inserted through the tension-adjusting spring of the same type (part code: SA156, SFB (XA5539-151)). Slide the button and open the cover. 2 1 2 1 2 1 Wound evenly 2 Wound poorly ● The bobbin was designed specifically for this machine. If bobbins from other models are used with this sewing machine. KNOWING YOUR SEWING MACHINE Lower Threading • For more details on the foot controller and the machine starts to sew, you set bobbin...
Users Manual - English
Page 21
.... 2 1 • Replace the cover so that the end of the thread comes out from other models are used, the machine will not operate correctly. Put the left side of the cover (as shown. Actual size 11.5 mm (7/16 inch) This model Other models CAUTION ● Be sure to loosen, breaking the needle and resulting in injury. Use only the enclosed bobbin or bobbins of the same type (part code: SA156...
.... 2 1 • Replace the cover so that the end of the thread comes out from other models are used, the machine will not operate correctly. Put the left side of the cover (as shown. Actual size 11.5 mm (7/16 inch) This model Other models CAUTION ● Be sure to loosen, breaking the needle and resulting in injury. Use only the enclosed bobbin or bobbins of the same type (part code: SA156...

Users Manual - English
Page 26
...; When using the twin needle, make sure you can use the zigzag presser foot only. 24 Pull out about 10 cm (4 inch) of both threads 3 and put the bobbin back in. When sewing gathers or darts, you (counterclockwise) by hand so that some thread will be removed. You can sew with this machine (part code: X57521-021). The needle could break and damage the machine. ● When using the twin needle, make sure the stitch width...
...; When using the twin needle, make sure you can use the zigzag presser foot only. 24 Pull out about 10 cm (4 inch) of both threads 3 and put the bobbin back in. When sewing gathers or darts, you (counterclockwise) by hand so that some thread will be removed. You can sew with this machine (part code: X57521-021). The needle could break and damage the machine. ● When using the twin needle, make sure the stitch width...

Users Manual - English
Page 49
... the bobbin properly. Reset the bobbin thread correctly. Attach the presser foot holder properly. - 6 The thread tension is too thick. Only use a bobbin that are sewing thin fabric, the stitch is incorrect. Adjust the tension of the upper thread. Only use a bobbin that has been designed for this machine. page 18, 19, 20 You have not wound the bobbin thread properly. You have not wound the bobbin thread properly. Reset the bobbin thread correctly. Wind the bobbin properly. Remove the tangled thread and clean the bobbin case...
... the bobbin properly. Reset the bobbin thread correctly. Attach the presser foot holder properly. - 6 The thread tension is too thick. Only use a bobbin that are sewing thin fabric, the stitch is incorrect. Adjust the tension of the upper thread. Only use a bobbin that has been designed for this machine. page 18, 19, 20 You have not wound the bobbin thread properly. You have not wound the bobbin thread properly. Reset the bobbin thread correctly. Wind the bobbin properly. Remove the tangled thread and clean the bobbin case...

Users Manual - English
Page 50
... service center. The stitch is damaged. The fabric does not feed. The sewing light bulb does not The sewing light bulb is not sewn correctly. Dust has accumulated under the Remove the needle plate cover and needle plate or in the bobbin case. The bobbin case is bent or blunt. You have not moved the needle holder to put it right You have not threaded the upper thread properly. Insert the needle properly. Stitches are appropriate for the type...
... service center. The stitch is damaged. The fabric does not feed. The sewing light bulb does not The sewing light bulb is not sewn correctly. Dust has accumulated under the Remove the needle plate cover and needle plate or in the bobbin case. The bobbin case is bent or blunt. You have not moved the needle holder to put it right You have not threaded the upper thread properly. Insert the needle properly. Stitches are appropriate for the type...
Users Manual - English
Page 51
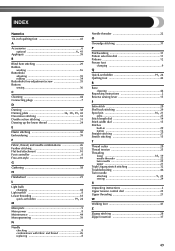
... 10 Foot controller 8 Free-arm style 10 G Gathering 38 H Handwheel 21 L Light bulb changing 44 Light switch 8 Lower threading 18 , quick-set bobbin 19 24 M Main parts 5 Main power 8 Maintenance 44 Monogramming 39 N Needle checking 8 combinations with fabric and thread 26 replacing 8 Needle threader 22 O Overedge stitching 31 P Patchworking 31 Pattern selection dial 11 Patterns 12 Presser foot changing 9 Q Quick-set bobbin 19, 24 Quilting foot 42 R Race cleaning 44 Repacking instructions 2 Reverse sewing lever 15 S Satin stitch 28 Shell tuck stitching 29 Spool pin...
... 10 Foot controller 8 Free-arm style 10 G Gathering 38 H Handwheel 21 L Light bulb changing 44 Light switch 8 Lower threading 18 , quick-set bobbin 19 24 M Main parts 5 Main power 8 Maintenance 44 Monogramming 39 N Needle checking 8 combinations with fabric and thread 26 replacing 8 Needle threader 22 O Overedge stitching 31 P Patchworking 31 Pattern selection dial 11 Patterns 12 Presser foot changing 9 Q Quick-set bobbin 19, 24 Quilting foot 42 R Race cleaning 44 Repacking instructions 2 Reverse sewing lever 15 S Satin stitch 28 Shell tuck stitching 29 Spool pin...

Owner's Manual (Español) - Spanish
Page 2
... when removing covers, lubricating, or when making any other user servicing adjustments mentioned in the instruction manual. 16. Always unplug the machine before using. Use this machine only for use . Never operate the machine with any opening. 6. Do not use the proper needle plate. Do not operate where aerosol (spray) products are being used or where oxygen is used as threading needle, changing needle, threading bobbin, or changing presser foot, and the like. 15. The wrong plate can cause the needle to break. 14...
... when removing covers, lubricating, or when making any other user servicing adjustments mentioned in the instruction manual. 16. Always unplug the machine before using. Use this machine only for use . Never operate the machine with any opening. 6. Do not use the proper needle plate. Do not operate where aerosol (spray) products are being used or where oxygen is used as threading needle, changing needle, threading bobbin, or changing presser foot, and the like. 15. The wrong plate can cause the needle to break. 14...
Owner's Manual (Español) - Spanish
Page 4
... MACHINE. Plug the machine directly into the wall. Do not use the machine safely 1. Please follow the troubleshooting table in high humidity conditions. To use extension cords. Do not touch the handwheel, thread take or send the machine to make sure you are sewing. Always consult this product are subject to clean the case. The contents of this manual and specifications of this manual before you replace or fit presser feet, the needle...
... MACHINE. Plug the machine directly into the wall. Do not use the machine safely 1. Please follow the troubleshooting table in high humidity conditions. To use extension cords. Do not touch the handwheel, thread take or send the machine to make sure you are sewing. Always consult this product are subject to clean the case. The contents of this manual and specifications of this manual before you replace or fit presser feet, the needle...

Owner's Manual (Español) - Spanish
Page 5
...Presser Foot ...9 Flat Bed Attachment ...10 Using a Free-arm Style ...10 THE CONTROLS ...11 Pattern Selection Dial ...11 Patterns and Stitch Names ...12 Stitch Length Dial ...14 Stretch Stitching ...15 Stitch Width Dial ...15 Reverse Sewing Lever ...15 THREADING THE MACHINE 16 Winding the Bobbin ...16 Lower Threading ...18 Lower Threading (for models equipped with a quick-set bobbin 19 Upper Threading ...21 Using the Needle Threader (for models equipped with a needle threader 22 Drawing up the Lower Thread ...24 Sewing with a Twin Needle ...24 Thread Tension ...25 FABRIC, THREAD, AND NEEDLE...
...Presser Foot ...9 Flat Bed Attachment ...10 Using a Free-arm Style ...10 THE CONTROLS ...11 Pattern Selection Dial ...11 Patterns and Stitch Names ...12 Stitch Length Dial ...14 Stretch Stitching ...15 Stitch Width Dial ...15 Reverse Sewing Lever ...15 THREADING THE MACHINE 16 Winding the Bobbin ...16 Lower Threading ...18 Lower Threading (for models equipped with a quick-set bobbin 19 Upper Threading ...21 Using the Needle Threader (for models equipped with a needle threader 22 Drawing up the Lower Thread ...24 Sewing with a Twin Needle ...24 Thread Tension ...25 FABRIC, THREAD, AND NEEDLE...

Owner's Manual (Español) - Spanish
Page 49
... around the hole in the needle plate is scratched. Replace the needle. Symptom Possible cause How to put it . Replace the presser foot. thread breaks. Wind the bobbin properly. Incorrect bobbins will not work properly. page 21 You have not used a bobbin that has been designed for the type of the upper thread. page 25 You have not used a bobbin that has been designed for this machine. Sew with stabiliser material under the fabric. - The bobbin case is...
... around the hole in the needle plate is scratched. Replace the needle. Symptom Possible cause How to put it . Replace the presser foot. thread breaks. Wind the bobbin properly. Incorrect bobbins will not work properly. page 21 You have not used a bobbin that has been designed for the type of the upper thread. page 25 You have not used a bobbin that has been designed for this machine. Sew with stabiliser material under the fabric. - The bobbin case is...
Owner's Manual (Español) - Spanish
Page 51
... 10 Foot controller 8 Free-arm style 10 G Gathering 38 H Handwheel 21 L Light bulb changing 44 Light switch 8 Lower threading 18 , quick-set bobbin 19 24 M Main parts 5 Main power 8 Maintenance 44 Monogramming 39 N Needle checking 8 combinations with fabric and thread 26 replacing 8 Needle threader 22 O Overedge stitching 31 P Patchworking 31 Pattern selection dial 11 Patterns 12 Presser foot changing 9 Q Quick-set bobbin 19, 24 Quilting foot 42 R Race cleaning 44 Repacking instructions 2 Reverse sewing lever 15 S Satin stitch 28 Shell tuck stitching 29 Spool pin...
... 10 Foot controller 8 Free-arm style 10 G Gathering 38 H Handwheel 21 L Light bulb changing 44 Light switch 8 Lower threading 18 , quick-set bobbin 19 24 M Main parts 5 Main power 8 Maintenance 44 Monogramming 39 N Needle checking 8 combinations with fabric and thread 26 replacing 8 Needle threader 22 O Overedge stitching 31 P Patchworking 31 Pattern selection dial 11 Patterns 12 Presser foot changing 9 Q Quick-set bobbin 19, 24 Quilting foot 42 R Race cleaning 44 Repacking instructions 2 Reverse sewing lever 15 S Satin stitch 28 Shell tuck stitching 29 Spool pin...


