

Users Manual - English
Page 2
... push the fabric while stitching. It may deflect the needle causing it hasbeen dropped or damaged, or dropped into any adjustments in this sewing machine only for examination, repair, electrical or mechanical adjustment. 4. Always unplug the sewing machine from outlet. 9. Use this instruction manual. Use only accessories recommended by pulling on the cord. Do not unplug by the manufacturer as threading the needle, changing the needle, threading the bobbin, or changing the presser foot. 15. replace the bulb in...
... push the fabric while stitching. It may deflect the needle causing it hasbeen dropped or damaged, or dropped into any adjustments in this sewing machine only for examination, repair, electrical or mechanical adjustment. 4. Always unplug the sewing machine from outlet. 9. Use this instruction manual. Use only accessories recommended by pulling on the cord. Do not unplug by the manufacturer as threading the needle, changing the needle, threading the bobbin, or changing the presser foot. 15. replace the bulb in...

Users Manual - English
Page 4
... YOUR SEWING MACHINE Principal parts 1 Accessories 3 OPERATING YOUR SEWING MACHINE 4 Connecting Plugs 4 Main Power and Sewing Light Switches ....5 Foot Controller 5 Replacing the Needle 6 Checking the Needle 6 Changing the Presser Foot 7 Converting to Free-arm Style 7 VARIOUS CONTROLS 8 Pattern Selection Dial 8 Electronic Display (1 Line LCD) 11 Electronic Display (4 Line LCD) 12 Stitch Length Dial 18 Reverse Sewing Button 19 THREADING THE MACHINE 20 Winding the bobbin 20 Lower Threading 22 Upper Threading 23 Using needle threader (when the machine is...
... YOUR SEWING MACHINE Principal parts 1 Accessories 3 OPERATING YOUR SEWING MACHINE 4 Connecting Plugs 4 Main Power and Sewing Light Switches ....5 Foot Controller 5 Replacing the Needle 6 Checking the Needle 6 Changing the Presser Foot 7 Converting to Free-arm Style 7 VARIOUS CONTROLS 8 Pattern Selection Dial 8 Electronic Display (1 Line LCD) 11 Electronic Display (4 Line LCD) 12 Stitch Length Dial 18 Reverse Sewing Button 19 THREADING THE MACHINE 20 Winding the bobbin 20 Lower Threading 22 Upper Threading 23 Using needle threader (when the machine is...
Users Manual - English
Page 16
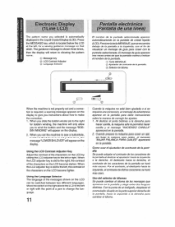
...maquina pars coser un ojal, sin bajar la potence pare elates. When the LCD adjuster key is slid to the left , for bobbin winding, the machine will only allow you instructions about how to showing the pattern name. (t) Message key (z) LCD Contrast Adjuster (a) Language Selector Pantalla electranica (Pantalla de una...dos leagues distintas. When you slide the bobbin winder pin to the right for a sewing guidance message on that stitch. When you selected is automatically displayed in the Liquid Crystal Display (LCD). Como userelajustador de contraste de la pantalla Sepuede ...
...maquina pars coser un ojal, sin bajar la potence pare elates. When the LCD adjuster key is slid to the left , for bobbin winding, the machine will only allow you instructions about how to showing the pattern name. (t) Message key (z) LCD Contrast Adjuster (a) Language Selector Pantalla electranica (Pantalla de una...dos leagues distintas. When you slide the bobbin winder pin to the right for a sewing guidance message on that stitch. When you selected is automatically displayed in the Liquid Crystal Display (LCD). Como userelajustador de contraste de la pantalla Sepuede ...
Users Manual - English
Page 18
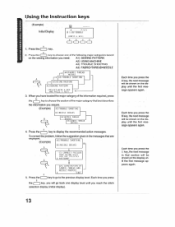
.... (Example) A3/TROUBLE SHOUTING DI/NEEDLE BREAKS B2HIPPER B MAKS B3)LCWER THREAD BREAKS • 4. To correct the problem, follow the suggestion given in that section will go to display the recommended action messages. Each time you press the (-) key, you will be shown on the sewing information you need: Al) SEWING PATTERN A2) USING MACHINE A3) TROUBLE SHOOTING A4) FABRIC•THREAD•NEEDLE r , A4 )I :BUTTONHOLE (PRESS / KLYI...
.... (Example) A3/TROUBLE SHOUTING DI/NEEDLE BREAKS B2HIPPER B MAKS B3)LCWER THREAD BREAKS • 4. To correct the problem, follow the suggestion given in that section will go to display the recommended action messages. Each time you press the (-) key, you will be shown on the sewing information you need: Al) SEWING PATTERN A2) USING MACHINE A3) TROUBLE SHOOTING A4) FABRIC•THREAD•NEEDLE r , A4 )I :BUTTONHOLE (PRESS / KLYI...

Users Manual - English
Page 20
... MACHINE B2)REPLACING BOHRI N Al) TROUBLE SIER711NG R21UPPER TIIRPAD BREAKS AA1FABII C • THREAD• ugEr); 02I LIMIT FABRIC 2 }PULL OUT BACK OF FOOT.LET WPM IN PLACE AND CLAMP AVUSIAG MACHINE IN/UPPER THREADING ANTIBES LE SHOWING 131 /LOWER THREAD BRIMS B ANFABR C-THREAD. Outline of 4 Line LCD Information I I :BUITOFIN31.4I (PRESS I KEY) AIISEWIIIO PATTERN (svurr WITH A KEY Amo PRESS 4 KEY) 4 A.21UnI NC HACHDIP DI/WINDING BOBBIN rrnoume...
... MACHINE B2)REPLACING BOHRI N Al) TROUBLE SIER711NG R21UPPER TIIRPAD BREAKS AA1FABII C • THREAD• ugEr); 02I LIMIT FABRIC 2 }PULL OUT BACK OF FOOT.LET WPM IN PLACE AND CLAMP AVUSIAG MACHINE IN/UPPER THREADING ANTIBES LE SHOWING 131 /LOWER THREAD BRIMS B ANFABR C-THREAD. Outline of 4 Line LCD Information I I :BUITOFIN31.4I (PRESS I KEY) AIISEWIIIO PATTERN (svurr WITH A KEY Amo PRESS 4 KEY) 4 A.21UnI NC HACHDIP DI/WINDING BOBBIN rrnoume...
Users Manual - English
Page 22
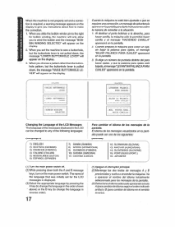
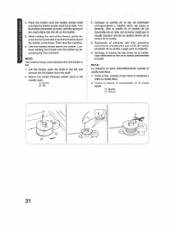
... de idioma enelsentido inverso). When the machine is not properly set the machine to sew a buttonhole, but the buttonhole lever is pulled down both the A and B message keys, turnon themainpower switch.The name of the language that was initially set for bobbin winding, the machine will only allow you instructions about how to make the correction. 1. When you set and a correction is required, a warning...
... de idioma enelsentido inverso). When the machine is not properly set the machine to sew a buttonhole, but the buttonhole lever is pulled down both the A and B message keys, turnon themainpower switch.The name of the language that was initially set for bobbin winding, the machine will only allow you instructions about how to make the correction. 1. When you set and a correction is required, a warning...
Users Manual - English
Page 23
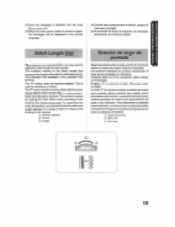
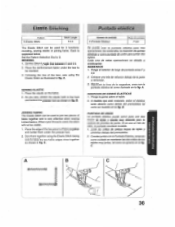
... en milimetros. Sirve para coser tin bortin. The position needed for making buttonholes and decorative stitches. Elajuste "O"no alimenta el lejido. Stitch Length Dial Depending on a scrap of fabric to observe the feeding of the stitch in millimeters (mm). The"F"areaisused formakinga Satin Stitch(a close zigzag stitch) which can be displayed in making the Satin Stitch varies according to adjust the stitch length for sewing on the Stitch Length Dial represent the length of the material. (9 STITCH LENGTH (2) Shorter (3i...
... en milimetros. Sirve para coser tin bortin. The position needed for making buttonholes and decorative stitches. Elajuste "O"no alimenta el lejido. Stitch Length Dial Depending on a scrap of fabric to observe the feeding of the stitch in millimeters (mm). The"F"areaisused formakinga Satin Stitch(a close zigzag stitch) which can be displayed in making the Satin Stitch varies according to adjust the stitch length for sewing on the Stitch Length Dial represent the length of the material. (9 STITCH LENGTH (2) Shorter (3i...
Users Manual - English
Page 26
... to theright. NOTA: La maquina se pare automat/camerae wand° la candle eSte Ilena. 7. Vuelva a colocar of the thread, gently depress the foot controller to the left and remove the full bobbin from the shaft. 8. Place the bobbin onto the bobbin winder shaft andslide thebobbin winder shaft to the needle mark. ® Spring (0 Slit 4. Continue winding the thread onto the bobbin by hand, until the...
... to theright. NOTA: La maquina se pare automat/camerae wand° la candle eSte Ilena. 7. Vuelva a colocar of the thread, gently depress the foot controller to the left and remove the full bobbin from the shaft. 8. Place the bobbin onto the bobbin winder shaft andslide thebobbin winder shaft to the needle mark. ® Spring (0 Slit 4. Continue winding the thread onto the bobbin by hand, until the...
Users Manual - English
Page 28
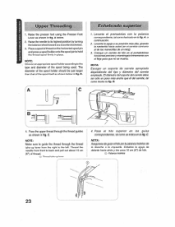
... de la derecha a la irquierda. Upper Threading 1. Raise the presser foot using the Presser Foot Lever as shown in fig. A below in fig. Thread the needle from the right to the left. Pa se el hilo superior on las guias correspondienies. C. Place a spoolof threadon the horizontalspoolpin andpressa spoof holder ontothe spoolpintohold the thread spool firmly in fig. tat como se indica en la lig. The...
... de la derecha a la irquierda. Upper Threading 1. Raise the presser foot using the Presser Foot Lever as shown in fig. A below in fig. Thread the needle from the right to the left. Pa se el hilo superior on las guias correspondienies. C. Place a spoolof threadon the horizontalspoolpin andpressa spoof holder ontothe spoolpintohold the thread spool firmly in fig. tat como se indica en la lig. The...

Users Manual - English
Page 30
N o b 0 to "C C O tn • 0 • Z 2.
N o b 0 to "C C O tn • 0 • Z 2.

Users Manual - English
Page 33
... (Supplied with your fabric. Select the correct needle and thread size from the above chart. 2. Velvet, Lightweight Wool, Fine Corduroy. Use the same size thread for the upper and lower threads (spool and bobbin). 28 KNOWING YOUR SEWING MACHINE CONOZCA SU MAOUINA DE COSER C Correct tension Correct tension is important since too much or too little tension will weaken your seams or cause puckers on your machine) Cotton: 80 Synthetic...
... (Supplied with your fabric. Select the correct needle and thread size from the above chart. 2. Velvet, Lightweight Wool, Fine Corduroy. Use the same size thread for the upper and lower threads (spool and bobbin). 28 KNOWING YOUR SEWING MACHINE CONOZCA SU MAOUINA DE COSER C Correct tension Correct tension is important since too much or too little tension will weaken your seams or cause puckers on your machine) Cotton: 80 Synthetic...

Users Manual - English
Page 35
... show your desired stitch on the Pattern Indication Window. Place the fabric under the presser foot and position the needle 1 cm (3/8") from the edge of the presser foot. 4. Release the Reverse Sewing Button and start sewing in as far as possible and lightly touch the foot controller. Gire elselector depuntadas pare vet puntada deseada en la ventana de indication correspondiente. Set the Pattern Selection Dial to the foot controller. Lower the presser foot. 6. Levant&la...
... show your desired stitch on the Pattern Indication Window. Place the fabric under the presser foot and position the needle 1 cm (3/8") from the edge of the presser foot. 4. Release the Reverse Sewing Button and start sewing in as far as possible and lightly touch the foot controller. Gire elselector depuntadas pare vet puntada deseada en la ventana de indication correspondiente. Set the Pattern Selection Dial to the foot controller. Lower the presser foot. 6. Levant&la...
Users Manual - English
Page 36
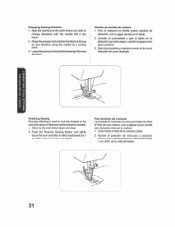
.... 3. x Ch Z n N N te) 0 -c N LNG C) C) Finishing Sewing Reverse stitching is used to lock the threads at the point where you wish to the end of the fabric. Stitch to change directions with the needle still in the fabric. 2. Raise the presser foot and turn the fabric to stitch backwards for 1 cm (3/81 from the end of the seam and stop. 2. Lowerthepresserfoot andstartsewingin thenow direction. Pare la maquina en donde quiera cambiar...
.... 3. x Ch Z n N N te) 0 -c N LNG C) C) Finishing Sewing Reverse stitching is used to lock the threads at the point where you wish to the end of the fabric. Stitch to change directions with the needle still in the fabric. 2. Raise the presser foot and turn the fabric to stitch backwards for 1 cm (3/81 from the end of the seam and stop. 2. Lowerthepresserfoot andstartsewingin thenow direction. Pare la maquina en donde quiera cambiar...
Users Manual - English
Page 41
..., sewing elastic or joining fabric. Sew them under the tear to 9. Ponga el selector de largo de puntada entre F y 9,5. 2. A. B. Elastic Stitching Pattern L9 (Elastic Stitch) Stitch Length F-2.5 The Elastic Stitch can be used to keep the two fabric edges close together as shown in fig. B. Ponga la goma sobre el tejido. 2. C. Janie las orillas de ambos trozos do punted& F-2,5 Se puede usar la puntada elastics pare tres operations...
..., sewing elastic or joining fabric. Sew them under the tear to 9. Ponga el selector de largo de puntada entre F y 9,5. 2. A. B. Elastic Stitching Pattern L9 (Elastic Stitch) Stitch Length F-2.5 The Elastic Stitch can be used to keep the two fabric edges close together as shown in fig. B. Ponga la goma sobre el tejido. 2. C. Janie las orillas de ambos trozos do punted& F-2,5 Se puede usar la puntada elastics pare tres operations...

Users Manual - English
Page 53
... superior, por ambos lades. USING ATTACHMENTS AND APPLICATIONS USO OE ACCESORIOS Y APLICACIONES Zipper Insertion Pattern 3 Stitch Length 2-3 Fool Zipper Foot The zipper foot is used to sew various types of zippers and can easily be positioned on the other side notch. 0; Set the Pattern Selection Dial to cremallera. Fold the edgeof thematerial2cm(3/4")andplace the zipper under the folded portion. 4. When sewing the right side of the zipper, attach the shank to the left side...
... superior, por ambos lades. USING ATTACHMENTS AND APPLICATIONS USO OE ACCESORIOS Y APLICACIONES Zipper Insertion Pattern 3 Stitch Length 2-3 Fool Zipper Foot The zipper foot is used to sew various types of zippers and can easily be positioned on the other side notch. 0; Set the Pattern Selection Dial to cremallera. Fold the edgeof thematerial2cm(3/4")andplace the zipper under the folded portion. 4. When sewing the right side of the zipper, attach the shank to the left side...
Users Manual - English
Page 54
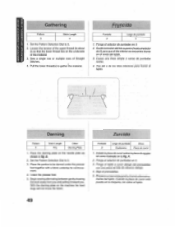
Gathering I Pattern Stitch Length 4 1. Set the Pattern Selection Dial to gather the material. Loosen the tension of he upper thread (to about 2) so that the lower thread lies on the underside of Straight Stitches. 4. Fruncido Malteds 3 Largo de puntada 4 1. a Cuesa una lino simple o varies de puntadas rectas. 4. Place the darning plate on the machine the feed dogs will not move the fabric. With the darning plate on the needle plate as shown in fig. Pull the lower thread(s) to...
Gathering I Pattern Stitch Length 4 1. Set the Pattern Selection Dial to gather the material. Loosen the tension of he upper thread (to about 2) so that the lower thread lies on the underside of Straight Stitches. 4. Fruncido Malteds 3 Largo de puntada 4 1. a Cuesa una lino simple o varies de puntadas rectas. 4. Place the darning plate on the machine the feed dogs will not move the fabric. With the darning plate on the needle plate as shown in fig. Pull the lower thread(s) to...
Users Manual - English
Page 56
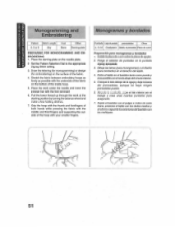
... Length tI Foot F:5 or 6 My None Other Deming plate PREPARING FOR MONOGRAMMING AND EM BROIL) EfiNG 1. Place the darning plate on the bottom of the fabric. 4. Instatelaplace dezurcirsobrelaplacedeagujas. 2. Dibuje las tetras (pare monogramas) o el diseno (pm bordados) en el derecho del tejido. 4. Girando to the appropriate Zigzag Stitch setting. 3. Pull the lower thread up through the work under the needle and lower the presser bar with the foot removed...
... Length tI Foot F:5 or 6 My None Other Deming plate PREPARING FOR MONOGRAMMING AND EM BROIL) EfiNG 1. Place the darning plate on the bottom of the fabric. 4. Instatelaplace dezurcirsobrelaplacedeagujas. 2. Dibuje las tetras (pare monogramas) o el diseno (pm bordados) en el derecho del tejido. 4. Girando to the appropriate Zigzag Stitch setting. 3. Pull the lower thread up through the work under the needle and lower the presser bar with the foot removed...
Users Manual - English
Page 59
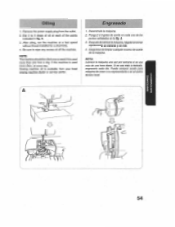
... cada dia. After oiling, run the machine at each of oil at a fast speed without thread installed for a short time. 4. Be sure to 3 drops of the points indicated in fig. lksonchule magunia. 2. Puede comprar aceite pare maquina de cosera surepresentante oen elcentro teem° local. 0 ID 54 Sewing machine oil is used more than one hour a day. NOTA: Lubricar la maquina una vez per semana...
... cada dia. After oiling, run the machine at each of oil at a fast speed without thread installed for a short time. 4. Be sure to 3 drops of the points indicated in fig. lksonchule magunia. 2. Puede comprar aceite pare maquina de cosera surepresentante oen elcentro teem° local. 0 ID 54 Sewing machine oil is used more than one hour a day. NOTA: Lubricar la maquina una vez per semana...
Users Manual - English
Page 60
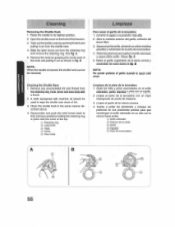
... aceite de maquina. 3. B. A cloth dampened with machine oil should be used to their previous positions holding the retaining ring in place with a brush. 2. Hook (4) Driver 0) Race body Limpieza Para sacar el garfio de la lanzadera 1. Quite los hilos y polvo acumulados en el anillo retenedor, garlic), impulsory piste con un cepillo. 2. A. 5. Clean the shuttle hook in fig. Reassemble and push the latch levers back...
... aceite de maquina. 3. B. A cloth dampened with machine oil should be used to their previous positions holding the retaining ring in place with a brush. 2. Hook (4) Driver 0) Race body Limpieza Para sacar el garfio de la lanzadera 1. Quite los hilos y polvo acumulados en el anillo retenedor, garlic), impulsory piste con un cepillo. 2. A. 5. Clean the shuttle hook in fig. Reassemble and push the latch levers back...
Users Manual - English
Page 64
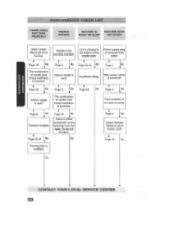
Main power switch is incorrect Insufficient oiling. The combine ion of needle size/ thread size/fabric is turned off. Let the Thread is installed. PERFORMANCE CHECK LIST FABRIC DOES NOT FEED PROPERLY NEEDLE BREAKS MACHINE IS MACHINE DOES NOISY OR SLOW NOT START Stitch Length Dial is set at no feeding. Page 20 Darning plate is tangled. No V CONTACT YOUR LOCAL SERVICE CENTER 59 Page 6 No Interior needle ' is not used . Page 5.4 Page 5 No V Foot controller is used correctly. Page 6 No...
Main power switch is incorrect Insufficient oiling. The combine ion of needle size/ thread size/fabric is turned off. Let the Thread is installed. PERFORMANCE CHECK LIST FABRIC DOES NOT FEED PROPERLY NEEDLE BREAKS MACHINE IS MACHINE DOES NOISY OR SLOW NOT START Stitch Length Dial is set at no feeding. Page 20 Darning plate is tangled. No V CONTACT YOUR LOCAL SERVICE CENTER 59 Page 6 No Interior needle ' is not used . Page 5.4 Page 5 No V Foot controller is used correctly. Page 6 No...


